X-cam A10-3H User manual

X-CAMA10-3HforGOPRO3AxisGimbalUserManual
(V2.00)
TheX-CAMA10-3HforGOPRO3AxisGimbalhasbeenfinished
withalltheadjustmentsbeforebroughtontothemarket,itis
READYTORUN.
Parameters
Weight: 280g(withoutGOPRO)
StabilizationFrequency: 5200Hz
InputVoltage(DCIN): 7.4v~16.8v(2S~4SLipo)
TiltTravel: +-90degree;RollingTravel: +-45degree
PanTravel: 360degreeswithunlimitedrotation
Built-inAVoutput&ChargingModule
AutoPilotSystemsupportingisnotrequired
Built-in2X6Axisgyroscopesensors&1Infraredlocalizer.
SupportsautomaticbacktoHOMEfunction.
SupportsGoPro3,GoPro3+,GoPro4(blackorsilverversion)
Accessories
● 1xX-CAMA10-3HGimbalFrame
● 1xX-CAMA10-3HController
● 1xUSBCable
● 1xPPMCable
● 5xDampingballs
● 4xRubberrings
● 4xFastenerrings.
ConnectionInstructions
The S-BUS output comes with full functions which have been
definedchannelnumber:
Channel1:ROLLControlling
Channel2:ReturntoHOME
Channel3:TILTControlling
Channel4:PANControlling
Channel5:ModeSwitch
Therecommendoperationmethods
1.Singlecontrol:JustconnectPPMchannelforPANControlling
orHEADFOLLOWING,HEADLOCKandAUTOBACKTOHOME
mode(Default),S-BUSchannelconnectionisnotrequired,One
receiveronly.
2.Dualcontrol: OnlyS-BUSoutputchannelmodeprovidesfull
functions.But2receiversarerequired.
Notice:ItdoesnotrequiredtosupplythepowertotheS-BUSreceiverunderthedualcontrolmode,theA10-3Hcontrollerwillsupply
thepowertotheS-BUSreceiverviatheS-BUS.TheTILTandPanaxis(orModeSwitch)canbecontrolledunderthesinglecontrolordual
control.

TheAVoutputadapterinstruction
You may connect your own
video transmitter here , the
YELLOWwireisthevideo
signalandthePINKwireis
GND
PCSoftware
ConnectwithPC
UsestheUSBadaptertoconnectwithyourPC,NormallytheWindowscanfindthedriverautomatically,youcouldfindthePORT
number inthedeviceManager
Notice:thedrivefileisdifferentbetweenWin7andWinXPanddoesnotsupportWin8
Youmaydownloadthedriveonourofficialwebsiteat
http://www.x-camtech.com/html_info/Downloads-10.html

LaunchtheX-CAMGimbalAssistant,choosethecorrectportnumberandclickCONNECT
BEEPBEEPwillbeshoutedaftertheconnectionsucceed,theparameterswillbereadoutautomatically.
Theparametersasbelow:
1. Gains
Thereare2gains,PositionGainandAccelerationGain
Pos.Gain:Inclinedthegimbaltoonepositionslowlyandwatchthevideoimageishorizontalornot,ifnotpleaseadjustthe
Pos.Gaininthesoftware
Acc.Gain:AfteradjustingthePos.Gain,Inclinedthegimbaltoonepositionquicklyandwatchthevideoimageishorizontal
intime,ifnotpleaseadjusttheAcc.Gaininthesoftware
Notice:theX-CAMA10-3Hhasbeenfinishedtheadjusting,doesnotneedtoadjustagaininnormally
2. GimbalControl
TheA10-3Hprovides2waystocontroltheTILT, LinearModeorTrackingMode
LinearMode:PushtheTILTsticktohighorlowformovingthecameramounttoupordownuntilthestickbacktomidpoint
TrackingMode:PushtheTILTsticktohighorlow,thecameramountwillfollowthestickposition.

Pushspeed:Setupthecameramountmovingspeed,highvaluesethighspeed;lowvaluesetlowspeed.
3.sensorsadvancedcalibration
Thisisanadvancedsetup,normallyitdoesnotneedtosetunlessserioustilthashappenedontheTiltorRollaxis.moredetalisplease
readtheX-CAMA10-3Hinitialdataresetguideappendix1.
3. theFunctionchoosingonsinglecontrol
Youmaychoosethefunctiononsinglecontrolmode,thedefaultisModeSwitch.
Firmwareupgrade
1. PowerofftheX-CAMA10-3H
2. UsestheUSBcabletoconnectwithyourPC,Normally
the windows can find the driver automatically, you will
findthePORTnumberinthedevicemanager.
3. SelecttheCOMportnumber
4. Openthefirmwarefile(*.bin)
5. Click“LoadandConnect”button
6. PowerontheX-CAMA10-3H,itwillupgradethe
firmwareautomatically,Theblueindicatorwilllight,
and red indicator will flash quickly. When the
upgradeiscompleted,theredindicatorwilllight,
andtheblueindicatorwill flashquickly
Notice: Pleasedonottouchanythingandkeepthepoweron
duringtheupgrade,iftheupgradeisbreakpleasebacktoSTEP
1 and try again, normally it could be fix automatically. It will
beep4timesafterupgradeandthesystemwillberestarted.

Announcements
1. DonottouchtheX-CAMA10-3Hduringtheinitializationafterpoweron,KeeptheX-CAMA10-3Hinquietude.
2. DonotuseBECfortheX-CAMA10-3Hpower,stronglyrecommendusing2~6SLipobatterydirectly.
3. Stronglyrecommendusing12mmtubetomounttheX-CAMA10-3H.
4. MakesurethecenterofgravityoftheX-CAMA10-3Hiscorrectbeforeusing.
5. Itdoesnotrequiredtosupplythepowertothesecondreceiverwhenunderdualcontrolmode.
6. TheX-CAMA10-3HsupportsS-BUS1only.
Disclaimer
X-CAMA10-3Hgimbalsarecoveredbyoneyearlimitedwarranty.Pleasedonotdisassembleormodifymechanicalstructure
inthewarrantyperiod.ThecustomizedprogramofX140BcontrolmoduleisbasedonA10-3Hstructureandmotors,andall
debugginghasbeencompletedinfactory.Anydirectorindirectdamagescausedbyauserduringuseordamagewillnotbe
coveredbyourwarranty,andX-CAMwillnotcompensatethelossandthecorrespondingliability.
SILIGOOInc.doesnottakeanyresponsibilitytowardanydamageorlossinusingtheX-CAMA10-3Hgimbal.

Appendix1.TheX-CAMA10-3HSensorAdvancedCalibrationGuide
1. Connect the USB cable to the PC and launch the X-CAM Gimbal Assistant Software,then power on the X-CAM
A10-3H.
2. Clickthebuttonof“Connect”andclickthebuttonof“ReadParams”,youwillhearbeep-beep.
Notice:PleasebackuptheDrivenVoltagevaluesandServoReversevalues(asthepicture1shows)beforecalibrate.
(Picture1)
3. Clickthebuttonof“initializeParams”.Thenyouwillhearthreebeep(beep-beepandbeep),pleaseinput”0”to
theDrivenVoltage.Thenclickthebuttonof“BurnParams”,Youwillhearbeep-beep-beepthatmeansithasbeen
burnedintotheX-CAMA10-3H.(donotdoubleclick)
4. (1)Togglethegimbalverticaltotheground(90degree).Putthebubblelevelonthesensor.
(Picture2)
(2)Adjustthecameratokeepthebubbleatthecenterpositionmanually.Clickthebuttonof“Auto
Calibrate”(Picture3)
Notice:whenyouclickthebuttonof“AutoCalibrate”,pleasekeepthebubbleatthecenterposition(picture2).(If
failed,pleasetryagain)
(Picture3)
(3)Afterthecalibration,clickthebuttonof“Disconnect”,andpowerofftheX-CAMA10-3H.Thenre-powerthe

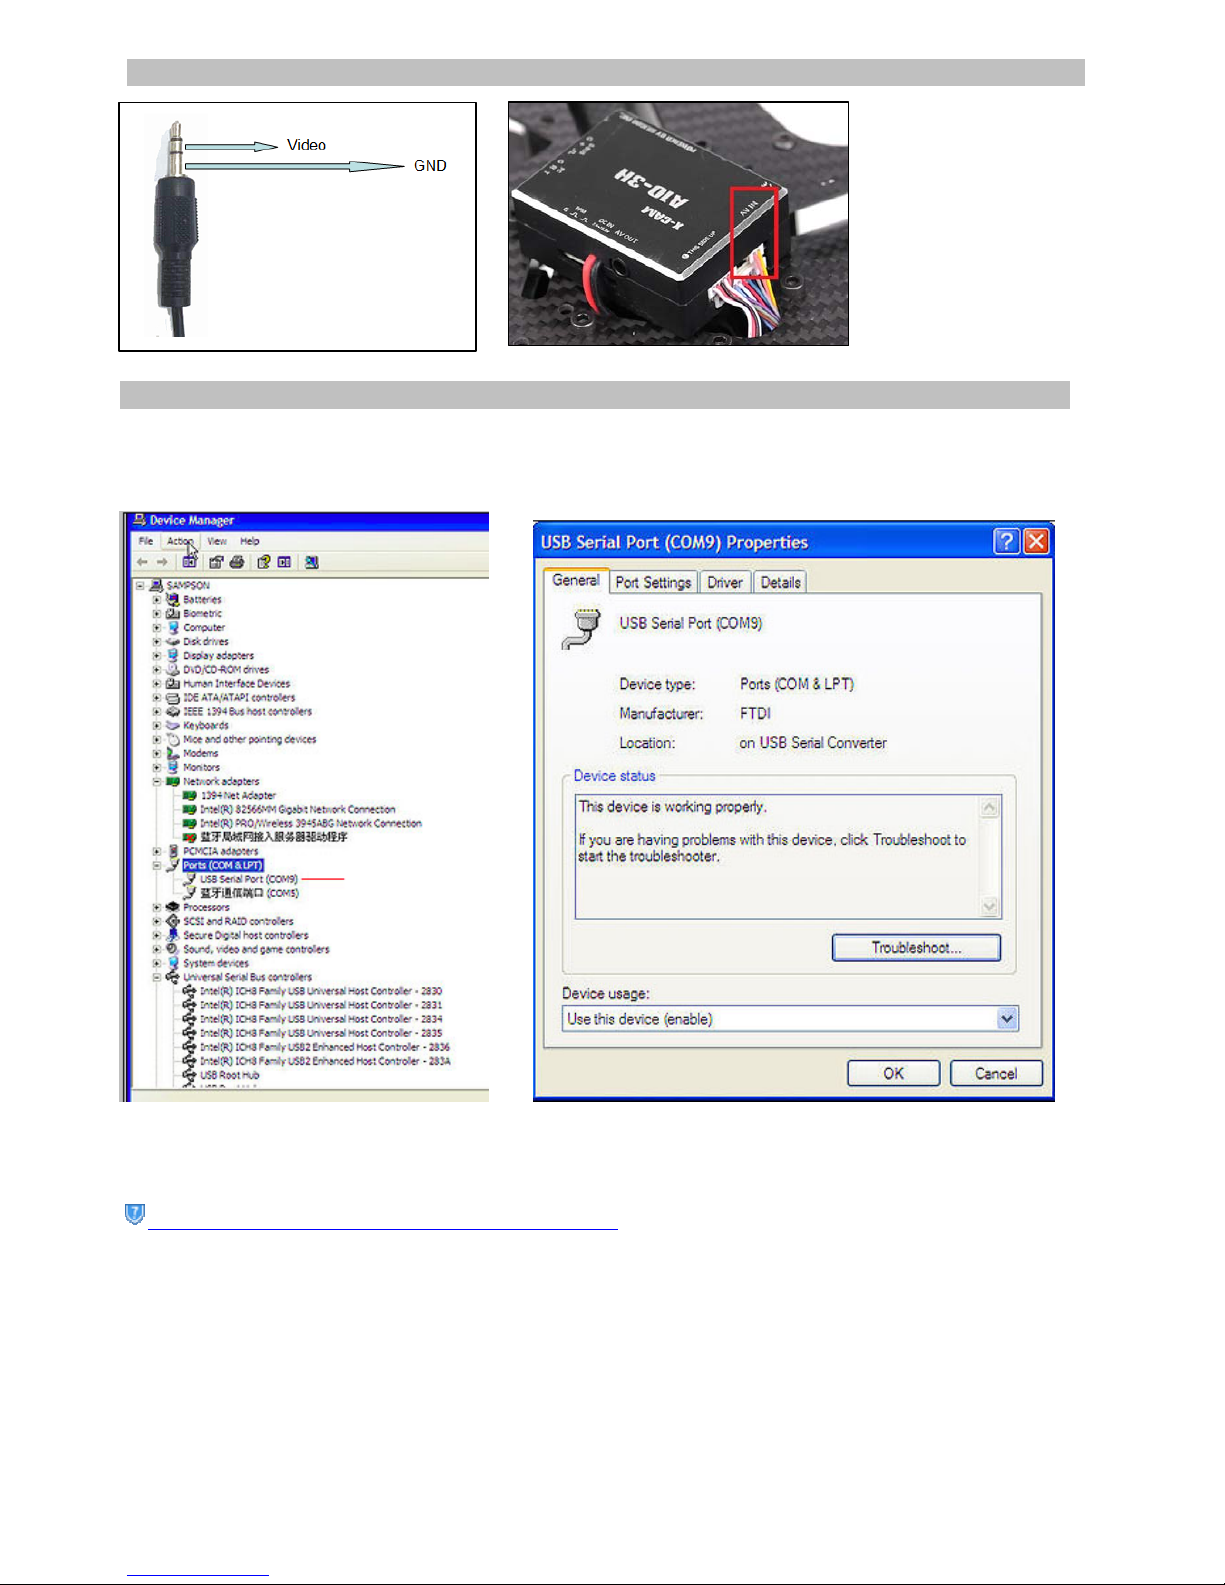
X-CAMA10-3Htocheckifthebubbleisatthecenterpositionornot.(absolutecenterpositionisnotrequired.
5.Filltheback-upvaluesintothe“DrivenVoltage”and “ServoReverse”andclickthe“BurnParams”
Forexample
(aftertheupsteps,theX-CAMA10-3Hdoesnotwork ,pleasetryfollowingsteps)
1. Setthe“PanControlWay”to”ModeSwitch”
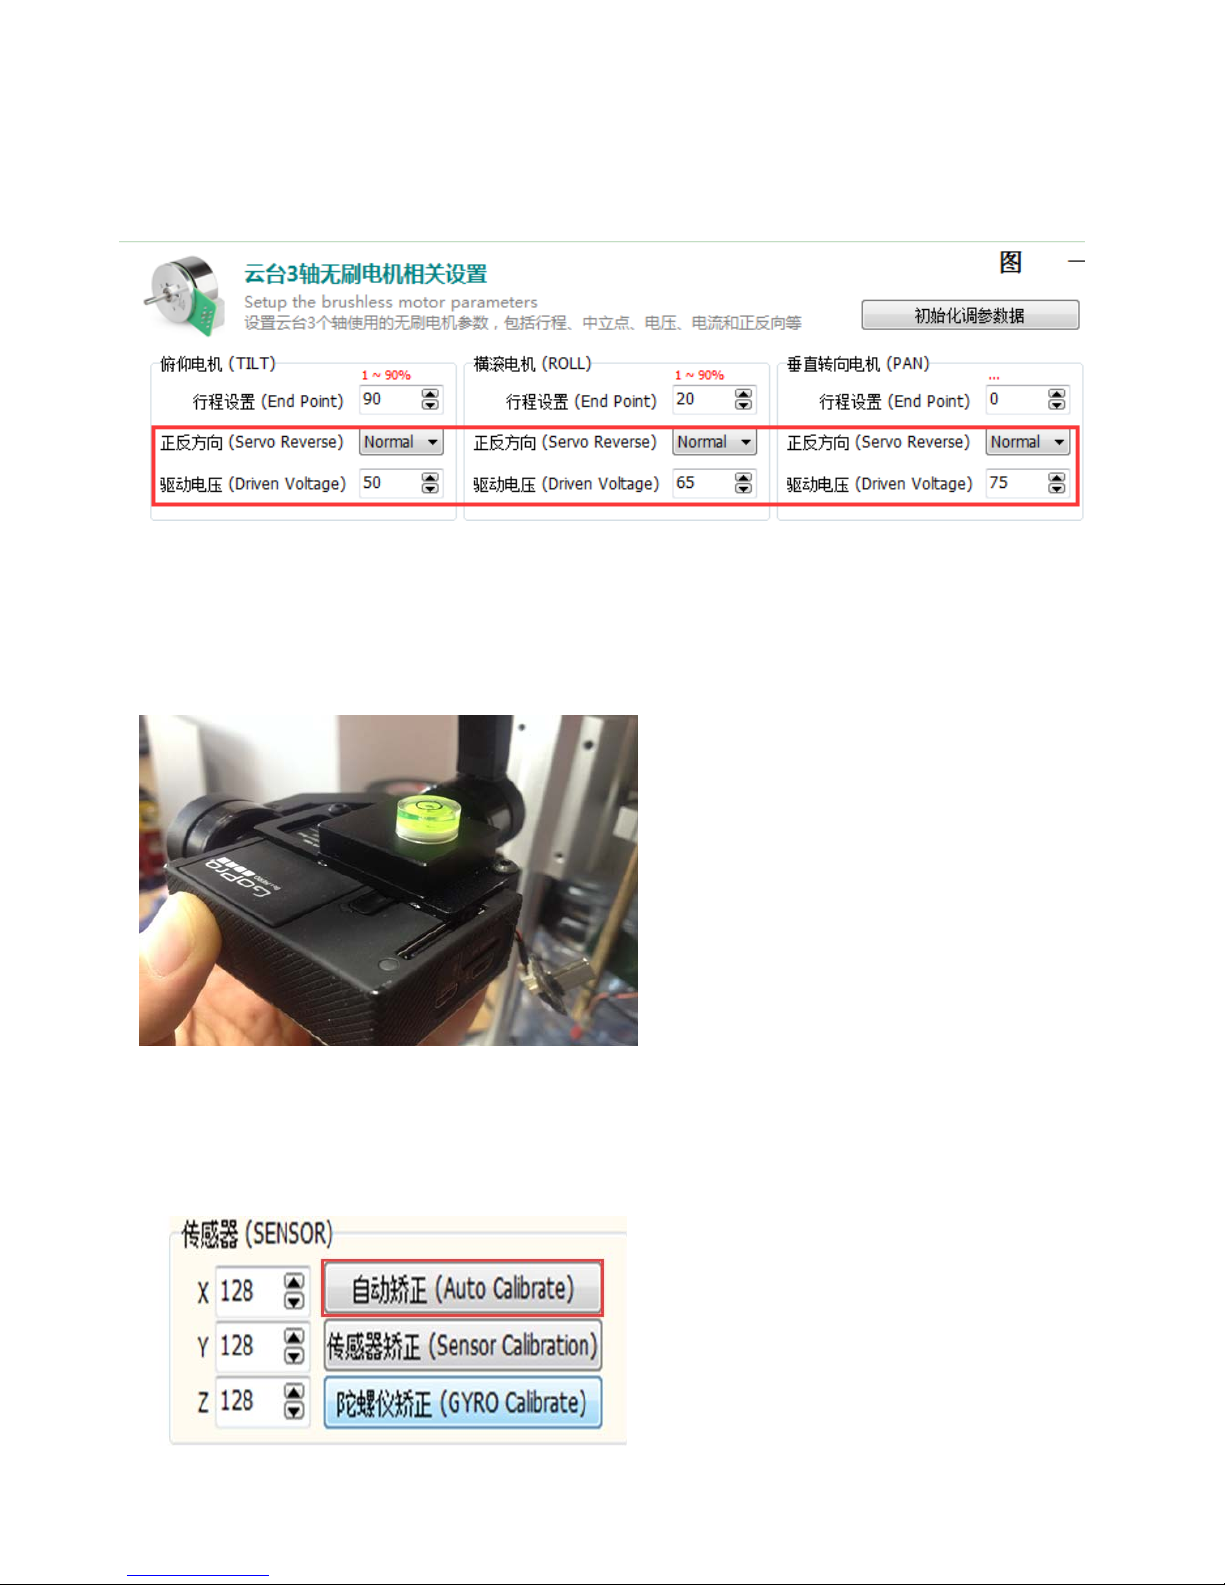
2. Adjustthe3motorsasblow:
Tiltmotor
RecoverthevaluesofTiltmotorinblankof“DrivenVoltage”andclick“BurnParams”. itwillshow“Saved”atthe
low-leftcornerin5secs,andclick“disconnect”.Click“Connect”againandclick“ReadParams”.MakesuretheTilt
motordoesnotshockhuge.Ifnot,pleasechangethe“ServoReverse”andtryagain.
Rollmotor
RecoverthevaluesofRollmotor inblankof“DrivenVoltage”andclick“BurnParams”. itwillshow“Saved”atthe
low-leftcornerin5secs,andclick“disconnect”.Click“Connect”againandclick“ReadParams”.MakesuretheRoll
motordoesnotshockhuge.Ifnot,pleasechangethe“ServoReverse”andtryagain.
Panmotor
RecoverthevaluesofTiltmotor inblankof“DrivenVoltage”andclick“BurnParams”. itwillshow“Saved”atthe
low-leftcornerin5secs,andclick“disconnect”.Click“Connect”againandclick“ReadParams”.MakesurethePan
motordoesnotrotatecontinuallyormotionless .Ifnot,pleasechangethe“ServoReverse”andtryagain.
Ifitstilldoesnotworkaftertheupsteps ,pleasereferto theV2.18TheFirmwareUpgradeGuide
Appendix2.TheprocedureofV1.10/V1.13upgradetoV2.18orover
Notice:ifthecurrentfirmwareversionisV2.XXthendoesnotreadthisguide.
Pleaseaccordingtothestepsstrictly asbelow:
1.Accordingtothemanualabove,firstlyburnthe“PARAM_UPDATE 20140924 V0.00.Bin”firmware totheX-CAM
A10-3Handclosethefirmwareupgradeprogram,andpowerofftheX-CAMA10-3H
2.PowerontheX-CAMA10-3Handconfirmtheredandbluelightsareflashingalternatelyandpoweroff.(ifnot,please
trystep1again)
3.Thirdlyburn“A10-3H20141022V2.18ABate.Bin”firmwaretotheX-CAMA10-3Handclosethefirmwareupgrade
program,andpowerofftheX-CAMA10-3H.
4.PowerontheX-CAMA10-3Handobservethestatus,ifitisunorderedturningthentrythestep1andstep2again(the
step2mustbeexecuted).
5.IfthePanmotorisunorderedturning,pleaseconnecttotheX-CAMGimbalassistantsoftwaretochangethePan
motordirection.
6.IfthePanmotorisstillunorderedturningafterthestep5,pleaseaccordingtotheabovemanual,burnthe“A10-3H
20141022V2.18BBate.Bin”firmwaretotheX-CAMA10-3H.
7.IftheX-CAMA10-3Hstilldoesnotwork,pleasefeelfreetocontactX-CAM.
Table of contents
Other X-cam Camera Accessories manuals