XEMEX KWHIQ User manual

1
Installation Guide On-site installation procedure PV monitoring with Xemex KWHIQ meter
Introduction
The Kwhiq IQ0102065BNEM electricity meter is a single-phase smart meter developed for measuring
and monitoring energy to enable good energy management. Many energy parameters (such as
energy, voltage, power, ...) are measured, logged and made available. The meter can be read and
congured via the mobile network (4G / 2G).
The most important features:
Installation Guide
On-site installation procedure PV monitoring
with Xemex KWHIQ meter
Measurement accuracy Active power: EN 50470-3 Class B
Reactive power: IEC 62053-23 Class 2
MID certied
Connection 1 phase, 2 wires, direct connection
Rated voltage
Voltage range 230V
+/- 20%: 184V – 276V
Rated current
Current range 5A
0.25A - 65A
Starting current 20mA
Frequency 50Hz (+/- 5%)
Internal power
consumption Voltage circuit: < 2W / 10 VA per phase. Current circuit: 0.5 VA per phase
Interfaces – DLMS / COSEM via CAT M / GPRS / NBIoT mobile network
– Optical local interface DLMS / COSEM direct HDLC - IEC 62056-21
–P1 port (SMR v5.0.2)
– LCD display with auto-scroll and push button for manual scrolling.
– 2 energy pulse LEDs: active 2000 imp/kWh & reactive 2000 imp/
kvarh
Real time klok IEC 62054-21
0.5s deviation over 24h at 23°C +/- 0.15 s/°C/24h
Backup by super capacitor to bridge 5 days of power failure
Mechanical Dimensions: 210 x 131.6 x 85.5 mm Weight: 0.95 kg

2
Installation Guide On-site installation procedure PV monitoring with Xemex KWHIQ meter
Description
Front view
1. Optical port for local conguration and debugging
applications
2. Status LEDs -> ‘Power’ (energised/de-energised)
& ‘Status’: mobile communication status & ‘Res’:
reserved for future use
3. Sealing of communication module
4. Interchangeable module for mobile
communication with type designation
5. Type designation of electricity meter
6. Serial number with bar code
7. LCD Display
8. Display scroll button
9. Sealed button for manual checkout (not
applicable)
10. Peripheral equipment connection (P1 port).
11. Terminals cover (can be sealed). With wiring
diagram on the inside.
12. Indicator lights. The red LED ashes when energy is
being consumed or fed in.
There is a LED for active energy (left) and a LED for
reactive energy (right).
Environment IP54
-40°C - +70°C in operation, -40°C - +80°C in storage or transport
Relative humidity up to 95% non-condensing
Packaging 5 meters per box with meter and box barcodes also externally on the
box label
Carton
DIM:598x265x192
lower paper cushion
upper paper cushion

3
Installation Guide On-site installation procedure PV monitoring with Xemex KWHIQ meter
Description
Rear view
13. Adjustable mounting hook
14. Mounting hook
15. Fixing hole
16. Wiring diagram
Display
LCD display
1. CODE indicating which value is shown on the display
2. 2. Unit of the value shown on the display
3. 3. Main breaker state closed/open
4. 4. Mobile network - signal strength
5. 5. Tariff indication (not used)
6. 6. Direction of reactive energy: consumption from the grid f (+Q) or delivery to the grid j (-Q)
7. 7. Direction of active energy: consumption from the grid ^ (+P) or delivery to the grid ^ (-P)
8. 8. Tariff
9. 9. Value
10. 10. Indicators:
i. L1 -> Voltages on phase 1
ii. F -> Meter cover opened (fraud)!
iii. T -> Terminals cover opened
iv. M -> Strong magnetic eld detected (fraud)!
v. C -> error situation (for example: invalid internal clock)

4
Installation Guide On-site installation procedure PV monitoring with Xemex KWHIQ meter
After starting: the rmware version of the meter is rst shown on the display (briey).
Auto scroll mode (4 screens)
This is followed by the active energy consumed so far in 0.001 kWh (code 1.8.0)
After 5 seconds, this is automatically followed by the active energy delivered so far in 0.001 kWh
(code 2.8.0)
After 5 seconds, the current power consumption in 0.001 kW (code 1.7.0) is automatically displayed
Then, after 5 seconds, it starts again at the beginning of the display cycle (back at code 1.8.0)
Manual scroll mode (21 values)
Scroll through the list of values by briey (> 0.2s & < 2s) pressing the upper blue button. After 60
seconds without pressing this button, the display will return to auto scroll mode.

5
Installation Guide On-site installation procedure PV monitoring with Xemex KWHIQ meter
CODE VALUE
no code Clock (UTC): top row the time/ bottom row the date/ “ “ if unknown
97.98.0 Alarm Register (0 = no alarm, 1 = clock (still) not synchronised).
1.8.0 Total active energy consumed from the grid (+A)
2.8.0 Total active energy delivered to the grid (- A)
1.8.1 Active energy consumed from the grid (+A)-during low tariff (tariff T = 1)
1.8.2 Active energy consumed from the grid (+A)-during high tariff (tariff T = 2)
2.8.1 Active energy delivered to the grid (- A)-during low tariff (tariff T = 1)
2.8.2 Active energy delivered to the grid (- A)-during high tariff (tariff T = 2)
14.7.0 Frequency of the grid
16.7.0 Active power - net value: (|+P|-|-P|)
32.7.0 Voltage
31.7.0 Current
25.6.0 GSM operator (name of ‘mobile country code’ + ‘mobile network code’) + status
network registration:
0 = not registered
1 = registered on own network
2 = not registered and looking for a (new) network operator
3 = registration denied
4 = unknown
5 = registered as roaming (= normal value)
+ access technology
0 = not active
1 = GPRS
2 = EDGE
7 = LTE CAT M1 (= normal value)
8 = LTE CAT NB1
9 = LTE CAT NB2
94.31.6 Mobile network signal strength indicator
94.31.7 Mobile network signal strength RSRP
94.31.8 Mobile network signal strength RSRQ
94.31.9 Mobile network signal strength RSSI
25.4.0 Mobile network - APN
94.31.4 SIM kaart ICCID
25.1.0 IP_address
0.2.0 Active rmware version (FW version measurement part + FW version application)

6
Installation Guide On-site installation procedure PV monitoring with Xemex KWHIQ meter
Installation
Choose a suitable location with sufcient signal strength
The meter should be installed in a dry and well-ventilated location. The meter or the installation board
should be placed against a robust, re-resistant solid wall. In case of any doubt (e.g. in basements),
use a telephone and reference meter to check the signal strength of the mobile network in advance.
Fix the meter
Respect the safety regulations and act in accordance with the user manual of the meter.
Dimensions: 210mm x 131,6mm x 85.8mm
Materials:
– Pozidriv screwdriver PZ no.2 for the screws on the terminal block.
– 3 Self-tapping M5 screws with countersunk head for xing to the wall or panel.
– Drill with M5 stone drill bit and 3 plastic plugs for installation against a concrete wall.
Check the meter before connecting it. Only connect the meter if there is no visible
or audible damage or defect (loose parts). Meters that have been dropped
may not be installed, even if no damage is visible. They must be returned to
the manufacturer for inspection. Internal damage may cause short circuits or
malfunction.
The meter is xed at 3 points: 1 hook at the top and 2 screw holes.
The hook can be adjusted to 3 positions. First hang the meter on the hook at the top
and then attach the 2 screws.
Connect the meter
First de-energise the side of the circuit to which the meter is to be connected. Make sure that the
circuit cannot be re-energised by accident.
Connect the meter as indicated below.

7
Installation Guide On-site installation procedure PV monitoring with Xemex KWHIQ meter
The kwhiq meter is equipped with terminal connectors that allow the use of wires with a section
of 2.5 to 25 mm2. If a solid cable is not used, the correct cable ferrules must be tted. The terminal
connectors are tted with M7 x 13 cross-head and slotted-head screws that must be tightened with a
Posidriv PZ No. 2 screwdriver to a torque of at least 3.5Nm.
The 1-phase meter is connected with side of mains or meter box to L (terminal l) and N (terminal 4).
See also the diagram on the inside of the terminal cover.
Important: if the connection of the meter box and solar panels is reversed, the solar panels will work
but the monitoring will not! You can check whether the meter is correctly connected by looking at
the display. This must be done with a working installation: there must be PV production. The display
shows an arrow on the right with -P as caption. It must point to the LEFT.
Fit the terminal cover. On the underside, the correct routing can be cut out for the cable.
1-phase meter
Meter box
Phase L: Terminal 1
Neutral N: Terminal 4
PV panels
Phase L: Terminal 3
Neutral N: Terminal 6
L from the meter box
N from the meter box
From inverter (AC)
From inverter (AC)

8
Installation Guide On-site installation procedure PV monitoring with Xemex KWHIQ meter
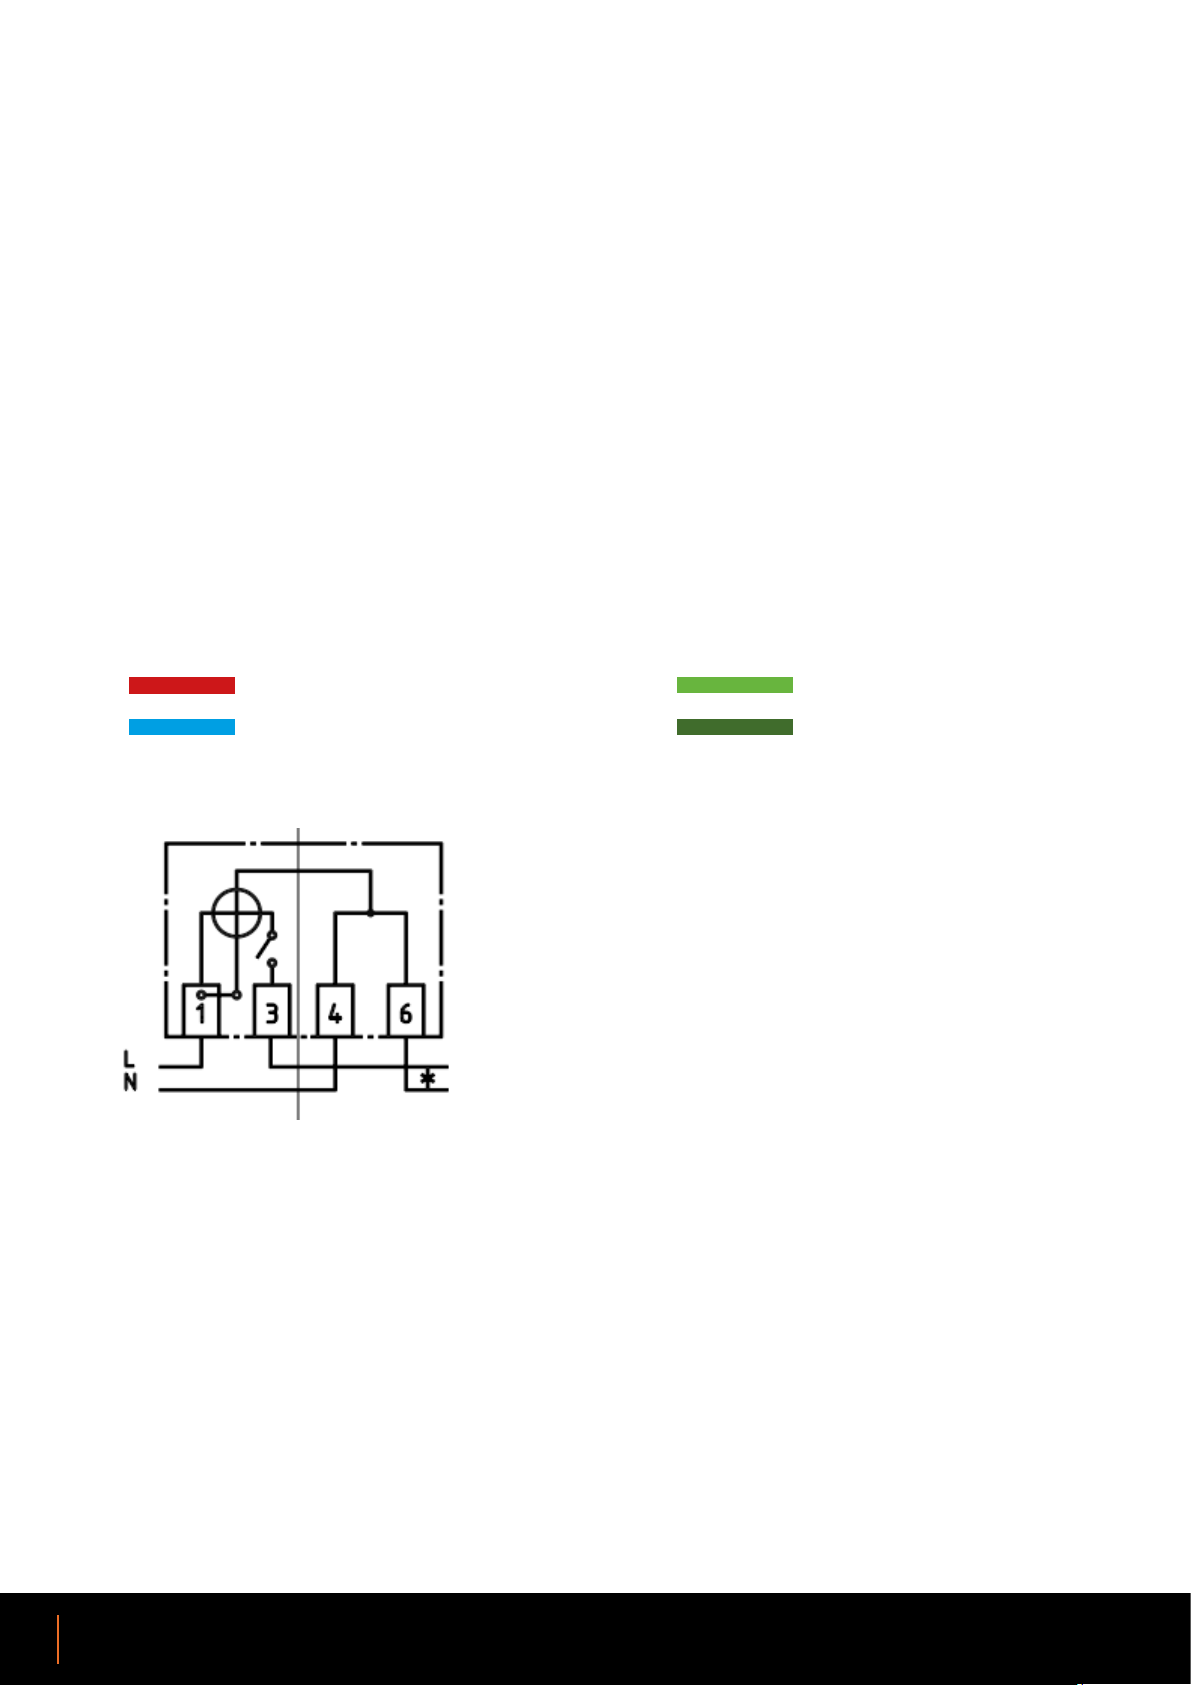
Power up the installation
The display becomes active and the ‘Power’ led lights up continuously. The ‘Status’ led lights up
continuously (looking for a network) or ashes slowly (0.8 sec. on and 0.8 sec. off: registered on the
network but cannot receive a data connection yet).
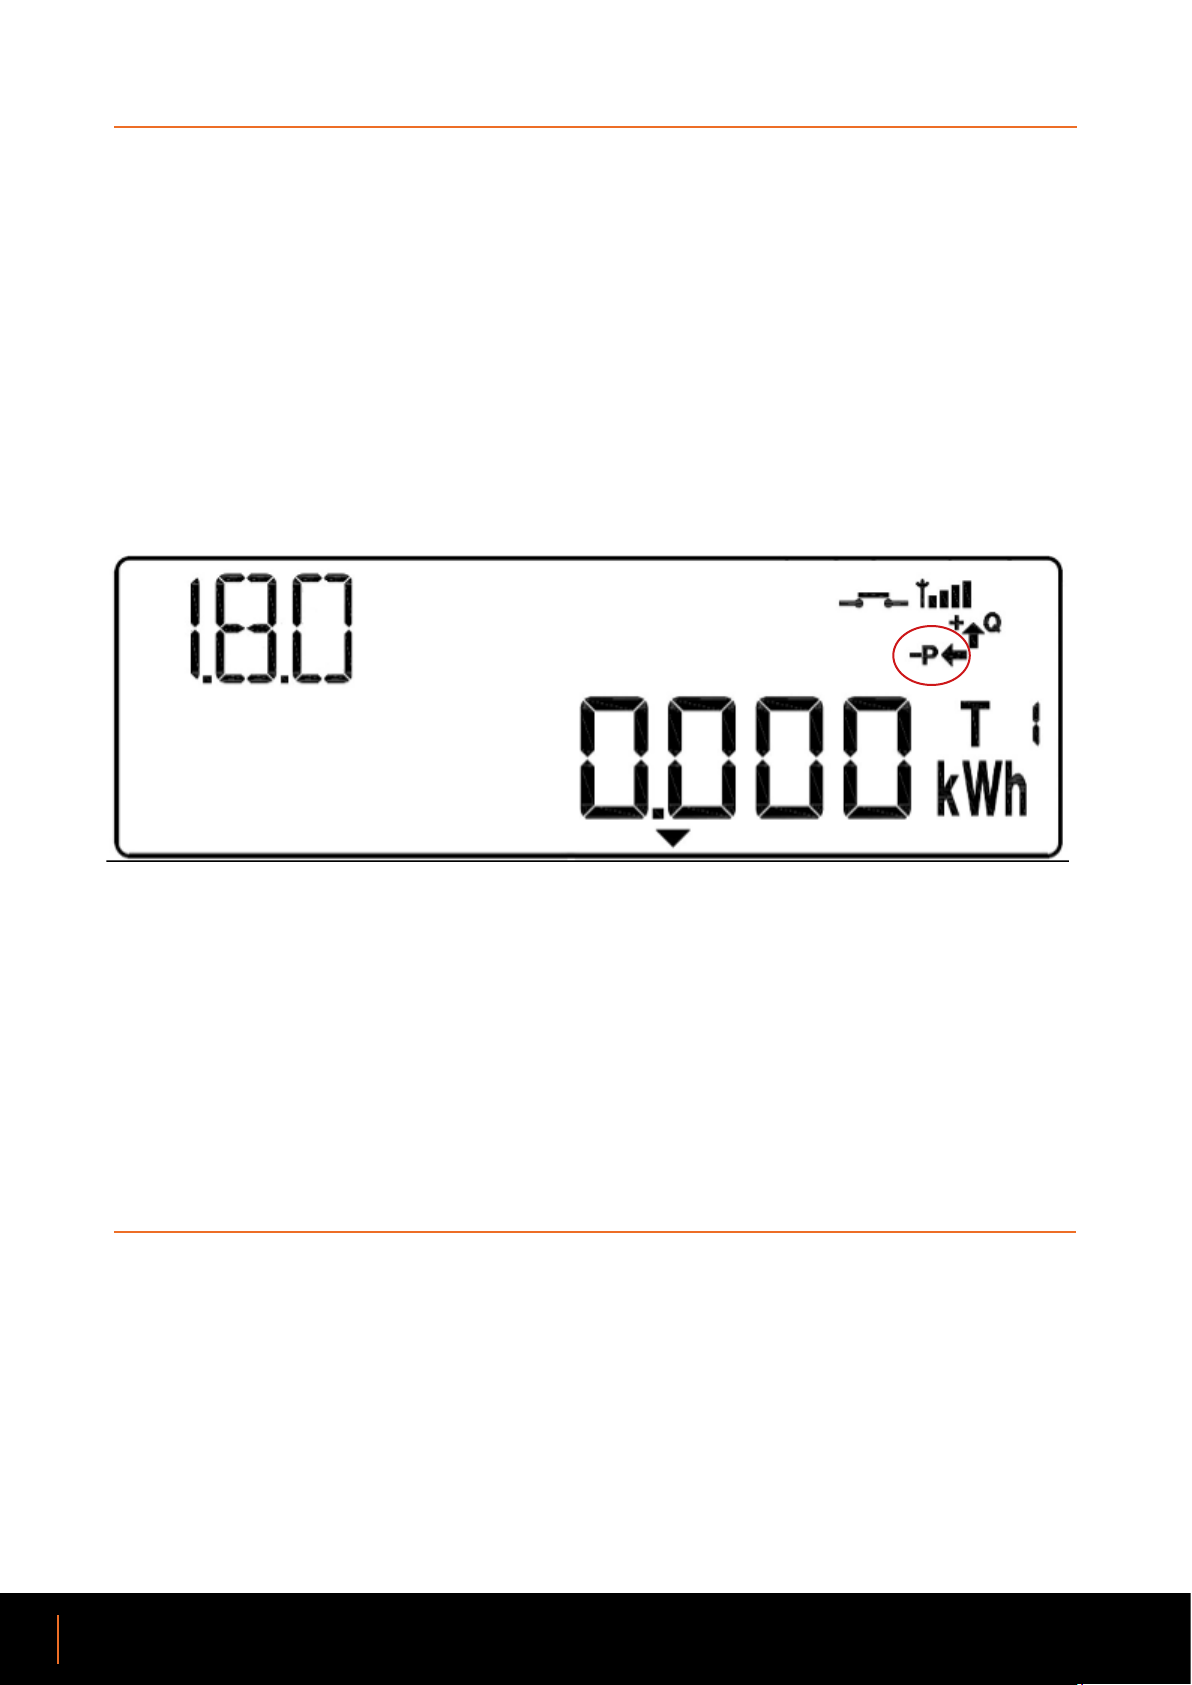
Immediately after switching on the voltage, the arrow may point to the right (+P). This is because the
inverter needs time to start up. During this start-up period, the inverter consumes electricity from the
grid so that the arrow points to the right. You must wait until the inverter actually delivers solar power.
→ If the arrow continues to point to the right (+P), electricity is owing, but in the wrong direction.
The meter might be connected incorrectly. Another possibility is that there is not enough sunlight
to feed into the grid and the inverter is using enough power to be visible on the meter. If there is no
sunlight (or if the PV plant is not working for another reason), it is also possible that there is no arrow
on the display at all. In these cases, please check whether the meter is connected properly.
Registration on the GSM network
– Maximum 5 minutes after start-up, the ‘Status’ LED will start ashing faster (0.2 sec. on and 0.2 sec.
off).
– In the meantime, the network symbol has also appeared in the display.
– The meter is now registered on the GSM network and able to receive a data connection.
– Usually the meter will not need 5 minutes but will be ready after +/- 25 seconds.
If the ‘Status’ LED does not ash quickly 5 minutes after start-up, there is probably no mobile network
coverage at that location and the meter should be moved to a location where there is.
Check the connection
Check that the arrow on the right of the display points to LEFT.

9
Installation Guide On-site installation procedure PV monitoring with Xemex KWHIQ meter
Check the signal strength
The network symbol at the top right of the display indicates the signal strength of the GSM network at
that location:
Excellent (rsrp >= -80 dBm)
Go0d (rsrp >= -90 dBm & rsrp < -80 dBm)
Sufcient (rsrp >= -100 dBm & rsrp< -90 dBm)
Insufcient (rsrp >= -120 dBm & rsrp < -100 dBm)
No signal (rsrp < -120 dBm)
If there is no signal, or if the signal is insufcient or poor (less than 2 bars at the network symbol)
the meter should be moved to a place where the signal strength is sufcient. An external antenna
can be used (optional item). In this case, the meter can remain at the location without network
coverage because an antenna is installed at the location with sufcient signal. The external antenna
is connected to the meter with a cable. The connection point (MCX connector) is located under the
communication module cover. This section is sealed. The seal must therefore rst be broken and a
new seal must be placed after the antenna cable has been connected.
Installing an external antenna
1. Remove the seal from the communication module.
2. Remove the cover from the communication module.

10
Installation Guide On-site installation procedure PV monitoring with Xemex KWHIQ meter
3. Install the antenna cable. Connect the MCX connector and tuck the cable into the groove provided.
4. Break out the piece of plastic to allow the cable to come out of the cover.
5. Replace the cover on the communication module and reseal the bolt with a (proprietary) seal.
6. Install the antenna in a location with sufcient network coverage.

11
Installation Guide On-site installation procedure PV monitoring with Xemex KWHIQ meter
Installation unsuccessful
When nothing appears on the meter’s display and the ‘power’ LED does not light up.
Check whether the meter has voltage at the terminal block by means of a voltage tester or voltmeter.
If there is 230V between terminals 1 and 4 but nothing appears on the display, the meter may be
defective. Replace the meter and start an RMA procedure for the defective meter.
If it is not possible to achieve successful conrmation in the Cast4All Connect app. And/or if the
signal strength of the meter remains insufcient.
Check the signal strength of the mobile network by using a reference meter. Only if the reference
meter shows a good signal strength (the value on the screen is updated every 30 seconds) in exactly
the same place will the meter need to be replaced. In this case, write down or lm all the data from
the display. To do this, press the upper blue button and scroll through all the codes of the display
cycle.
All values must be noted in the RMA document.
Check the installation by using the Cast4All Connect app, which can be downloaded from
Apple’s App Store and Android’s Google Play Store.
This manual suits for next models
1
Table of contents