XFARM xSense Pro User manual

xSense Pro
Tutorial
xfarm.ag/tutorial
GUIDA RAPIDA
ALL’INSTALLAZIONE
QUICK GUIDE
TO INSTALLATION
GUÍA RÁPIDA
DE INSTALACIÓN
ITALIANO
ENGLISH
ESPAÑOL

2

3
Indice
Index
Índice
ITALIANO
ENGLISH
ESPAÑOL
xSense Pro
xSense Pro
xSense Pro
Installazione in campo
Instalación en campo
Field installation
Field conguration
Congurazione in campo
Conguración de campo
Attrezzatura necessaria
Equipamiento necesario
Required tools
Accessori
Pulizia xSense Pro
Accesorios
Limpieza de xSense Pro
Accessories
Cleaning xSense Pro
18
32
4
21
35
7
12
26
40
20
34
6
24
30
38
44
10
16

4
xSense Pro
Assembly and installation guide: components
Box contents
xSense Pro
Rod
Anemometer
Bracket for rod
xing
1 X
1 X
1 X
1 X
E) 1 X Bracket
F) 2 X Bolt set
G) 2 X Short plastic tie
H) 1 X Long plastic tie
A) 15 X Bird deterrents
B) 4 X Fixing screws
C) 1 X Rod xing kit
D) 2 X Threaded U
I) Allen Wrench
Fixing kit

5
EN
Assembly and installation guide: assembly steps
1
2
2
3
Place all components of xSense Pro on a at
surface and start assembling.
The rst thing to do is to insert the rod into
the bracket as shown.
Lean the anemometer blades against
their seat and, using the supplied
Allen screw I), fasten it to the axle,
ensuring that it turns freely without
friction.
Insert the bird deterrent needles into
the respective holes on the
circumference of the cone, if
necessary use a small hammer
Fasten the rod to the bracket using
fastening kit C) and a screwdriver
C)
Thread the cable
Secure the cable to the bracket as shown.

6
Assembly and installation guide: required tools
At this point we are ready to go into the eld and install the xSense Pro.
To do this, we need:
- Metal pole of approximately 3 metres with a diameter
of 30 - 44 mm (40 mm recommended)
- Auger 10-15 cm in diameter and at least 50 cm long
- Rubber gavel
- Spanner 11
- Compass, to orient the xSense sensor
assembly correctly (e.g. mobile phone app)
- Spirit level (mobile app can be used)
- Screwdriver

7
Assembly and installation guide: eld installation
It is advisable to install xSense in an area that is representative of the
farm from a morphological and environmental point of view.
- Install xSense as far as possible from buildings, artefacts, hedges,
trees, watercourses or other topographical elements that may
inuence/disturb the correct collection of data.
- Install xSense away from obstacles that exceed its height; having
taller obstacles nearby could distort anemometric and rainfall data.
- xSense must be installed out of the way of agricultural vehicles in
order to avoid possible damage.
- xSense should be installed between 1.5 and 3.0 metres above the
ground (preferably grass).
- xSense should be installed in a place where there is good cellular
network coverage.
Choice of Installation Site.
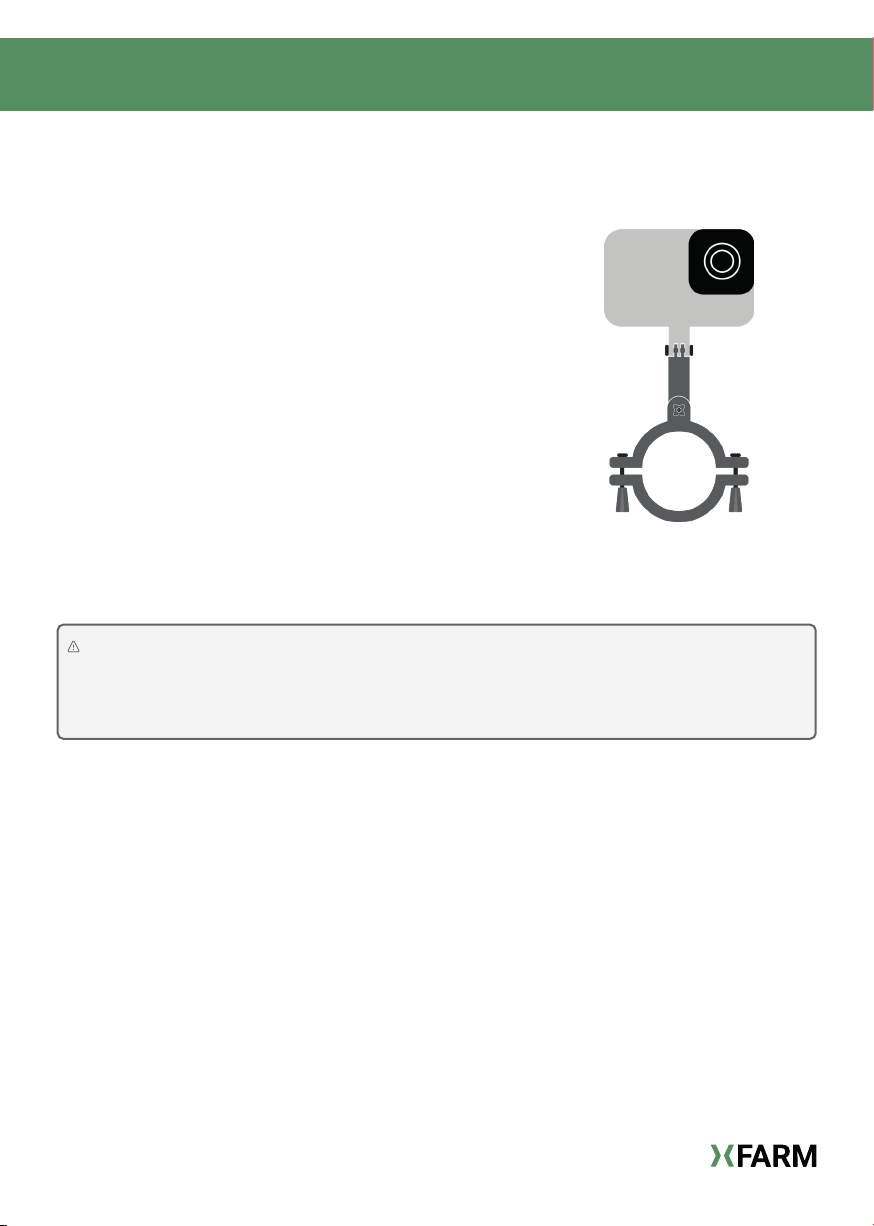
After identifying the right place, we drill the hole with the drill in order to
rmly x the metal pole.
It is important that the pole is positioned perfectly level in order to not receive
incorrect data

8
Assembly and installation guide: eld installation
Level
F)E)E)
D)
E)
E)
After having positioned the pole
perfectly level, we move on to xing
the xSense Pro.
We then use the supplied xing kit.
To attach it to the pole, the collector
cone must rst be removed.
To do this, the base cone of the
station must be turned anti-clockwise.
Note: When new, the cone ts tightly
to the base and may require additional
pressure.
As with the pole, it is important that the
xSense Pro is also xed perfectly level, and
the level inside the sensor can be used to
do this.

9
Assembly and installation guide: eld installation
When fastening also make sure that
the xSense has the photovoltaic panel
facing south and the pole facing
north.
Finally, secure the anemometer wire
to the pole using the clamps
provided.
South
North
After attaching xSense to the pole, we
can close it by placing the collector
cone in the appropriate slot and turning
it clockwise to lock it.
Plastic cable
tie H)
Plastic cable
tie G)
Plastic cable
tie G)

10
Assembly and installation guide: accessories
In the case of xSense installation with
xCam, the latter will arrive already
connected to the Gateway, so simply x it
to the same pole using the vertical bracket
and choose the framing that best suits the
crop.
After switching on the xSense for the rst
time the xCam will take a picture to
determine the correct framing.
xCam
When selecting the xSense Pro sensor + accessories in the xFarm app, during in-
stallation, if the xCam is factory connected to the Gateway it will be automatically
recognised so it will not be present in the list combined with the xSense Mini.

11
Assembly and installation guide: accessories
In case of xSense installation with xLeafs it
will be necessary to x it to the pole with
the bracket and clamps provided.
The sensor must be cleaned periodically using a cloth moistened with just
water.
If the sensor is used in extremely sunny areas with unusually high radiation
loads, the application of McNett UV protection is recommended.
To apply McNett UV Technology:
• Clean the sensor with water and a clean, soft cloth.
• Spray a soft cloth with UV Tech spray.
• Wipe both sides of the sensor surface with a damp cloth to apply
protection
xLeaf (foliar wetting sensor)
Cleaning and Maintenance
Install sensor and wire at a minimum of 1 metre from the ground with the tip
pointing North and the raised part upwards.

12
Assembly and installation guide: eld conguration
Or scan the QR code from your smartphone
Search for XFARM in the App Store or Google Play Store
Download the xFarm app to create your account and connect xSense
After xing xSense Pro you will need to enter it into the xFarm App.
There are 2 ways to do this:
METHOD 1 - QR Code
Scan the QR code located under and inside
the connection box.
METHOD 2 - Serial Number
Enter the serial number found under and
inside the connection box manually in the
app.

13
In the menu select Scan The camera will activate
and recognise the QR code
Complete all data and tap
Create Sensor
1) Scanning the QR code (recommended)
Step 1 Step 2
Step 3
xxxxxxxxxxxxxxxxxxxx
You can put the
location of the
sensor on the
map
select xSense
Pro alone or
with accessories
installed
Assembly and installation guide: eld conguration

14
select xSense
Pro alone or
with accessories
installed
In the menu select Sensors From the button select
New Sensor
2) Writing the Serial Number by hand
Step 1 Step 2
Step 3
Assembly and installation guide: eld conguration
Complete all data and tap
Create Sensor
You can put the
location of the
sensor on the
map

15
Assembly and installation guide: eld conguration
To switch on xSense Pro we need to open
the connection box panel then proceed as
follows:
1 - lift up the tab at the base of the cover
2 - slide the cover upwards, matching the
alignment indicators on the side of the box
3 - pull the cover towards you to lift it out of
the box.
4 - with the connection board in
front connect the battery cable
where the arrow points to power up
the xSense Pro
5 - press the RESET button
6 - the LED will start ashing quickly
and after a maximum of 5 minutes
it will switch off.
Powering up the xSense
Opening up
Alignment
LED
Solar panel cables

16
Assembly and installation guide: cleaning xSense Pro
1 - remove and clean the lter located at the
end of the cone
2 - clean the water inlet hole at the base of
the cone
3 - Open xSense by pressing counterclockwise
on the collector cone and clean the rain gauge
spoon.
4 - Close xSense by pressing the manifold
cone clockwise and screwing the rain gauge
lter back down.
It may happen that the rain gauge returns abnormal data, in which case
one possible cause is dirt and debris in the cone or on the rain gauge which
is located under the collector cone.
To clean it, therefore, proceed as follows:
Cleaning xSense Pro

17

18
xSense Pro
Guida di montaggio e installazione: componenti
Contenuto della scatola
xSense Pro
Asta
Pale anemometro
Staffa per
ssaggio asta
1 X
1 X
1 X
1 X
E) 1 X Staffa
F) 2 X Set bulloni
G) 2 X Fascetta in plastica corta
H) 1 X Fascetta in plastica lunga
A) 15 X Dissuasori per volatili
B) 4 X Viti di ssaggio
C) 1 X Kit ssaggio asta
D) 2 X U lettata
I) Brugola
Kit di ssaggio

19
IT
Guida di montaggio e installazione: step di montaggio
1
2
2
3
Posizionare tutti i compomenti di xSense
Pro su una supercie piana einiziare ad
assemplare.
La prima cosa da fare è inserire l’Asta nella
staffa appositam come in gura.
Appoggiare le pale dell’ anemometro
alla propria sede e, utilizzando la
brugola in dotazione I), ssiamola
all’asse assicurandoci che giri
liberamente senza frizioni.
Fissare l’Asta alla staffa utilizzando il kit di
ssaggio C) e un cacciavite
C)
Inlare il cavo
Bloccare il cavo alla staffa come in gura.
Inserire gli aghi dissuasori per volatili
nei rispettivi fori sulla circonferenza
del cono, se necessario utilizzare un
piccolo martelletto

20
Guida di montaggio e installazione: attrezzatura necessaria
- Cacciavite
A questo punto siamo pronti per andare in campo ed installare la xSense Pro
Per farlo abbiamo bisogno di:
- Palo di metallo di circa 3 metri con diametro
30/44 mm (consigliato 40 mm)
- Trivella 10-15 cm di diametro e almeno 50
cm di lunghezza
- Martelletto in gomma
- Chiave inglese 11
- Bussola, per orientare il gruppo sensori di xSense
correttamente (per esempio app per cellulare)
- Livella (può essere usata app per cellulare)
Table of contents
Languages:
Other XFARM Weather Station manuals