XFIRE AUDIO XFR Series User manual

XFR DSP PRO
Digital Sound Processor
Quick Guide
XFIREAUDIO.COM

XFR series LIFE AMPLIFIED
Introduction
Welcome to XFIRE AUDIO ‘‘The New Breed Of Mobile Audio’’.
Congratulations on purchasing one of the finest autosound digital sound processors in existence.
Born in The U.S.A from rigorous pursuits of exceptional sound, strength, performance, and style delivering kick ass mo-
bile audio! Relentless pride and passion with 30 plus years of experience and excellence in the 12 volt industry.
It’s Your Music, It’sYour Style, It’s Your Life, AMPLIFIED!
Purchase and serial number information.
Record your New XFIRE AUDIO product information for future reference.
Purchase Date
Retailer
Model #
Serial #
All the controls at you finger tips with the DSP PRO Digital Sound Processor. Create your Ultimate Car Audio system with
the userfriendly iPad app or PC Software. Have your system up and running in less than 15 minutes.
Make the difference, stand out from the crowd, XFR DSP PRO will take each car audio system to the next level.
• DualDSPdesigndigitalsoundprocessor.
• 6 Channel input and 8 Channel RCA output.
• Butterworth or Linkwitz Riley crossover types selectable per Output with upto 48dB/Octave slopes.
• 31 band EQ for each output channel, Graphic or Parametric EQ selectable per output channel.
• Maximum adjustable time alignment delay 25ms per output channel.
• High Level, RCA, AUX and Optical input options.
• Software package includes iPad and PC tuning software and iPhone and Android remote control software.
• English operating software ConfigurationWizard for fast and easy setup.
• Auto sense option with Remote out when used with High Level inputs.
• High current Remote output with 0 - 10 Seconds turn On time delay.
• Independant channel parameter setup.
This quick guide provides necessary information to setup your XFR DSP PRO digital sound processod. Please read it care-
fully to insure a lifetime of high fidelty autosound enjoyment.
Features

Specifications
Frequency response 20Hz - 20kHz (-3dB)
Sampling rate 48kHz 24Bit
S/N ratio analog input 1V > 85dB (A-weighted)
S/N ratio analog input 5V > 100dB (A-weighted)
S/N ratio digital input 1V > 85dB (A-weighted)
THD-N @ 1V 0,08%
Operating Voltage 8.2 - 16V DC
Max RMS output @ 0,3% THD 5V
Channel Separation 100dB
Gain range -60 to 0dB
Input impedance (RCA) 30kOhm
Input Impedance (High Level) 100kOhm
Remote output 1Amp
Auto sensing Audio or DC offset
Dimensions : H x W x L 30 x 240 x 120mm
All specifications are subject to change without notification due to continual product improvements.
XFIREAUDIO.COM
XFR series LIFE AMPLIFIED

Connections
Installation
Actual installation of an XFR DSP PRO is not a difficult task. However, it takes a few tools, considerable care and precise
attention to the instructions in this manual. If you doubt that you are up to the task, or your car proves to require special
installation skills, we recommend having the work done by an authorized XFIRE AUDIO installation professional.
XFR series LIFE AMPLIFIED
1 Hi Level INPUTS These inputs are connectd to the source unit’s speaker outputs in case the source unit does not
have RCA type outputs.
2 Lo Level INPUTS (RCA) These inputs are connectd to the source unit’s RCA outputs.
3 AUX 3mm stereo jack auxilary input.
4 OPTICAL Auxilary optical input.
5 BTA DONGLE Connection for the included Blue Tooth dongle for for programming via iPad.
6 USB USB connection for programming via PC.
7 POWER This connector holds Remote input, Remote output, Ground and Positive connections.
8 Power + PRT LED indicators for power and protection circuit.
9 TURN ON/OFF Selection switch Switch for selecting Remote turn on/off (RCA inpyts) or turn on/off with auto
sensing (Hi Level inputs).
10 OUTPUT These outputs are connected to the power amplifiers input connections (RCA).

The XFR DSP PRO can be programmed via Blue Tooth by iPad (iPad Gen 4 and up, iPad Mini Gen 2 and up) or with a PC
running Windows 10 via USB.
Each time the DSP PRO starts up a window will open asking if you want to run the ConfigurationWizard, running the
Wizard is recommended with each first programming of the DSP PRO, select Yes to run theWizard.
When re connecting with an already programmed DSP PRO select Cancel to skip theWizard.
Steps within the Wizard
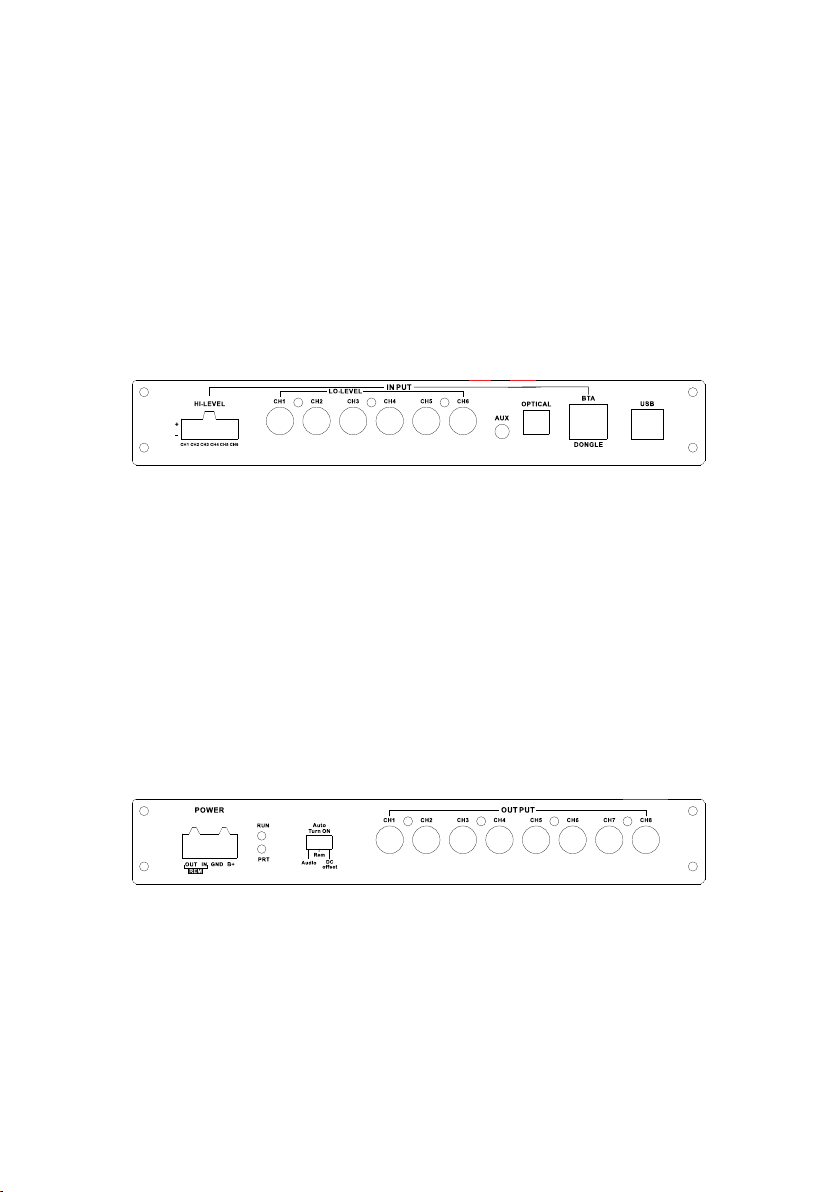
Step 1 - Select the Master input you are using for the DSP PRO, Hi Level (Speaker inputs) or Lo Level (RCA inputs).
Select if you will be using one of the available Auxilary inputs (Aux, Optical).
Step 2 - This is the step where you set the input/output mapping.
A matrix is shown with the available inputs on the Left (6) and the available outputs on the Top (8).
The matrix is a fast and easy way to program into the DSP PRO which input needs to be routed to which
output.You can select a single input to be routed to a single output but it is also possible to route multiple
inputs to a single output or a single input to multiple outputs, the signals will automatically be summed by
the DSP PRO.
Important to know: Subwoofers should always be connected to output Ch7 - Ch8, these output channels
are connected to the subwoofer output volume control of the DSP PRO.
Step 3 - All 8 outputs are shown here, you can now select what kind of speaker each output will be connected to.
Choose Next to have the basic setup written to the DSP PRO.
Now go to Configuration and select Store DSP, this command will save the settings selected with the Wizard in the
DSP PRO. Repeat“Store DSP”each time you have changed settings of the DSP PRO (X-over, EQ,Time Alignment settings).
Xover & EQ screen
The top portion of this screen holds all the settings to program the desired crossover function for each output of the
DSP PRO. For the selected output channel you can choose from a default X-overType selection depending on the kind of
speaker you selected in step 3 of the Configuration Wizard.You can choose the desired HP and LP Freq as well as the
X-over Slope and of course which X-over Model (Butterworth or Linkwitz/Riley).
The bottom portion of this screen holds a 31 band equalizer section which can be adjusted for each output channel.
For each output channel there is the option to use a Graphic Equalizer (GEQ) or Parametric Equalizer (PEQ).
The car drawing with the system layout on the Left side of this screen shows which output channel you are programming,
the selected output channel will be lit up in Blue. You can select a different output channel by selecting the speaker in
the drawing.The frequency graph in the middle of the screen shows you information of the output signal of the selected
output channel.
XFIREAUDIO.COM
XFR series LIFE AMPLIFIED
Programming
This manual suits for next models
1
Table of contents
Other XFIRE AUDIO Recording Equipment manuals