Xomax XM-V418 User manual

User's Manual
XOMAX
ENGLISH
XM-V418
Thank you for purchasing one of our XOMAX products! We appreciate your con-
dence. Enjoy your brand new multimedia unit!
Please read the following manual carefully before you install and use the unit.
Please save this manual in case you will need to clarify further possible ques-
tions regarding installation and usage of our product.
We are constantly trying to keep our online-library of user's manuals for our
products up-to-date. In case you miss some information or if something should
be unclear, please visit our homepage www.xomax.de/download for a current
version of user's manual or contact our customer service.
i
We appreciate our environment, so to keep it safe and clean, we
do not print our manuals on paper but provide our products with
manuals in digital version created in *.pdf format.
You can nd and download them anytime on our homepage
www.xomax.de/download, view them on your mobile devices and
print them for yourself if needed.
Please note: Any alterations and changes of technical data or/and design
due to technical update of some models need no advertisement.
Version 1.0
Last update 31.01.2019

2
EN
Thema:
Table of contents
Safety instructions and precau-
tions 4
Handling by stop only...................... 4
Installation .................................... 4
Regular loudness ............................ 4
Repair of the unit............................ 4
Power supply ................................. 4
Replacement of fuses ...................... 4
Overheating................................... 4
Regular temperature ....................... 5
Cleaning of the unit ........................ 5
Moisture........................................ 5
Installation 6
Installation notes............................ 6
Before the installation ..................... 6
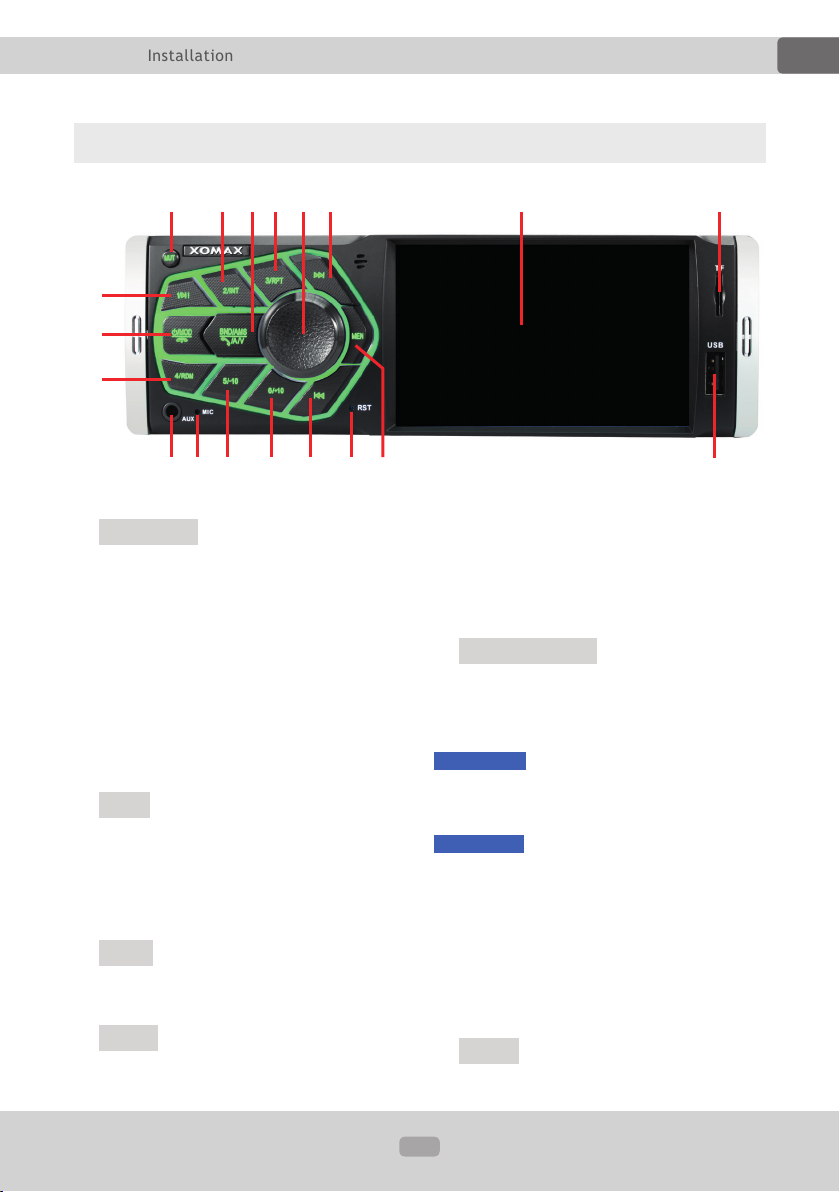
Operating elements of the unit ......... 8
Unit on/off....................................11
Insert a SD card............................11
Insert a USB ash drive..................11
AUX input.....................................11
Factory settings.............................11
Basic functions 12
Mode choice..................................12
Volume ........................................12
Mute............................................12
Settings .......................................12
Preset Equalizer ............................13
Loudness......................................13
Stereo/Mono.................................13
Switching the key tone on or off ......13
LOC Signal Sensitivity ....................13
RDS Settings ................................14
RDS Functions...............................14
AF function (Alternative Frequency) ..14
TA function (Trafc Announcement) ..14
PTY function (Program Type)...........14
Settings menü 15
Main menu ...................................15
Setting the menu language .............15
Set date .......................................15
Time setting .................................15
Factory default ..............................15
Radio area....................................16
LED backlight................................16
Steering wheel control ...................16
Radio mode 17
Radio mode on..............................17
Automatic station searching ............17
Manual station searching ................17
Store the found stations .................17
AMS Automatic frequency scan........17
Switch the frequency bands ............17
Audio playback mode 18
Switch to playback mode ................18
Start the playback/pause................18
Skip track for-/backwards...............18
Rewind / fast-forward.....................18
10 tracks skip for-/backwards .........18
Change folder ...............................18
Intro function................................18
Repeat track .................................18
Table of contents

3
EN
Thema:
Table of contents
Random playback ..........................18
Audio le overview ........................18
Audio folder overview.....................19
ID3 tag (song/interpreter/album) ....19
Video playback mode 19
Switch to video playback mode........19
Start the playback/pause................19
Skip track for-/backwards...............19
Rewind / fast-forward.....................19
Repeat video le............................19
Random playback ..........................20
Video le overview.........................20
Audio folder overview.....................20
Pictures le diashow 20
Switch to picture diashow ...............20
Start the diashow and pause ...........20
Skip picture for-/backwards ............20
Pictures le overview .....................20
Pictures folder overview..................20
Start AUX-IN mode 21
Bluetooth connection 21
Hand-free phone call 22
Common information .....................22
Take a call ....................................22
Make a call ...................................22
Redial function ..............................22
End / reject a call .........................22
Bluetooth music 22
Common information .....................22
Start Bluetooth music ....................22
Operate Bluetooth music ................22
Common solutions 23
Disposal / recycling informa-
tion 25
Disposal of an old unit / battery.......25

4
EN
Thema:
Safety instructions and precautions
THIS IS NOT A TOUCH-
SCREEN DISPLAY!
Do not press with your nger on
the display of the device. It may
cause image distortion, malfunc-
tion or damage to the screen.
!
!
Handling by stop only
To avoid any accidents please don't
handle the unit while you driving. Please
stop and park the vehicle at safety
place and handle the unit casually.
!
Installation
Please read the following manual
carefully before you install the unit. We
recommend you to let the technician
install the unit in your vehicle.
!
Regular loudness
Please set the loudness of the unit to
the appropriate level so you were still
able to hear exterior noises especially
trafc warning signals. Furthermore the
higher loudness level can damage your
hearing organs.
!
Repair of the unit
Do not open the unit. Do not try to
repair the unit by yourself due to any
emerging technical problems. While
opening the unit by yourself exists the
danger to be electrocuted.
Do not use the unit any further since
you detect any kind of technical
problems.
Leave all the repair operations to
professional technicians.
Due to awed warranty seal the
warranty becomes invalid.
!
Power supply
Use the unit connected only to 12 Volt
on-board power supply. The minus (-)
should be connected with the ground
(GND) (negative).
Due to the wrong conguration exists
the danger of re. In case of doubt
please consult with professional techni-
cians.
!
Replacement of fuses
While replacing the fuse please make
sure that the new fuse has the same
properties as the old one, especially the
amperage.
!
Overheating
Do not occlude the vent holes to avoid
the heat generation and accumulation
in the unit. Otherwise exists the danger
of re.
!
Safety instructions and precautions

5
EN
Thema:
Safety instructions and precautions
!
Regular temperature
Please make sure that the temperature
inside of the vehicle amounts to not
more than +40 C.
If it's too cold or too hot inside of the
vehicle, do not turn the unit on until
the inside temperature of the cabin
descends.
!
Cleaning of the unit
Please keep the unit clean and remove
the dust from it regularly. Please use for
that a soft and dry cleaning rag.
Major soilings can be removed carefully
with the wet cleaning rag. Do not use
any chemical or alcohol-containing
detergents to avoid the damage of the
unit's varnish.
!
Moisture
To avoid the danger of re or the
electric shock do not put the unit in to
the moist environment (e.g. adverse
weather conditions, inappropriate wet
cleaning etc.)

6
EN
Thema:
Installation
Installation notes
Here you can nd relevant installation
notes and common information.
We recommend you to let the
technician install the unit in your
vehicle.
!
Before the installation
WARNING!
Please read the following manual care-
fully before you install the unit.
Damages caused due to an inapprop-
riate installation will not be covered by
warranty.
If you do not want to risk your warranty
entitlement, please let the technician
install the unit in your vehicle.
»To avoid a short circuit please
disconnect the vehicle battery before
the installation. To do it properly please
read the manual of your vehicle.
»Make sure that your vehicle is
equipped with a car radio slot of
required size (1DIN)
»As may be the case you will need a
suitable faceplate, adapter or other
accessories. These could be provided
from your local specialist supplier.
!
»The connection cables may not be
cutted or short-circuited. Otherwise the
warranty becomes invalid.
»Before the installation please make
sure that your vehicle has the 12 Volt
on-board power supply.
»The minus (-) should be connected
with the ground (GND) (negative).
»Please tag the polarity of the avai-
lable speakers before you disconnect
the vehicle battery.
»A proper grounding of the unit's
housing requires a clean ground
connection. Thus the grounding area
should be rust-, stain- and dust-free.
»Please ground the cable separately
from other heavy current devices such
as an amplier etc.
»Please ensure that the colored cables
are connected according to the wiring
diagram. The wrong wiring may lead to
malfunctions or even damages of the
electric elements of the vehicle.
»Please note that the connection
cables of this unit and of the other
devices may have the same purpose
but the different color. For this reason
while connecting this unit with the
other devices please ensure that both
of the cables in each case have the
same purpose. To connect everything
correctly please refer to the manuals of
the both devices.
Installation

7
EN
Thema:
Installation
»Please ensure that the negative
speaker cable is in each case connected
with the negative speaker terminal of
the ISO port. Do not ever connect the
negative speaker cables with the vehicle
body.
»This unit is designed and construed
for connection with 4 speakers. Do not
combine this unit with devices that are
designed and construed for connection
with 2 speakers.
»The speakers should feature the
impedance of 4-8 Ohm and a sufcient
wattage.
»Please ensure that the speakers you
are connecting with the unit are intact.
Damaged speakers can impair the unit.
»To avoid a short circuit please isolate
all cable junctions and endings of the
unused cables with the electrical tape.
»All the cables should be layed and
xated tidy and properly. The cables
should not contact any movable or hot
objects.
»If your vehicle doesn't have an "ACC"
ignition position, please connect the red
cable with the ignition switch. Other-
wise the unit will not turn off automati-
cally, causing the discharging of the
vehicle battery.
»To avoid a rogue and hazardous
short circuit do not lay the yellow cable
through the engine bay in order to
connect it with the vehicle battery.
»Do not ever connect speaker cables
among one another. In case you do not
want to connect all the 4 speakers with
the unit please isolate the endings of
unused cables with the electrical tape
to prevent a short circuit.
»Do not ever connect the negative
speaker cables with the vehicle body.
»To ensure a awless performance of
the unit the intergration angle should
amount to +/- 30.

8
EN
Thema:
Installation
Operating elements of the unit
1
2
5 6 7
9
A
H
GFEDCB
4
J
I
3 8
1?/MOD/UUnit on or off/Mode
selection/End or reject an incoming call
Press the power button to turn the unit
on. Keep it pressed for ca. 2 seconds to
turn it down.
If the unit is on, press this button to switch
between diverse modes: [Radio],[USB],
[SD], [AUX-IN] and [B lue tooth].
[in telephony mode]: press the button to
end or to reject an incoming call.
21/< Stored radio stations/Play or
pause
[in radio mode]: stored radio station "1".
[in play mode]: starts / pauses the
playback.
3MUTE Mute
Press the button to mute the sound or
to turn the sound on again.
42/INT Stored radio stations/Intro
function
[in radio mode]: stored radio station "2".
[in play mode]: rst 10 seconds play-
back of each track
5BND/AMS/�/AV Frequency band /
Automatic memory channel search
[in radi / Accept or start a call / Switching
Playback Mode
[in radio mode]:
brief press: press the button to switch
between frequency bands: FM1, FM2,
FM3, AM1 or AM2.
long press: starts the automatic
frequency scan and stores the found
radio stations.
[in telephony mode]: press the button to
answer a call.
[in playback mode]: switch between
audio, video or picture viewer mode.
63/RPT Stored radio stations/Repeat

9
EN
Thema:
Installation
[in radio mode]: stored radio station "3".
[in play mode]: repeat playback.
7Change the volume/Audio settings
rotate: Rotate the button clockwise to
boost the loudness and reverse to reduce
the loudness.
brief press: Press the button several
times to switch between following
options: Bass, Treble, Balance, Fader,
Loudness, Equalizer and LED.
Please note that some functions may be
inavailable in your country.
Turn the knob to adjust the options of
the corresponding setting.
[in radio mode]:
long press: press the button for about 2
seconds to switch between RDS settings
[AF], [TA] or [PTY].
87Next track/Frequency band scan
[in play mode]:
brief press: skip to the next track.
long press: fast forward.
[in radio mode]:
brief press: starts the automatic radio
station search forwards.
long press: switches to the manual
frequency scan forwards.
94/RDM Stored radio stations/
Random
[in radio mode]: stored radio station "4".
[in play mode]: random playback
AAUX Auxiliary audio input
3,5 mm jack plug for connection with an
external playback device such as MP3
player, smarthone, tablet PC etc.
BMIC Bluetooth microphone
The microphone is used during hand-
free phone calling via Bluetooth. The
microphone should not be blocked to
achieve the best possible sound quality.
C5/-10 Stored radio stations/10
tracks skip/Previous folder
[in radio mode]: stored radio station "5".
[in play mode]:
brief press: 10 tracks skip backwards.
long press: skip to the previous folder.
D6/+10 Stored radio stations/10
tracks skip/Next folder
[in radio mode]: stored radio station "6".
[in play mode]:
brief press: 10 tracks skip forwards.
long press: skip to the next folder.
E8Previous track/Frequency band
scan
[in play mode]:
brief press: skip to the previous track.
long press: fast rewind.
[in radio mode]:
brief press: starts the automatic radio
station search forwards.
long press: switches to the manual
frequency scan forwards.
FRST Reset
The device can be reset with the
internal button.
Use a pointed object (e.g. a paper clip)
to gently press the button.
GMENU Main menu

10
EN
Thema:
Installation
[in radio mode]: this button takes you
directly to the main menu.
[in play mode]: press the button to
display the playlist.
Press the button several times to go to
a superordinate menu (e.g. folder list).
HDisplay
IMicroSD-Slot
The SD card slot is added for reading
of microSD-cards in following formats:
FAT32 le system.
JUSB-plug
The USB plug is added for reading of
USB ash drives in following formats:
FAT32 or exFAT le system.
Other USB devices such as an
external harddisc can not be supported.
!

11
EN
Thema:
Installation
Important! The USB port is not
designed for charging the smart-
phone via USB cable.
!
AUX input
The AUX input is a 3,5 mm jack plug on
the front operating panel.
Herewith you can connect the unit with
on of the external playback devices:
MP3 player, smartphone, cellphone or
tablet PC.
An adapter cable 3,5 mm jack-to-jack
will be required.
If the external device is connected with
the unit, the playback is audible via car
radio loudspeakers.
The playback control can be achieved
via external device only.
Factory settings
Pressing the FRST button (see page
8) button you can set the unit back to
the factory settings.
Use a pencil or similar to press the
button. After reset the unit shuts down
automatically.
Unit on/off
Press the ?/MOD/Ubutton to turn the
unit on.
If the unit is already on, keep the
button pressed for a couple of seconds
to turn it down.
Insert a SD card
Insert a SD card into the slot with the
label side to the up and the pin side to
the down.
Make sure that the card is intact and
dirt-free.
Insert a USB flash drive
Insert an USB ash drive proper into a
USB plug.
Do not insert any heavy or big USB
ash drives in order not to hit it
accidently - it could cause damages of
the USB plug or USB ash drive.
Micro SD cards and USB ash
drives should have following le-
system format: FAT32. Other types
will not be supported.
i

12
EN
Thema:
Basic functions
Volume
Use for that the rotary button on the
front panel.
Rotate the button clockwise to boost
the loudness and reverse to reduce the
loudness.
Mute
Press the MUTE to mute the playback
or to restore the sound afterwards.
Settings
Press the rotary knob on the front
panel several times to switch between
following settings:
1. Bass settings*
(prompt "BAS/00" on the screen)
2. Treble settings*
(prompt "TRE/00" on the screen)
3. Balance settings
(prompt "BAL/00" on the screen)
4. Fade settings
(prompt "FAD/00" on the screen)
5. Loudness on/off
(prompt "LOUD OFF" on the screen)
6. Equalizer on/off
(prompt "EQ OFF" on the screen)
7. Subwoofer on/off
(prompt "SUB OFF" on the screen)
8. [in radio mode]: Stereo/Mono switch
(prompt "ST" on the screen)
Mode choice
Press the ?/MOD/Ubutton on the
front panel to switch between the
modes: [Radio], [Bluetoot h], [SD],
[USB] and [AUX].
Or press the MENU button in radio
mode to display the selection menu.
Now you can navigate in the menu by
turning the knob.
You can conrm your selection by
pressing the rotary knob.
Example Illustration for USB Mode Selection
Basic functions

13
EN
Thema:
Basic functions
9. Noise when key is pressed on/off
(prompt "BEEP ON" on the screen)
10. [in radio mode]: Set Distance/Local
Sensitivity
(prompt "LOC OFF" on the screen)
As soon as you choose one of the
functions to set, turn the knob on the
front panel.
* If the preset EQ is active, the BASS
and the TREBLE settings can not be
changed - these options are unavailable
in the menu. To change the BASS/
TREBLE settings you have to turn the
EQ preset off rst.
Preset Equalizer
The EQ preset offers a few factory stored
frequency settings, depending on the
musical genre of the current playback: Pop,
Rock, Classic or EQ OFF (EQ preset off).
Loudness
The "Loudness" function boosts BASS
and TREBLE frequencies to achieve more
voluminous sound.
To activate this function: press the knob
on the front panel till you see the prompt
"LOUD-OFF" on the screen.
You can also use for that the knob on the
front panel.
Stereo/Mono
If FM stereo broadcasting is poorly
received, press the knob repeatedly
until "ST-ON" appears on the screen and
change from "Stereo mode" to "Mono
mode".
(When STEREO mode is activated, you
will see the "ST" icon on the display).
Switching the key tone on or off
To switch the key tone on or off, press
the knob several times until "BEEP ON"
appears on the screen.
Turn the knob to activate the key tone.
BEEP OFF" appears on the screen.
LOC Signal Sensitivity
To select the desired preset, press the
knob encoder repeatedly until "LOC-
OFF" appears on the screen.
Turn the knob to toggle between the
presets.
If the LOC function is activated ("LOC"
appears on the display), only local
stations with a strong signal are
searched for during automatic station
search.
If this function is deactivated (no
"LOC" is shown on the display), remote

14
EN
Thema:
Basic functions
stations with a weaker signal will also
be scanned.
RDS Settings
Press and hold the knob on the panel
for about 1-2 seconds to recall the RDS
settings:
AF ON
TA ON
PTY Pty None
Turn the knob to select a specic func-
tion and then press the knob to conrm
the selection.
You can switch the corresponding func-
tion on or off by subsequently turning
the rotary knob.
RDS Functions
The RDS functions AF, TA and PTY are
available.
Please note that these functions are not
available in all countries.
AF function (Alternative Frequency)
The AF function switches automatically
to alternative radio station as soon
as you leave the receiving area of the
current station.
We recommend you to deactivate
this function in-city. Otherwise the
searching starts each time you drive
through the tunnel.
i
TA function (Trafc Announcement)
While this function is activated the unit
switches automatically to the radio
mode for the current trafc announ-
cement. After the announcement it
switches back to the initial mode.
PTY function (Program Type)
The Program Type function allows you
to search for stations of your type.
Program Type designates the classica-
tion of the stations according to catego-
ries: e.g. Pop or news. PTY selection is
one of the standard features of common
RDS receivers.
To activate the PTY function, press and
hold the knob on the panel for about 1-2
seconds until RDS settings appear.
Turn the knob two times clockwise
and press the knob to select the RDS
settings: "PTY Pty None"
Now turn the knob to select further
sections of the PTY function: e.g. Jazz,
Classic, Country, Oldies etc. to search
for stations of this section.
While the search is in progress, the
"SEEK PTY" indicator lights up on the
display.

15
EN
Thema:
Settings menü
Settings menü
Main menu
Press the MENU button in radio mode to
enter the main menu.
Turn the knob to select the setting icon.
Press the knob to enter the settings
menu.
Setting the menu language
Press the knob to select the menu:
"Language tGerman u".
Now turn the knob to switch between
the languages:
German, Italian, Turkish, Polish,
English, Chinese, Spanish, French,
Portuguese and Russian.
The menu will now appear in the
selected language.
Then press the Knob to save the
selected language.
Set date
Turn the rotary knob to reach the line:
"Date 01 - 01 - 2017".
Press the rotary knob to select the day
display: "Date t01 u- 01 - 2017"
a) Turn the Rotary encoder to set the
date.
When the current day is set, press the
Rotary encoder to save.
b) Now turn the knob further clockwise
to view the month display and press the
knob to select the month display:
"Date 01 - t01 u- 2017"
Turn the knob to set the current month.
When the month is set, press the
Rotary encoder to save.
The year is also set in the same way.
Time setting
The time is set according to the same
principle as the date.
Factory default

16
EN
Thema:
Settings menü
Turn the knob to go to the "Factory
default" line.
Press the knob twice to reset the radio
to the factory settings.
Radio area
Turn the knob to get to the line:
"Radio Area Europe".
Press the knob to select the menu.
Now turn the knob to switch between
the radio ranges:
Europe, America 1, America 2 and
Russia.
Then press the knob to save the
selected radio range.
Turn the knob clockwise to scroll to the
second menu page.
LED backlight
Turn the knob to move to the line:
"LED backlight tAUTO u".
Press the knob to select the menu.
Now turn the knob to switch between
the color settings:
AUTO, WHITE, VIOLET, CYAN, YELLOW,
RED, BLUE and GREEN.
When the desired color is set, press the
knob to save the setting.
The setting "AUTO" stands for automatic
colour change: the car radio changes its
lighting colour every 5 seconds.
Steering wheel control
Turn the knob to move to the "SWC"
line.
Press the knob to enter the setting
menu for the steering wheel remote
control.
Please refer to the operating
instructions of your vehicle for
assistance in connecting the steering
wheel remote control.
Turn the knob to select any button on
the screen.
Then press and hold the corresponding
button on the steering wheel remote
control.
Press the knob to assign the button.
The button will be highlighted in light
blue.
Repeat the steps for the other buttons
on your steering wheel.

17
EN
Thema:
Radio mode
Store the found stations
There are 6 memory cells per FM and
AM frequency band.
If the transmitter has been successfully
stored, the memory slot display (1, 2,
etc.) will turn yellow.
AMS Automatic frequency scan
Press long the BND/AMS/�/AV button
to start the automatic frequency scan.
The unit searches automatically for the
radio stations with the strongest signal
and stores them in the memory cells
1-6 per frequency band.
Switch the frequency bands
Press the BND/AMS/�/AV button on
the front panel to switch the frequency
bands between FM1, FM2, FM3, AM1 and
AM2.
AM2
FM1
FM2
FM3
AM1
Radio mode on
To get to Radio mode press the
?/MOD/Ubutton several times till you
see the radio mode on the display.
Automatic station searching
Press the 8or 7button to start the
searching into corresponding direction
on the frequency scale.
Manual station searching
Keep pressed the 8or 7button
for ca. 2 seconds to switch to manual
station searching mode.
Now using the 8and 7buttons you
can search for radio stations stepwise
into corresponding direction on the
frequency scale.
After ca. 5 seconds of inactivity the
unit switchs back to automatic station
searching mode.
Radio mode

18
EN
Thema:
Audio playback mode
front panel to skip 10 tracks backwards
or forwards.
Change folder
Press and hold the 5/-10 or 6/+10
button on the front panel to move to
the previous or next folder.
Intro function
You can activate/deactivate this function by
pressing the 2/INT button on the front
panel: only the rst 10 seconds of each
track will be played.
Repeat track
The 3/RPT button on the front panel
activates/deactivates the repeat function.
If it's on, the current track will be played
repeatedly.
Random playback
The 4/RDM button on the front panel
activates/deactivates the random playback
function. If it's on, all the tracks will be
played randomly.
Audio file overview
You can select a title directly to start
playback.
During playback, press the MENU
button to display the playlist.
Audio playback mode
Switch to playback mode
As soon as you either plug an USB ash
drive or insert a micro SD card the
unit's processor reads the data from the
storage medium and the unit switches
to playback mode.
To get to the USB- or SD- mode
manually press the ?/MOD/Ubutton
several times till the corresponding
operating mode appears on the screen.
Start the playback/pause
The playback starts automatically as
soon as you insert the medium (Disc,
USB ash drive or SD card) or switch to
one of these modes.
The playback can be paused/resumed
via 1/<button on the front panel.
Skip track for-/backwards
To skip to the previous/next track press
briey the 8/ 7button either on the
front panel.
Rewind / fast-forward
Hold the 8/ 7button pressed till you
get to the required passage. Then release
the button, the playback resumes.
10 tracks skip for-/backwards
Press the 5/-10 / 6/+10 button on the

19
EN
Thema:
Video playback mode
Turn the knob to scroll up or down the
list. Then press the knob to select a
track and start playback.
Audio folder overview
During playback, press the MENU button to
display the playlist.
Now press the MENU button several times
to go to the folder overview.
Turn the knob to scroll up or down the folder
list. Then press the knob to select a folder.
Then press the knob to select a specic
music title and start playback.
ID3 tag (song/interpreter/album)
The "ID3 tag" function allows to view
the additional track information, e.g.
name of the current song/of an artist/of
an album.
This function is available only during the
MP3 les playback; the tags should be
stored in these les rst.
Video playback mode
Switch to video playback mode
Press the BND/AMS/�/AV button
to enter the video playback mode
manually.
Start the playback/pause
The playback can be paused/resumed
via 1/<button on the front panel.
Skip track for-/backwards
To skip to the previous/next track press
briey the 8/ 7button either on the
front panel.
Rewind / fast-forward
Hold the 8/ 7button pressed till you
get to the required passage. Then release
the button, the playback resumes.
Repeat video file
Press the 3/RPT button to activates/deac-

20
EN
Thema:
Pictures file diashow
tivates the repeat function. If it's on, the
current track will be played repeatedly.
Random playback
Press the 4/RDM button to activates/deac-
tivates the random playback function. If it's
on, all the tracks will be played randomly.
Video file overview
You can select a video le directly to
start playback.
During playback, press the MENU
button to display the playlist.
Turn the knob to scroll up or down the
list. Then press the knob to select a
video le and start playback.
Audio folder overview
During playback, press the MENU button to
display the playlist.
Now press the MENU button several times
to go to the folder overview.
Turn the knob to scroll up or down the folder
list. Then press the knob to select a folder.
Then press the knob to select a specic
video le and start playback.
Pictures file diashow
Switch to picture diashow
Press the BND/AMS/�/AV button
to enter the pictures le diashow
manually.
Start the diashow and pause
The playback can be paused/resumed
via 1/<button on the front panel.
Skip picture for-/backwards
To skip to the previous/next picture press
briey the 8/ 7button either on the
front panel.
Pictures file overview
You can select a picture le directly to
start diashow.
During playback, press the MENU
button to display the playlist.
Turn the knob to scroll up or down the
list. Then press the knob to select a
picture le and start diashow.
Pictures folder overview
During playback, press the MENU button to
display the playlist.
Now press the MENU button several times
to go to the folder overview.
Turn the knob to scroll up or down the folder
list. Then press the knob to select a folder.
Then press the knob to select a specic
picture le and start playback.
Table of contents
Other Xomax Car Stereo System manuals

Xomax
Xomax XM-RT284 User manual

Xomax
Xomax XM-RSU25 Series User manual

Xomax
Xomax XM-2CD613 User manual

Xomax
Xomax XM-R265 User manual

Xomax
Xomax XM-R281 User manual

Xomax
Xomax 2DTSBN6000 User manual

Xomax
Xomax XM-RD275 User manual

Xomax
Xomax XM-RD283 User manual

Xomax
Xomax XM-R282 User manual

Xomax
Xomax XM-DTSB913 Installation instructions