Xoro MTA 65 Series User manual

MTA 50
MTA 65 Serie
MTA 80 Serie
INSTALLATION MANUEL

1

TABLE OF CONTENTS
Page
GENERAL.....................................................................................................................3
IMPORTANT SAFETY INSTRUCTIONS .................................................................3
PACKING LIST ............................................................................................................4
USAGE..........................................................................................................................4
EXEMPTIONS ..............................................................................................................5
CABLE ENTRY PLATE CONNECTIONS................................................................5
INSTALLATION MANUAL.........................................................................................6
THE CASES THAT SHOULD BE CONSIDERED ..................................................6
INSTALLATION...........................................................................................................7

3
We thank you for purchasing Vehicle Satellite Receiver System.
GENERAL
Motosat (Vehicle Satellite Receiver System) is designed to be used for receiving and
watching satellite broadcasting in road vehicles like passenger, coaches, caravans,
minibuses, trucks and lorries while these vehicles are at park position.
IMPORTANT SAFETY INSTRUCTIONS
Do not open the cover of the unit. No user-serviceable parts inside. To open the covers
cancels the guarantee of the unit. Refer to authorized technical service.
Installation of the system should be done by authorized technical service. Installation
made by unauthorized person cancels the guarantee. Such a case is also risky for
safety of lives and vehicle.
There is a “CONTACT” input in the Controlbox. This input should be connected to a
supply voltage. When motor of the vehicle is switched on, system detects it and shuts
down antenna and the receiver unit switches off itself automatically.
This system is not suitable for using while the vehicle in motion. Using during drive may
cause damage to the vehicle as well as it will be dangerous for life safety.
The system shuts down itself and closes the antenna automatically when the vehicle is
operated, but checking on whether the antenna is closed or not, before moving, is
important for a safe journey.
The Controlbox is designed for installing into the dashboard of the vehicle. If dashboard
installation is not possible, while determining the installation place of the controlbox,
make sure that the heat is not very high. Over heat may cause dangerous situations.
If the antenna is covered by snow or ice, do not operate the system. That kind of usage
may cause permanent damages to the system.
Do not connect any unapproved equipment to prevent your unit against a permanent
damage or danger.
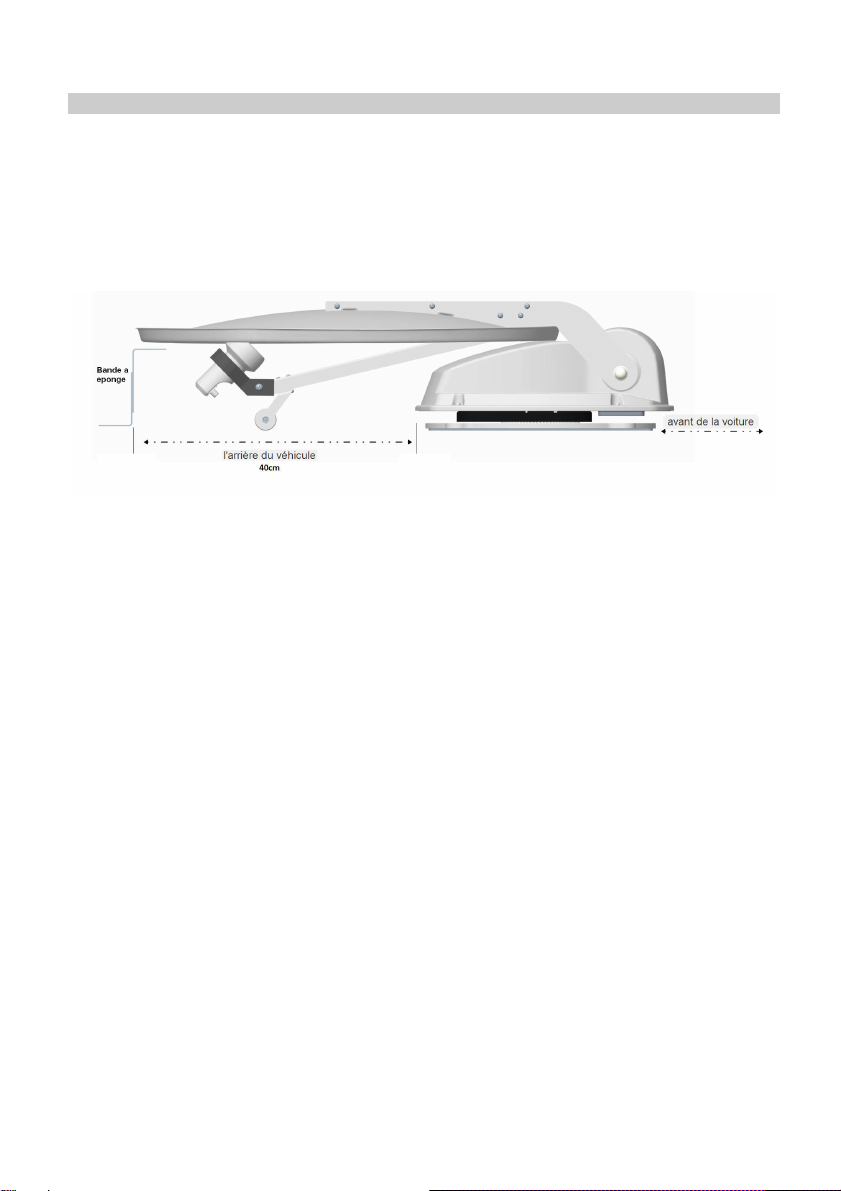
The antenna part of the system, which is installed on top of the vehicle, causes a height
on the vehicle. Make sure that this height will not cause any risk while cruising you’re
your vehicle. It is very important that to be aware of this height for safety while crossing
a bridge, crossover or wooded road.
Official actions in accordance with legislations about the antenna part of the system,
which is mounted top of the vehicle, are under user responsibility.

PACKING LIST
1) Motosat Dish
2)
Motor- assembly, with connected junction box
3)
2,5 mt. Motor control cable
4)
2,5 mt. RG6-U-6 LNB cable
5)
Self-adhesive foam band
6) Motosat Dish Installation Manual
USAGE
Operating the system;
First be sure all the connections between antenna system, Controlbox and receiver to
the loopout port of Controlbox are connected properly.
Press “ ” button on the front panel of the Control panel The LED on the front panel will
turn on and the system will start to operate.
When the system is operated, firstly the antenna is opened and starts to search the
selected satellite. The satellite search is completed in about 25 seconds. After the
satellite is found, the system defines the most suitable antenna position by making fine-
tuning and stops.
After the satellite is found, the signal will be available on the receiver which is connected
to the loop out port of Controlbox and the channels on the receiver can be watched.
Turn off the system;
To turn off the system press “ ” button on the front panel of the Controlbox, if the
antenna is open it starts to close automatically. The system goes on operating until the
antenna is closed. The system turns off after closing the antenna.
When the antenna system is totally closed, all the LED indicators will be turned off on
the Control panel.
There shouldn’t be any physical obstruction between the antenna and satellite. Tall
buildings on the roadside, mountains, trees, crossovers, bridges and similar barriers
may block to reach the satellite signals to the antenna partly or completely.
The signal receiving performance of the system may decrease during heavy rainfall or
snowfall. It also happens if the antenna is covered by snow. In such case, remove
gently the snow off the dish.

5
EXEMPTIONS
We are not liable for:
1. Damage caused by fires, natural disaster (such as thunder, earthquake, etc.), acts
by third party, accidents, misuse, or use in other improper conditions.
2. Incidental damages (such as profit loss or interruption to business, modification or
erasure of data and so forth) caused by use or inability to use of this product.
3. Damage caused by neglect of instructions as described in the operating manual.
4. Damage caused by misuse or malfunction through simultaneous use of this product
and other connected equipment.
CABLE ENTRY PLATE CONNECTIONS
1. Connect the antenna cable (No.1) from LNB and the antenna cable (No.2) from
Controlbox antenna input to each other by using F connectors.
2. Connect motor cable female connector with 8 taps on the rear panel of the
Controlbox and the junction box to the each other with the power cable. (YSLY-
J 8x0.5mm²)
3. Connect motor control cable (No.3) from the antenna to the motor cable (No.4)
coming from the Controlbox with the connector terminals.
4. Fix the plastic guard on the motor cable by pushing towards the junction box,
after the connector connections are completed.
5. Lead the cable gland through the motor cable and fix it until the gasket is
tightened.

INSTALLATION MANUAL
THE CASES THAT SHOULD BE CONSIDERED
Make sure that there are no physical obstacles on the vehicle that prevent watching the
satellites and motion of the dish, when choosing the installation place of the antenna.
Installation place should be smooth and plain surface and on the centerline according to
the vehicle width.
While doing installation at rough surfaces, the bottoms of the installation holes should be
supported. Otherwise, the bottom plate may bend. Such a case may cause some
technical problems.
Make sure that the installation base is a rigid surface and it never stretches.

7
INSTALLATION
1. Before installing the system, make sure that the place is dry and clean, on which the
antenna will be mounted.
2. It is important that the closing direction of the antenna should be towards back of
the vehicle. In this position, the wind effect is at the minimum level during the driving
of the vehicle when the antenna is closed.
3. Depending on the requirements; two different motor unit installation method can be
used.
a. Fixing with bold; align the dish holes with rivets on the mounting bracket
and place the dish onto the mounting bracket. Screw forepart of the dish to
mounting bracket with M6x10 screws. Use silicon to isolate the tighten
screws.
b. Fixing with bonding: Lead up the mounting surface and motor unit base
plate according the adhesive. Fix the motor unit by bonding it to the
mounting surface.
4. Stick the foam band 40cm far away from the rear-middle axis of the antenna, after
thoroughly cleaning the mounting area of the base plate.
5. Get the antenna and motor cables into the vehicle properly. This process should be
done suitably for interior structure of the vehicle.
6. Position the Controlbox close to TV at the inside of the vehicle. Antenna cable is
connected between the antenna input of the Controlbox and the junction box.
7. Connect the TV to the satellite receiver with RCA cable. The ground connection of
the RCA cable should be good; otherwise some noise may occur on audio and
video signal. If required, connecting the satellite receiver to the vehicle ground with
a short cable.
8. Connect 12-24 V DC supply voltage to the input of the Controlbox by a thermal fuse
and connect the “CONTACT” input to the supply that comes from the contact of the
vehicle.


9


TECHNICAL SPECIFICATIONS
Antenna motion: Two axis; azimuth and elevation
Satellite search: Automatic at stationary position only
Connection: Via two cables (Control and LNB)
Azimuth moving range: 0° ~ 380° limited
Azimuth moving speed: 15°/second
Elevation moving range: 0° ~ 90°
Elevation moving speed: 10°/second
Operating voltage: 12-24V DC
Operating power consumption: 30W
Dimensions (in closed position): 82cm x 104cm x 21cm (width x length x height)
Packed dimensions: 83cm x 105cm x 23cm (width x length x height)
Weight: 15 kg
Packed weight: 18 kg
Storage temperature: -30°C ~ +70°C
Operating temperature: -15°C ~ +50°C
Operating relative humidity range: 0 ~ 98 %
The manufacturer reserves the right to change specifications without notice.
H7434_V1
05.11.2015
This manual suits for next models
2
Table of contents
Other Xoro Antenna manuals
Popular Antenna manuals by other brands

Antenna Pros
Antenna Pros AX-912 manual

MaxEnergy
MaxEnergy MAXS01 301-0030 user guide

RCA
RCA ANT1275E quick start guide

TERK Technologies
TERK Technologies AM/FM Tower Powered Indoor Antenna owner's manual

Andrew
Andrew ATC200-Lite Teletilt Installation and operation user guide

Evolveo
Evolveo Xany 1 quick start guide