XOXO Modular MIDIXO Installation and operating instructions

MIDIXO
Operation Manual
&
Installation Guide
Manual Version 1.2
Module Version 1.4 & 1.5

INTRODUCTION..................................................................................................................................2
MIDI TRS? ............................................................................................................................................2
PANEL LAYOUT...................................................................................................................................3
INSTALLATION & OPERATION.........................................................................................................3
MODE 1: STANDALONE TRS MIDI A/B CONVERTER..............................................................4
MODE 2: TRS MIDI BREAKOUT FOR EXPERT SLEEPERS* MODULES.................................5
MODE 1+2: DISTING MK4 WITH THRU MIDI............................................................................5
MODE 3: DUAL TRS MIDI A/B TO MIDI ......................................................................................6
FREQUENTLY ASKED QUESTIONS.................................................................................................7
TECHNICAL SPECIFICATIONS.........................................................................................................8
LIMITED WARRANTY.........................................................................................................................8
SUPPORT .............................................................................................................................................8

2
INTRODUCTION
MIDIXO is a TRS MIDI Swiss Army Knife for your Eurorack synth. It's a simple, functional
utility module that can help you use MIDI over 3.5mm stereo cables in one of several
ways, depending on how its jumpers are configured:
At its simplest, MIDIXO can serve as a TRS MIDI A/B converter, allowing devices from
manufacturers that use TRS MIDI "Type A" (eg: Make Noise, Korg, Akai) to talk with
devices from manufacturers that use TRS MIDI "Type B" jacks (eg: Arturia, Malekko,
Novation, Pittsburgh).
MIDIXO is friends with some excellent Expert Sleepers* modules. By using the included 4-
pin ribbon cable, MIDIXO can serve as a TRS MIDI breakout for disting mk4, FH-2, or
General CV modules. The input and output jacks are each independently switchable to
allow maximum compatibility with your other gear. MIDIXO is best-est friends with disting
mk4. If you turn on "MIDI Thru" in disting's settings, MIDIXO will function as its MIDI
breakout when you're using algorithms that accept or generate MIDI. When you're in any
"non-MIDI" disting algorithms, MIDIXO goes back to being a TRS MIDI A/B converter –
without having to reconfigure the jumpers. Thanks, Expert Sleepers*!
Finally, you can pair MIDIXO with the Expert Sleepers* MIDI breakout – again using the
included 4 pin ribbon cable – to have two independent TRS MIDI / MIDI 5-pin DIN
converters!
MIDI TRS?
For as long as we can remember, MIDI has travelled over 5-pin DIN cables. Recently,
manufacturers of Eurorack-compatible gear have wanted to move to the slimmer, more
familiar, 3.5 mm cabling that we all know and love. But without a standard to guide them,
each manufacturer seems to have flipped a coin when deciding which part of the cable’s
insides would be which. This has left us with two kinds of MIDI over 3.5 mm TRS cables:
MIDI TRS A and MIDI TRS B. If you’ve got gear from Make Noise, Akai, or Korg, it works
one way. Novation and Arturia do it the other way. Etcetera. The solution, so far, has
involved using the MIDI dongles that come with your gear, leaving you with a chain of
cables that looks something like this:
MIDIXO gets rid of the MIDI-middlemen and allows you to directly connect any device
with a 3.5 mm MIDI jack to any other device with a 3.5 mm MIDI jack.

3
PANEL LAYOUT
INSTALLATION & OPERATION
The module works in one of several ways, depending on how its jumpers are set.
For a short visual explanation of the different modes and how to configure MIDIXO for
each mode, see this video: https://youtu.be/cuk8IXdVqC8
They are also described, in more depth, on the next few pages.

4
MODE 1: STANDALONE TRS MIDI A/B CONVERTER
Let’s say you get the bright idea to connect the MIDI output of your Arturia Beatstep Pro
to the MIDI input of your Make Noise 0-Coast using a regular old 3.5 mm stereo cable.
Could work. Should work. Won’t work. But, putting MIDIXO between the two devices
allows you to crisscross the pins inside the cable, allowing the two to talk to each other
without any trouble. (And without having to resort to two clunky dongles and a MIDI 5-pin
DIN cable).
To install the module for this mode:
1. Install all 3 jumpers on the printed circuit board.
2. Do not connect the 4-pin ribbon cable.
To operate the module in this mode:
1. Plug a stereo audio cable from your device’s MIDI output to the module’s input jack.
2. Plug a separate stereo cable from the module’s output to the MIDI input of your
other device.
3. Set each of the module’s two switches to different positions to perform conversion
from A to B (or vice versa – it works either way).

5
MODE 2: TRS MIDI BREAKOUT FOR EXPERT SLEEPERS* MODULES
Way cooler than the above, is the fact that MIDIXO can serve as a TRS MIDI breakout for
an Expert Sleepers* disting mk4, disting EX, FH-2, or General CV module.
To install the module for this mode:
1. Use the supplied 4-pin ribbon cable to connect the two modules. (The Expert
Sleepers* module will have a 4-pin connector labeled either GT2 or GT3 – check
your module’s manual.) Note which color is connected to pin 1 on MIDIXO and
make sure that same color is connected to pin 1 on your Expert Sleepers* module.
2. Make sure all 3 jumpers on the printed circuit board are disconnected. You can do
this by making sure each jumper is connected to only one of its corresponding pins.
Or you can remove the jumpers completely from the board. (Don’t lose the jumpers
– they’re smaller than the common size that you’ve probably got hanging around.)
To operate the module in this mode:
1. Check your module’s manual to see what its capabilities are, with respect to
sending and receiving MIDI.
2. To send MIDI to your Expert Sleepers* module, plug a stereo audio cable from your
device’s MIDI output to MIDIXO’s input jack
3. To get MIDI out of your Expert Sleepers* module, plug a stereo cable from
MIDIXO’s output jack to the MIDI input of your other device.
In this mode, the switches have no relationship with each other: the input switch affects
the input jack and the output switch affects the output jack.
MODE 1+2: DISTING MK4 WITH THRU MIDI
Modes 1 and 2 above are mutually exclusive, depending on how you’ve set the jumpers.
But, if you own a disting mk4 or EX, MIDIXO can do everything described above – without
changing any jumpers. Just turn on “Thru Midi” in your disting’s settings.
After that, MIDIXO will function as described in Mode 2 above whenever you’re using a
disting algorithm that accepts or generates MIDI data. When you’re using any other
disting algorithm, MIDIXO works as described in Mode 1 (ie: as a converter for two pieces
of gear that have trouble being TRS friends.) Thanks, Expert Sleepers*!
Note that MIDIXO will also work as a TRS MIDI breakout for the Melisma by SDS Digital
& K. Since the pinout is different, you will need to rearrange the connectors in the 4-pin
ribbon cable supplied with MIDIXO. Since the headers on the Melisma (and disting) are
optically isolated, there is no harm in getting the order of the wires wrong.

6
MODE 3: DUAL TRS MIDI A/B TO MIDI
Finally, you can pair MIDIXO with an Expert Sleepers* MIDI breakout, to gain two
independent TRS independent TRS MIDI / MIDI 5-pin DIN converters. Thanks to LPZW for
noticing that this is possible!
To install the module for this mode:
1. Use the supplied 4-pin ribbon cable to connect MIDIXO to the GT1 header on your
Expert Sleepers* MIDI Breakout. Note which color is connected to pin 1 on MIDIXO
and make sure that same color is connected to pin 1 on the MIDI breakout.
2. Make sure all 3 jumpers on the printed circuit board are disconnected. You can do
this by making sure each jumper is connected to only one of its corresponding
pins. Or you can remove the jumpers completely from the board. (Don’t lose the
jumpers – they’re smaller than the common size that you’ve probably got hanging
around.)
To operate the module in this mode:
1. Plug a stereo audio cable into the upper jack on MIDIXO
2. Plug a MIDI 5-pin DIN cable into the upper jack on your Expert Sleepers* MIDI
breakout.
3. Toggle the upper switch to accommodate TRS A or B, as needed.
That's it. MIDI that goes through the 5-pin DIN cable will come out of the TRS cable. Or,
you can send MIDI through the TRS cable, and it will come out of the 5-pin DIN cable. The
lower jacks and switches work the same way, and are totally independent of the upper
half of the module, so you can convert two separate MIDI signals between TRS and 5-pin
DIN at once.

7
FREQUENTLY ASKED QUESTIONS
Q: The Internet says that there
is
a standard for the use of TRS connectors with MIDI
A: Yes, the MIDI Manufacturers Association approved a standard in 2018. Unfortunately,
we all have gear that was made before the standard, which is why the MIDIXO module
exists. It’s worth noting that the specification says that 2.5 mm connectors are preferred
over 3.5 mm. It also says that standard stereo audio cables should not be used because
the wires are not in twisted pairs, and are individually shielded. In practice, people use
regular audio cables (as we’ve suggested) without problems. Keeping the length of the
cables as short as possible is not a bad idea.
Q: Is there a list of which manufacturers' devices are compatible/incompatible?
A: This crowd-sourced list is pretty comprehensive, and still growing:
https://muffwiggler.com/forum/viewtopic.php?p=2620781
Q: I followed the instructions for using the module in Mode X, but my devices still aren’t
talking to each other. Why no?
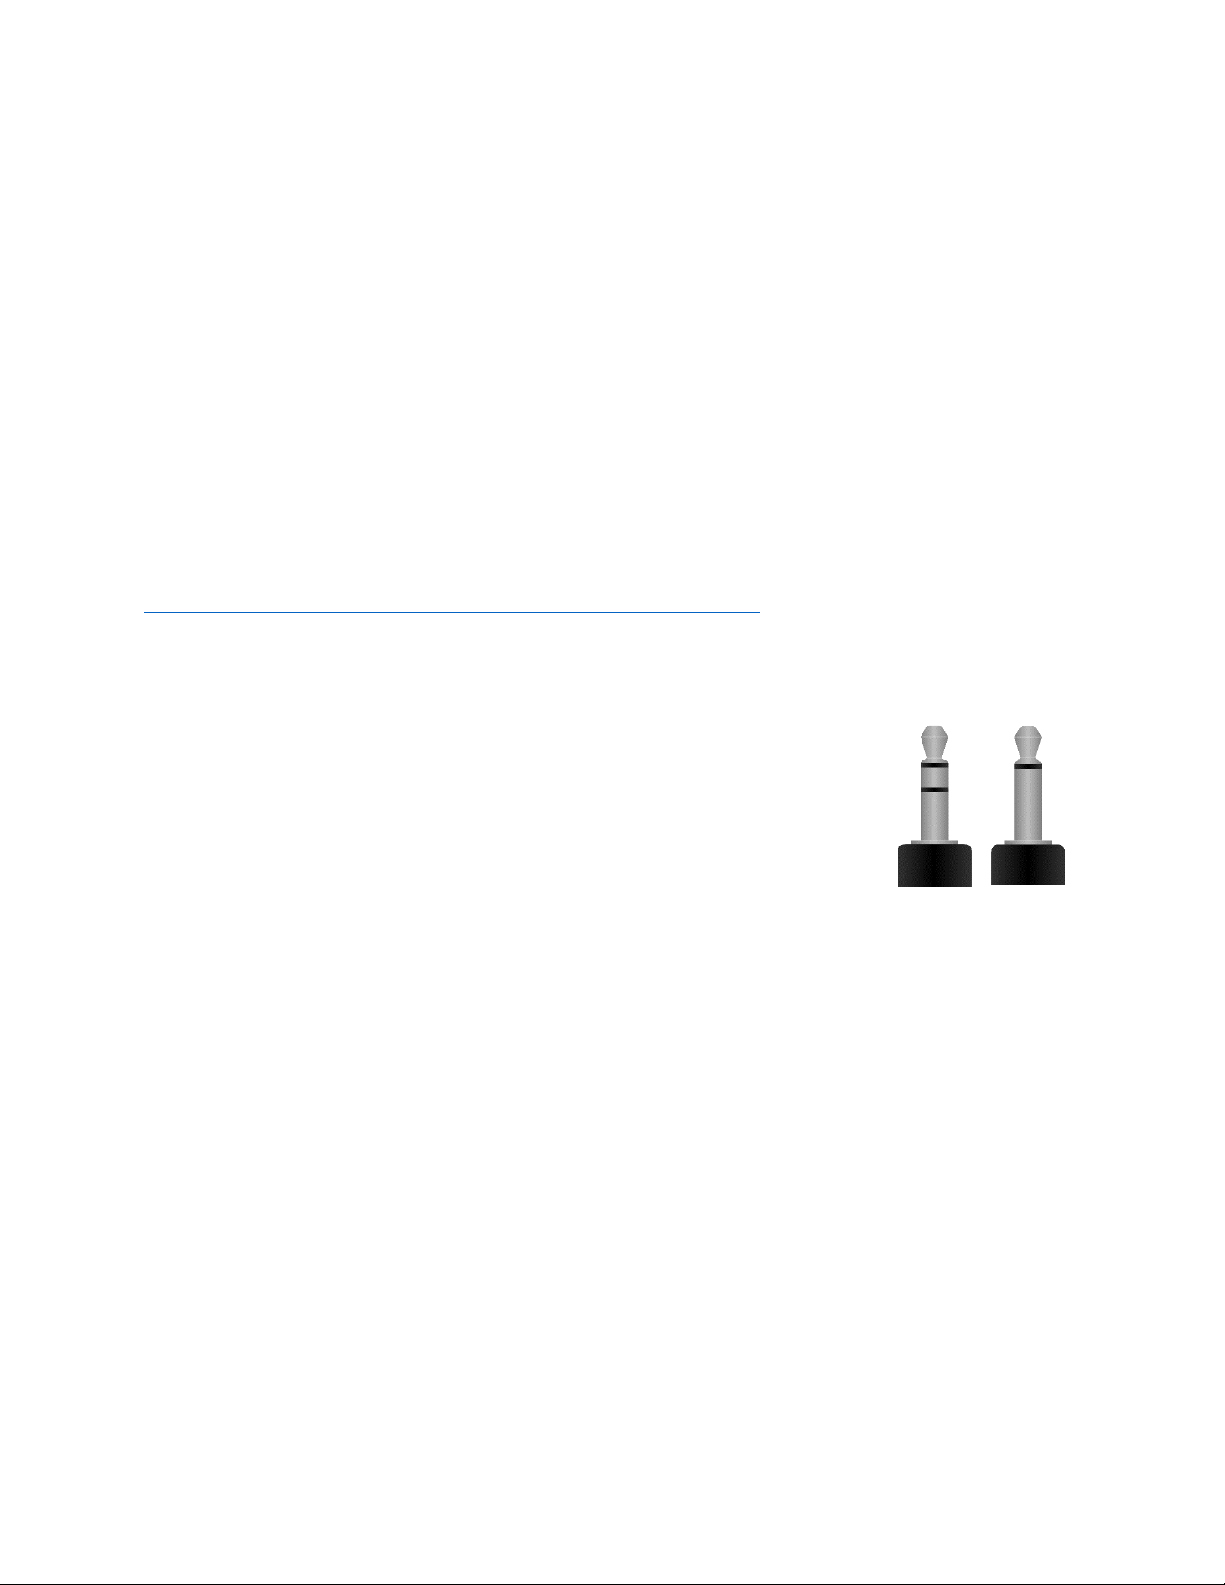
A: First, make sure you’re using a stereo cable. Your regular mono
patch cables won’t cut it. Make sure the cable ends look like the one
on the left, not the one on the right.
If that’s not it, double check that all three of the jumpers are in place or
that they're all removed (depending on the instructions for that mode.)
Q: I’m trying to use MIDIXO with my Expert Sleepers* module and it’s not working.
Where do I start troubleshooting?
A: First, make sure that none of the three jumpers are in place. Then, make sure the 4-pin
cable is in place. If both of those check out, the next step is to take a look at the MIDI
section of your Expert Sleepers* manual. Make sure that you’re not expecting the module
to respond to MIDI in a way that it’s not designed to. Finally, try another MIDI device to
see if you still have trouble. If you find that the problem is related to a particular piece of
gear, it may be that it’s configured wrong, that it uses strange voltages on its MIDI ports,
or that it’s the rare, rumored unicorn that corresponds to neither MIDI TRS A nor TRS B.
Q: What’s the difference in versions of MIDIXO?
A: MIDIXO Model 92½ has a laser engraved aluminum front panel. Model 92¾ has a black
& gold FR4 panel (think Make Noise). The two versions of the PCB (1.4 and 1.5) differ only
in their place of manufacture: the functionality is the same.

8
TECHNICAL SPECIFICATIONS
MIDIXO is designed to be used in a Eurorack-compatible case. It is a passive module and
does not require a Eurorack power supply or a connection to your bus board.
Width 2hp
Depth 17 mm
Current Draw Zero
Included are two M3 x 0.5 mm stainless steel pan-head screws, three 2 mm jumpers, and
one 4-pin cable (4 in. length) for connecting to a module with a compatible MIDI header.
Solder, jumpers, printed circuit board and all its attached electronic components are
certified RoHS compliant. Packaging for MIDIXO Model 92¾ is made of all recycled or
reclaimed materials.
LIMITED WARRANTY
From the date of manufacture this device is guaranteed for a period of 1 year against any
manufacturing or material defects. Any such defects will be repaired or replaced at the
discretion of XOXO Modular. This does not apply to damage caused by misuse or
physical mistreatment.
No responsibility or liability is implied or accepted for harm to person or apparatus
caused through operation of this product, or for any errors or inaccuracies that may
appear in this document.
By using this product you agree to these terms.
SUPPORT
Any support information about this module can be found at http://xoxomodular.com
Email info@xoxomodular.com with questions, feedback, or because a 2mm jumper got
lost in your high-pile carpet.
* While MIDIXO is compatible with the Expert Sleepers modules described above, Expert
Sleepers does not manufacture or provide support for this module. Thank you to os for his
consent and encouragement, and for making some amazing hardware and software.
Table of contents
Popular Media Converter manuals by other brands

TDK-Lambda
TDK-Lambda EZA 2500 - 32048 installation manual

Hirschmann
Hirschmann OZDV 2471 P Technical description and operating instructions

Compunicate
Compunicate em800 user manual

Bose
Bose FreeSpace 6 Technical specifications

C&C TECHNIC
C&C TECHNIC HIT-3MF3HDMI-641RIPRO user manual

Ltech
Ltech LT-905 instruction manual