Xpress D2.1 User manual

D2.1
Digital 2.1 Channel Amplifier
User Guide

2
• Explanation of Graphical Symbols
The lightning flash with arrowhead symbol, within an equilateral triangle, is
intended to alert you to the presence of uninsulated “dangerous voltage” within
the product’s enclosure that may be of sufficient magnitude to constitute a risk of
electric shock to persons.
The exclamation point within an equilateral triangle is intended to alert you to the
presence of important operating and maintenance (servicing) instructions in the
literature accompanying the product.
APPLICABLE FOR USA, CANADA OR WHERE
APPROVED FOR USAGE
CAUTION: TO PREVENT ELECTRIC SHOCK,
MATCH WIDE BLADE PLUG TO WIDE SLOT,
INSERT FULLY.
ATTENTION: POUR EVITER LES CHOCS
ELECTRIQUES, INTRODUIRE LA LAME
LA PLUS LARGE DE LA FICHE DANS LA
BORNE CORRESPONDANTE DE LA PRISE ET
POUSSER JUSQU AU FOND.
RISK OF ELECTRIC SHOCK
DO NOT OPEN
RISQUE DE CHOQUE ÉLECTRIQUE
N'OUVREZ PAS
CAUTION: To reduce the risk of electric shock, do not remove cover (or back).
No user-serviceable parts inside. Refer servicing to qualified service personnel.
1. Read these instructions.
2. Keep these instructions.
3. Heed all warnings.
4. Follow all instructions.
5. Do not use this apparatus near water.
6. Clean only with a dry cloth.
7. Do not block any ventilation openings. Install in accordance with the manufacturer’s instructions.
8. Do not install near any heat sources such as radiators, heat registers, stoves, or other apparatus (including amplifiers) that produce heat.
9. Do not defeat the safety purpose of the polarized or grounding-type plug. A polarized plug has two blades with one wider than the other. A grounding-type plug has
two blades and a third grounding prong. The wide blade or the third prong are provided for your safety. If the provided plug does not fit into your outlet, consult an
electrician for replacement of the obsolete outlet.
10. Protect the power cord from being walked on or pinched particularly at plugs, convenience receptacles, and the point where they exit from the apparatus.
11. Only use attachments/accessories specified by the manufacturer.
12. Use only with the cart, stand, tripod, bracket, or table specified by the manufacturer, or sold with the apparatus. When a cart is used, use caution when moving the
cart/apparatus combination to avoid injury from tip-over.
13. Unplug this apparatus during lightning storms or when unused for long periods of time.
14. Refer all servicing to qualified service personnel. Servicing is required when the apparatus has been damaged in any way, such as power-supply cord or plug is
damaged, liquid has been spilled or objects have fallen into the apparatus, the apparatus has been exposed to rain or moisture, does not operate normally, or has been
dropped.
15. The apparatus shall not be exposed to dripping or splashing and that no objects filled with liquids, such as vases, shall be placed on the apparatus.
16. CAUTION: Servicing instructions are for use by qualified service personnel only. To reduce the risk of electric shock, do not perform any servicing other than that
contained in the operating instructions unless you are qualified to do so.
17. WARNING: To reduce the risk of fire or electric shock, do not expose this apparatus to rain or moisture.
18. Where an appliance coupler is used as the disconnect device, the disconnect device shall remain readily operable.
19. CAUTION: Danger of explosion if battery is incorrectly replaced. Replace only with the same or equivalent type.
PORTABLE CART WARNING
Important Safety Instructions

3
Table of Contents
Important Safety Instructions ..................................................................................................2
Introduction................................................................................................................................ 4
Features.........................................................................................................................................................5
What’s Included...........................................................................................................................................5
D2.1 Inputs & Outputs............................................................................................................... 6
D2.1 Side Vents.......................................................................................................................... 7
D2.1 IR Remote .......................................................................................................................... 8
Installation ................................................................................................................................. 9
Shelf Mount ..................................................................................................................................................9
Wall Mount....................................................................................................................................................9
Connections.............................................................................................................................. 10
Optical In (TV Audio Connection) ......................................................................................................... 11
Sub Out (Bxa100 Subwoofer Amp Connection).............................................................................. 11
L- L+ R- R+ (Speaker Connections)..................................................................................................... 11
Line In (Auxiliary Audio Source)............................................................................................................ 11
Receiver In (Bluetooth Audio Streaming & Amplifier Setup)....................................................... 11
Ac Power Terminal (100-240V-50/60Hz 2.5A).............................................................................. 11
Operation.................................................................................................................................. 12
On/Off ......................................................................................................................................................... 12
Volume ........................................................................................................................................................ 12
Mute............................................................................................................................................................. 12
Eq.................................................................................................................................................................. 12
Source Select............................................................................................................................................. 12
Xpress Bluetooth Module........................................................................................................ 13
Pairing A Bluetooth Device ................................................................................................................... 13
Bluetooth Transport Functions............................................................................................................ 13
IR Learning ............................................................................................................................... 14
To Enter Learning Mode......................................................................................................................... 14
Power .......................................................................................................................................................... 14
Volume Up.................................................................................................................................................. 14
Volume Down............................................................................................................................................ 14
Mute............................................................................................................................................................. 14
Input Select................................................................................................................................................ 15
To Exit Learning Mode ............................................................................................................................ 15
To Clear All Learned Commands.......................................................................................................... 15
Factory Reset ........................................................................................................................... 15
Specifications........................................................................................................................... 16
Audio............................................................................................................................................................ 16
General........................................................................................................................................................ 16
Limited Warranty..................................................................................................................... 17

4
Introduction
Congratulations and thank you for purchasing the Xpress D2.1, Digital 2.1 channel audio
amplifier!
The compact size and advanced design of the D2.1 deliver a whole lot more than just great,
powerful, clear audio in a small package. The D2.1 delivers a true 50 Watts at 8 Ohms, making
it the perfect companion for all Xpress in ceiling and in wall speakers. Though we’d rather that
you used our speakers, the D2.1 will also team up nicely with other branded speakers...when
those situations are just unavoidable.
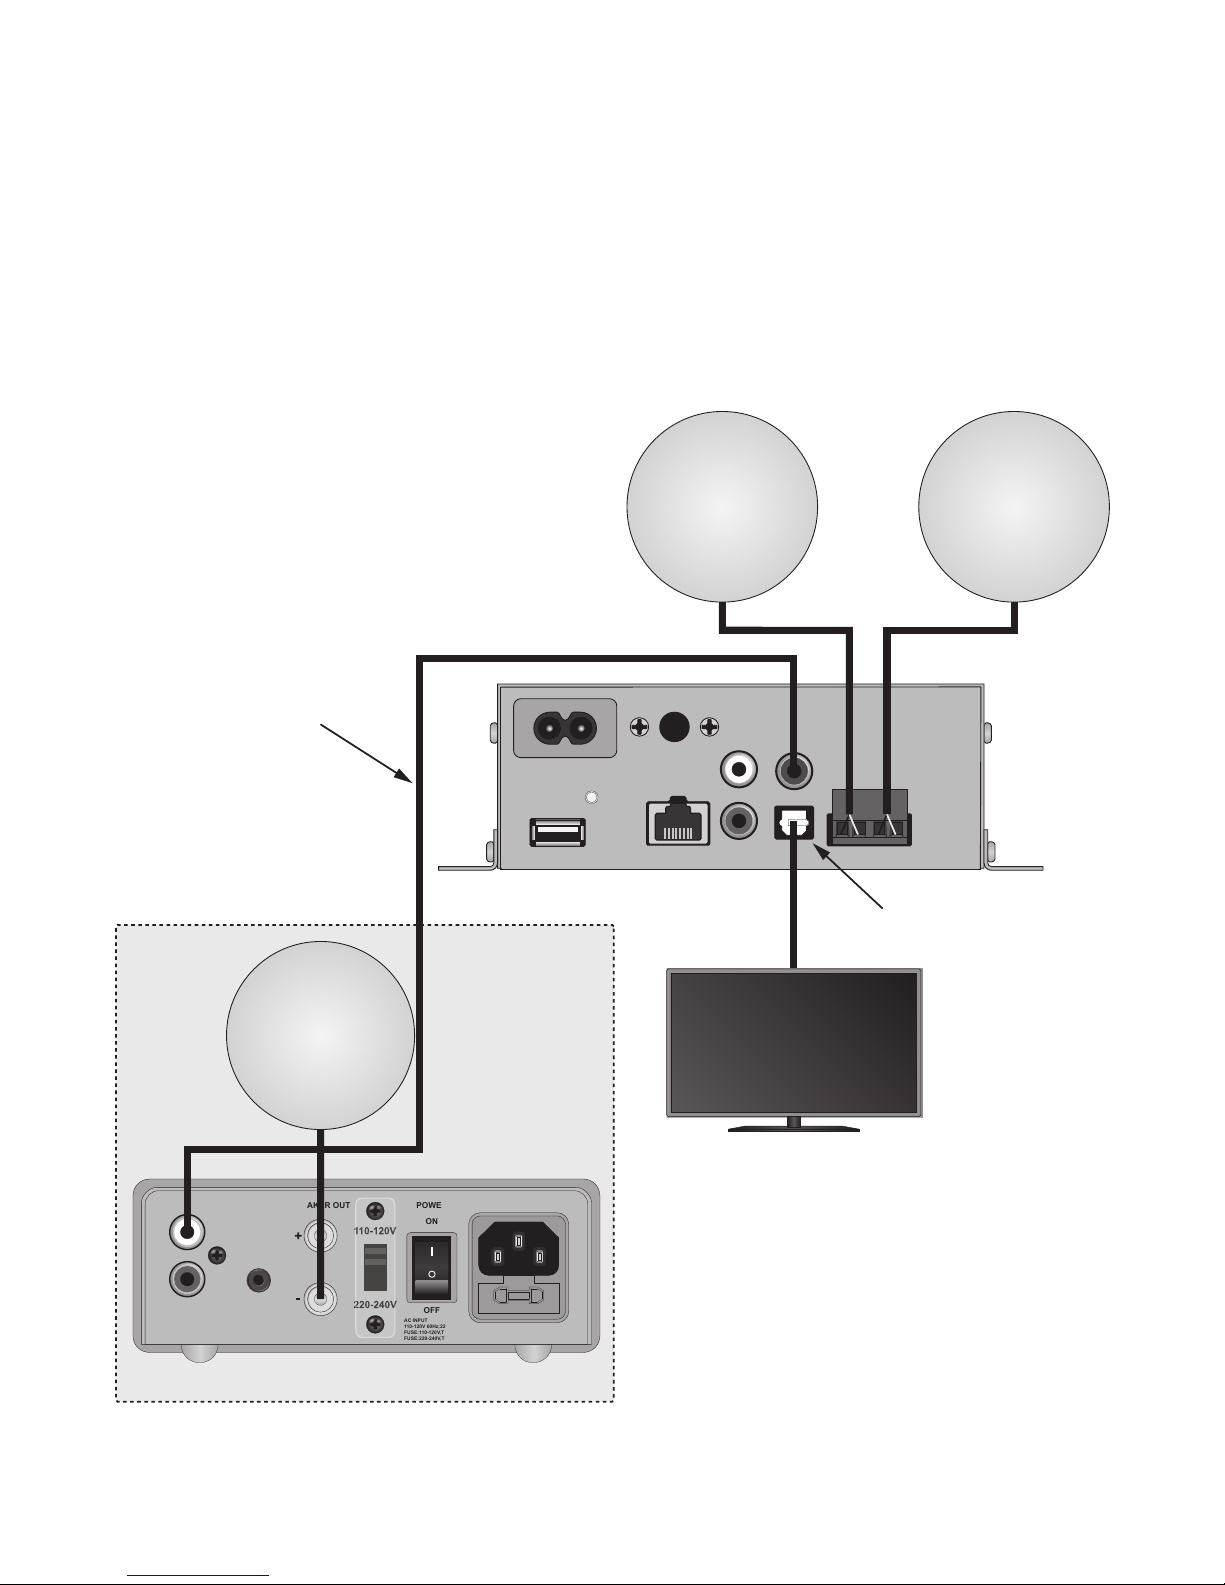
Are you a bass freak? If so, the D2.1 has a line level subwoofer output that can be used to
drive an Xpress subwoofer amplifier and subwoofer for additional bass extension and pres-
ence. (Of course, if you have to, you can use other branded amps and subs, but c’mon...Get
Beale!)
Beyond all of the great audio amplification and subwoofer flexibility, are the other great fea-
tures that make the D2.1 so powerful. Let’s start with three audio inputs, including stereo line
level, Digital Optical and a special Bluetooth streaming input. All three inputs are auto-sensing
so when the music plays on any source, the D2.1 will automatically turn ON making system
control as easy as pressing the play button or turning on the TV.
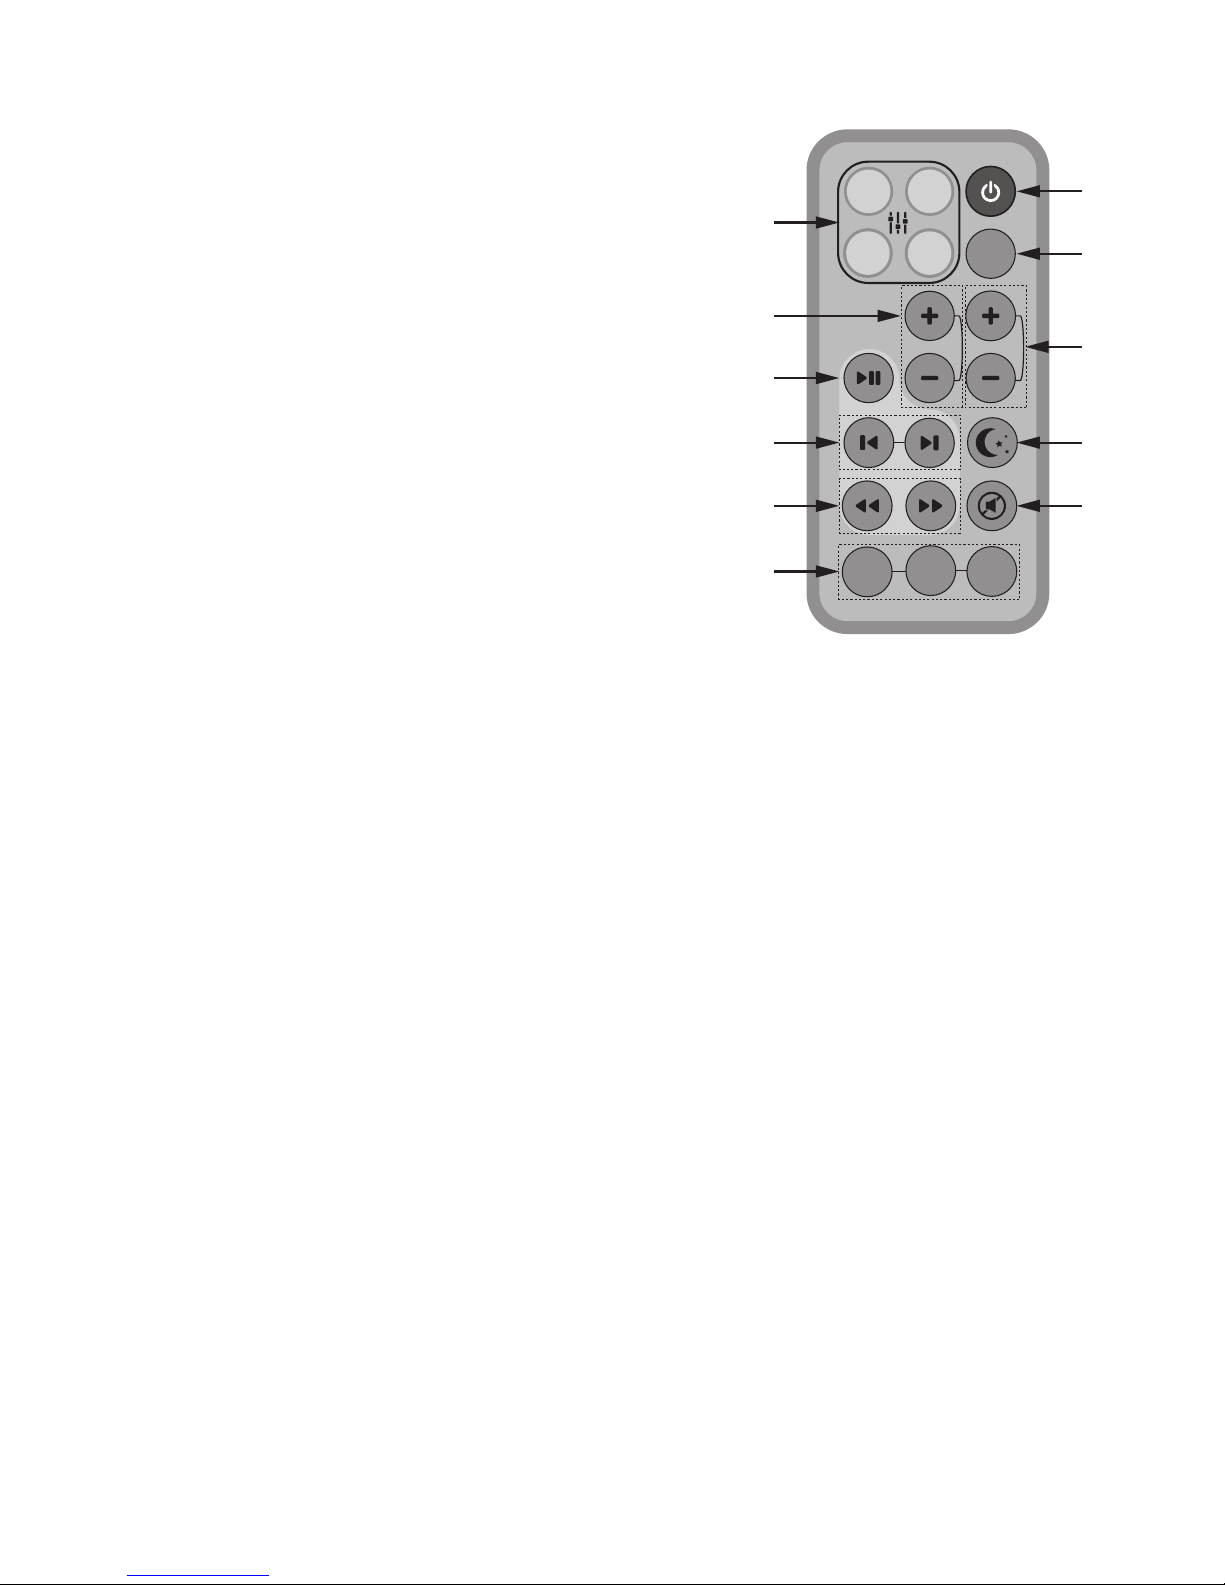
The D2.1 also features IR control from the D2.1 IR Remote for source selection, volume, mute,
EQ. The IR Remote also features commands for Bluetooth device control for most current
Bluetooth devices. (Even though the D2.1 is auto-sensing we have also provided IR control
of power ON/OFF, for applications where manual power is preferable.) The built-in IR eye,
increases installation location options in that by using an IR control system, and yes we make
those too, the D2.1 can be hidden away in a cabinet or closet and still be controlled via remote
control.
Got Bluetooth? Good...so do we! The Xpress Bluetooth Module will interface with most cur-
rent Bluetooth devices for streaming audio from smartphones, tablets and other Bluetooth
devices. The D2.1 features a special port for the Bluetooth Module that not only acts as an
audio input, but also outputs play commands to the Bluetooth device, when triggered by the
D2.1 IR Remote!
So let’s see...compact size, big power, sub out, three audio inputs, auto-sensing, IR control of
the amp and a Bluetooth device, wow, that’s a whole lot of stuff right?
Well there’s more...like the D2.1 Setup App.
The Setup App communicates with the D2.1 via the Bluetooth Module. The App allows access
to and control of typical functions like volume, balance, sub level and source select but there’s
more to it than that. Like the ability to create, store and recall different amp setup configura-
tions. Max output limiting. Select and set custom EQ settings that can then be selected with
the IR Remote. Auto-sense ON/OFF with source priority that determines which source plays
if more than one source is playing at the same time and variable auto-OFF delay. The App also
includes configurable sub/LFE selection, variable crossover, slope and phase with a variable
high-pass setting for main speaker low frequency cutoff for fine tuning the amp and speakers
to the given room environment.
So yes, the best things do come in small packages.
Please read and follow the instructions in this User Guide to assure you are getting the most
from your new Xpress D2.1 Digital 2.1 Channel Amplifier.

5
Features
• Compact size...fits almost anywhere
• Cool, efficient digital design
• Stereo Audio Line level Input (RCA)
• Digital Optical Audio Input
• Bluetooth Compatible (audio and control)
• Line Level Subwoofer Output (RCA)
• 5VDC power supply output for Xpress Accessories
• 10 Band Graphic EQ
• Adjustable High-Pass or full range speaker settings
• Adjustable Subwoofer crossover frequency, slope and phase settings
• Anti-clipping Output Limiter
• Bluetooth playback control via IR Remote Control
What’s Included
1 - D2.1 Amplifier
1 - AC Power Cord
1 - Owner’s Manual

6
D2.1 Inputs & Outputs
These connectors connect things to the D2.1...some actually do some other stuff too...
100-240V-50/60Hz 2.5A
STATUS RECEIVER
IN
LINE IN
L
R
SUB OUT
OPTICAL IN
L- L+ R- R+
USB
1 3 4
56789
2
1. AC POWER TERMINAL (100-240V-50/60Hz 2.5A) - Universal power connector. Automat-
ically selects AC power mode (110VAC/220VAC) when connected to AC power. After all
connections have been made, connect the supplied AC Power Cord to an unswitched AC
power outlet.
2. IR SENSOR - IR sensor ‘sees’ the IR commands from the D2.1 IR Remote, or other properly
configured programmable remote to control D2.1 Power, Volume, EQ Input, etc.
3. LINE IN (L&R) - Two RCA jacks. Analog audio sensing input. When an audio signal is pres-
ent on these jacks the amplifier will turn ON. The amp will enter sleep mode when no
audio input has been sensed for a configurable delay to save energy. Using a stereo RCA
cable with gold ends, connect to the L&R line level audio output on a source to be played
though the D2.1. If the source has variable output be sure to lower the volume on the
source prior to turning the source and amp on the avoid unintentional damage to the D2.1
and/or speakers. Set source to an appropriate output level during audio level setup.
4. SUB OUT - One RCA jack. Outputs line level low frequency content to a powered
subwoofer. Using a mono RCA cable, connect to the Sub IN or LFE jack on a powered
subwoofer.
5. SPEAKER TERMINALS - Four-position plug-in screw terminal. Outputs speaker level audio
to left, right channel speakers or a sound bar. Using 16AWG (min) speaker wire, connect to
the appropriate speaker terminals on a sound bar or left and right speakers. Before con-
necting the speaker wire to the amp, twist the ends of the speaker wire so there are no
strays that can cause shorts.
6. OPTICAL IN - S/PDIF Optical Terminal. Digital audio sensing input. When an audio signal is
present on this terminal, the amplifier will turn ON. The amp will enter sleep mode when
no audio input has been sensed for a configurable delay to save energy. Using an optical
audio cable, connect to the Optical output of a TV or other device to be played through the
D2.1.

7
7. RECEIVER IN - RJ45 Connector. Allows connection of the Xpress Bluetooth Streaming
Audio/Setup Module. Allows setup of the D2.1 via D2.1 Setup App and Bluetooth Module.
Also allows IR control of a connected Bluetooth streaming device via the Xpress Bluetooth
Module, using the D2.1 IR Remote or other properly programmed IR System Remote.
Using Cat5/5e/6 cable, connect to the RJ45 jack on the Xpress Bluetooth Setup/Streaming
Module.
8. STATUS - LED flashes or illuminates solid to indicate various setup modes.
Solid ON - Learn Mode
One Flash - Ready to learn Power, Volume UP, Volume DOWN, Mute, IN 3
Solid ON 1 Second - confirms learned command
OFF - Learn Mode OFF
9. USB - Provides 5VDC to Xpress Accessories.
D2.1 Side Vents
Even though the D2.1 will typical run cool, the side vents allow air to circulate through the
chassis allowing optimum performance, and besides...they just look cool...get it...air vents...
look cool...never mind...
One serious item...please be sure to not block the vents with wires or other objects that will
block the free flow of air through the amp.
D2.1
Shelf
IMPORTANT! DO NOT BLOCK VENTS!

8
D2.1 IR Remote
Push the buttons...stuff happens...
1. POWER - Toggle power button. Press once to turn
the D2.1 ON. Press again to turn the D2.1 OFF.
2. EQ FLAT - Press to cancel active EQ and return all
EQ settings to neutral (flat).
3. VOLUME UP/DOWN- Press ‘+’ to increase volume.
(Turn it up.) Press ‘-’ to decrease volume. (Turn it
down.)
4. NIGHT MODE- Press once to turn Night Mode ON
(Night Mode maintains relative dynamics of audio
content at low listening levels.) Press again to turn
Night Mode OFF.
VOLSUB
IN 1IN 2IN 3
EQ2EQ1
EQ4EQ3 EQ
Flat
1
2
3
4
5
6
7
8
9
10
11
5. MUTE - Toggle mute. Press once to mute speakers. Press again to un-mute speakers.
6. EQUALIZER 1-4 - Select EQ 1-4. These settings are identical to the EQ1-4 settings in the
D2.1 Setup App.
7. SUB UP/DOWN - Press ‘+’ to increase D2.1 Sub Out level. Press ‘-’ to decrease D2.1 Sub
Out level.
8. BLUETOOTH PLAY/PAUSE - Toggle Play/Pause when controlling a Bluetooth device
paired to an Xpress Bluetooth Module connected to the D2.1 RJ45 Receiver IN jack. Press
once to Pause. Press again to Play.
9. BLUETOOTH SKIP FORWARD/BACK- Press I◄to skip to the previous track when con-
trolling a Bluetooth device paired to an Xpress Bluetooth Module connected to the D2.1
RJ45 Receiver IN jack. Press ►I to skip to the next track.
10. BLUETOOTH SCAN FORWARD/REVERSE - Press ◄◄ to reverse scan to the current track
when controlling a Bluetooth device paired to an Xpress Bluetooth Module connected to
the D2.1 RJ45 Receiver IN jack. Press ►► to forward scan the current track.
11. INPUT SELECT - IN 1 - Press to select the source connected to the D2.1 L&R Line Level
IN.
IN 2 - Press to select the source connected to the D2.1 Optical IN.
IN 3 - Press to select the Xpress Bluetooth Module
connected to the Receiver IN.

9
Installation
Here’s where you can stick it...and how...
D2.1
Shelf
Wood
Screw
Wood
Screw
100-240V-50/60Hz 2.5A
STATUS RECEIVER
IN
LINE IN
L
R
SUB OUT
OPTICAL IN
L- L+ R- R+
USB
100-240V-50/60Hz 2.5A
STATUS RECEIVER
IN
LINE IN
L
R
SUB OUT
OPTICAL IN
L- L+ R- R+
USB
SHELF MOUNT
The D2.1 can be conveniently mounted on a shelf top as shown. Use wood screws to secure
the amp to the shelf to avoid having the amp slide off the shelf and possibly damage the amp,
connected cables or other equipment. Leave room for wires. Allow adequate space for airflow.
Do not set objects on top of the amp.
D2.1
Drywall or Plywood
Keyholes
Keyholes
WALL MOUNT
The D2.1 can be wall mounted to the inside of an equipment cabinet or regular wall surface.
A sheet of plywood or particle board attached to wall studs makes a good mounting surface,
otherwise use proper drywall anchors to assure a secure mount. Install wood screws at the
spacing of the mounting bracket keyholes. Slip the amp (connector plate end down) over the
screw heads and then slide the amp down to lock the amp in place. Tighten the screws to
secure the amp to the wall. Leave room for wires. Allow adequate space for airflow. Do not
set objects on top of the amp.

10
Connections
All connections are conveniently placed on the side panel for sane wire management, conve-
nient connections and simple service.
The illustration shows the D2.1 in a typical home entertainment system for TV audio with
stereo in ceiling speakers with a subwoofer amp and subwoofer.
INPUT
TRIGGER
AC INPUT
110-120V 60Hz;220-240V 50Hz 150W
FUSE:110-120V,T2AL/250V
FUSE:220-240V,T1AL/250V
SPEAKER OUT POWER
ON
OFF
L
R
100-240V-50/60Hz 2.5A
STATUS RECEIVER
IN
LINE IN
L
R
SUB OUT
OPTICAL IN
L- L+ R- R+
USB
D2.1 2.1 Channel Amp
TV
TV Digital Optical Audio OUT
To D2.1 Optical IN
In Ceiling Speakers
16AWG (min)
Stranded
Speaker Wire
Mono RCA-RCA Patch Cable
6”or 8”
In Ceiling
Sub
A100 Subwoofer Amp
Left Right
D2.1 Sub OUT
to BXA100 Line IN
Optional Add-on

11
Connections
NOTE: Do not connect the AC power cord or turn the amp on until all connections have been
made and confirmed. Making connections with the power on can result in...well...undesir-
able circumstances...that may not be covered under the factory warranty.
OPTICAL IN (TV AUDIO CONNECTION)
1. Using a Digital Optical Audio cable, connect the Digital Optical Audio OUT on the TV (or
other source) to the Optical IN on the D2.1. To select this input, press IN 2 on the D2.1 IR
Remote.
SUB OUT (BXA100 SUBWOOFER AMP CONNECTION)
1. Using a mono RCA-RCA cable with gold ends, connect the Sub OUT on the D2.1 to the Sub
IN on the BXA100 subwoofer amp , a powered sub or other subwoofer amplifier.
L- L+ R- R+ (SPEAKER CONNECTIONS)
1. Use16AWG (min) 2-conductor stranded speaker wire for speaker connection
2. Strip approximately 1/2 to 3/4 of an inch off the ends and twist the strands together so
there are no loose ends that can cause shorts.
3. While observing proper wire polarity, insert the stripped and twisted ends of the speaker
wire into the appropriate + and - terminals for the left and right speakers.
4. Tighten the terminal screws.
5. Confirm connection and polarity.
6. Connect the speaker wires to the appropriate + and - terminals on the left and right speak-
ers.
7. Confirm connection and polarity.
LINE IN (AUXILIARY AUDIO SOURCE)
1. Using a stereo RCA-RCA patch cable connect the L&R line level audio OUTs on a Bluetooth
audio receiver or other source to the L&R Line IN on the D2.1. To select this input, press IN
1 on the D2.1 IR Remote.
RECEIVER IN (BLUETOOTH AUDIO STREAMING & AMPLIFIER SETUP)
1. Using a Cat5 patch cable with RJ45 connectors, connect the output of the Xpress
Bluetooth Module to the Receiver IN port on the D2.1. For streaming audio, see section
‘Operation’ for information on pairing a Bluetooth device. For information regarding the
setup App, please visit www.bealexpress.com for additional information.
AC POWER TERMINAL (100-240V-50/60Hz 2.5A)
1. After all connections have been made connect the supplied AC Power Cord to an un-
switched AC power outlet. Automatically selects AC power mode (110VAC/220VAC) when
connected to AC power.
NOTE: Do not connect the AC power cord or turn the amp on until all connections have been
made and confirmed. Making connections with the power on can result in...well...undesir-
able circumstances...that may not be covered under the factory warranty.

12
Operation
You don’t need to be a brain surgeon to perform these operations...
ON/OFF
The D2.1 is auto-sensing, so typically once the system is installed and setup, the power
will automatically turn ON with the presence of an audio signal on either the Digital Optical
IN, Line IN or Receiver IN. The amp will automatically turn OFF when no audio signal has
been detected for the delay set using the Setup App.
POWER - If however you are a major control freak and just have to have the ability to turn
the amp ON/OFF, press the Power button once to turn the amp ON, and press it again to
turn the amp OFF.
VOLUME
VOLUME UP (+) - Press to increase volume. Turn it up! YAY!!!
VOLUME DOWN (-) - Press to decrease volume. Turn it down! BOO!!!
MUTE
(SPEAKER WITH A SLASH THROUGH IT SYMBOL) - Press once to mute the speakers while
a source is playing. Press again to un-mute the speakers while a source is playing.
EQ
EQ FLAT - Press to cancel active EQ and return all EQ settings to neutral (flat).
EQ 1-4 - Press to adjust the tonal balance of the audio output to suit different audio con-
tent...whatever sounds good to you is the right setting!!!
NIGHT MODE- Press once to turn Night Mode ON (Night Mode maintains relative dynamics of
audio content at low listening levels.) Press again to turn Night Mode OFF.
SOURCE SELECT
IN 1 - Press to select the source connected to the Line L&R jacks on the D2.1.
IN 2 - Press to select the source connected to the Digital Optical jack on the D2.1.
IN 3 - Press this button to select the Xpress Bluetooth Module connected to the Receiver
In Port on the D2.1.

13
Operation
XPRESS BLUETOOTH MODULE
OK...so you’re one of the really smart people who also purchased the Xpress Bluetooth
Module. This device will not only allow you to stream your favorite audio content via
Bluetooth from almost any current Bluetooth device to the D2.1, but it will also allow IR
control of D2.1 functions, (source select, volume, mute, EQ etc) but also allow IR control
of most current Bluetooth devices using either the D2.1 IR Remote or other properly
programmed IR remote control.
PAIRING A BLUETOOTH DEVICE
With the Bluetooth Module connected to th D2.1, open the Bluetooth Menu on the device
to be paired. Select Xpress Bluetooth Module from the list. Done...Really...That’s it...Go
ahead...play something...pretty cool huh?
BLUETOOTH TRANSPORT FUNCTIONS
BLUETOOTH PLAY/PAUSE - Toggle Play/Pause when controlling a Bluetooth device paired
to an Xpress Bluetooth Module connected to the D2.1 RJ45 Receiver IN jack. Press once to
Pause. Press again to Play.
BLUETOOTH SKIP FORWARD/BACK- Press I◄to skip to the previous track when con-
trolling a Bluetooth device paired to an Xpress Bluetooth Module connected to the D2.1
RJ45 Receiver IN jack. Press ►I to skip to the next track.
BLUETOOTH SCAN FORWARD/REVERSE - Press ◄◄ to reverse scan to the current track
when controlling a Bluetooth device paired to an Xpress Bluetooth Module connected to
the D2.1 RJ45 Receiver IN jack. Press ►► to forward scan the current track.

14
IR Learning
What...you don’t want to have to use more than one remote to control your system??? WOW...
some people!!! Well...if you insist...here’s what you can do to use a TV or other pre-pro-
grammed remote to control the D2.1. (You can also teach the IR commands from the D2.1 IR
Remote to a programmable IR system remote if you prefer.)
The D2.1 can learn IR commands for ON/OFF, Volume UP/DOWN, Mute and IN 3.
Please carefully follow the steps below to teach the D2.1 the IR commands to be used from
the remote to be used for system control.
TO ENTER LEARNING MODE
1. Press the Power button on the D2.1 IR Remote to turn D2.1 power OFF.
2. Sequentially press the Mute, IN 3 and Volume Down (-) buttons to enter the learning
mode.
3. Status LED will turn ON.
POWER
1. Press the Power button on the D2.1 IR Remote. The Status LED will flash once and turn
OFF.
2. Press the button on the system remote to be used for turning the D2.1 ON/OFF.
3. The Status LED should flash twice and turn OFF.
4. Press the button on the system remote again. The Status LED will flash once and turn ON
to confirm the learned code.
5. To exit Learning Mode, press IN 1, otherwise press the next button to be learned.
VOLUME UP
1. Press the Volume UP button on the D2.1 IR Remote. The Status LED will flash once and
turn OFF.
2. Press the button on the system remote to be used for Volume UP.
3. The Status LED should flash twice and turn OFF.
4. Press the button on the system remote again. The Status LED will flash once and turn ON
to confirm the learned code.
5. To exit Learning Mode, press IN 1, otherwise press the next button to be learned.
VOLUME DOWN
1. Press the Volume DOWN button on the D2.1 IR Remote. The Status LED will flash once
and turn OFF.
2. Press the button on the system remote to be used for Volume DOWN.
3. The Status LED should flash twice and turn OFF.
4. Press the button on the system remote again. The Status LED will flash once and turn ON
to confirm the learned code.
5. To exit Learning Mode, press IN 1, otherwise press the next button to be learned.

15
MUTE
1. Press the Mute button on the D2.1 IR Remote. The Status LED will flash once and turn
OFF.
2. Press the button on the system remote to be used for Mute.
3. The Status LED should flash twice and turn OFF.
4. Press the button on the system remote again. The Status LED will flash once and turn ON
to confirm the learned code.
5. To exit Learning Mode, press IN 1, otherwise press the next button to be learned.
INPUT 3 SELECT
1. Press the IN 3 button on the D2.1 IR Remote. The Status LED will flash once and turn OFF.
2. Press the button on the system remote to be used for IN 3.
3. The Status LED should flash twice and turn OFF.
4. Press the button on the system remote again. The Status LED will flash once and turn ON
to confirm the learned code.
5. To exit Learning Mode, press IN 1, otherwise press the next button to be learned.
TO EXIT LEARNING MODE
1. Press the IN 1 button on the D2.1 IR Remote to exit learning mode. The Status LED will
turn OFF.
TO CLEAR ALL LEARNED COMMANDS
First Enter Learn Mode:
1. Press the Power button on the D2.1 IR Remote to turn D2.1 power OFF.
2. Sequentially press the Mute, IN 3 and Volume Down (-) buttons to enter the learning
mode.
3. Status LED will turn ON.
In Learn Mode:
4. Press the IN 2 button on the D2.1 IR Remote to clear all learned commands. The Status
LED will flash once.
To Exit Learn Mode:
5. Press the IN 1 button on the D2.1 IR Remote to exit learning mode. The Status LED will
turn OFF.
Factory Reset
RESET TO FACTORY DEFAULT SETTINGS
1. Sequentially press the buttons to restore the D2.1 to factory default settings.
The Status LED will turn ON then OFF.
NOTE: It is not necessary to be in Learn Mode to reset factory default settings.
IR Learning

16
Specifications
AUDIO
Maximum Output Power per Channel.................................................................................................. 50W
THD+N ......................................................................................................................................................... <0.5%
Signal to Noise (RCA/Bluetooth)...........................................................................................................78dB
Signal to Noise (Optical)...........................................................................................................................90dB
Input Sensitivity ..................................................................................................................................... 500mV
GENERAL
DC Power Supply Output........................................................................................................... +5VDC/0.5A
Line Voltage Range ...................................................................................................................100~240 VAC
Standby Power...............................................................................................................................................1W
Dimensions................................................5.3”W x 6.9”H x 2” D (135mm W x 175mm H x 51mm D)
Weight...............................................................................................................................................2.3lbs (1kg)

17
Limited Warranty
All in-wall, in-ceiling, outdoor speakers, volume controls, and freestanding
loudspeakers have a Lifetime Limited Warranty. This warranty includes
lifetime parts and repair on components. Powered subwoofers and Xpress
amplifiers have a two (2) year limited warranty. This warranty includes two
(2) year parts and repair labor on components. Xpress obligation under this
warranty is limited to repairing or replacing any component found defective in
material or workmanship under normal conditions of use. This warranty shall
not apply to products which have been abused, modified, disassembled, or
repaired by anyone other than Xpress or one of its appointed service centers.
Products to be repaired under this warranty must be returned to the factory
or designated service center with all transportation and insurance charges
pre-paid.
IMPORTANT: This warranty is ONLY valid if the product is purchased through a
Certified Xpress Dealer. Proof of purchase may be required.
Note: It is the policy of Xpress to continuously incorporate improvements
into our products. All specifications, warranty terms, and prices are subject to
change without notice.

18
Notes

19
Notes

Beale Xpress
122 Gayoso Street, Suite 101
Memphis, TN 38103
Phone: 844.489.2700 Fax: 901.205.0900
www.bealexpress.com
©2015 Beale Street Audio D21UG060215 Rev 3
Table of contents
Other Xpress Amplifier manuals