XPROHELI DYS 3X User manual

User Manual
XProHeli DYS 3X Brushless Gimbal
DYS 3X Brushless Gimbal For GoPro Page i
©2014 XPROHELI. All Rights Reserved.
TheAppTimes
[DYS 3 Axis Gimbal User Manual]
This user manual provides information on the specifications, installation and functions of
the DYS 3 Axis Brushless Gimbal system.

User Manual
XProHeli DYS 3X Brushless Gimbal
DYS 3X Brushless Gimbal For GoPro Page ii
©2014 XPROHELI. All Rights Reserved.
Revision History
Version Date Revision Description
1.0 8/05/2014 Manual Creation

User Manual
XProHeli DYS 3XBrushless Gimbal
DYS 3XBrushless Gimbal Page 0
©2013 XPROHELI. All Rights Reserved.
Table of Contents
Revision History .......................................................................................................................................ii
1. Welcome..............................................................................................................................1
Warning & Disclaimer! ............................................................................................................2
2. QUICK START ........................................................................................................................4
Unpacking your DYS 3X .........................................................................................................5
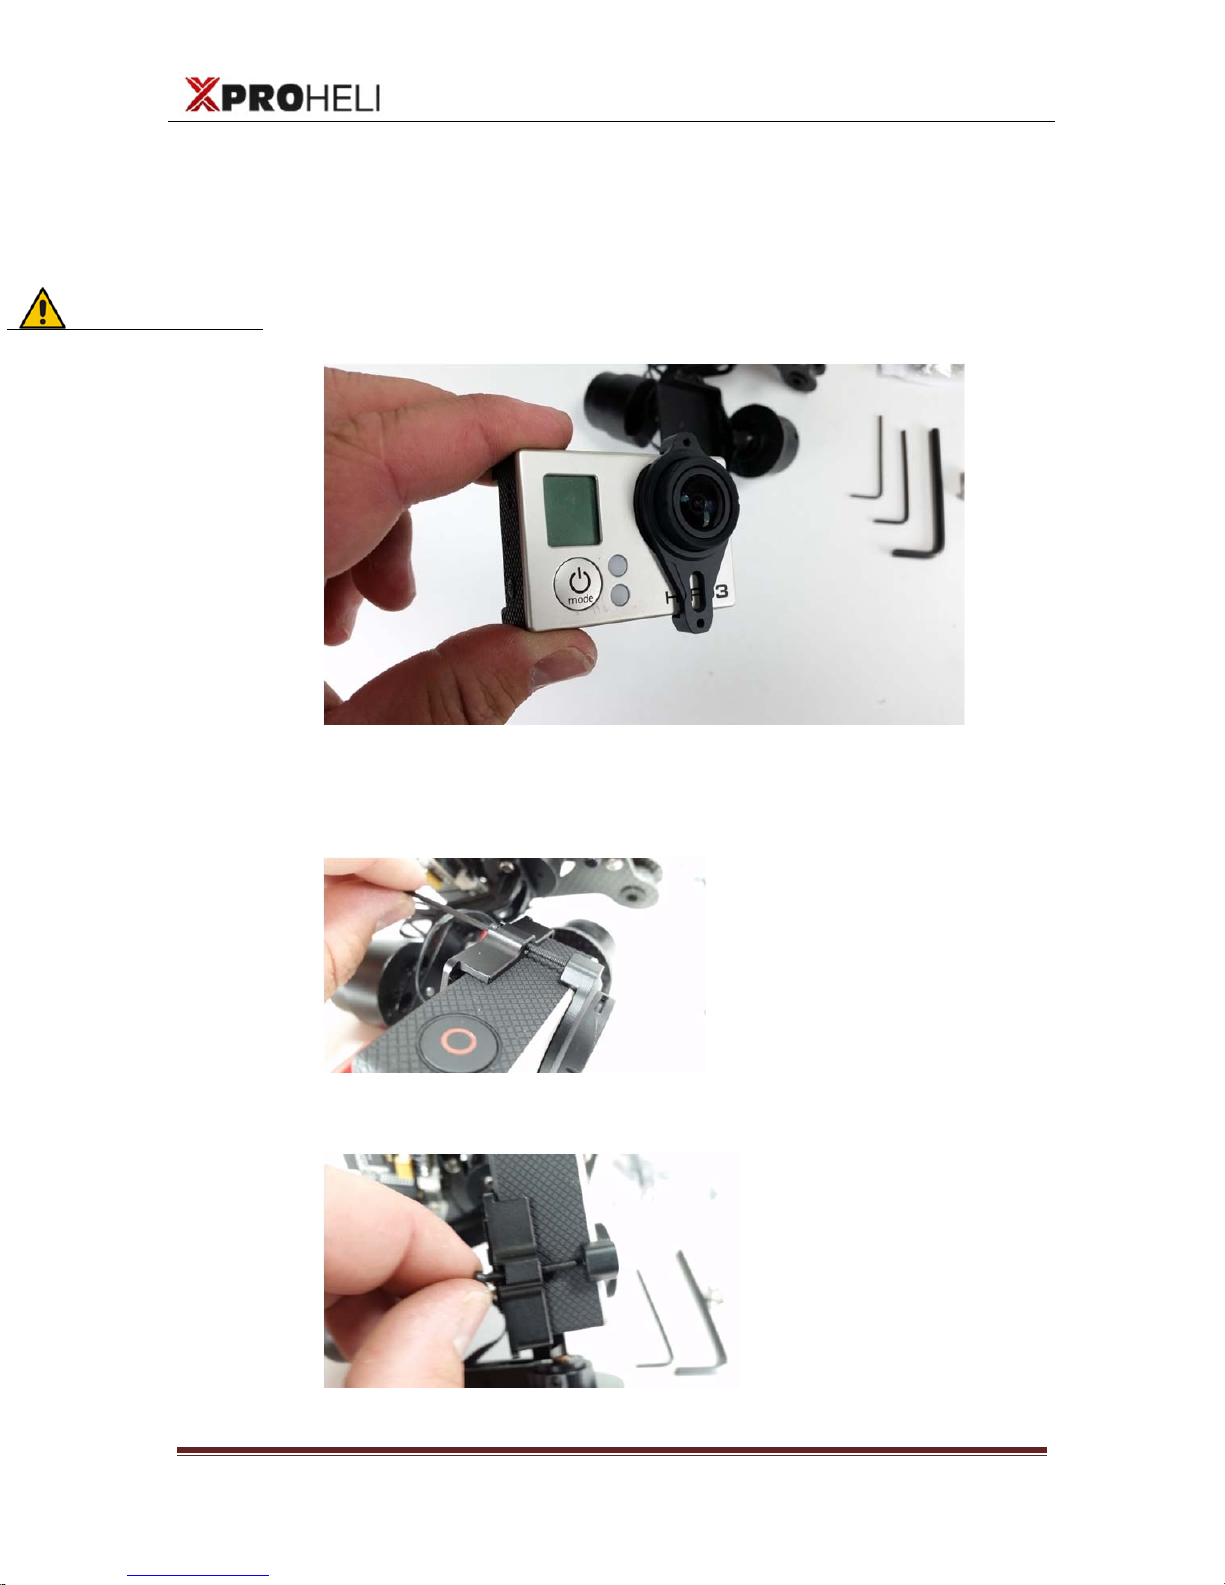
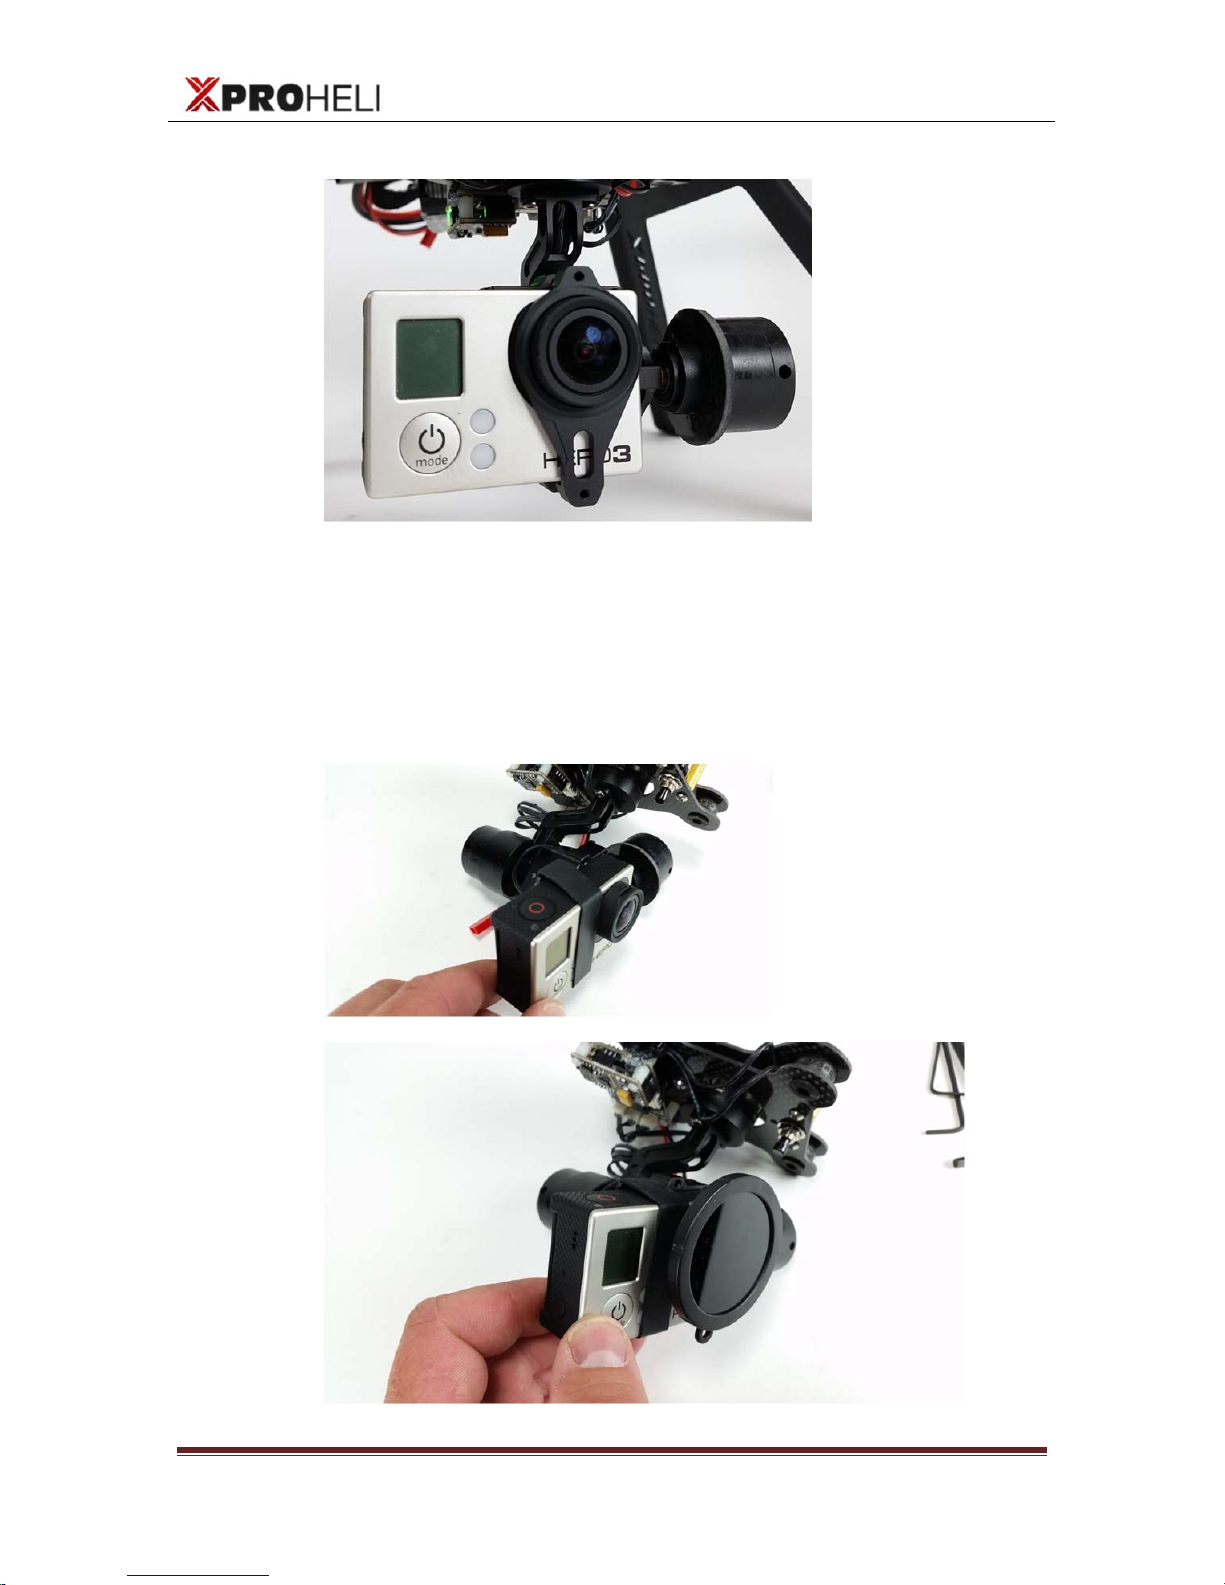
Mounting Your GoPro .............................................................................................................6
XP2 / Multi-rotor Installation...................................................................................................8
Overview..................................................................................................................................8
Powering On DYS 3X.............................................................................................................10
Operating Modes..................................................................................................................12
3. SimpleBGC SOFTWARE......................................................................................................13
Overview................................................................................................................................14
Connecting DYS 3X to Your Computer ..........................................................................................14
USING SimpleBGC GUI........................................................................................................................15
SimpleBGC GUI Layout ......................................................................................................................16
Performance Tuning..............................................................................................................18
Overview..............................................................................................................................................18
Tuning Follow Modes..........................................................................................................................19
Manual PID Tuning..............................................................................................................................22
Setup for 2
nd
Operator / Tilt Control.....................................................................................25
DYS 3X Recovery Procedures..............................................................................................28
Overview..............................................................................................................................................30
Recovery Steps:...................................................................................................................................30
Troubleshooting.....................................................................................................................32

User Manual
XProHeli DYS 3XBrushless Gimbal
DYS 3X Brushless Gimbal For GoPro Page 1
©2014 XPROHELI. All Rights Reserved.
1. Welcome
Message from CEO:
On behalf of XProHeli I would like to thank you for your
purchase of the DYS 3X gimbal for GoPro.
Our team at XProHeli respectfully requests that you take the
time to read this manual to the fullest extent before using
your new DYS 3X for the first time.
The DYS 3X gimbal is a great step up from the XPG as it adds
a new cinematic dimension to your shots with the addition of
a 3
rd
axis of stabilization. We have tested several 3 axis
gimbals and feel this gimbal when setup properly is the best
solution for our applications.
While the XPG has been and is still an excellent performing
top leading 2-Axis gimbal, the competition in this market with
the new gimbals coming out of China has forced us to go
into the obsolescence phase with the XPG after only 1 short
year. We still have plenty of parts available for these units so
don’t hesitate to contact us for replacement frame parts,
motors or controllers if needed.
If you have any questions, concerns or need help please
do not hesitate to email or call us:
Phone:
541-639-8828
Mailing Address:
XProHeli
20810 Sockeye Place
Suite #110
Bend, OR 97701
Customer satisfaction is our priority. If your not happy were
not happy!
Thanks,
Hans Skjersaa

User Manual
XProHeli DYS 3XBrushless Gimbal
DYS 3X Brushless Gimbal For GoPro Page 2
©2014 XPROHELI. All Rights Reserved.
Warning & Disclaimer!
The DYS 3Xgimbal is capable of capturing incredible footage,
and as exciting as it is we at XProHeli want to remind
customers that operating RC aircraft with the DYS 3X should
be done with great care and precaution.
There have been several incidences of people throughout the
world seriously injured by RC Helicopters (even some deaths!)
Multi-rotors are not a toy. People under the age of 18 years old
should not operate any multi-rotor unless supervised by an
experienced adult. The props on the XP2 like other multi-rotors are
sharp and can cause serious damage to people and property.
Never fly around people who are unaware of the damage
these devices can cause.
Liability Disclaimer
XProHeli shall not be responsible for any special, incidental, or
consequential damages, including but not limited to personal
injuries, damage to property, injury to others, including that to
life and health, resulting from any application and use of any
XProHeli products, including but not limited to camera
stabilization systems, multi-rotors, quadcopters, hexcopers or
octocopters. The Purchaser and any Pilot in Command (PIC)
assumes full and unlimited responsibility for all applications
and uses of any products sold by XProHeli.

User Manual
XProHeli DYS 3XBrushless Gimbal
DYS 3X Brushless Gimbal For GoPro Page 3
©2014 XPROHELI. All Rights Reserved.
INDEMNITY
XPROHELI AGENTS, REPRESENTATIVES AND EMPLOYEES ARE TO BE
HELD HARMLESS FROM ANY AND ALL CLAIMS, LIABILITIES, DAMAGES,
AND EXPENSES (INCLUDING ATTORNEYS’ FEES ACTUALLY INCURRED)
ON ACCOUNT OF DEATH OR INJURY TO ANY PERSON OR DAMAGE
TO ANY PROPERTY ARISING FROM OR IN CONNECTION WITH ANY
PRODUCTS SOLD OR SUPPLIED BY XPROHELI.
THIS INDEMNITY SHALL APPLY WITHOUT REGARD TO WHETHER THE
CLAIM, DAMAGE, LIABILITY OR EXPENSE IS BASED ON BREACH OF
CONTRACT, BREACH OF WARRANTY, NEGLIGENCE, STRICT LIABILITY,
OR OTHER TORT.

User Manual
XProHeli DYS 3XBrushless Gimbal
DYS 3X Brushless Gimbal For GoPro Page 4
©2014 XPROHELI. All Rights Reserved.
2. QUICK START
Overview
The DYS 3X is configured and custom tuned by XProHeli with the
addition of a custom soldered mode button to access different
features in the software. Setup of this gimbal is done in a few steps,
mounting the gimbal, installing the camera and finally powering
the unit on.
Please take care in unpacking the contents and be conciencious
of how you handle the gimbal. Gimbals are not yet bullet proof so
be careful not to snag a loose wire or neglect the gimbal. Water
will damage the gimbal as will lots of dirt / debris.
Never power the gimbal with any power source other than a 3S
rated voltage (11.1 – 12.5 volts). Doing so will ruin the control board.
Specifications
Supported Camera: GoPro Hero 3/3+
Weight: 238g (316g with GoPro Hero 3)
Working Rotation Range: Tilt Axis: +-90
o
Roll Axis: +- 40
o
Yaw Axis: +- 270
o
Input Power: 3 S (11.1V)
Software Requirements: Windows XP, Vista/7/8, Mac OSX
Motors: Brushless, rewound 14 poles
Run-Time: 45 min (800mA battery)
100% Tested & Configured in Bend, OR USA
Important!
Never power up
your DYS 3X gimbal
without your GoPro
mounted to it!
Doing so can cause
damage.

User Manual
XProHeli DYS 3XBrushless Gimbal
DYS 3X Brushless Gimbal For GoPro Page 5
©2014 XPROHELI. All Rights Reserved.
Unpacking your DYS 3X
The DYS 3X comes packed as shown below:
Packed Contents:
(1) DYS 3X Gimbal with XP Lander mounting plate
(1) Bag of accessory mounts (for other multirotors)
(1) 1.5mm Allen Key
(1) 2mm Allen Key
(1) 5/32” Allen Key
(1) ¼-20” x ½” Hex Button Head Screw
(1) Mounting Band (rubber) – optional for GoPro
(1) Pack Black Tarot dampeners (recommended for best
footage)
XProheli provides additional optional dampeners from Tarot that
we feel are superior to the stock DYS dampeners. You can
experiement with each set or combination but we feel the black
works best.

User Manual
XProHeli DYS 3XBrushless Gimbal
DYS 3X Brushless Gimbal For GoPro Page 6
©2014 XPROHELI. All Rights Reserved.
Mounting Your GoPro
Overview
The DYS 3X comes with a machined retaining lens housing to
secure the GoPro to the camera tray of the gimbal:
Install the camera onto the gimbal by using the (2) small 1.5mm
allen screws and 1.5mm allen key. These screw into the back of the
retaining ring, one on the top and one on the bottom:
Screw in bottom:
Should look like this when mounted properly:
Quick Tip!
For best
performance
always make sure
you adjust the Roll
plate for balance
when changing to
different GoPro
configurations!

User Manual
XProHeli DYS 3XBrushless Gimbal
DYS 3X Brushless Gimbal For GoPro Page 7
©2014 XPROHELI. All Rights Reserved.
Mounting for ND / Polarizing Filters:
You can also use the provided mounting band to secure the GoPro
to the gimbal. This is a good mounting solution if you are using a
light weight filter from Snake River or Polar Pro. We recommend a
filter with a weight of 20 grams or less (minimal impact on PID
settings)

User Manual
XProHeli DYS 3XBrushless Gimbal
DYS 3X Brushless Gimbal For GoPro Page 8
©2014 XPROHELI. All Rights Reserved.
XP2 / Multi-rotor Installation
Overview
Installation of the DYS 3Xon your XP2 quadcopter is done in a
few simple steps. First is removal of any existing gimbal or
GoPro landing gear plate, mounting of the DYS 3X and then
finally the remote tilt lead wire hook-up. This section is
specifically for the XP2, however if you are a Phantom V1 user
please reference this YouTube video for the DYS 3X install:
https://www.youtube.com/watch?v=Bz1Dh3itkOM
Installation
1. Prepare your XP2 by removing the lower horizontal GoPro
mounting plate (if applicable).
2. If you purchased the DYS 3XHandle or ProGrip, carefully
unscrew the fasteners on the top of the DYS 3X to the handheld
mount.
3. Using the provided XP Lander adapter plate, screw the plate
onto the lander frame with the provided ¼-20” adapter hex
screw.

User Manual
XProHeli DYS 3XBrushless Gimbal
DYS 3X Brushless Gimbal For GoPro Page 9
©2014 XPROHELI. All Rights Reserved.
4. Align the DYS 3X Gimbal mounting stand offs with the 3 holes in
the adapter plates and fasten using the provided M3x8 screws.
5. Plug in the JST power lead to the back of the gimbal. It is
optional to use the auxiliary power from your XP2 power harness
or use a small lipo battery back such as the XProHeli 800mAh
battery.

User Manual
XProHeli DYS 3XBrushless Gimbal
DYS 3X Brushless Gimbal For GoPro Page 10
©2014 XPROHELI. All Rights Reserved.
Mounting to Pro-Grip (dual handles)
Align the DYS 3X Gimbal mounting stand offs with the 3
matching holes in the top of the Pro-Grip mounting plate and
fasten using the provided M3x8 screws.
The battery is typically mounted on the top plate of the ProGrip
with Velcro. Handles are relatively easy to mount, once
complete it should look like this:
Quick Tip!
Make sure your
XP2 main flight
battery does not
touch or rub
against the back
of the gimbal, this
can cause
undesired
vibrations to the
DYS 3X resulting in
poorer quality
footage.

User Manual
XProHeli DYS 3XBrushless Gimbal
DYS 3X Brushless Gimbal For GoPro Page 11
©2014 XPROHELI. All Rights Reserved.
Powering On DYS 3X
Once your Gimbal is mounted and the camera is secured you
can now power the gimbal on by connecting the battery pack
to the JST power lead wire on the DYS 3X.
Upon startup the gimbal will go through a 5 second gyro
calibration with the buzzer beeping intermittently. If this does
not happen at start up it means that the software is set to skip
the gyro calibration on power up. This can be set either way, we
recommend leaving the gyro calibration off.
If you find that the gimbal starts up and is off center like this:
Gently rotate the gimbal with your hand until the yaw motor
‘centers’ on the next set of poles. It may take 5-10 seconds for
the gimbal to center at the 0 position.
If you find that the gimbal acts erratic on start up. Simply press
the mode button 1 time to ensure it is in mode 1 and then with
the gimbal still, press and hold the button for 5 seconds to
initialize a manual gyro calibration. The motors will power off
and the controller will calibrate the sensor for the temperature
of the room or area you are filming in.

User Manual
XProHeli DYS 3XBrushless Gimbal
DYS 3X Brushless Gimbal For GoPro Page 12
©2014 XPROHELI. All Rights Reserved.
Operating Modes
The DYS 3X has a custom mode function button on the front
of the gimbal that allows you to access multiple operating
features on the fly. Each DYS 3X is setup by us with the
following functions:
Mode 1 - Follow Pan only
Mode 2 - Follow Pan + Pitch
Mode 3 - Set Camera angles by hand (motors turn OFF
for 2 seconds, hold camera at desired angle - gimbal
now holds this angle)
Mode 4 - Lock Mode (camera remains pointed
forward at all times - does not follow hands)
Mode 5 - Customized by user in Software package
Gyro Calibration – Hold 5 seconds, keep gimbal still as
possible.
Mode Button

User Manual
XProHeli DYS 3XBrushless Gimbal
DYS 3X Brushless Gimbal For GoPro Page 13
©2014 XPROHELI. All Rights Reserved.
Using FPV with the DYS 3X
To use FPV with the DYS 3X gimbal you will need a low
profile lightweight/flexible FPV cable like this one:
If you do not have this cable it is available on our
website.

User Manual
XProHeli DYS 3XBrushless Gimbal
DYS 3X Brushless Gimbal For GoPro Page 14
©2014 XPROHELI. All Rights Reserved.
3. SimpleBGC SOFTWARE
Overview
This section provides information and instructions on the
SimpleBGC Software and how to make specific changes to
your software settings to help with getting the best
performance from your DYS 3X.
The 32 bit controller in each DYS 3X comes with a licensed
bootloader from Basecam Electronics (Alexmos). This license
allows you to download and flash your controller with the
latest firmware when new releases are available. Please note
that any upgrades or downgrades to the firmware on your
DYS 3X are will most likely require you to reconfigure all the
settings on the controller. Unless you are an advanced user
and are comfortable configuring the sensor and making the
proper adjustments, we do not recommend you change the
firmware.
Future firmware releases will be carefully monitored and test
at XProHeli before making a recommendation to upgrade. If
there is a firmware version that we feel is superior to the
original shipped version we will put together a step by step
video on the firmware upgrade process and necessary
adjustments.
Connecting DYS 3X to Your Computer
Connect the board to your computer with a mini USB cable.
The first time you connect the board to your computer, it may
install the drivers automatically. If not, you can download the
latest drivers from the following link:
www.silabs.com/products/mcu/pages/
usbtouartbridgevcpdrivers.aspx
After you install the driver, a new virtual COM port will be
created. You need to choose this COM port in the SimpleBGC
GUI software application to initiate the connection.
IMPORTANT!
Your DYS 3X comes
preconfigured with a
tune that works really
well for the GoPro
Hero 3/3+.
Make sure you
backup your Profile
settings prior to
making any changes!
DO NOT LOAD ‘USE
DEFAULTS’ and
overwrite the
controller!! Doing this
will reset your gimbal
controller completely
and you will have to
perform the setup
recovery procedures.

User Manual
XProHeli DYS 3XBrushless Gimbal
DYS 3X Brushless Gimbal For GoPro Page 15
©2014 XPROHELI. All Rights Reserved.
Caution: It is safe to connect both USB and the battery
simultaneously, but be very careful not to reverse
the polarity of the battery, because it will burn out the
controller and may damage your PC!
Download the SimpleBGC GUI & User Manual
SimpleBGC GUI 2_40b8.zip
SimpleBGC 32bit 2_40b8 GUI User Manual
The SimpleBGC GUI software application enables you to do
the following:
Update the firmware
Make changes to the settings of your controller
Tune settings for optimal performance
Adjust settings for various modes of operation
USING SimpleBGC GUI
After you start the software and select the correct COM port
from the list, click “Connect." When the connection is
established, all board settings and profiles will be loaded into
the software. You can re-load the current board parameters
anytime by clicking the “READ” button.
After adjusting parameters in the software, you should write
them to the controller board by clicking the “WRITE” button.
Only the current profile parameters will be saved to the
board. To return to the default settings, select the “USE
DEFAULTS” button.
To choose a different profile, select it from the list of profiles
located in the upper right corner of the window. You can
store different settings as five different profiles onto the
controller board. You can switch profiles saved on the board
by choosing the profile in the
software or by pressing the MENU button, if configured on
your controller board.

User Manual
XProHeli DYS 3XBrushless Gimbal
DYS 3X Brushless Gimbal For GoPro Page 16
©2014 XPROHELI. All Rights Reserved.
Remember that some settings are common for all profiles and
can not be saved on a per profile basis. Parameters such as
sensor orientation, hardware configuration, RC inputs, and
motor outs are the same across all profiles. The software starts
in English. To change the interface language, choose one in
the “language” menu and restart the program.
SAVE BACKUPS OF YOUR PROFILE SETTINGS!
The first thing you should do prior to making any adjustments
or changes to the the software is save a backup of your
gimbals Profile settings to your computer. To do this connect
the gimbal to the GUI and Select Profile 1 -> Save As, then
save the profile to a specified backup folder on your
computer. Do this fro Profiles 1, 2 and 4.
SimpleBGC GUI Layout
SimpleBGC GUI has a fairly intuitive layout with several
sections:
1. Connection – COM-port selection and connection status.

User Manual
XProHeli DYS 3XBrushless Gimbal
DYS 3X Brushless Gimbal For GoPro Page 17
©2014 XPROHELI. All Rights Reserved.
2. Profile – Select, rename, load, and save different profiles.
The DYS 3X Profiles are configured as follows:
a. Profile 1 – Follow Mode (Pan only)
b. Profile 2 – Follow Mode (Pan + Pitch)
c. Profile 3 – Unused (3 clicks set manual tilt angles
defined in service tab)
d. Profile 4 – Lock Mode (follow modes off)
Note: to switch modes on the DYS 3X while connected
to the GUI simply select Profile 1,2 or 4 and click write.
3. Configuration – Central part of the window, organized into
seven tabs:
i. Basic Tab – Basic gimbal stabilization settings. Do not
change these settings unless you are familiar with their
functions. See performance tuning section for more
details.
ii. Advanced Tab – More precise tuning options – for
fine tuning you should not need to adjust any of these
parameters.
iii. RC Settings – Settings to control the gimbal
roll/pitch/yaw orientation with RC inputs.
iv. Service – Specify the behavior of the MENU button
(located on the bottom of the control box) and tune
the battery monitoring service.
v. Follow Mode – Settings related to this special mode
of camera control.
vi. Realtime Data – Realtime sensor data monitoring.
This screen is helpful in tuning your gimbal performance.
vii. Firmware Upgrade – Firmware and SimpleBGC GUI
software versions and update options. Upgrade
firmware at your own risk!
4. Control Panel – Graphic visualization of gimbal orientation
angles for all three axes.
• Black arrows display the angles.
Table of contents