Yamaha MDX-9 User manual

MDX-9
MINIDISC RECORDER
LECTEUR ENREGISTREUR DE MINIDISC
MINIDISC RECORDER
LECTEUR ENREGISTREUR DE MINIDISC
TIMER
OFF PLAYREC
POWER
DISPLAY TITLE CHARA. DELETE EDIT SET
CANCEL ENTER
INPUT REC LEVEL
SEARCH
STOP
3
8
REC
+
NATURAL SOUND MINIDISC RECORDER MDX-9
010
PLAY/
PAUSE
7
¡1
¢4
0
s
MDX-9
OWNER’S MANUAL
MODE D’EMPLOI
BEDIENUNGSANLEITUNG
BRUKSANVISNING
MANUALE DELL’UTENTE
MANUAL DE INSTRUCCIONES
GEBRUIKSAANWIJZING
OWNER’S MANUAL
MODE D’EMPLOI
BEDIENUNGSANLEITUNG
BRUKSANVISNING
MANUALE DELL’UTENTE
MANUAL DE INSTRUCCIONES
GEBRUIKSAANWIJZING
B G

2
CAUTION: READ THIS BEFORE OPERATING YOUR UNIT.
1. This unit is a sophisticated mini disc recorder. To ensure
proper operation for the best possible performance, please
read this manual carefully.
2. Choose the installation location of your unit carefully. Avoid
placing it in direct sunlight or close to source of heat. Also
avoid locations subject to vibration and excessive dust, heat,
cold or moisture. Keep it away from sources of hum such as
transformers or motors.
3. Do not place another component on top of this unit, to do so
may discolor or damage the surface of the unit.
4. Do not open the cabinet of this unit, to do so may result in
damage to the unit or electrical shock. If any foreign object or
substance gets into the unit, contact your dealer for
assistance.
5. When removing the power plug from the wall outlet, always
pull directly on the plug; never pull the cord itself.
6. Do not apply excessive force when operating switches and
knobs.
7. When moving the unit, be sure to first disconnect the power
cord from the AC outlet and disconnect all cords connecting
the unit to other equipment.
8. Do not attempt to clean this unit with chemical solvents as this
may damage the finish. Use a clean, dry cloth.
9. Be sure to read the “TROUBLESHOOTING” section for advice
on common operating errors before concluding that your unit
is faulty.
10. Keep this manual in a safe place for future reference.
Note
Please check the copyright laws in your country to record from
records, compact discs, radio, etc. Recording of copyright
material may infringe copyright laws.
WARNING
TO REDUCE THE RISK OF FIRE OR ELECTRIC SHOCK, DO
NOT EXPOSE THIS APPLIANCE TO RAIN OR MOISTURE.
For U.K. customers
If the socket outlets in the home are not suitable for the
plug supplied with this appliance, it should be cut off and
an appropriate 3 pin plug fitted. For details, refer to the
instructions described below.
Note: The plug severed from the mains lead must be
destroyed, as a plug with bared flexible cord is hazardous
if engaged in a live socket outlet.
IMPORTANT
THE WIRES IN MAINS LEAD ARE COLOURED IN
ACCORDANCE WITH THE FOLLOWING CODE:
Blue: NEUTRAL
Brown: LIVE
As the colours of the wires in the mains lead of this
apparatus may not correspond with the coloured
markings identifying the terminals in your plug,
proceed as follows: The wire which is coloured BLUE
must be connected to the terminal which is marked
with the letter N or coloured BLACK. The wire which is
coloured BROWN must be connected to the terminal
which is marked with the letter L or coloured RED.
Making sure that neither core is connected to the
earth terminal of the three pin plug.
CLASS 1 LASER PRODUCT
This mini disc recorder is
classified as a CLASS 1 LASER
product.
The CLASS 1 LASER PRODUCT
label is located on the rear
exterior.
DANGER
Invisible laser radiation when open and interlock failed or
defeated. Avoid direct exposure to beam.
CAUTION
Use of controls or adjustments or performance of procedures
other than those specified herein may result in hazardous
radiation exposure.

3
ENGLISH
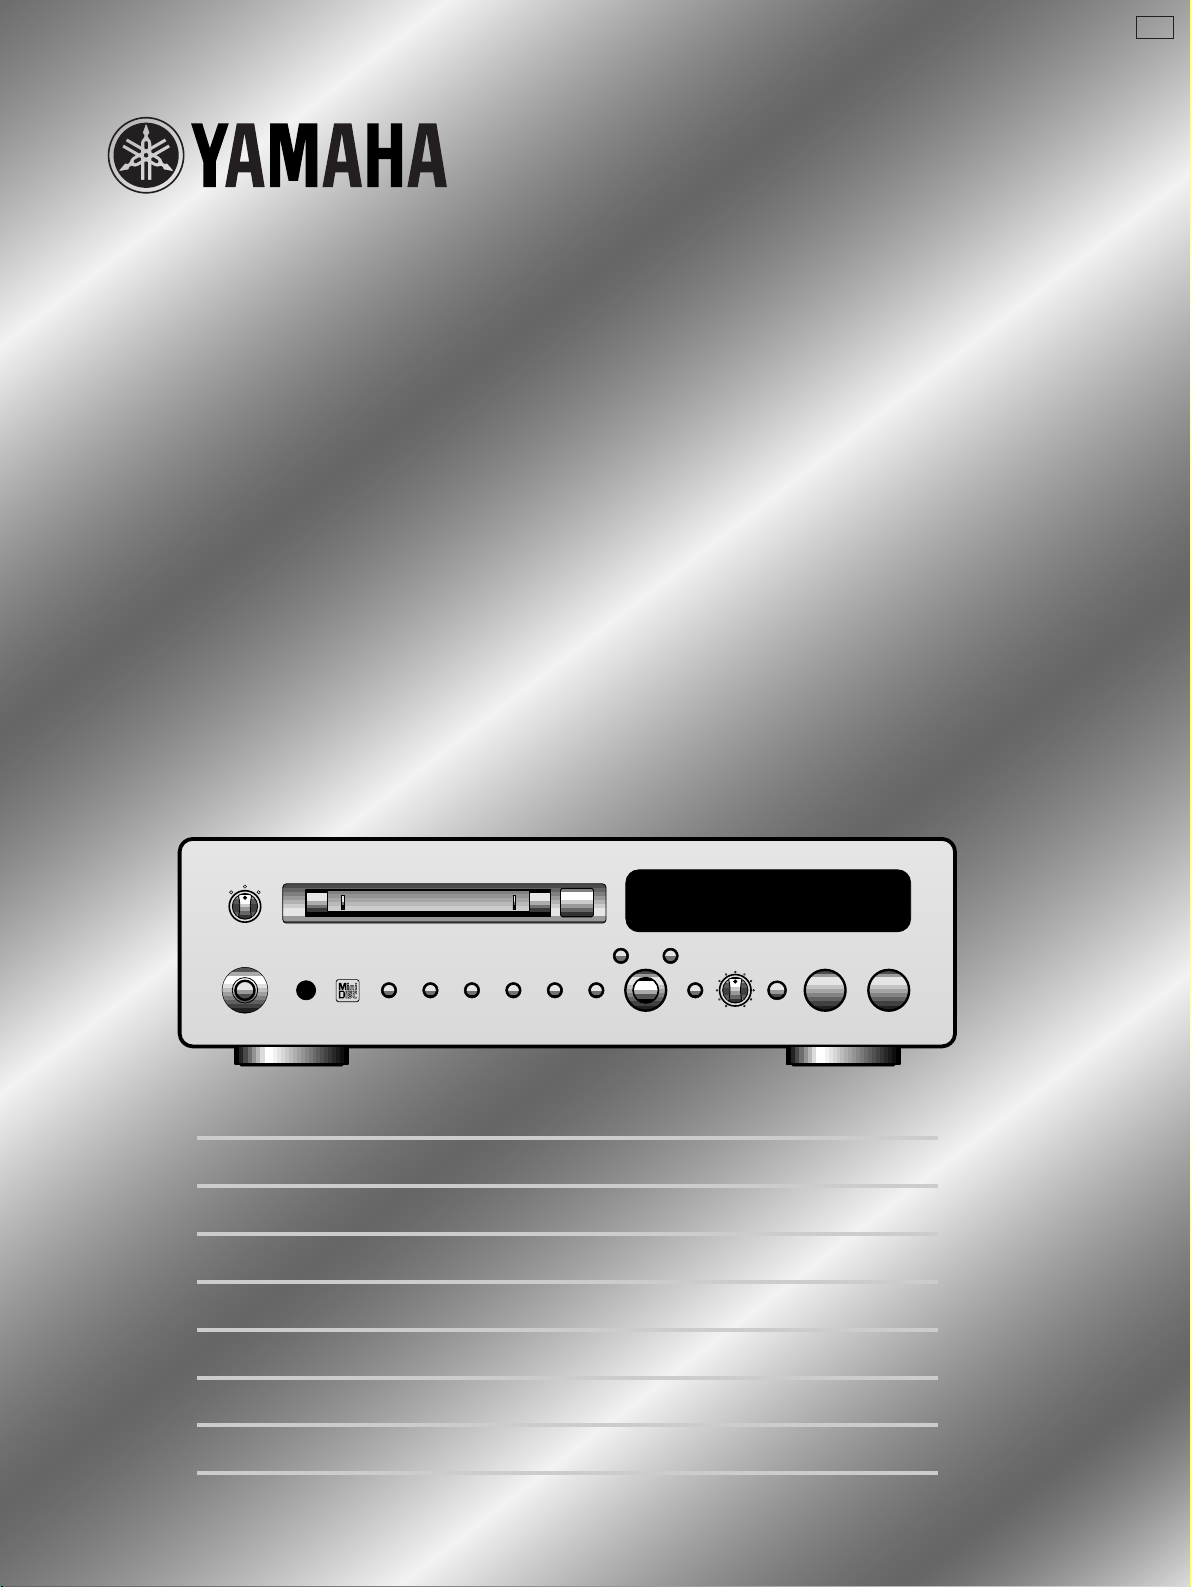
Thank you for selecting this YAMAHA mini disc recorder.
CONTENTSFEATURES
¶A sampling rate converter that lets you make
digital recordings from 32 kHz (DAT, etc.) , 44.1
kHz (CD, DAT, MD, etc.) and 48 kHz (DAT, etc.)
program sources.
¶Editing features (MOVE, ERASE, DIVIDE,
COMBINE, TITLE, and UNDO) that let you take
full advantage of the MD recording system.
¶Multiple digital INPUT terminals (2 optical inputs
and 1 coaxial input) let you connect up to three
different digital program sources.
¶The digital optical OUTPUT terminal lets you
output digital audio from an MD.*
¶In addition to the standard disc and track repeat
modes, this unit also has a part (A-B) repeat
mode that lets you repeat a specific part of a
track.
¶Synchro Record lets you make synchronized
recordings from any type of source component.
¶Time Rescue Record monitors the sound being
input and allows you to recover sound input from
a point approximately four seconds before you
start the recording operation. (So you will not
miss the beginning of a song when recording
directly from the radio, etc.)
¶The Monaural Record mode lets you record up to
148 minutes of audio onto one MD.
¶Timer playback and recording modes that let you
start playback or recording at a preset time using
an optional audio timer.
* This is not possible if MD is a direct copy of another digital
signal (see page 24 for details regarding SCMS copy
protection).
US and foreign patents licensed from Dolby Laboratories
Licensing Corporation.
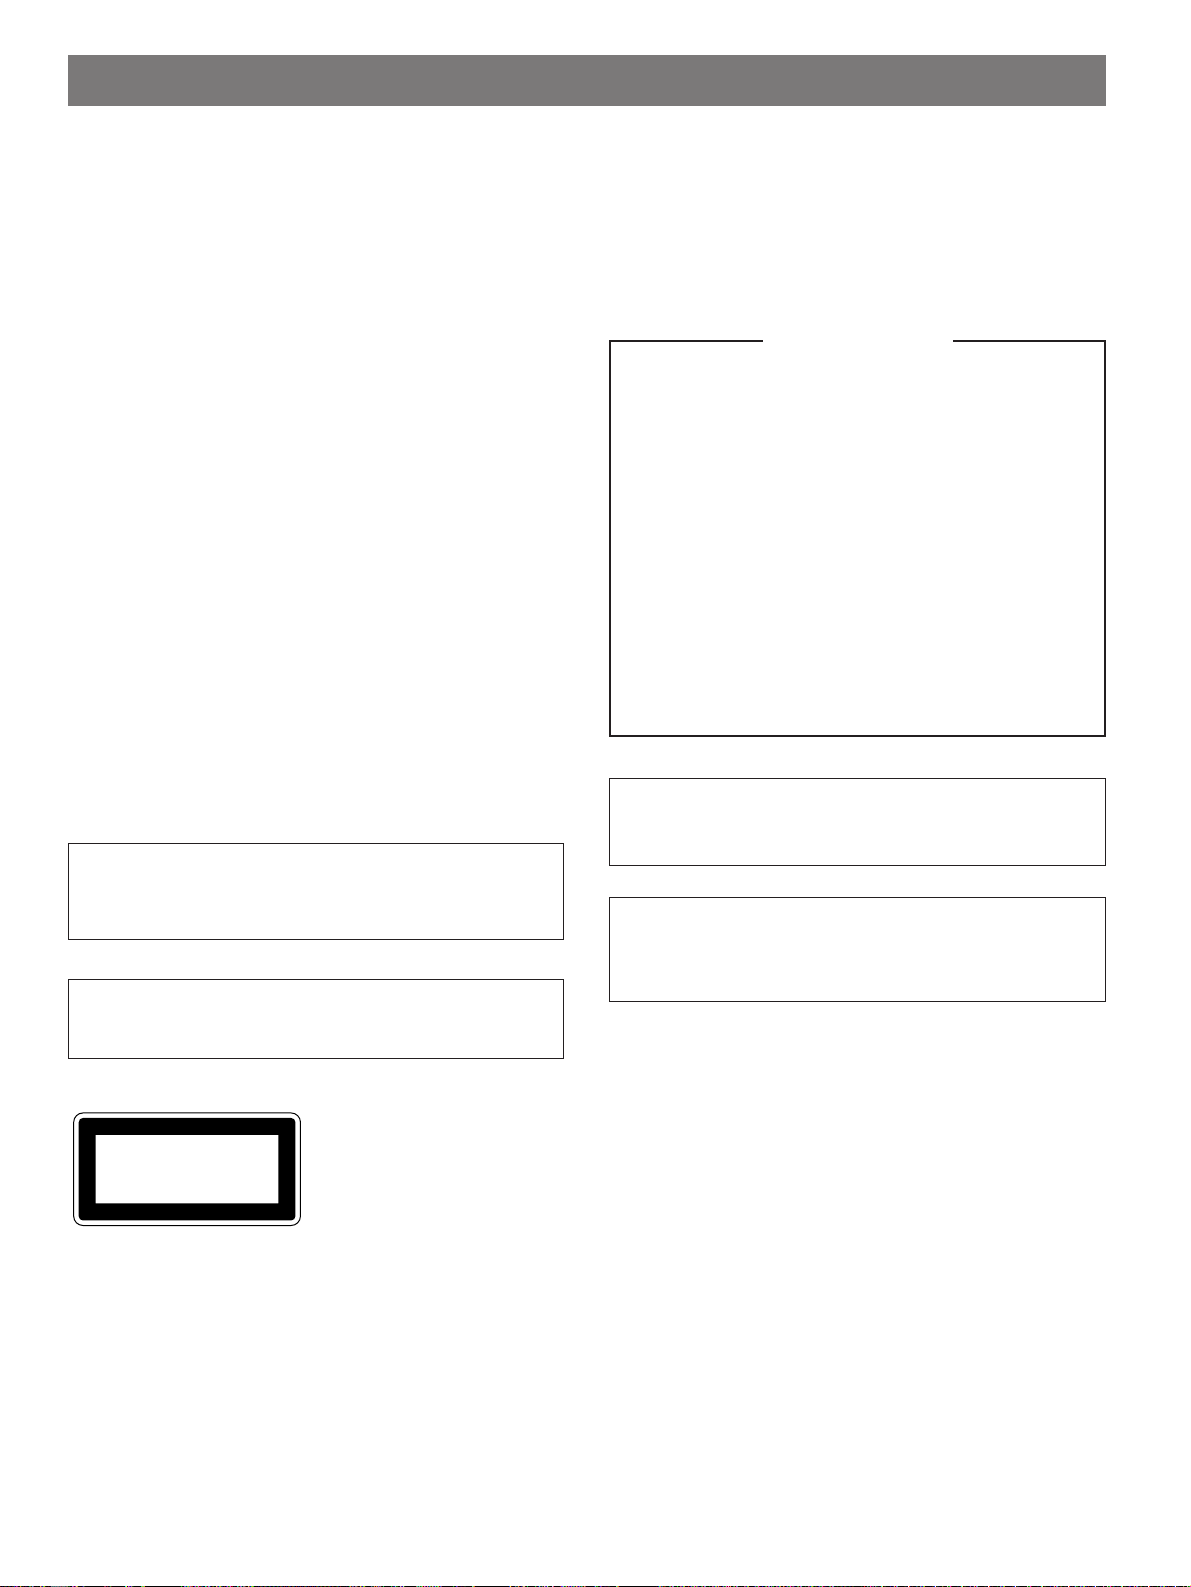
PART DESCRIPTIONS........................................................ 4
FRONT PANEL ..................................................................... 5
REMOTE CONTROL............................................................. 6
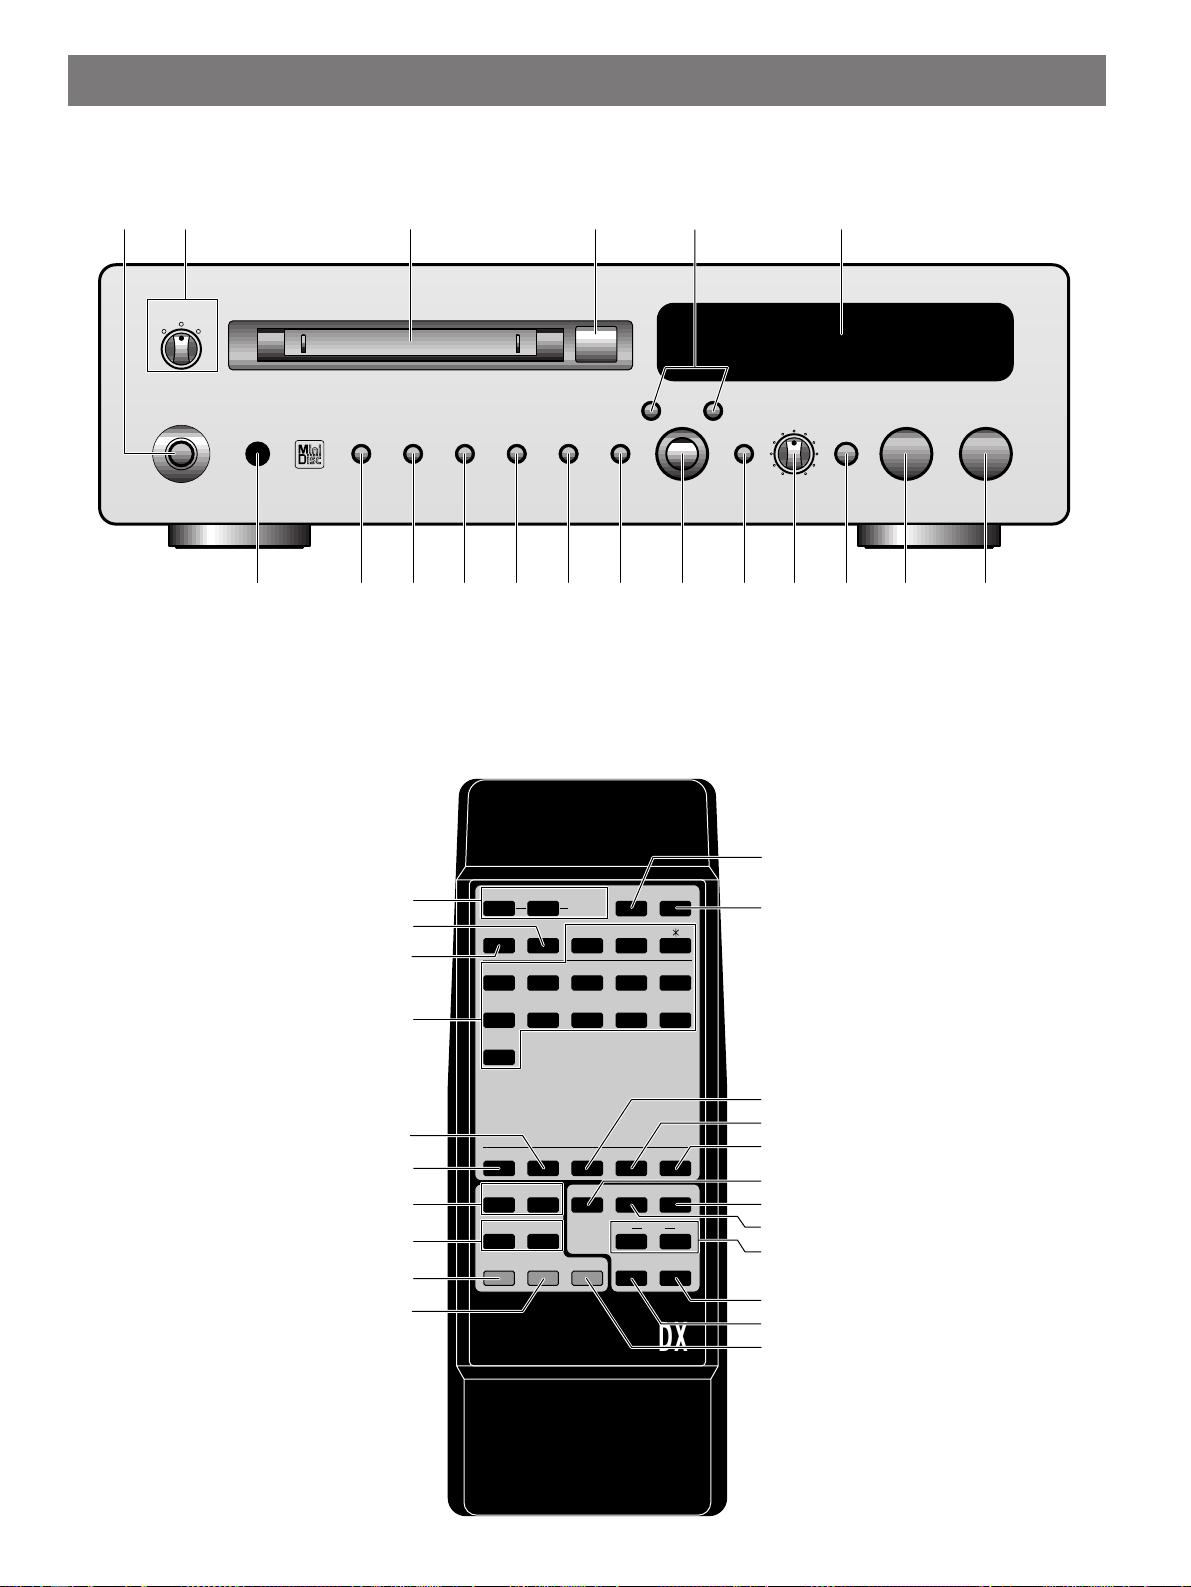
CONNECTIONS ................................................................... 7
ANALOG CONNECTIONS ................................................... 7
DIGITAL CONNECTIONS .................................................... 7
PLAYBACK.......................................................................... 8
Skipping Tracks ................................................................ 8
Searching.......................................................................... 9
Switching the Display ....................................................... 9
RANDOM PLAY .................................................................. 10
REPEAT PLAY .................................................................... 10
Single Track Repeat ....................................................... 10
Full Disc Repeat.............................................................. 10
Part (A-B) Repeat............................................................ 11
PROGRAM PLAY................................................................ 11
RECORDING...................................................................... 13
Recording Level.............................................................. 14
Auto Marking................................................................... 14
TIME RESCUE RECORDING ............................................. 15
SYNCHRO RECORDING.................................................... 15
MONAURAL RECORDING................................................. 16
MONITOR OUT................................................................... 16
EDITING ............................................................................. 17
MOVE.................................................................................. 17
ERASE................................................................................. 18
Disc Erase....................................................................... 18
Track Erase ..................................................................... 18
Part Erase........................................................................ 19
COMBINE ........................................................................... 19
DIVIDE ................................................................................ 20
TITLING.............................................................................. 21
TIMER OPERATIONS ....................................................... 22
Timer recording .............................................................. 22
Timer playback ............................................................... 22
MD SYSTEM LIMITATIONS.............................................. 23
COPY PROTECTION (SCMS) .......................................... 24
NOTES REGARDING THE REMOTE CONTROL............ 24
Remote control operation range .................................... 24
Battery installation .......................................................... 24
TROUBLESHOOTING....................................................... 25
DISPLAY MESSAGES ...................................................... 26
SPECIFICATIONS ............................................................. 27

4
PART DESCRIPTIONS
Front Panel
Remote Control
TIMER
OFF PLAYREC
POWER
DISPLAY TITLE CHARA. DELETE EDIT SET
CANCEL ENTER
INPUT REC LEVEL
SEARCH
STOP
3
8
REC
+
—
NATURAL SOUND MINIDISC RECORDER MDX-9
010
PLAY/
PAUSE
7
¡1
¢4
0
s
Ÿ ! ⁄ ¤@~
# ‹$›%fi^ fl &‡* ° (
?
A—B
!
S/F SCROLLDISPLAY
REPEAT
—
PROG
&
RNDM )(
D E F
2
A B C
1M N O
5
J K L
4
G H I
3
S T U
7
P Q R
6/
0
Y Z
9
V W X
8
CHAR.TITLE SETDELETENUMBER
¡
SEARCH
1
INPUT
M-MARK MONO/ST
¢
SKIP
4
PAUSE
8
PLAY
£
REC
¶
STOP
7
SPACE
+10
s
MDX
CD—P
SYNCTIME
REC
@
¤
#
‹
$
⁄
~
!
Ÿ
›
fi
%
fl
^
&
*
‡
·
)
‚
(
°

5
ENGLISH
FRONT PANEL
~POWER (8)
Press to turn the unit on or off.
ŸTIMER (22)
Use to set the unit to play or record when activated by
an external timer.
!Disc insertion slot
Insert the disc into this slot.
⁄Eject )
Press to remove the disc.
If the TOC* data has not yet been written, it is written
automatically before the disc is ejected.
@SEARCH !⁄(9, 21)
Press and hold to search quickly during play or pause.
Use to move the cursor when inputting a disc (track)
title.
¤Display panel (9)
Displays various information.
#Remote control sensor (24)
Receives the signals emitted from the remote control.
‹DISPLAY (9)
Press repeatedly to switch between the title and time
displays.
$TITLE (21)
Press to activate or deactivate the title mode.
›CHARA. (21)
Press repeatedly to select different types of characters
when titling a disc (track).
%DELETE/CANCEL (17, 21)
Press to cancel an edit function or to delete the
selected character when titling a disc (track).
fiEDIT (17)
Press repeatedly to accesses the different edit modes.
^SET/ENTER (17, 21)
Press to confirm the current operation or select an edit
mode (etc.).
flJog dial [– / +] [$›] (8, 21)
Use to skip to the beginning of the previous or next
tracks.
Use to select characters when inputting a disc (track)
title.
&INPUT (13)
Press repeatedly to select the input jacks you want to
record from: ANALOG or DIGITAL (OPTICAL 1,
OPTICAL 2, or COAXIAL).
‡REC LEVEL (14)
Use to adjust the recording level when recording from
the analog inputs.
*REC (14)
Press during stop or pause to activate the record
pause mode.
Press while recording to manually add a track division.
°&STOP (8, 13, 17, 21)
Press to stop recording or playback.
Press to cancel an edit or title input operation.
(‹PLAY/*PAUSE (8, 13)
Press during stop (or pause) to start playback. Press
while playing to pause.
Press during record pause to start recording. Press
while recording to pause.
See the pages in parenthesis for details regarding operation.
* TOC (Table of Contents): This is the non-audio data
contained on all mini discs (track numbers, playback
time, title data, etc.).
UTOC (User’s Table of Contents): This is non-audio data
that you can edit (like track numbers, playback time, and
title data).

6
REMOTE CONTROL
See the pages in parenthesis for details regarding operation.
fiSCROLL (9)
Press to scroll the disc (track) title across the display.
Press while scrolling to pause the scroll.
^NUMBER (21)
Press before pressing a number button to input a
number during title mode.
flDELETE (21)
Press to delete the selected character when titling a
disc (track).
&SET (21)
Press to confirm selected character when titling a disc
(track).
‡M-MARK (14)
Press to select automatic or manual marking of tracks
during recording.
*INPUT (13)
Press repeatedly to select the input jacks you want to
record from: ANALOG or DIGITAL (OPTICAL 1,
OPTICAL 2, or COAXIAL).
°MONO/ST (16)
Press during stop or pause to select either monaural or
stereo recording.
(Special Record buttons
TIME (15)
Press during record pause mode to activate Time
Rescue Recording and set the unit to the record pause
mode.
SYNC (15)
Press during stop to activate Synchronized Recording
and set the unit to the record pause mode.
·CD-P (15)
Press to start playback from a YAMAHA CD player.
)?REC (14)
Press during stop or pause to activate the record
pause mode.
Press while recording to manually add a track mark.
‚&STOP (8, 14, 17, 21)
Press to stop recording or playback.
Press to cancel an edit or title input operation.
~REPEAT (10~11)
S/F (!)
Press to select single track (S) or full disc (F) repeat.
Press to select “!” when creating a disc (track) title.
A-B (?)
Press to specify the A and B points for A-B repeat.
Press to select “?” when creating a disc (track) title.
ŸPROG (–) (11)
Press to activate or deactivate the program play mode.
Press to select “–” when creating a disc (track) title.
!RNDM (&) (10)
Press to activate or deactivate the random play mode.
Press to select “&” when creating a disc (track) title.
⁄Numbers/Characters (8, 21)
Use to specify a track.
Press repeatedly to select a character when creating a
disc (track) title.
@CHAR. (21)
Press repeatedly to select uppercase or lowercase
letters during title mode.
¤TITLE (21)
Press to activate or deactivate the title mode.
#SEARCH !⁄(9, 21)
Press and hold to search quickly during play or pause.
Use to move the cursor when inputting a disc (track)
title.
‹SKIP $›(8, 21)
Press to skip to the beginning of the previous or next
tracks during play, pause or stop.
Use to select characters when inputting a disc (track)
title.
$‹PLAY (8, 14)
Press during stop (or pause) to start playback.
Press during record pause to start recording.
›*PAUSE (8, 14)
Press to pause playback or recording.
%DISPLAY (9)
Press repeatedly to switch between the title and time
displays.

7
ENGLISH
• Connections should be made to the correct input/output terminals on the other component.
• Also refer to the owner’s manual supplied with the component you are connecting.
• If the placement of this unit causes noise in other equipment, such as a tuner, move them farther apart.
CONNECTIONS
Do not plug in this unit (or other components) until all other connections are complete.
ANALOG CONNECTIONS
DIGITAL CONNECTIONS
ANALOG
LINE IN LINE OUT DIGITAL IN DIGITAL OUT
OPTICAL OPTICALCOAXIAL 12
PLAYREC
34
L
R
DIGITAL OUT
OPTICAL
DIGITAL IN DIGITAL OUT
OPTICAL OPTICAL
DIGITAL OUT
COAXIAL
Optical fiber cable (not included)
To AC outlet
CD player (etc.) with
optical OUT
Satellite tuner (etc.)
with coaxial OUT
Amplifier/Receiver
(or MD/DAT recorder)
with optical IN/OUT
Coaxial cable (not included)
Optical fiber cable (not included)
Notes for digital connections
• The DIGITAL IN terminals can be connected to any component with an optical or coaxial output so you can make direct digital
recordings.
• The DIGITAL OUT terminal can be connected to a any component with an optical input so you can output digital audio from an MD.
• Before making OPTICAL connections, remove the terminal cover(s).
• In order to protect the terminals from dust, be sure to attach the terminal covers when the optical terminals are not being used.
Notes for analog connections
• The white plug on the connecting cables corresponds to the L (left) channel and the red plug corresponds to the R (right) channel. Be
sure to connect L (left) to L and R (right) to R. Also make sure that the plugs are fully inserted and that the connection is firm.
• The LINE OUT jacks on the MD recorder should be connected to the MD PLAY jacks on your amplifier.
The LINE IN jacks on the MD recorder should be connected to the MD REC jacks on your amplifier.
• The LINE OUT terminals on this unit are numbered 3and the LINE IN jacks are numbered 4. When connecting this unit to a YAMAHA
amplifier or receiver whose terminals are numbered 1, 2, 3, 4... (etc.), connect this unit’s LINE OUT terminals to the input terminals
numbered 3and connect this unit’s LINE IN terminals to the output terminals numbered 4on the rear panel of the amplifier or receiver.
ANALOG
LINE IN LINE OUT DIGITAL IN DIGITAL OUT
OPTICAL OPTICALCOAXIAL 12
PLAYREC
34
L
R
PLAY
REC
3
4
LR
Connecting cords (included)
Amplifier/Receiver
To AC outlet

8
PLAYBACK
Preparations
• Be sure to set the TIMER switch to OFF, then press
POWER to turn this unit on.
• Set your amplifier or receiver to MD.
1Insert an MD.
2Press #PLAY/*PAUSE (or #PLAY on the
remote) to start playback.
3Adjust the volume using the volume control on
your amplifier or receiver.
Label facing up
Arrow pointed toward
disc insertion slot
NATURAL SOUND MINIDISC RECORDER MDX-9
0
s
To stop
Press &STOP.
To pause
Press #PLAY/*PAUSE (or *PAUSE on the remote).
Press again to resume playback (or press #PLAY on the
remote).
To eject the MD
Press ).
Note
The MONO indicator lights when playing monaural MDs.
Skipping Tracks
To skip to the next track
Turn the jog dial to the right (or press SKIP ›on the
remote).
To skip to a previous track
Turn the jog dial to the left (or press SKIP $on the
remote).
Turn one click to skip to the beginning of the current track.
Turn an additional click to skip to the beginning of each
previous track.
To skip to a specific track number
Press the number buttons on the remote corresponding to
the track you desire.
Example:
To select track 3, press 3.
To select track 13, press +10, then press 3.
To select track 23, press +10 twice, then press 3.
To skip to the last track on the disc
Turn the jog dial to the left when the display is showing the
total tracks and total playing time.
jog dial &STOP
TIMER
OFF PLAYREC
POWER
DISPLAY TITLE CHARA. DELETE EDIT SET
CANCEL ENTER
INPUT
REC LEVEL
SEARCH
STOP
#
*
REC
+
–
NATURAL SOUND MINIDISC RECORDER MDX-9
010
PLAY/
PAUSE
&
⁄!
›$
)
s
SEARCH !⁄2
1)
?
A–B
!
S/F SCROLLDISPLAY
REPEAT
–
PROG
&
RNDM )(
D E F
2
A B C
1M N O
5
J K L
4
G H I
3
S T U
7
P Q R
6/
0
Y Z
9
V W X
8
CHAR.TITLE SETDELETENUMBER
⁄
SEARCH
!
INPUT
›
SKIP
$
PAUSE
*
PLAY
‹
REC
?
STOP
&
SPACE
+10
s
MDX
CD-P
RECSYNCTIME
M-MARK MONO/ST
SEARCH
!⁄
2
SKIP
$›
*PAUSE
Numbers
&STOP

9
ENGLISH
2Time remaining on the MD (only for recordable MDs)
3Disc title
During playback
Press DISPLAY to repeatedly to display the following
information.
1Current track number and elapsed time
2Time remaining on the current track
3Track title
If the track has not been given a name, “No Title” is
displayed and the display switches back to the elapsed time
(1).
To view the entire disc (track) title
If the disc (track) title is too long to fit in the display, press
SCROLL. Press SCROLL while the title is scrolling to stop
the scrolling. Press again to continue scrolling through the
title.
Searching
To search forward during play or pause
Press and hold SEARCH ⁄.
To search in reverse during play or pause
Press and hold SEARCH !.
Notes
• Sound can be heard when searching in play mode to help you
locate the desired position within the track. No sound is heard
when searching in pause mode, but the search is conducted
at a higher speed.
• When searching in play mode, playback stops when you
reach the end of the last track.
• Search may not function correctly when there are several
consecutive tracks consisting of only a few seconds apiece.
Switching the Display
When you insert an MD the disc title is displayed
automatically (“No Title” appears if there is no disc title).
Pressing DISPLAY during stop or playback lets you
display other information, such as the remaining time and
track titles.
During stop
Press DISPLAY to repeatedly to display the following
information.
1Number of tracks and total playing time
?
A–B
!
S/F SCROLLDISPLAY
REPEAT
–
PROG
&
RNDM #)(
D E F
2
A B C
1M N O
5
J K L
4
G H I
3
S T U
7
P Q R
6/
0
Y Z
9
V W X
8
SPACE
+10
SCROLL
DISPLAY
TIMER
OFF PLAYREC
POWER
DISPLAY TITLE CHARA. DELETE EDIT SET
CANCEL ENTER
INPUT
REC LEVEL
SEARCH
STOP
#
*
REC
+
—
NATURAL SOUND MINIDISC RECORDER MDX-9
010
PLAY/
PAUSE
&
⁄!
›$
)
s
DISPLAY
DISC TRACK
TOTAL
REMAIN
Total tracks Total playing time
REMAIN indicator
DISC TRACK
TOTAL
REMAIN
Time remaining on the MD
Total tracks
DISC TRACK
TOTAL
REMAIN
DISC TRACK
TOTAL
REMAIN
#
REMAIN indicator
DISC TRACK
TOTAL
REMAIN
#
Track number Elapsed time
DISC TRACK
TOTAL
REMAIN
#

10
RANDOM PLAY
You can have the unit play all the tracks on a disc in a
random sequence
To start random playback
Press RNDM.
The RANDOM indicator lights up and “RandomSearch”
appears in the display while the unit selects a track.
Playback starts automatically.
To cancel
Press RNDM again to turn off the RANDOM indicator.
Notes
• Pressing SKIP ›during random play skips to another track
at random. Pressing SKIP $returns to the beginning of the
current track (you cannot return to previously played tracks).
• If you turn the unit off during random playback, it will be ready
for random play the next time you turn the power back on.
?
A–B
!
S/F SCROLLDISPLAY
REPEAT
–
PROG
&
RNDM #)(
D E F
2
A B C
1M N O
5
J K L
4
G H I
3
S T U
7
P Q R
6/
0
Y Z
9
V W X
8
SPACE
+10
RNDM
REPEAT PLAY
You can have the unit play a single track, the full disc, or
just part of a track repeatedly.
Single Track Repeat
1Select the track you want to repeat.
2Press S/F – REPEAT repeatedly to light the
REPEAT S indicators.
To cancel
Press S/F – REPEAT repeatedly to turn off the REPEAT S
indicators.
Note
Single track repeat is not available during random or program
playback.
Full Disc Repeat
Press S/F – REPEAT repeatedly to light the REPEAT
F indicators.
To cancel
Press S/F – REPEAT repeatedly to turn off the REPEAT F
indicators.
Notes
• In program play mode, the entire program is played
repeatedly.
• In random play mode, the unit reshuffles the tracks and plays
them again after each track plays once.
?
A–B
!
S/F SCROLLDISPLAY
REPEAT
–
PROG
&
RNDM #)(
D E F
2
A B C
1M N O
5
J K L
4
G H I
3
S T U
7
P Q R
6/
0
Y Z
9
V W X
8
SPACE
+10
S/F – REPEAT
A-B – REPEAT
REPEAT
A-BSF
REPEAT
A-BSF

11
ENGLISH
Part (A-B) Repeat
This function lets you repeat a specific part of a track. It’s a
convenient way to study a language, or learn the lyrics to
your favorite song (etc.).
1Press A-B – REPEAT during playback to specify
the beginning (A point) of the part you want to
repeat.
The REPEAT A indicators light up.
2Press A-B – REPEAT again to specify the end (B
point) of the part you want to repeat.
The REPEAT A-B indicators light up and the part you
specified starts to repeat.
To cancel
Press &STOP or A-B – REPEAT.
REPEAT
A-BSF
REPEAT
A-BSF
PROGRAM PLAY
This function lets you enjoy listening to your favorite tracks
in any order you desire.
1Press &STOP to stop playback.
2Press PROG to light up the PROGRAM indicator.
3Program the desired track by pressing the
corresponding numeric buttons.
Example:
To select track 3, press 3.
To select track 13, press +10, then press 3.
To select track 23, press +10 twice, then press 3.
The following display appears momentarily to
show the step information:
The display then switches to the program status:
Repeat this operation to program of up to 30 steps.
4Press #PLAY to start program playback.
4
2
TOTAL
PROGRAM
Total steps Total playing time
Continued on next page
?
A—B
!
S/F SCROLLDISPLAY
REPEAT
—
PROG
&
RNDM #)(
D E F
2
A B C
1M N O
5
J K L
4
G H I
3
S T U
7
P Q R
6/
0
Y Z
9
V W X
8
CHAR.TITLE SETDELETENUMBER
⁄
SEARCH
!
INPUT
›
SKIP
$
PAUSE
*
PLAY
‹
REC
?
STOP
&
SPACE
+10
s
MDX
CD-P
RECSYNCTIME
M-MARK MONO/ST
DISPLAY
1
3
DELETE
SET
SEARCH
!⁄
SKIP
$›
PROGRAM
Step number Track number

12
To check the programmed data
1Stop or pause program playback.
2Press SKIP $or ›to skip through the step
information (or use the jog dial on the front panel).
To delete a specific step
1Stop program playback.
2Press SKIP $or ›to skip through the step
information (or use the jog dial on the front panel).
3Press DELETE (or DELETE/CANCEL on the front
panel) to delete the step. The higher steps are
renumbered automatically.
To change a step
1Stop program playback.
2Press SKIP $or ›to skip through the step
information (or use the jog dial on the front panel).
3Use the numeric buttons to program a new track
number for that step. The original track is cleared from
memory and the new track is programmed.
To cancel
Press PROG To turn off the “PROGRAM” indicator, eject
the disc, or set POWER to off.
Notes
• If the total time exceeds 255 minutes “255mOver” is displayed
instead of the total time.
•SKIP $or ›can be used during playback to skip
between programed tracks.
•SEARCH ⁄can be used during playback to search through
all tracks in the current program.
•SEARCH !can be used during playback return to the
beginning of the current track.

13
ENGLISH
RECORDING
This unit allows you to make recordings from a wide variety
of program sources (both analog and digital).
When recording an analog source (such as an LP or
cassette) this unit converts the analog signals to 44.1 kHz
digital signal before recording them onto the MD.
When recording a digital source, this unit converts the
digital signals to 44.1 kHz for recording onto the MD.
However, If you are recording a 44.1 kHz source signal
(such as a CD) there is no conversion. This unit can record
32, 44.1 and 48 kHz digital signals.
Preparations
• Be sure to set the TIMER switch to OFF, then press
POWER to turn this unit on.
• Set your amplifier or receiver to the program source to be
recorded.
1Insert an MD.
2Press INPUT repeatedly to select the input
connected to the sound source you want to
record.
For Select
LINE IN 4ANALOG
DIGITAL IN COAXIAL DIGITAL COAX.
DIGITAL IN OPTICAL 1 DIGITAL OPT. 1
DIGITAL IN OPTICAL 2 DIGITAL OPT. 2
* Appears when digital signal is input.
3Locate the point where you want to start
recording.
• When recording from a blank MD
Skip this step.
• To start recording from the end of a previous recording.
Press &STOP to set this unit to stop mode.
• To record over a previous recording.
Turn the jog dial (or press SKIP $or ›on the remote)
to select a track (recording starts from the beginning of the
deleted track), or press *PAUSE during playback to pause
at the point where you want to start recording.
CHAR.TITLE SETDELETENUMBER
⁄
SEARCH
!
INPUT
›
SKIP
$
PAUSE
*
PLAY
‹
REC
?
STOP
&
s
MDX
CD-P
RECSYNCTIME
M-MARK MONO/ST
2
4
M-MARK
Label facing up
Arrow pointed toward
disc insertion slot
NATURAL SOUND MINIDISC RECORDER MDX-9
0
s
Input indicator
(Source) sampling frequency indicators*
ANALOG
DIGITAL
OPT. 1 2
COAX.
3244.148
kHz
REPEAT
DISC TRACK
TOTAL
REMAIN
RANDOM
PROGRAM
A-BSF
Continued on next page
TIMER
OFF PLAYREC
POWER
DISPLAY TITLE CHARA. DELETE EDIT SET
CANCEL ENTER
INPUT
REC LEVEL
SEARCH
STOP
#
*
REC
+
—
NATURAL SOUND MINIDISC RECORDER MDX-9
010
PLAY/
PAUSE
&
⁄!
›$
)
s
1)REC LEVEL &STOP
246
&STOP
6

14
4Press REC to set the this unit to record pause
mode.
The REC *indicators light up.
“REC Standby” and the amount of time available for recording
flash alternately in the display.
If you selected a track number or paused playback (in step
3) to record over a previous recording
“OverWriteOK?” appears in the display.
To confirm, press ENTER. This operation will erase the
selected track number (or point) and all subsequent material.
To cancel, press CANCEL (or &STOP).
If you selected ANALOG in step 2, adjust the recording
level as described in “Recording Level”.
Note
When recording from a digital source that has a digital output
(volume) control, set the output level (volume) to “MAX”.
Recording may not be possible at low output levels (when the
digital volume is turned down).
5Start playing the program source to be recorded.
6Press #PLAY/*PAUSE (or #PLAY on the
remote) to start recording.
The TOC indicator lights up.
When the TOC indicator is lit, this means that the TOC
information has not yet been written to the disc. After
recording, eject the disc, or turn this unit’s power off to write
the TOC information and finalize the recording.
To stop
Press &STOP.
To pause
Press #PLAY/*PAUSE (*PAUSE on the remote).
Press again to resume recording.
To eject the MD
Press ).
TOC writing may be impossible (or track number
marking may not perform as expected) when recording
a damaged CD or a broadcast source under
interference.
Recording Level
To set the recording level, first set this unit to the record
pause mode (press REC). Then play the loudest passage
of the source to be recorded and watch the meter
readings. Adjust the REC LEVEL control so that the
highest peak causes the 0 dB level indicators to flicker.
The OVER indicators should not light.
Note
Although some sources can be recorded with lower peak levels,
setting the peak levels too low may degrade the quality of the
recording.
Auto Marking
When making a recording, you can choose either
automatic or manual marking. This feature operates
somewhat differently for analog and digital signals. See
below for details.
Press M-MARK on the remote repeatedly to select
automatic (MANUAL indicator out) or manual
(MANUAL indicator lit) marking.
When recording analog signals
Auto : Track numbers are written in synchronization with
the input level of the signal being recorded. In other words,
if the source signal falls below a certain level for more than
1.5 seconds a track number is written automatically the
next time the source signal rises above that level.
Manual : One track number is written automatically when
you start recording, but none are written during recording.
To mark a track number, press REC at the desired position
while recording.
Note
When using manual marking, the marks must be set at least 4
seconds apart.
When recording digital signals
Track numbers are written in the same positions as the
original source (CD, etc.) with either automatic or manual
marking.
To add additional track numbers, set M-MARK to MANUAL
and press REC at the desired position while recording.
Note
When recording is paused, the portion recorded up to the pause is
counted as an individual track. When recording is resumed, a new
track number is created. On the other hand, if one track is
recorded in continuous repetition, that track(s) is recorded as one
continuous track with a single track number.
MANUAL
Should not light
L
R
dB –60 30 10 6 4 2 1 0 OVER00 ––– –––

15
ENGLISH
TIME RESCUE RECORDING
The Time Rescue (TIME) recording function allows you to
start recording four seconds before you press record.
During record pause mode, the MD recorder monitors the
input signal and continuously maintains a four second
memory “cache”. Therefore, you can record a song that
just started without cutting off the beginning. You may find
this function useful when recording live broadcasts, or
when you want to start recording from the beginning of a
song without recording lots commercials (etc.).
1Press INPUT repeatedly to select the input
connected to the sound source you want to
record.
2Locate the point where you want to start
recording.
3Press REC to set this unit to record pause mode.
The REC *indicators light up.
“REC Standby” and the amount of time available for recording
flash alternately in the display.
If you selected ANALOG in step 1, adjust the recording level
as described in “Recording Level”.
4Press TIME to start recording when you hear the
beginning of a song you want to record.
Recording starts from the memory cache, allowing you to
record from a point approximately four seconds before you
pressed TIME.
Note
To take full advantage of the Time Rescue Recording function,
be sure to wait at least four seconds between steps 3 and 4.
CHAR.TITLE SETDELETENUMBER
⁄
SEARCH
!
INPUT
›
SKIP
$
PAUSE
*
PLAY
‹
REC
?
STOP
&
s
MDX
CD-P
RECSYNCTIME
M-MARK MONO/ST
1
3
4
SYNCHRO RECORDING
The synchronized recording function lets you set this unit
to start recording automatically when a sound signal is
input. When operating this unit in combination with a
remote controllable Yamaha CD player, you can use the
CD-PLAY button on this unit’s remote control to start
playback from the CD player.
1Load the sound source into the source
component.
If necessary, program, or select the track you want to
start recording from before proceeding to the next
step. (Refer to the operation manual supplied with your
source component for instructions regarding its use.)
2Press INPUT repeatedly to select the input
connected to the sound source you want to
record.
3Locate the point where you want to start
recording.
4Press SYNC to set this unit to record pause
mode.
The REC *indicators light up.
“Synchro REC” and the amount of time available for recording
flash alternately in the display.
If you selected ANALOG in step 2, adjust the recording level
as described in “Recording Level”.
5Start playing the sound source. (Press CD-P if
recording from a Yamaha CD player.)
The MD starts recording automatically when a sound signal is
input. When the sound signal stops, the unit switches back to
record pause mode and “Synchro REC” blinks in the display.
6To continue recording, repeat step 5.
When you have finished recording, press &STOP
on this unit to cancel the record pause mode.
CHAR.TITLE SETDELETENUMBER
⁄
SEARCH
!
INPUT
›
SKIP
$
PAUSE
*
PLAY
‹
REC
?
STOP
&
s
MDX
CD-P
RECSYNCTIME
M-MARK MONO/ST
5
2
4

16
MONAURAL RECORDING
Recording in monaural (mono) allows you to record up to
148 minutes of sound on one 74 minute MD. (When
recording in stereo you can record up to 74 minutes of
sound.) This may be useful when recording an interview,
debate, or other whenever you want to record a long time
on one disc.
1Press INPUT repeatedly to select the input
connected to the sound source you want to
record.
2Locate the point where you want to start
recording.
3Press MONO/ST to light the MONO indicator.
4Press REC.
The REC *indicators light up.
“REC Standby” and the amount of time available for recording
flash alternately in the display.
If you selected ANALOG in step 1, adjust the recording level
as described in “Recording Level”.
5Press #PLAY to start recording.
MONITOR OUT
When a disc is not loaded, you can use the monitor out
function to monitor the sound of the input source. This
allows you to enjoy better sound from your other digital
source components, such as CD, by using this unit as a
digital to analog converter.
1Press )to remove the disc.
2Press INPUT repeatedly to select the input
connected to the sound source you want to
monitor.
3Press REC.
“MONITOR OUT” appears in the display.
Sound from the selected input will be output from this unit’s
analog and digital output terminals.
4Start playing the sound source selected in step 2.
The sound is output from the MD recorder’s analog and digital
output terminals.
To cancel
Press REC again, press &STOP, or insert a disc.
1
TIMER
OFF PLAYREC
POWER
DISPLAY TITLE CHARA. DELETE EDIT SET
CANCEL ENTER
INPUT
REC LEVEL
SEARCH
STOP
#
*
REC
+
—
NATURAL SOUND MINIDISC RECORDER MDX-9
010
PLAY/
PAUSE
&
⁄!
›$
)
s
32
CHAR.TITLE SETDELETENUMBER
⁄
SEARCH
!
INPUT
›
SKIP
$
PAUSE
*
PLAY
‹
REC
?
STOP
&
s
MDX
CD-P
RECSYNCTIME
M-MARK MONO/ST
3
4
5
1

17
ENGLISH
EDITING
MOVE
This function lets you change the position of any track.
First, you select the track you want to move, then you
specify the track number you want to move it to. After the
move, the tracks located between the old and new
positions are renumbered automatically. You can perform
this operation repeatedly to completely reorder the disc.
1Turn the jog dial to select the track you want to
move.
2Press EDIT repeatedly to display “Move ?”, then
press ENTER.
3Turn the jog dial to select the track’s destination.
4Press ENTER.
To cancel before moving the track
Press CANCEL (or &STOP).
To undo MOVE
1Press &STOP to set this unit to stop mode.
2Press EDIT repeatedly to display “Undo Move”, then
press ENTER.
“Undo OK ?” appears in the display.
3Press ENTER again to undo.
To cancel, press CANCEL (or &STOP).
One of the main advantages of the MD is its editing
capabilities, you can remove the commercials from a radio
broadcast, reorder songs into the order you want to listen,
remove songs, combine songs, even remove part of a
song.
Edit functions
This unit offers the following editing operations.
(Please note that track numbers are updated automatically
when you perform a MOVE, ERASE, COMBINE or DIVIDE
operation.)
¶MOVE
Lets you move a track to a different track number.
¶ERASE
Lets you erase a track, the entire disc, or part of a
track.
¶COMBINE
Lets you combine two adjacent tracks.
¶DIVIDE
Lets you split a single track into two different tracks.
¶UNDO
Lets you undo the previous edit operation if you make
a mistake (you cannot, however, undo the undo).
Note
After performing an edit operation, the TOC indicator lights up
to show that the TOC information has not yet been written to
the disc. Undo is possible only when the TOC indicator is lit.
However, if you perform a recording operation (by pressing
REC, TIME, or SYNC), undo is not possible even if the TOC
indicator is lit.
ANALOG
DIGITAL
OPT. 1 2
COAX.
3244 148
DISC TRACK
TOTAL
REMAIN
RANDOM
Destination
Selected track
TIMER
OFF PLAYREC
POWER
DISPLAY TITLE CHARA. DELETE EDIT SET
CANCEL ENTER
INPUT
REC LEVEL
SEARCH
STOP
#
*
REC
+
—
NATURAL SOUND MINIDISC RECORDER MDX-9
010
PLAY/
PAUSE
&
⁄!
›$
)
s
22,4 1,3 &STOPCANCEL

18
ERASE
The ability to erase sound without having to re-record is
another convenient function. You can erase the entire disc,
a single track, or just part of a track.
Disc Erase
This operation lets you erase all audio and title (character)
data to create a blank MD. Please note that once erased,
this data cannot be recovered.
1Press &STOP to set this unit to stop mode.
2Press EDIT repeatedly to display “Disc Erase?”,
then press ENTER.
“DiscEraseOK?” appears in the display.
3Press ENTER again.
When all audio, name and title data has been erased
“Complete” appears momentarily.
To cancel before erasing the entire disc
Press CANCEL (or &STOP).
To undo ERASE
1Press &STOP to set this unit to stop mode.
2Press EDIT repeatedly to display “Undo Erase”, then
press ENTER.
“Undo OK ?” appears in the display.
3Press ENTER again to undo.
To cancel, press CANCEL (or &STOP).
Track Erase
This operation lets you erase a single track. After you erase
the track, the total number of tracks decreases by one and
all tracks following that track are renumbered.
If you plan to erase two or more tracks
To avoid confusion you should always erase from higher track
numbers to lower track numbers. This prevents accidental
renumbering of tracks you plan to erase.
1Turn the jog dial to select the track you want to
erase.
2Press EDIT repeatedly to display “Erase ?”, then
press ENTER.
“(track number) EraseOK?” appears in the display.
3Press ENTER again.
The track is erased and “Complete” appears momentarily.
To cancel before erasing the track
Press CANCEL (or &STOP).
To undo ERASE
1Press &STOP to set this unit to stop mode.
2Press EDIT repeatedly to display “Undo Erase”, then
press ENTER.
“Undo OK ?” appears in the display.
3Press ENTER again to undo.
To cancel, press CANCEL (or &STOP).
EDIT ENTER &STOPJog dial
SEARCH
!⁄
#PLAY/
*PAUSE
TIMER
OFF PLAYREC
POWER
DISPLAY TITLE CHARA. DELETE EDIT SET
CANCEL ENTER
INPUT
REC LEVEL
SEARCH
STOP
#
*
REC
+
—
NATURAL SOUND MINIDISC RECORDER MDX-9
010
PLAY/
PAUSE
&
⁄!
›$
)
s
CANCEL

19
ENGLISH
Part Erase
This operation lets you erase part of a track.
1Press #PLAY/*PAUSE to play the track
containing the part you want to erase.
2Use SEARCH !or ⁄to locate the beginning
of the part you want to erase (point A), then press
#PLAY/*PAUSE to pause at that point.
3Press EDIT repeatedly to display “A–B Erase?”,
then press ENTER.
Point A (from step 2) is registered and “Erase A–_” appears in
the display.
4Use #PLAY/*PAUSE and SEARCH ⁄to
locate the end of the part you want to erase (point
B).
5Press ENTER to register point B.
“Check” appears, then the part you specified plays
repeatedly and “Erase A–B?” appears in the display.
To adjust point B
Turn the jog dial while the “B” of “Erase A–B?” is blinking
Point B can be adjusted up to 2 second (176 steps) in either
direction.
6Press ENTER again.
The part is erased and “Complete” appears momentarily.
To cancel before erasing the part
Press CANCEL (or &STOP).
To undo ERASE
1Press &STOP to set this unit to stop mode.
2Press EDIT repeatedly to display “Undo Erase”, then
press ENTER.
“Undo OK ?” appears in the display.
3Press ENTER again to undo.
To cancel, press CANCEL (or &STOP).
To erase parts spanning more than one track
Use the COMBINE function described below to combine
the tracks into one track before performing this operation.
Note
After part erase, a new track number is automatically assigned to
the section starting after point B.
33,4 2
COMBINE
This function lets you combine two consecutive tracks into
one. After you combine the tracks, the total number of
tracks decreases by one and the tracks following the
combined tracks are renumbered.
1Press &STOP to stop playback.
2Turn the jog dial to select the second track of the
two you want to combine.
3Press EDIT repeatedly to display “Combine ?”,
then press ENTER.
“Check” appears momentarily, then the unit plays the 4
seconds before and after the point where the tracks will be
connected. “(track number) + (track number) OK?” appears in
the display.
4Press ENTER again.
The tracks are combined and “Complete” appears
momentarily.
To cancel before combining the tracks
Press CANCEL (or &STOP).
To undo COMBINE
1Press &STOP to set this unit to stop mode.
2Press EDIT repeatedly to display “UndoCombine”, then
press ENTER.
“Undo OK ?” appears in the display.
3Press ENTER again to undo.
To cancel, press CANCEL (or &STOP).
Notes
• This operation is not possible when track 1 is selected.
• You can also divide the track later using the DIVIDE function.
• If “Can’t Edit” appears in the display the tracks cannot be
combined. This sometimes happens when you have edited
the same track many times. This is due to the technical
limitations of the MD system and is not a mechanical error or
malfunction.
CANCEL
TIMER
OFF PLAYREC
POWER
DISPLAY TITLE CHARA. DELETE EDIT SET
CANCEL ENTER
INPUT
REC LEVEL
SEARCH
STOP
#
*
REC
+
—
NATURAL SOUND MINIDISC RECORDER MDX-9
010
PLAY/
PAUSE
&
⁄!
›$
)
s
1

20
&STOP
1,2
2
3 3,5 4
DIVIDE
This function lets you divide one track into two separate
tracks by adding a new track number to a certain point in
the track. If you add a track number at the beginning of a
section you want to hear, you can access it quickly by
using the skip function during playback. After you divide a
track, the total number of tracks increases by one and the
tracks following the divided tracks are renumbered.
1Press #PLAY/*PAUSE to play the track you
want to divide.
2Use SEARCH !or ⁄to locate the point
where you want to divide the track, then press #
PLAY/*PAUSE to pause at that position.
3Press EDIT repeatedly to display “Divide ?”, then
press ENTER.
“Check” appears momentarily, then “Divide OK ?” appears
and the unit starts repeating the point where the track will be
divided.
4If necessary, use the jog dial to adjust the
position of the point where the track will be
divided.
The divide position can be adjusted up to 2 second (255
steps) in either direction.
5Press ENTER.
The track is divided and “Complete” appears
momentarily.
To cancel before dividing the track
Press CANCEL (or &STOP).
To undo DIVIDE
1Press &STOP to set this unit to stop mode.
2Press EDIT repeatedly to display “Undo Divide”, then
press ENTER.
“Undo OK ?” appears in the display.
3Press ENTER again to undo.
To cancel, press CANCEL (or &STOP).
Notes
• You can also combine the tracks later using the COMBINE
function.
TIMER
OFF PLAYREC
POWER
DISPLAY TITLE CHARA. DELETE EDIT SET
CANCEL ENTER
INPUT
REC LEVEL
SEARCH
STOP
#
*
REC
+
—
NATURAL SOUND MINIDISC RECORDER MDX-9
010
PLAY/
PAUSE
&
⁄!
›$
)
s
CANCEL
Table of contents
Other Yamaha Mini Disc Recorder manuals

Yamaha
Yamaha MD8 User manual

Yamaha
Yamaha MDX-E300 User manual

Yamaha
Yamaha MD4 Instruction Manual

Yamaha
Yamaha MDX-596 User manual

Yamaha
Yamaha MDX-M5 User manual

Yamaha
Yamaha MDX-E100 User manual

Yamaha
Yamaha MD4 User manual

Yamaha
Yamaha MDX-596 User manual

Yamaha
Yamaha MDX-595 User manual

Yamaha
Yamaha MDX-E100 User manual