Yamaha NUAGE User manual

Nuage Setup Guide
Version 1.8

2
Table of Contents
1. Introduction.....................................................................................................................................4
2. Used Equipment List ......................................................................................................................4
3. Installing primary equipment........................................................................................................5
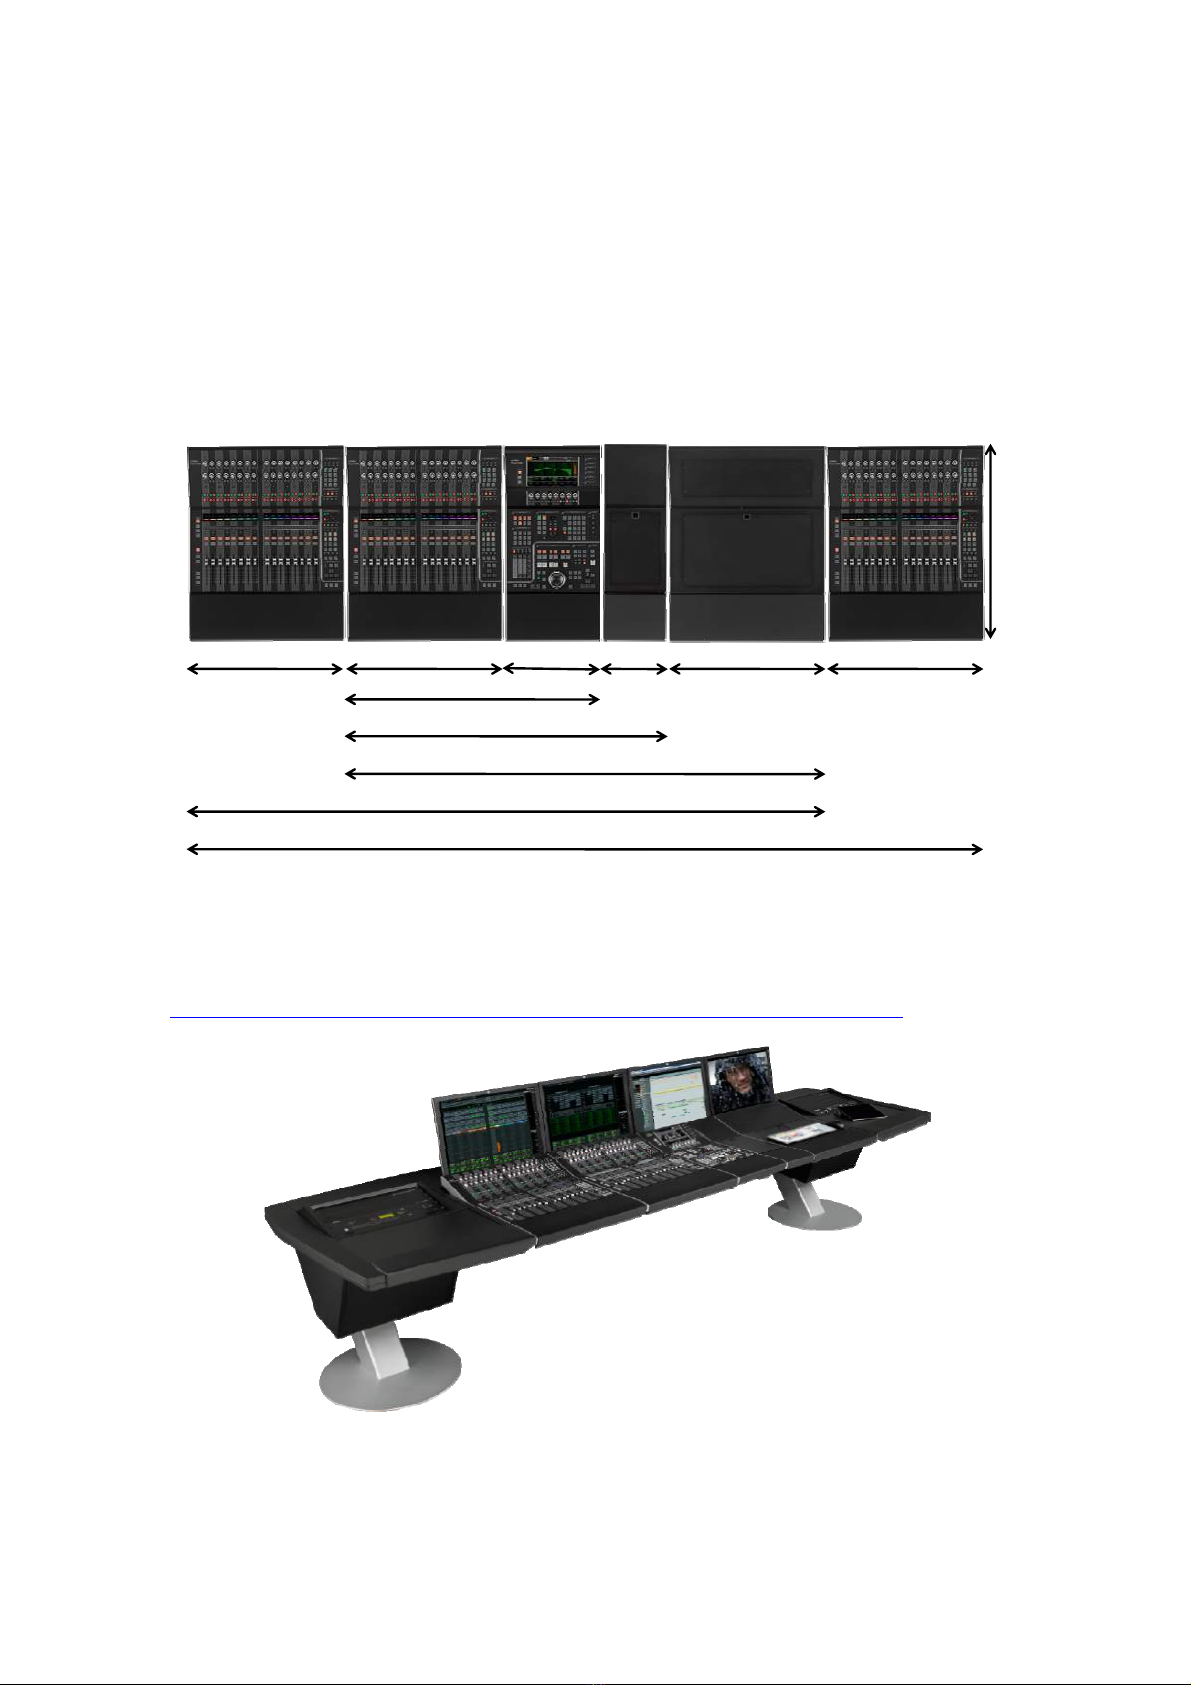
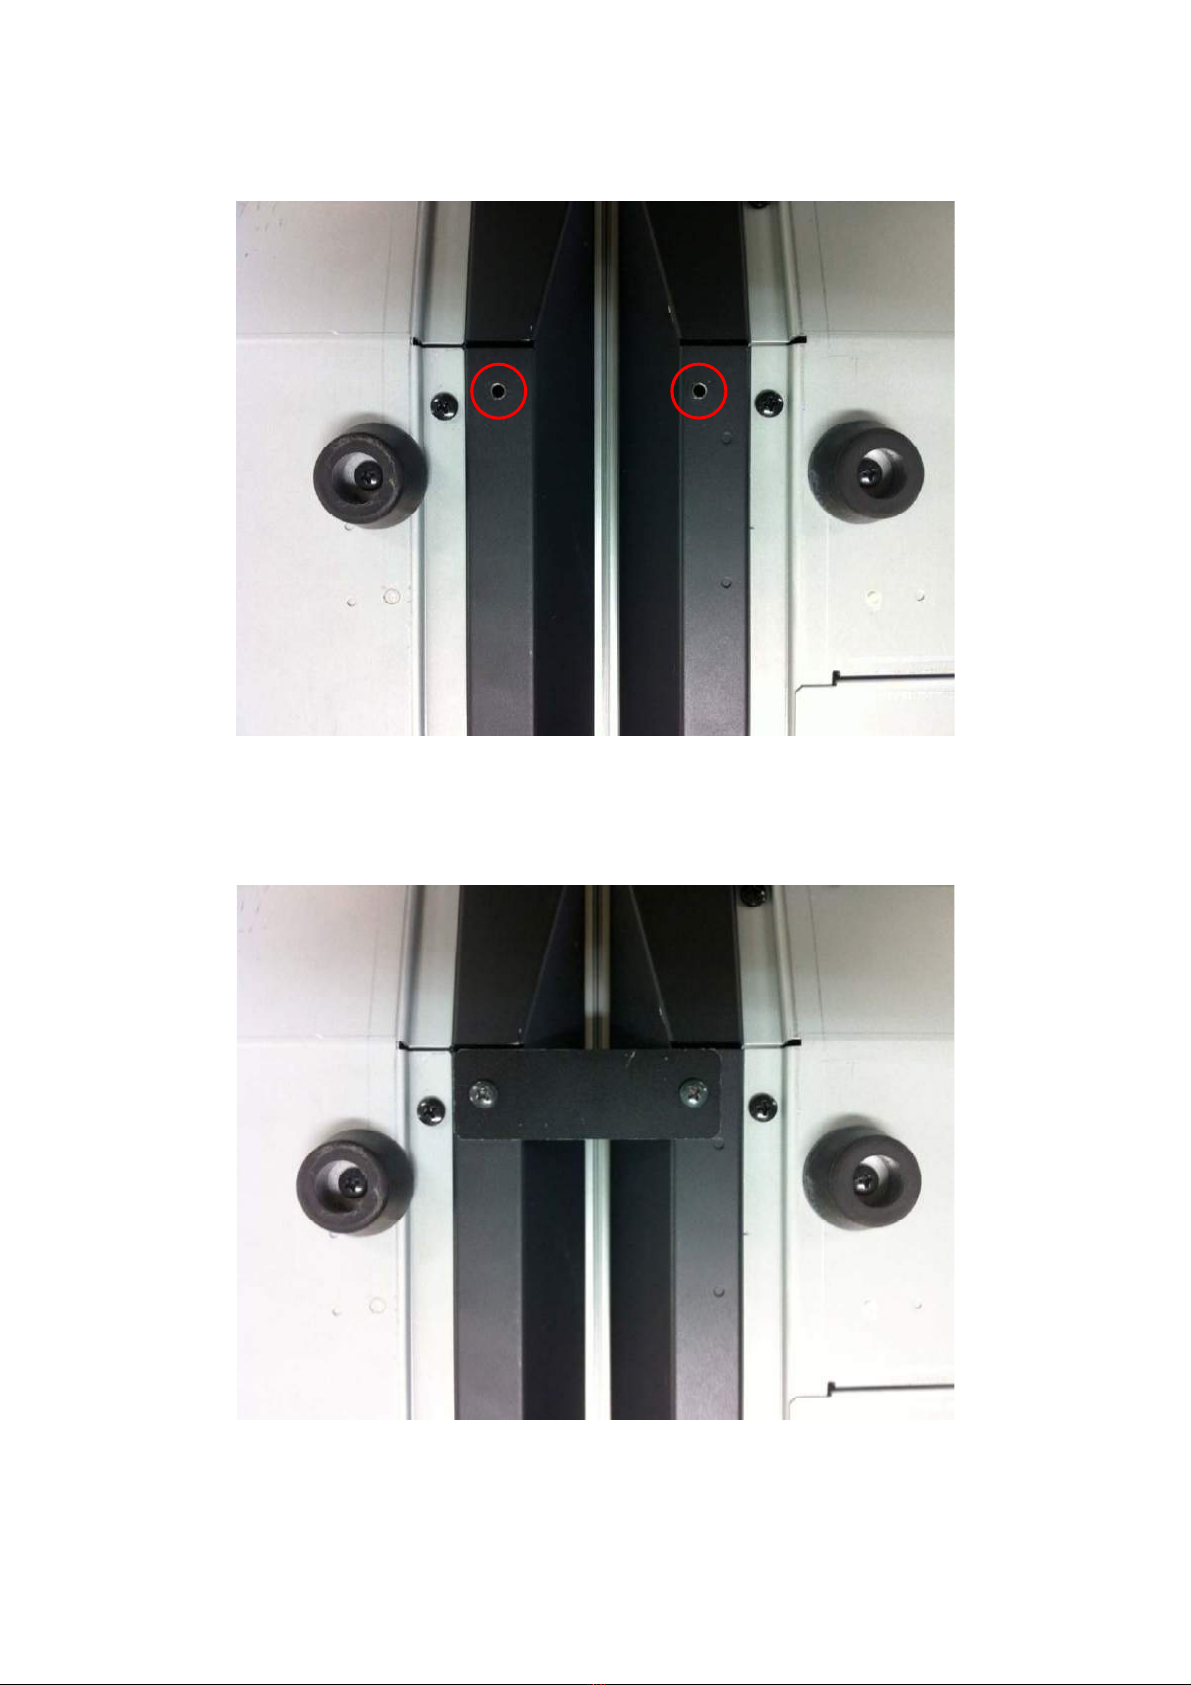
3-1. Installing the controller and console desk .............................................................................5
3-2. Installing video monitors.......................................................................................................11
3-3. Installing Nuage I/O ..............................................................................................................17
3.4. Installing the computer and peripheral hardware..............................................................17
3-5. Installing the network switch................................................................................................20
3-6. Installing a KVM switch.......................................................................................................23
3-7. Installing video-related equipment.......................................................................................28
3-8. Installing powered speakers..................................................................................................34
3-9. Installing input devices..........................................................................................................36
4. Connecting equipment..................................................................................................................37
4-1. Power connections .................................................................................................................37
4-2. Ethernet connections.............................................................................................................37
4-3. KVM-switch connections......................................................................................................41
4-4. Audio connections..................................................................................................................44
4-5. AD8HR Connections .............................................................................................................50
4-6. Video-related equipment connections and other connections............................................53
4-7. Wordclock Connections.........................................................................................................55
5. Installing software and drivers....................................................................................................57
5-1. Installing the eLicenser Control Center ..............................................................................57
5-2. Installing NUENDO...............................................................................................................59
5-3. Installing Tools for Nuage.....................................................................................................62
5-4. Installing Dante Controller...................................................................................................67
5-5. Installing QuickTime 7.7.9 from Apple Software Update (For Windows only)...............71
5-6. Installing Bonjour (For Windows only)...............................................................................73
5-7. Installing the driver for Dante Accelerator.........................................................................76
5-8. Installing the driver for SyncStation....................................................................................78
6. Starting up & equipment settings................................................................................................84
6-1. Sequence for equipment start-up .........................................................................................84
6-2. Starting up controller............................................................................................................84

3
6-3. Starting up computer monitors and computer peripherals...............................................85
6-4. Starting up computers...........................................................................................................85
6-5. Settings for Windows and Mac OS X...................................................................................89
6-6. Settings for Nuage Workgroup Manager............................................................................95
6-7. Settings for Dante Controller................................................................................................97
6-8. Setting up and launching NUENDO..................................................................................104
6-9. Device Setup settings...........................................................................................................106
6-10. Project Synchronization Setup .........................................................................................109
6-11. Setting VST Connections...................................................................................................111
6-12. HA Remote settings withAD8HR ....................................................................................120
6-13. Connecting R Series units.................................................................................................122
6-14. Connecting RMio64-D.......................................................................................................129
6-15. Connecting GPIO units.....................................................................................................131
6-16. Connecting and setting up Pro Tools system...................................................................136
6-17. Setting up and configuring DolbyAtmos environment using VST MultiPanner.........148
History
March, 2013 v1.0 released
August, 2013 v1.1 released
June, 2014 v1.5 released
June, 2016 v1.7 released
September, 2016 v1.8 released
All Yamaha products described in this document are the registered trademarks of Yamaha Corporation.
Also, other products described in this document are either the trademarks or the registered trademarks of each
manufacturer or party.

4
1. Introduction
This guide explains how to build a system using the Nuage, the Yamaha Advanced Audio
Production System.
The Yamaha Nuage is a complex system that brings together the Nuage Fader/Nuage Master, Nuage
I/O, Dante Accelerator, and other Nuage hardware; a computer, video monitor, network switch, and
other PC-related equipment; and software such as Steinberg NUENDO and Tools for Nuage. You
will need a thorough knowledge of each component, and you will need an accurate understanding of
ins and outs of their setup.
This guide will walk you step-by-step through installing each piece of primary equipment,
connecting them via the various cables needed, installing software and drivers and all the aspects of
setup that need to be handled before the system can be used.
2. Used Equipment List
The main devices used in this guide are as follows.
1. Nuage Master Unit
2. Nuage Fader Unit, 2 units
3. Nuage I/O, 3 units (8A/D8/8AD8)
4. Nuage Workspace Unit, 2 units (large/small)
5. Dante Accelerator Card
6. Steinberg SyncStation
7. HP z24i, 3 units
8. HP Z series Workstation Z840 (Windows 7 Professional)
9. Apple Mac Pro (Mac OS X 10.10)
10. Gefen 8 × 1 DVI KVM DL Switcher, 3 units
11. Gefen 1:4 Video Splitter
12. Cisco SG300-08
13. Sony DSR-1500A
14. JL Cooper GPIO
15. External compressor
16. Yamaha AD8HR, 2 units
17. Yamaha Rio1608-D
18. Yamaha HS50M, 5 units with an HS10W

5
3. Installing primary equipment
3-1. Installing the controller and console desk
Be sure to set aside enough space to allow for your particular Nuage setup. The figure below shows
the approximate sizes for the controllers.
58.1cm(22.9”)
93.5cm(36.8”)
116.2cm(45.7”)
174.3cm(68.7”)
35.4cm(13.9”)
232.4cm(91.6”)
290.5cm(114.5”)
58.1cm(22.9”) 58.1cm(22.9”) 58.1cm(22.9”)22.7cm(9.0”)
72.0cm(28.3”)
We recommend a couple of Nuage console desks shown below for installing your Nuage controllers.
1. Argosy Mirage for Nuage
http://www.argosyconsole.com/html_internal/argosy_studiofurniture_yamahaNuage_mirage32ls.html

6
2. AKA Design ProWave system
http://www.akadesign.co.uk/site_product/prowave/prowave.html
3. Sound Construction & Supply Custom Console (for Nuage)
http://www.custom-consoles.com/recording-studio-furniture.php
Once you have finished getting the console desk set up, fix each unit in place with joining brackets.
To attach a joining bracket, first line up the units and remove the two neighboring screws on their
undersides.

7
【Remove the screws】
Next, attach the joining bracket using the screws you just removed
【Place the Jointing bracket screwed into place】

8
Repeat the process at the opposite end of the units
‘
【Brackets installed in two locations】
Caution!
When multiple Fader units with Master unit are in use, always make sure to use the jointing
brackets
Caution:
Do not transport multiple units
that are held together with
joining brackets. This is
dangerous and likely to result in
drops or damage

9
The positions for each rubber foot are as follows:
【Nuage Fader (rear)】
【Nuage Fader (front)】
【Nuage Fader (side)】

10
【Nuage Master (rear)】
【Nuage Master (front)】
【Nuage Master (side)】
.
【Nuage Workspace Small (rear)】

11
【Nuage Workspace Small (side)】
※The dimensions and the positions of the rubber feet are the same as those of Nuage Fader
3-2. Installing video monitors
To ensure accurate color reproduction and a wide viewing angle, we recommend that the monitor
you use with the Nuage Fader be a professional 24-inch monitor with 1920 x 1200 resolution and
in-plane-switching (IPS) technology.
Why use an IPS monitor?
Although there are large LCD monitors available at low prices, these typically use a kind of display
technology called “Twisted Nematic” or TN, which has a narrow viewing angle (130–140°); when
viewed from outside their viewing angle, the colors and brightness tend to change considerably,
making it difficult to read them accurately.
【Good color reproduction on IPS 【Inaccurate color and brightness on TN
monitors with 178° viewing angles】 monitors】

12
Following are four recommended video monitors (current as of June 2016).
1. HP z24n
http://www8.hp.com/us/en/products/monitors/product-detail.html?oid=7483063#!tab=features
2. Dell U2413
http://www.dell.com/ed/business/p/dell-u2413/pd
Mounting the video monitor
There are two approaches to mounting video monitors for Nuage.
1. Use the included monitor stand.
2. Use a monitor arm

13
【Included monitor stand】 【Monitor Arm】
The advantages of using monitor arms are that they let you position the monitor with more freedom,
in terms of vertical and horizontal position and in terms of angle, and they don’t require as much
depth on your desk surface as a monitor stand. The disadvantages are that the monitor arm may be
less stable, depending on how many monitors it is supporting, how much they weigh, and how far
out they are cantilevered. If you can position the monitor at a suitable height and angle using the
included stand, as shown above, we recommend using that; if not, we recommend using a monitor
arm that supports a single monitor, and positioning it near the centerline of the clamp, to the extent
this is possible.
We recommend that the video monitor be angled at 70°, in line with the rear surface of the
controller.
When using HP Monitor ZR2440w, it is recommended to use Monitor Arm compliant to
VESA100mm. Please find the following list for recommendation
Tip:
Adjust all monitors to be at the same height with the correct angle takes a bit of skill and
experience. In case of using HP monitors, lock it at its lowest height and find the best angle from
there.

14
Ergotron LX Desk Mount LCD Arm
http://www.ergotron.com/ProductsDetails/tabid/65/PRDID/351/language/en-US/Default.aspx
Ergotron LX Dual Side-by-Side Arm
http://www.ergotron.com/ProductsDetails/tabid/65/PRDID/354/language/en-US/Default.aspx
Humanscale M8
http://www.humanscale.com/products/product_detail.cfm?group=m8

15
In order to see the information as much as possible, position the lower edge of the LCD panel to sit
just above the upper edge of the controller. Note that if the video monitor’s height creates acoustic
problems, you can position the lower part of the LCD panel to hid it behind the rear of the controller.
Adjustments to the display will be explained later

16
【Set to normal height】 【Lowered】
Also note that, depending on the monitor, the power button and screen-adjustment buttons may be
along the lower front of the video monitor, and if the monitor is too close to the controller, one of
these buttons may get pushed accidentally. Be careful to position the monitor so that this does not
happen
【Note the buttons along the lower front】
TIPS:
In order to avoid unexpected power discontinuity, press and hold the power button for ten seconds
when the monitor display is on to turn it into Power Button Lockout mode. And in order to turn the
mode off, press and hold the power button for 10 seconds again.

17
3-3. Installing Nuage I/O
Nuage I/O is a 19-inch rack-mount equipment in 2U. Please prepare enough rack space as necessary.
Nuage I/O has fan equipped on the rare panel, please install it to the machine room if there is noise
from the fan.
Set up UNIT ID
When using multiple Nuage I/Os, it is necessary to set the UNIT ID on each I/O in order. Please set
the UNIT ID with the rotary switch on the rear panel.
【UNIT ID on Nuage I/O】
3.4. Installing the computer and peripheral hardware
Powerful computers generate a lot of fan noise, which can affect your work in a control room or
studio where being quiet is required. Therefore, we recommend locating computers in the machine
rooms or other isolated spaces, to the extent that is possible. If setting up in an isolated spot is a
problem, we recommend setting it up in a distant spot, and that you use a sound-isolating rack.
TIPS:
When other devices such as R series are in use within the same workgroup, please make sure
not to use the same UNIT IDs of those devices and choose a unique ID.

18
【Sound Construction and Supply Isobox Post 24-45】
Keyboards, trackballs, etc
We recommend installing your keyboard on one of the following:
1. Nuage Fader/Workspace (large) keyboard tray *
2. On a Nuage Workspace (large)
*Accommodates a keyboard measuring up to 460 × 138 × 38 mm
1. The Nuage Fader/Workspace (large) keyboard tray
【Tray in open position】
TIPS:
To fit the keyboard into the Nuage Fader or Workspace (Large), the recommend size of the
keyboard up to 460 × 138 × 38 mm (18.11 × 5.43 × 1.49 inch). Please make sure your keyboard fits
into the space in advance.

19
【Thread keyboard cable through hole on underside】
【Tray with keyboard in place】
2. The Nuage Workspace (large)
If the keyboard is not stored in a tray, but you want to keep it readily accessible, place it on the
Workspace (large). The keyboard’s cable can be passed through a hole in the Workspace cover to run
underneath.

20
We recommend the Nuage Workspace (small) as a place to set your trackball. The cable can be
passed through a hole in the cover in the same way. If you use a mouse, we recommend using a
mouse pad rather than using your mouse directly on the cover.
【With trackball in use】 【With mouse in use】
3-5. Installing the network switch
We recommend installing the network switch in a machine room that is not prone to electromagnetic
interference.
Switching hub (switch)
Ensure that your network switch fulfills the following requirements for use with Nuage.
1. Gigabit switch (1,000 Mbps)
2. Managed switch
3. No EEE function or off switch
Other manuals for NUAGE
1
Table of contents
Other Yamaha Recording Equipment manuals

Yamaha
Yamaha PM5D-RH User manual

Yamaha
Yamaha FX900 User manual

Yamaha
Yamaha MY8-LAKE User manual

Yamaha
Yamaha DP-U50 User manual

Yamaha
Yamaha POCKETRAK PR7 User manual

Yamaha
Yamaha VL1-m Owner's manual

Yamaha
Yamaha SPX90 II User manual

Yamaha
Yamaha FX770 User manual

Yamaha
Yamaha EME-1 User manual

Yamaha
Yamaha TX-216 User manual

Yamaha
Yamaha CDR200tx User manual

Yamaha
Yamaha QY10 Manual

Yamaha
Yamaha MCX-C15 - MusicCAST Network Audio Player Installation guide

Yamaha
Yamaha DSR1 User manual

Yamaha
Yamaha GQ1031C User manual

Yamaha
Yamaha MSS1 User manual

Yamaha
Yamaha CBX-D3 User manual

Yamaha
Yamaha TX-802 User manual

Yamaha
Yamaha DR100 User manual

Yamaha
Yamaha MU5 User manual