Yamaha QX-3 User manual

-
-- - -
----
-
- -
--
-
--
- -
- -
--
- - --
--
---
--
~
TM
THE OFFICIAL PUBLICATION
OF
THE YAMAHA USERS
GROUP
AUGUST
1987
G
YAMAHA®

Editor
Tom Darter
Operations
Sibyl Darter
Editorial Board
Bob Frye
Bill Hinely
Mark Koenig
Jim Smerdel
Cover
Photograph
Jim Hagopian
AFfERTOUCH
is
pub-
lished monthly. Third class
postage paid
at
Long
Prairie, MN and additional
points of entry.
SUBSCRIPTIONS:
Free.
Address subscription cor-
respondence to AFTER-
TOUCH,
P.O.
Box
7938,
Northridge,
CA
91327-
7938.
POSTMASTER:
Send form 3579 to P.O.
Box
7938, Northridge,
CA
91327-7938.
-
--
--
--
--
-
--
--
-
- -
--
--
--
--
---
-
--
---
--
~
August
1987
Volume 3, Number 8
Issue
#23
4 FUNK SYNTH PIANO
A
new
DX9 voice created
by
Brian William Niles.
5
FULL
LEAD
PIPES
A
new
DX9 voice created
by
Brian William Niles.
6 Harmallets
A new DXlOO voice created by Dave Anderson.
7
Great
88
A
new
DXlOO voice created by S.E. McMayon.
8
COSMOS
9
MSS1
10 QX3
12
MEP4
A new DXlOO voice created by Daniel
P.
Estabrooks.
Yamaha unveils its new MIDI SMPTE synchronizer.
An
introduction to Yamaha's newest digital sequence recorder.
By
Tom Darter.
Using
the
MEP4 MIDI event processor in live applications.
By
Scott
Plunkett.
14
StringsUp
A
new
MEP4 setup created by
Scott
Plunkett.
16 Hot Tips
Reader tips for
the
SPX90, CXSM,
FB~Ol,
and DX7
II.
18 Questions
Answers
to
questions from readers.
By
Torn Darter.
©1987 Yamaha Music Corporation
USA.
No
part
of
this publication may
be
reproduced, stored
in
a retrieval system, or rransmmed in any form or
by
any means,
electronically, mechanically, photocopying:, recording,
or
otherwise,
without
the
prior wrirren permiSSion
of
Yamaha
lnrernational
Corporation.
2 AFfERTOUCH/Vol. 3 No. 8

From
The
Editor
MANY
OF
YOU may have recognized
the
cover art from last
month's
"Return
of
the
Reader"
issue
as
being
part
of
an
AfterTouch poster
that
appeared earlier this
year. It was a special project,
put
together
by
photographer Wynn Miller. Unfortunately, we
didn't
give Wynn credit last
month.
Our
regular
cover photographer, Jim Hagopian, was listed
on
the
masthead, and
we
neglected
to
add a
notice with the proper credit for
the
"Reader"
cover.
Our
apologies to Wynn Miller for this
oversight, and our thanks to
him
for doing such
a great job
on
this AfterTouch poster
and
cover.
This
month's
issue
features
4-operator
patches from readers, covering two generations
of
instruments-the
DX9
and
the
DXlOO.
There
are also
Hot
Tips and Questions from readers,
plus the MEP4 applications article postponed
from an earlier issue.
You
will also find short
introductions to
the
two
new
products featured
on
the
cover: the QX3 digital sequence recorder
and the MSS1 MIDI
SMPTE
synchronizer.
Next
month,
we'll
continue
with
more 4-op-
erator patches from readers,
once
again cover-
ing two generations
of
instruments-the
DXlOO
and
the
TX81Z.
There
will be reader articles
too, plus more
Hot
Tips
and
Questions. Also,
there will be information
on
more
new
products
from Yamaha.
And,
before
the
end
of
the
year,
we
will finally publish
the
long-promised, long-
anticipated article
on
6-operator
to
4-operator
patch conversion.
So, keep your suggestions,
hot
tips, patches,
questions, and articles coming in. Keep letting
Receive AfterTouch Free Every Month!
us
know
what
you
want
and
need,
and
we'll do
our best to get it into AfterTouch for you.
Also, please notice
that
we have a new mail-
ing address, which became effective beginning
with last month's issue.
The
new address
is
as
follows:
AfterTouch,
P.O.
Box
7938,
Northridge,
CA
91327-7938.
In
closing, here
is
our monthly repeat
of
some information
we
get asked for every
month:
Back
Issues:
If
a request for back issues
is
combined with a subscription request
or
other
material, chances are it will
not
be fulfilled. All
requests for AfterTouch subscriptions must
go
to
our
Mailing List
input
service.
After
the
addresses are entered,
the
letters are normally
kept
on
file, in
keeping
with
various
postal
regulations. To be absolutely sure
that
you
receive any available back issues
that
you want,
make back issue requests separately,
and
include
the indication
"ATTN:
Back Issues"
on
the
en-
velope. Please do
not
send back issue requests
on
the
attached subscription postcard.
Product
Literature:
All
requests for lit-
erature
on
specific products must go directly to
Yamaha.
(The
address
is:
Yamaha Music
Cor-
poration
USA,
P.O. Box 6600, Buena Park,
CA
90622.)
We
at
AfterTouch are happy to
receive specific questions
concerning
the
use
of
Yamaha professional music products,
and
we
will answer as many
of
them
as
we
can
in
the
Questions column; however, requests for gen-
eral product information must be
sent
directly
to Yamaha.
-TD
Y
OU
CAN
RECEIVE
AFTERTOUCH
for
an
entire year, absolutely free, just by
asking. Ifyou are
not
already
on
our mailing list
and
would like
to
be, fill
out
the
attached postcard. Be sure to sign
the
card (a postal regulation); it lets
us
know
that
you
really
want
to
receive AfterTouch.
After you have filled
in
the
relevant information,
put
a stamp
on
the
postcard
and mail it to us.
When
we receive
the
card, we'll
put
you
on
our
permanent
mail-
ing list,
and
you will receive twelve issues of AfterTouch absolutely free!
There
is
absolutely
no
obligation,
and
no
other
strings are attached.
(By
the
way,
if you received
this
issue in the mail, you are already
on
our
perma-
nent
mailing list,
so
you
don't
need
to send
in
another
card.)
Also,
don't
limit yourself to just sending in your address: Let
us
know what you
want
to
read,
and
what
you
have
to
offer (see page
19
for details).
We
look forward
to your input.
AFTER~
TOUCH
is
a
monthly
informational
publication from
Yamaha
To receive
AFTER~
TOUCH
every
month,
abso~
lutely free, just
put your name
and address
on
the enclosed
card and mail it
to
us.
Vol.
3 No.
8/
AITERTOUCH 3

0\
B
:;;!~
~~
~§
~
"'
g
g
!!!
99
0
Ro\NGE
TRI
WAVE
POLY
POLY
MJNO
c::
.
·2]
<0\~
....
~
·><
>-z
~ o
0
~e
~~
~
~~
Q)
.....
-::::=
ooS:Z~~
OFF
OFF
PITCH
28
SPEED
7
PITCH
BEND
RANGE
OFF
ON
MODULATION
V'<l-IEEL
OFF OFF
BREATH
CONTROL
AMP
EGBIAS
0 1
0
13
0 1 0 2
3 3
0 4
DELAY
PM)
NJO
PITCH
ANP
OP-
LFO
MODSENS
OFF
0
C3
ON
MODE
TIME
KEY
osc
PORTM£NTO
TRANS
SYNC
~
0
z
FREQUENCY
DETUNE
FREQUENCY
DETUNE
0.50
+7
1.00
-1
ENVELOPE
DATA
ENVELOPE
OAT
A I
FEEDBACK
I
R1
R2
R3
R4
RS
R1
R2
R3
R4
RS
74 79
10
41 6
82
33 35
48
7
LEVEL
L1
L2 L3 L4
LS
L1
L2 L3
L4
LS
7
86
99
99
0
10
86 89
69
0
11
OP-
~
I
OUTPUT
L~~L
OP-
@J
I
OUTPUT
LEVEL
~
92
•
FREQUENCY
DETUNE
FREQUENCY
DETUNE
1.00
+5
1.00
-5
ENVELOPE
DATA
ENVELOPE
DATA
R1
R2
R3
R4
RS
R1
R2
R3
AI
RS
80
23
17
42
6
80
23
17
42
6
L1
L2
L3
L4
LS
L1
L2
L3
L4
LS
99
77
77
0 0
99
77
60
0 1
OP-
~
IOUTPUT~~
OP-
~
I
OUTPUT
L~~L
1 I
ALGORITHM #5
ct)
ci
<:3
~
z
<!"§
....,
"'
~
~
:;;
~
-~
oil
0
!:!
3:
~
<.>
a·.c..
t~Jf~
u
;:J
~
~
1:j
~
~
0
:.;:;
£~
2:1
<!
. g
~
E-~'-'1!
r.<J
.2.
s:!
.
,....,
s
t;:
·-
.Sl
~
~
~
-<
~i~F8~
...,..

~
<.,.;
z
:::>
(y:)
):
~
::j
~
::t
Ul
;;!iS
~~
s§
~
"'
g
&l
:;
99
0
RANGE
SINE
WAVE
POLY
POLY
MONO
OFF
OFF
PITCH
36
SPEED
7
PITCH
BEND
RANGE
OFF
ON
MODULATION
WHEEL
BREATH
OFF OFF
CONlROL
AIVP
EG
BIAS
0 1
35
8 0 2 0 2
3 3
0 4
DELAY
PM)
MD
PITCH
AIVP
OPI
LFO
MODSENS
OFF
0
C3
ON
MODE
TIME
KEY
esc
PORTAMENTO
lRANS
SYNC
~
FREOOENCY
I
DETUNE
0
2.00
ENVELOPE
DATA
R1
R2
R3
R4
RS
61
60
40
41
1
L1
L2
L3 L4
LS
87 87
93
0
17
OP#
~
OUTPUT
LEVEL
72
I
•
FREOOENCY
DETUNE
1.00
0
ENVELOPE
DATA
R1
R2
R3
R4
RS
91 1 1
28
0
L1
L2 L3 L4
LS
91
1
78
0 7
OPt
~
J
OUTPUT
LEVEL
(!I
72
,.
FAEOOENCY
DETUNE
2.00
0
ENVELOPE
DATA
R1
R2
R3
R4
RS
61
60
40
41 1
L1
L2 L3 L4
LS
87
87
93
0 0
OPI
~
I
OUTPUT~
ALGORITHM
#6
[f~~it
~
;::B~~~
~
~r"a~>~
~
§"~I>
8
6-
:!<
8
:s-
~??
~~
~
~~·
&.£.ii1E..~
.
~"'~"'
.,_~>-~~-·
'""
"'
"
"'
'"'
;::;:
0
~~
Po..
;:r
~
...........
~
a_~o
FEEDBACK
LEVEL
7
~
FREOOENCY
I!EUNEo
0.50
ENVELOPE
DATA
R1
R2
R3
R4
99
99
40
41
L1
L2 L3
L4
87 87
93
0
OPI
~
I
OUTPUT
~~L
I
RS
1
LS
0
z
o:n'
'"C
~
~
EJ·
~=a
rll:=\OtT1_
•
r:n
l
~~·
t"'"
=··>tT1
-(")
"""-
s·
(D
z.,.
8~~tj
~
\0

DXlOO
Harmallets. A
NewDXlOO
Voice
By
Dave
Anderson.
Notes:
This
is
a
good
African
mallet
patch
with
a
twist.
Regular
playing
touch
wilt
produce
the
Mallet
sound,
while
touching
the
keys
lightly
and
quickly
wiU
produce
"harmonics."
If
the
patch
is
programmed
on
a
DX21,
add
the
Chorus
parameter.
6 AITERTOUCH/Vol. 3 No. 8
LFO
&
FUNCTtoNS
I
TRI
I 31 I
13
I
14
I
30
I
OFF
I
WAVE
SPEED
DELAY
PM)
IND
SYNC
I 5 I 3 I I
C2
I
PMS
N/6
KEY
TRANSPOSE
IPOLY I 4 I
OFF
I 0 I I
,J
I
PQ.
YIMONOj
PB
RANGE
MODE
TIME
PORT
SUSTAN
L
PORTAMENTO
FOOTSWITCH
J
I
99
I 0 I
50
I 0 I
50
[ 0 J
PITCH
AMP\.
PITCH
AMP\.
PITCH
BIAS
EGBIAS
VMEB.RANGE
BREATH
RANGE
t
FRECU91CY
I
CETLNE
N/6
FREQUENCY
l
DETUNE
N/6
2.00
-3
1
4.00
·3
0
B>IVB.OPE
Dot.
TA
ENVB.OPE
Dot.TA
AR
I
D1R
I
D1L
I
tr<R
I
RR
AR
I~R
ID1L

LFO &FUNCTIONS
I
TRI
I
35
I 0 I 0 I 0 I
OFF
WAVE
SPEED DELAY
PM)
NKJ
SYNC
I 5 I 0 I I
C3
I
PMS
N/6
KEY TRANSPOSE
IPOLY I 2
OFF
0 I I "
PQ.Y/MONOI PBRANGE
MOOE
TIME
PORT
SUSTAN
PORTAMENTO FOOTSWITCH
I
5o
I 0 0 0 I
5o
I 0
PITCH
AMPL
PITCH AMPl PITCH BIAS
EGBIAS
YMEB.
RANGE BREATH RANGE
FREQUENCY I
DEnNE
N/6
3.00
·3
0
ENVB.OPE
04TA
AA 101A I
01L
I
OOA
I
AA
24
5
13
2 5
EGBIAS
KEYBOA.RO
SCALING
0
RATE
LEV
B.
0
82
OPI
~
OUTPUT
LEVB.
VB.OCITY
62
0
1
FAB:IUENCY I
DEnNE
N/6
1.00
+3
0
ENVELOPE
04TA
AA
r,A
1
01L
1
00A
1
AA
24
5
13
2 5
EGBII\S
KEYBOARD
SCALING
0
RATE
LEV
B.
0
99
OPI
~ OUTPUT LEVB. VB.OCITY
79
0
1
~
FAB:IUENCY I
DEnNE
N/6
1.00
·3
0
ENVELOPE
04TA
AA 101A 101L
IOOR
IRA
21
6
13
5 5
EGBIAS
KEYBOARD SCAI.NG
0
RATE
LEV
B.
2 8
OPI
~
OUTPUT LEVEL
VB.OCITY
99
0
ALGORITHM
#3
I
I
I
t
FREQUENCY
I~
N/6
3.00
0
~VB.OPE
OA
TA
AA
~~A
101L
ID2R
IRA
29
5
13
5 5
EGBIAS
KEYBOA.AO
SCALING
0 RATE LEVEL
0
78
OPI
~
OUTPUT
LEVB.
VB.OCITY
57
0
DXlOO
IFEEOBACK ILEVEL
7
Great 88. A
NewDXlOO
Voice
By
S.E.
McMayon.
These
DXlOO
voices can also
be loaded into
the
DX21,
DX27, and
DX27S 4,oper,
ator
FM
digital
synthesizers,
and into the
newTX81Z
4,operator
FM
digital tone
generator.
Vol.
3 No.
8/
AFTERTOUCH 7

DXlOO
COSMOS.
A
NewDXlOO
Voice
By
Daniel
P.
Estabrooks.
Notes:
You
should
be
able
to "feel"
this
one!
Amplitude
of
lOOdb
@ 3
feet
with
arange of
80Hz w 20kHz
flat
should
about
do
it.
Play
the
lowest
and
highest
C
notes on
the
DXl00
for
7
sec-
onds,
then
release.
8 AFTERTOUCH!Vol. 3 No. 8
S/H
84
0
71
0
OFF
WAVE
SPEED
DELAY
5 0
C3
~
FREQUENCY
IIJET\.tiE
I>N6
FREQUENCY
I~E
I>N6
12.72
0 0
0.50
0
ENVElOPE DATA ENVElOPE
DATA
AR I
D1R
I
D1L
Tl2R
I
RR
AR
rR
rL
rR
r
28
7 1 4 0 0 4 4
14
0 3 r
FEEDBACK
l
LEVEl.
EGBIAS
KEYIICII\RD
SCAlJiG
EGBIAS KEYBOARD SCALf'IG 1
0
RATE
LEVEl. 0
RATE
LEVEL
1
46
0 1
0""
~
QUTPUTLEVEI.
VElOCITY
OPt
~
OUTPUT
LEVEl. VELOCITY
85
0
99
0
1 I
~
FREQUENCY
~~E
I>N6
FREQUENCY
I
DElLO<E
I>N6
5.00
0
1.00
+3
0
ENVElOPE DATA ENVElOPE
DATA
AR
ID1R
ID1L
I~
IRA
13
9
12
0 2
AR
ID1R ID1L
I~
IRA
14
4
10
0 2
EGBIAS
KEYIICII\RD SCALING EGBIAS KEYBOARD SCALNG
0
RATE
LEVEl. 0
RATE
LEVEL
1 1 1 1
0""
'[]
QUTPUTLEVEI. VElOCITY
OPt
~
QUTPUTLEVEI. VElOCITY
98
0
99
0
I I
ALGORITHM
115

T
HE
YAMAHA
MSS
1 is a
SMPTE-
compatible MIDI synchronizer designed
for use in home recording
as
well
as
motion pic-
ture, television,
and
professional recording
applications.
It
provides
an
easy,
cost-effective
way
to synchronize MIDI devices to SMPTE
time code.
The
MSSl
can
lock any clock-
driven MIDI device precisely
to
SMPTE time
code replayed from a multitrack tape recorder or
video tape unit.
The
MSSl
is
fully compatible with all four
SMPTE formats: 30-frame, 30-drop-frame, 25-
frame, and 24-frame. In addition, a precision
SMPTE time code generator
is
built into the
MSS
1,
so
that
you
can
generate
and
record your
own SMPTE time code tracks
on
virtually any
type ofaudio or video reproduction equipment.
The
MSS1
can
also be programmed to trans-
mit
MIDI
Program
Change
and
Control
Change messages
in
a precisely-timed sequence
timed to SMPTE time code from a master tape.
The
MSS
1's
memory
holds
up
to
7168
beats-obviously, it can record extremely long
compositions.
The
overall memory
is
divided
into
10
memory banks, which
can
be called up
in any order in
Chain
mode to create full-length
compositions from smaller parts.
Tempos
can
be entered into
the
MSS1 sim-
ply
by
tapping a
button
on
the front panel. This
does away with stiff, robotic performances, and
adds a new sense
of
human
feel to sequenced
music.
Front-Panel Displays
The
MSS1 provides a number
of
front-panel
displays to give you constant feedback
on
the
status
of
the
unit's operations, including a
16
x
1 backlit LCD, two rows
of
large, 10-position,
8-segment LED displays, a green LED indicator
light, and two red LED indicator lights. These
various
displays
give
you
the
following
information.
16
x 1
LCD
(Message/Data Display): shows
operating modes, program data,
and
user
prompts when necessary.
Upper
LED
(Time
Code
Display):
shows
SMPTE time code
in
hours, minutes, sec-
onds, and bits.
Lower LED
(MIDI
Data
Display): in
PLAY
and RECORD modes, shows bank, mea-
sure, beat,
and
tempo.
In
MIDI Event
MSSl
mode, shows command type, step number,
MIDI channel, and command data.
Green
LED
(SYNC/CLOCK
indicator):
lights when
the
MSS1
is
locked to received
SMPTE data.
Red
RUN
LED
indicator:
lights
when
the
MSSl
is
in RECORD
or
PLAY
mode.
Red
METRONOME
LED
indicator: blinks
as
a visual tempo display.
Front-Panel
Controls
The
MSSl
gives
the
user a
multitude
of
front-panel controls, including six MODE keys,
six
FUNCTION
keys, a 10-key numeric data-
entry pad (which, in addition to
the
10 num-
bered keys, has a
</NO
key,
a
YES/>
key,
and
an ENTER key),
and
START and
STOP
keys.
These give you control over
the
following:
MODE
Keys: These allow you to access the
MSS
1's six basic
modes
of
operation:
PLAY,
RECORD, EDIT,
CHAIN,
GEN-
ERATOR, and UTILITY.
FUNCTION
Keys: These allow you to access
the
MSS1's six basic function modes, JOB,
SONG
CUE,
TIME
CUE,
BANK,
CHASE, and METRONOME.
In
EDIT
mode,
the
last four function keys access
the
REPLACE, COPY, DELETE,
and
IN-
SERT functions.
10-Key
(+)Numeric
Pad: These keys are for
entering virtually all types
of
data.
The
NO
and
YES
keys allow selection
of
cer-
tain types ofdata (as well
as
allowing con-
trol over incrementing and decrementing
data).
The
function
of
the ENTER key
is
obvious.
START
and
STOP
Keys: These start and stop
most functions;
the
STOP
key
is
also used
to cancel or exit in
certain
situations.
With
its list price
of
$1195.00,
the
new
Yamaha MSS1 MIDI-SMPTE synchronizer
is
a
cost-effective time-code
controller-one
that
offers
both
great
flexibility
and
ease
of
operation.
Yamaha
Unveils Its
New MIDI
SMPTESyn
..
chronizer.
Vol.
3 No.
81
AITERTOUCH 9
QX3
An lntroduc
..
tion To
Yamaha's
Newest
Digital
Sequence
Recorder.
By
Tom Darter.
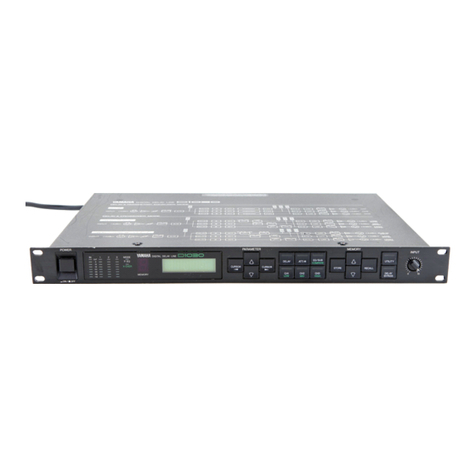
THE
NEW
QX3 digital sequence recorder
is
a 16-track MIDI sequencer with a built-in
3.5" disk drive. Each
of
the
16 tracks
can
con-
tain
unlimited simultaneous polyphony.
The
total capacity
of
the
QX3
is
48,000
notes with
velocity
(in
Chain
Play mode).
Up
to 24,000
notes
can
be recorded in
one
pass.
The
time
resolution
of
the
unit
is
96 clocks per quarter-
note.
The
QX3
is
designed to be a full-feature se-
quencer
like
the
QX1;
at
the
same
time,
though,
the
QX3 offers a number
of
significant
improvements over its older brother. Some
of
the
most obvious (
16
tracks instead
of
8 and a
disk drive
that
uses
the
smaller, denser, more
durable 3.5" disks) are mentioned above, but
there
are
many
more.
Unlike
the
QX1,
the
QX3 receives
and
records aftertouch data. It
generates
and
receives
MIDI
Song
Position
Pointer,
and
can
be synced to
an
external MIDI
clock
or
tape
clock
for
both
recording
or
playback.
The
QX3 features 512K of internal
RAM,
which
almost completely eliminates
the
long
"executing
now!"
delays found
on
the
QXl.
Finally,
the
QX3 offers a combined Play/
Record mode
and
greater accessibility to all
functions,
both
of
which make
the
QX3 signifi-
cantlyeasier
and
less time-consuming to operate
than
the
QXl.
The
unit's front panel includes a number
of
features designed for ease of operation. These
include a 40x2
LCD
with a variable contrast
control,
Note
Value
and
Note
Name
keys, a
numeric keypad for entering data, Track Select
keys,
an
Editing
Dial,
F1
and
F2
keys,
and
much
more.
The
Editing Dial
can
be used to set
tempo, move through measures
(in
Play/Record
mode), move through events in a track (in Edit
mode),
or
to
select a file
number
(when saving
to
or
loading from disk).
The
Function Key fea-
ture allows you
to
assign any procedure
up
to
128 keystrokes long to
the
F1
or
F2
keys.
Record/Play Mode
The
QX3 offers Real
Time,
Step
Time,
and
Punch-In recording.
Punch-In
recording may
be
performed
manually
or
automatically.
Punch-In
can
begin or
end
anywhere (even in
the
middle of a measure),
and
can
be used in
conjunction
with a fully-implemented
Auto-
Locate feature.
The
QX3 offers great range in defining time
signatures.
The
basic
beat
for a time signature
ranges from whole notes
(x/1)
to thirty-second
10 AITERTOUCH!Vol. 3
No.8
notes
(x/32),
and
the
number
of
beats ranges
from 1 to 64. As with the QX1, different time
signatures may be used in a single song, and
time signature changes are shared by all tracks.
However, unlike
the
QX1,
the
time signature of
a measure
cannot
be changed once
the
measure
has been recorded.
Each track
on
the
QX3 holds data for one
MIDI channel.
In
other
words,
channel
data
is
not
recorded.
The
MIDI
channel
of
outgoing
data
is
determined by the
Output
Channel
set-
ting for each track. Ifyou want to record incom-
ing data
that
involves a number
of
MIDI chan-
nels simultaneously, you
need
to record
on
two
or more tracks,
and
set each track
to
receive
on
a different MIDI
channel.
Receive
Channel
and
Output
Channel
settings may be different.
The
QX3 has two MIDI
OUT
ports, and
each track may be assigned
to
either or
both
of
these two
OUTs
for playback.
The
unit also has
an
Echo Back function
that
allows incoming
MIDI
data
to
be merged with outgoing MIDI
data
at
the
unit's MIDI
OUT
ports.
The
QX3 has 32 Job Commands available in
the Record/Play mode,
as
follows:
1) Click
2) Click Beat
3)
Count
In
4) Measure Locate
5)
Auto
Punch Point
6) Foot Switch
7)
Setup Save
8) Setup Load
9) Song Clear
10) Erase Track
11) Sync Clock
12) Echo Back
13)
Output
Channel
14)
Output
Port
15) Receive
Channel
16) Receive Event
17) Remote
In
18) Remote
Out
19) Song Select
In
20) MIDI Monitor
21) Memory Status
22) Disk Status
23) Disk Format
24) Disk Copy
25) Number ofFiles
26) File Rename
27) File Kill
28) E-Seq File Load
29) QX1 Data In

30) QX1 Data
Out
31) Rel Tempo Record
32) Time Display
Edit Mode
In the Edit mode,
the
QX3 offers
an
exten-
sive set of 29 Job Commands,
as
follows:
1)
Clock/Beat
2)
Gate
Time
Ratio
3) MIDI
Control
4)
Event Display
5) Measure Copy
6) Measure Erase
7) Measure Create
8) Measure Delete
9) Mix Track
10) Erase Track
11
) Transpose
12)
Note
Shift
13)
Gate
Time
Modify
14) Velocity Modify
15) Crescendo
16) Quantize
1
7)
Chord
Sort
18)
Chord
Separate
19) Clock Move
20) Rel Tempo Erase
21) Memory Status
22) File Include
23)
Note
Extract
24)
Ctrl
Extract
25) P.Bend Extract
26) Prog Extract
27) A.Touch Extract
28) Excl Extract
29) Spot Extract
Many
of
these Jobs access functions
that
are
self-evident, and still others will be familiar to
QX1 users. Here
is
a quick rundown
on
some of
the new Edit mode features:
Transpose allows you to shift all notes a fixed
amount over a specific area
of
a track.
Note
Shift allows you to convert any given note
to
another
note
over a specific area
of
a
track.
Chord
Sort
allows you
to
re
arrange chords
vertically.
Chord
Separate allows you
to
separate chords
by
a given clock interval to create "instant
arpeggios."
File
Include
allows you
to
combine 2 songs into
a new song; additional parts can
then
be
added to this new song.
Spot
Extract
allows you to remove all data in a
specific range.
The
QX3 combines
the
professional features
of
the
QX1 with
the
ease ofoperation and flexi-
bility
of
the
QX5
.
Moderately
priced
at
$1595.00, this newest addition to
the
QX series
offers
the
operating ease
and
reliability
that
only
a
dedicated
hardware
sequencer
can
provide.
QX3
digital
sequence
recorder.
Vol.
3 No. 8/AFTERTOUCH
11

MEP4
Using
The
MEP4
In
Live
Applications.
By
Scott
Plunkett.
W
ITH
ITS ABILITY to solve MIDI
sys-
tem
problems
and
create MIDI effects,
the
MEP4 MIDI event processor has proven it-
self to be a great tool
in
studio applications.
One
of
the
hidden
strengths
of
the
MEP4,
though,
is
its usefulness
in
live applications.
If you have never worked
with
the
MEP4,
you will
need
a brieftour before you
can
under-
stand
what
follows:
The
MEP4 MIDI event pro-
cessor has four microprocessors,
each
of
which
is
capable
of
manipulating
MIDI
data
that
appears
at
its
MIDI
IN
independently.
Each
microprocessor has six programmable sections,
as follows:
1) Data Presetter:
This
section allows you to
send
a
program
change,
a
pitch
bend
position,
and
any
two
controller
messages.
2)
Channel
Filter:
This
section allows you
to filter incoming
channel
messages so
that
only
certain
channels
are recog-
nized.
Any
combination
of
channels
may
be selected.
3) Message Filter:
This
section
can
be used
selectively-like
the
channel
filter-to
recognize only
certain
MIDI
messages
and
ignore others.
4)
Data
Modifier:
This
section allows you to
alter MIDI messages.
There
are a number
of
possible changes
that
can
be made to
any selected message.
5) Delay Processor:
This
section
can
be used
to
delay
the
MIDI
output
of
a processor
for up
to
three
seconds.
6)
Output
Assigner:
This
section allows you
to select
the
output
channel
and
OUT
port
(there are four MIDI
OUT
ports
on
the
MEP4).
Each processor
can
be programmed separately,
and
any
number
of
processors
can
be combined
to
create complex effects.
To show you
the
usefulness
of
the
MEP4
in
performance, I will describe a MIDI system I
recently used
in
a
number
of
live shows. While
preparing
the
system, I encountered familiar
problems-those
that
are
inherent
to all large
MIDI systems.
The
MEP4
helped
solve these
problems by offering alternatives
that
would
not
have
been
possible otherwise.
The
system consisted
of
two controller key-
boards-a
KX88
and
a DX7
Il-plus
a rack
of
·tone
generators, including a Yamaha TX816, a
sampler,
and
an
analog synthesizer.
The
DX7
II
12 AITERTOUCH/Vol. 3
No.8
could
also
be
accessed
as a
tone
generator
through MIDI (as well
as
being controlled by its
own keyboard).
The
MIDI outputs
of
the
two
controllers were merged together, sent to the
MEP4,
and
distributed
to
the
tone generators
through
a
Yamaha
MJC8
MIDI
junction
controller.
The
biggest setup problem with a system like
this
is
deciding
how
the
controllers and tone
generators will be split up.
That
is,
how can
each
tone
generator be addressed
both
sepa-
rately
and
in
a group?
There
are basically two
solutions
to
this problem: 1) Separate
the
tone
generators by MIDI
channel;
or 2) Keep all of
the
tone
generators
on
the
same MIDI
channel
and use key limiting
or
zoning to separate them.
The
advantage
of
putting
the
instruments
on
different MIDI
channels
is
that
you
can
access the entire MIDI
note
range
of
any single
tone generator without affecting any
other
tone
generator.
The
disadvantage
is
that
you
can't
play multiple tone generators
on
different MIDI
channels unless your controller keyboard has
split and dual modes
that
will
output
more
than
one
channel
at
a time. Or, to
put
it a slightly
different
way,
the
number
of
tone modules you
can
address simultaneously will depend
on
the
number
of
channels your controller will output
at
the
same time.
The
advantage
of
key zoning
is
that
you
can
keep all
of
the
tone generators
on
the
same
MIDI
channel,
so
it's easy to address all
of
them
at
the
same time.
The
disadvantage
is
that
it
isn't
always easy
to
keep musical
parts
from
overlapping into adjacent zones.
You
must
con:-
stantly transpose all
of
your voices, depending
on
whether they appear
in
a zone
on
the
upper
or lower
part
of
the
keyboard.
And,
since all of
the
tone generators are
on
the
same channel,
they all respond to
the
same program change,
pitch
bend,
and
controller information.
In
my
case, I needed three
or
four separate
sounds
at
my disposal during some songs, but
only one
main
sound for others. So, I wanted a
system which would allow me to address
at
least
four sounds separately,
but
which would also
allow me to combine all
of
the
tone
generators
at times to create
one
of
those tasteless, larger-
than-life, MIDI monstrocity, sounds.
Using
The
MEP4
To
Channelize
The
solution to my problem was to divide
the system four ways (by MIDI
channel),
and

let the MEP4 change the controller channel
assignments.
The
MIDI channel assignments
were set
as
follows:
Controller
KX88
DX711
Tone
Generator
TX816 modules 1-4
Analog Synthesizer
TX816 modules 5-8
DX7
II
Sampler
Transmit
Channel(s)
1,2
3
Receive
Channel
1
1
2
3
4
With this setup in mind, let's
say
that
you
want the
KX88
to
control
the
first four modules
of the TX816, the analog synthesizer, and the
sampler. This means
that
when
the
KX88 out-
puts chan
nell,
its output needs to be converted
to
channel 1 and channel 4. Let's also say
that
you
want the
DX7
II
to play
the
second four
modules of the TX816,
so
you
want to convert
the
DX7
II's output from MIDI
channel
3 to
channel
2.
You
can
use
two of
the
MEP4 processors to
take care
of
the KX88. First, set the
Channel
Filters
so
that both processors only recognize
data coming in
on
MIDI channel
1.
This
guar-
antees
that
no data from
the
DX7
II
(which
is
transmitting on MIDI channel 3) will be mis-
takenly sent to the wrong tone generators.
You
can
then
set the
Output
Assigner on
the
first
processor
to
channel
1,
and
the
Output
Assigner
on
the second processor
to
channel4.
Similarly, you can
use
a single processor to
handle the output ofthe
DX7
II. This time, the
Channel Filter will
be
set to recognize data
on
MIDI channel 3, and you'll
use
the
Output
As-
signer to send
the
data out on MIDI channel
2.
The
advantage
of
this system
is
that,
by
using
the
Channel
Filters and
Output
Assigners
on
the MEP4, any of
the
tone modules can be
accessed in any combination
by
either
of
the
controllers. And, since
the
MEP4
can
make
program changes (via its 60 different programs),
the relationship between
the
controllers and
tone
modules
can
be
chan
ged as
often
as
necessary.
Program Changes
By
using
the
Data Presetters
on
the MEP4,
you
can
send
up
to
four
separate
program
change commands
at
once. This means that,
by
changing
a program
on
your
controller
key-
board, you
can
send
four different program
changes on four different MIDI channels.
For instance,
by
pressing program number 1
on
the
KX88, you could make the following
changes in
the
system described above:
Tone MIDI Program
Generators
Channel
Change
analog synth 1 3
TX816 1-4 1 3
TX816 5-8 2 5
DX7
II
3 2
Sampler 4 9
The
great thing about this arrangement
is
that
you
don't
have to set all
of
the patches for a
particular song to
the
same program number. If
you
were accessing all of these instruments on
the same MIDI channel, they would all jump to
the same program when you made a program
change from
the
KX88. Ifyou wanted to use the
same sound from a particular tone generator in
different MIDI configurations, you would be
forced to save
that
sound to at least two dif-
ferent
patch
memories.
The
MEP4 lets you
avoid this problem.
Another
advantage
of
this system
is
that
it
is
easy to set up and modify. Ifyou decide to mix a
group
of
brass sounds from different tone gener-
ators, you
can
easily change which sounds are
mixed
by
changing
the
programs
that
are called
from the Data Presetters.
Co
ntinued on
page
15
MEP4
MIDI
et~ent
proc
essor.
Vol.
3 No.
8/
AITERTOUCH 13

MEP4
StringsUp.
A
NewMEP4
Setup
By
Scott
Plunkett.
Notes:
This
is
an
MEP4
program
that
I
use
to
solve
a
problem
that
is
very
similar
to
the
one
described
in
the
accompanying
article.
The
KX88
keyboard
is
split,
and
a
high
string
sound
is
played
from
the
lower
half
of
the
keyboard.
A
slightly
busier
part
is
being
played
in
the
right
hand.
Here's
a bnef
descrip-
tion
of
what
each
processor
is
doing:
Processor
I
sends
a
program
change
(
15)
and
volume
com-
mand
(07,55) to
the
first
four
modules
of
the
TX816
and
the
analog
synthesizer.
This
is
the
sound
that
is
being
played
by
the
right
hand
on
the
upper
half
of
the
KX88.
The
upper
half
of
the
KX88
is
transmit-
ting
on
MIDI
channel/,
so
the
Channel
Filter
is
set
to
accept
only
messages
that
appear
on
this
channel.
All of
the
messages
on
channel
I
are
recognized
(Message
Filter),
except
for
Polyphonic
Aftertouch,
since
the
KX88
doesn't
transmit
this
message.
The
Data
Modifier
is
used
to
transpose
the
voice
down
an
octave,
and
the
processor
is
set
to
output
on
MIDI channel/.
Continued
on
page
15
14
AITERTOUCH/Vol. 3 No. 8
000
CCC
-1-1-1
"'0 ' '
0
nn
:IJII
-to~
~-nen
en-nen
enVl-
-mG'l
G'l-IZ
z
0
m
~
-<
:j
s::
0
m
r-
~
-<
:j
s::
0 m 0
~r-~
"'0
~
c
-<
-1 "'0
~
:IJ
en
0
en
n
~---4G)
~
000
CCC
-1-1-1
"'0'
'
0
nn
:IJII
-to~
~..,en
en-nen
(j')Vl-
-mG'l
G'l-IZ
z
z
en
g;
0
~
0
m
r-
~
-<
:j
s::
0 m 0
cr---m
-1
r-
"'0
~
c
-<
-1 "'0
~
:IJ
en
o
en
n
1-----4
Gi
~
000
CCC
-1-1-1
"'0 ' '
0
nn
:IJII
-to~
~-nen
en-nen
enVl-
-mG'l
G'l-IZ
z
z
en
g;
0
~
0
m
r-
~
-<
:j
s::
0 m 0
~~~
"'0
~
c
-<
-1
~
en
en
1-------1
Gi
"'0
:IJ
0
n
m
en
en
z
m 0 0
:IJ
:IJ
OS:
"T1CJ)
0C)
><
CD
><
::I
<
~><><
II
I~
~
N
~
W N
__.
0
OS:
"T1CJ)
0C)
+:-.
W N
__.
0
OS:
"T1CJ)
C/)C)
I I
00000
zzzzz
00000
,...,.,.,.,,,
...,.,,.,,,
0
"T1
"T1
0
"T1
"T1
.. 0
..
"T1
..
"T1
..
zz
00
-i-1
mm
oo
z-n
"T1
000
"T1
"T1 "T1
"T1 "T1 "T1
0
~
s::
z
N
0
s::
z
0
s::
z
o n
..,
I
"T1
~
0
s::
z
z
z
m
'
:!!
r-
-1
m
::0
~
g
"T1
~
z
z
m
'
nn-o-o
OO=i:IJ
zznO
-1-t:r:G'l
:IJ:IJ
::0
00
~
r-r-
s::
000
.....
~o
"'0
0000
~
:IJ
zzzz
-1 0
~
~
-o
en
:IJ
en
m 0
en
::o
m
::j w
m
1-------::IJ
ooo
...,.~o
0
~
"'0
:!! 0
00
0
-1
:IJ
~
0
-o n
::o
m
m
en
en en
m 0
::j
::0
~ ~ ~
~
::g
m
::0
m
.&>
::0

Setup
Notes,
Continued.
Processor
2
sends
a
program
change
(9)
and
volume
com-
mand
(07,
55)
to
the
last
four
modules
of
the
TXB I
6.
This
is
the
sound
that
is
being
played
by
the
left
hand
on
the
lower
half
of
the
KX88.
The
lower
half
of
the
KX88
is
transmitting
on
MIDI
channel
2,
so
the
Channel
Filter
is
set
to
accept
only
messages
that
appear
on
this
channel.
Again,
all
of
the
messages
on
channel
2
are
recognized
except
for
Polyphonic
Aftertouch.
The
Data
Modi-
fier
is
used
to
transpose
the
voice
up
three
octaves,
and
the
processor
is
set
to output
on
MIDI
channel2.
Processor
3
sends
a
program
change
(I
I)
and
volume
com-
mand
(07,46) to
the
DX7
II.
Notice
that
the
Channel
Filter
is
set
to
receive
messages
on
MIDI
channel2,
so
the
DX7
II
will
also
be
playing
parts
from
the
lower
halfof
the
KX88
keyboard.
This
is
a
good
example
of
how
the
MEP4
allows
you
to
use
more
than
one·
tone
generator
to
play
the
same
part.
The
Mes-
sage
Filter
of
processor
3
is
set
differently
than
that
of
the
first
two
processors.
In
addition
to
filtering
out
Polyphonic
Aftertouch,
the
processor
is
filtering
out
Control
Changes
(the
' ' ' '
means
that
all
Control
Changes
are
ig-
nored).
The
reason
for
this
is
that
processor
4
wiU
be
used
to
modify
Control
Change
mes-
sages
for
the
DX7
II.
The
Data
Modifier
moves
the
voice
up
three
octaves,
and
the
data
is
sent
out
on
MID
I
channel3.
Processor
4
is
normally
reserved
for
the
sampler
in
my
setup.
Since
the
sampler
isn't
being
used
here,
the
processor
is
being
put
to a
different
use.
Once
again,
the
Channel
Fil-
ter
is
set
to
receive
only
chan-
nel2.
The
Message
Filter
only
recognizes
Control
Channel
messages.
The
Data
Modifier
then
offsets
the
volume
mes-
sage
(Bn,
07)
by
-20,
and
the
processor
sends
data
out
on
MIDI
channel
3.
Basic-
ally,
this
setup
is
used
to
keep
the
DX7
II's
volume
mixed
down
in
relation
to
that
of
the
last
four
modules
of
the
TX8I6.
MEP4
Continued from page 13
Transposing Voices
In
live performance, you are
often
forced
to
play parts
on
the
lower
part
of
the
keyboard
that,
ideally, should be located
on
the
upper
part
of
the
keyboard. For instance, if there
is
a
fairly busy right
hand
part
that
has
to
be played
at
the
same time as a
high
string line,
the
string
line will
end
up being played by
the
left
hand
on
the
lower
part
of
the
keyboard. Unless you
want
that
high
string
part
to
sound like a 'cello part,
you will have
to
transpose
the
string voice.
In
addition, if you
want
to
use
the
same string
voice
with
four different transpositions during a
show, you would
need
to
store four different ver-
sions
of
the
same sound for
each
affected
tone
generator.
The
Data Modifiers
in
the
MEP4
can
take
care
of
this problem.
This
sort
of
change
is
very
simple,
but
requires some knowledge
of
MIDI
messages.
If
you normally go glassy-eyed
when
dealing
with
technical
things,
don't
panic.
You
can
save yourself a
lot
of
time
and
work by
learning just a few
of
the
most useful messages.
In order
to
transpose a voice, you
need
to
modify a MIDI
Note
On
message.
This
message
consists
of
three bytes (bytes, bits,
and
all
of
those
other
computer
terms
aren't
really impor-
tant
to
the
musical applications
we
are talking
about
here-
The
MEP4 owners manual explains
most
of
these terms if you would like
to
know
more
about
them).
The
Note
On
message looks
like this:
9n,xx,yy
The
first
byte-
"9n"
-is
called
the
status byte.
Very simply,
the
"9" says
that
"This
is
a
Note
On
message,"
while
the
"n"
represents
the
MIDI
channel
that
the
message
is
in.
The
first
data
byte-
"xx"
-corresponds
to
the
MIDI
note
number: It tells the
tone
generator
which
note
to play
(and
is
the
byte we will
want
to
change
to
transpose
the
voice).
The
second
data
byte-
"yy"-indicates
how
hard
the
note
is
played,
and
is
called
the
velocity byte.
With
the MEP4's Data Modifier, you
can
use
the
Offset feature
to
add
or
subtract a fixed
value
to
either
"xx"
or
"yy."
If
you Offset
the
"xx" byte
(the
MIDI
note
number)
of
a
Note
On
message, you will transpose
the
voice.
Now, here comes
the
payoff
of
this little
MIDI lesson.
In
the
case
of
our
string line exam-
ple, let's say we want
to
transpose
the
voice
up
three octaves. Since adding
12
to
a
note
num-
ber will move it up
an
octave, we
can
transpose
a voice up 3 octaves
by
setting
an
"xx"
Offset
of
+36. [NOTE:
Not
all keyboards use
the
same
system
of
sending
Note
Off
messages.
If
you run
into a problem
with
the
dreaded stuck-note syn-
drome, you may have
to
use
one
of
the
MEP4's
other
processors
to
offset
the
Note
Off
messages.]
You
can
also use the idea
outlined
above
to
offset volume.
The
Data Presetter sends a one-
time-only volume
command
when
an
MEP4
program
is
selected, but ifyou move a MIDI vol-
ume pedal, all
of
the
tone
generators will jump
to
the same volume. Normally, you will want
one
tone
generator
to
have a lower volume
than
the
others.
The
tricky
part
is
keeping
the
proper
mix
as
you change the volume
with
a MIDI vol-
ume pedal.
By
applying a volume offset
with
the
MEP4, you
can
do this.
The
MIDI message for volume
is
as
follows:
Bn,07,yy
The
status
byte-"Bn"-says
that
"This
is
a
MIDI
Control
Change
message."
The
second
byte-"07"-indicates
that
this
message will
control MIDI volume.
The
final
byte-"yy"-is
the
data
byte,
and
its value will be determined
by the position
of
the
volume pedal.
The
possi-
ble values for "yy" are 0-127.
By
offsetting
the
value of "yy,"
the
MEP4
can
control the relative volumes between tone
generators.
If
you Offset "yy" by -20
on
one
of
the
processors, for
instance,
the
MEP4 will
always
subtract
20
from
the
current
volume
pedal position.
Whichever
tone
generator
is
affected
by
this will consistently be playing at a
lower volume relative
to
the
other
tone
gener-
ators.
Once
again, this saves you the effort
of
individually
modifying
the
volume
of
the
patches
within
the
tone
generators themselves.
Beating
MIDI
I like
to
think
of
the
MEP4
as
a sort
of
MIDI
"Swiss
Army
Knife."
The
above examples only
begin
to
suggest
the
possible uses
of
the
MEP4,
but
they
do
describe some
of
the
uses
that
I find
most valuable
in
live applications. As MIDI
sys-
tems grow, they have a
tendency
to
become un-
wieldy:
They
create
restrictions
that
make it dif-
ficult
to
do
all
of
the
things you expect to be
able
to
do.
The
MEP4
can
help
you overcome
these restrictions,
so
that
you
can
make
the
most efficient use
of
your system.
Vol.
3 No.
8/
AITERTOUCH 15

/
Hot
Tips
An
SPX90
Patch
For
Recording
Guitars
And
Basses
Direct
By
John
R.
Barnes
I have a very simple SPX90
patch
that
works
very well for guitars
and
basses recorded direct. I
am just
one
of
the
many people
with
small
4-
track studios
on
tight budgets where direct
is
the
only possible way
to
record. I have never really
liked
the
direct sound
of
a guitar
or
bass,
but
this patch makes
the
instrument sound
as
if it
were
being
played
and
recorded
through
a
miked
amplifier-with
better
fidelity!
Start
with
the
Early Reflection 1 preset,
#5,
and use these settings:
TYPE:
HALL
ROOM
SIZE:
1.
7
LIVENESS: 4
DELAY:
10.0 ms
LPF:
THRU
I use four different versions
of
this
patch
(de-
pending
on
the
mood
I'm in),
but
this
is
my
favorite.
Other
users
might
like
to
try
the
"Plate" and increase
the
room size.
The
balance
should be set from about
30%
to 40% effect.
Create
Sequences
With
16,Note
Polyphony
Using
The
CX5M
Music
Composer
Cartridge
By Boyd
Stamey
There
is
a way
to
use
the
FM
Music
Com-
poser
Cartridge
programs
(
YRM
101
and
YRM501)
to
create sequences up to 16 notes
wide.
You
can
play up
to
8 voices
with
the
CX5M's
internal
tone
module
(SFG01
or
SFG05)
and
8 more
independent
notes
on
a
MIDI synthesizer.
The
secret lies
in
the
way you
assign MIDI
channels
to
the
parts.
As explained
in
the
Music Composer man-
ual, you
can
simply double
the
parts played via
the FM Music Composer by assigning
them
to
a
16
AFfERTOUCH!Vol. 3
No.8
Reader Tips
For
The
SPX90,
CX5M,
ffi
..
Ol,
And More.
SPX90
digital
multi-effects
processor.
MIDI
channel
and
having a MIDI synthesizer
play
the
same part.
This
is
good,
but
I wanted to
be able to play
additional
parts via MIDI. Well,
there
is
a
way,
but
you have to understand how
the
FM Music Composer counts voices to take
advantage
of
it.
Here
is
the
scheme:
1)
The
FM Music Composer begins counting
voices
on
Part
1,
then
on
Part
2,
and so
on
to Part 8.
2)
After it counts 8
internal
(SFG)
voices-if
no
MIDI voices have
been
counted, it will
then
count
up to 8 MIDI voices.
3)
Once
it counts any MIDI voices, all voices
after
that
are
counted
as
MIDI voices.
4)
Once
it counts 8 MIDI voices, it won't play
any
more voices after
that.
In
other
words,
there
are as many
as
16 notes
that
can
be assigned to
the
Music Composer's 8
Parts, if you keep
the
above scheme
in
mind.
This
is
how
you
can
make this scheme work
for you:
1)
Assign parts
to
be played only by the CX5M
to
Part 1,
then
Part
2,
and
so
on.
2) If any
of
these parts are to be doubled by the
MIDI synthesizer, assign
them
to
the
next
available higher numbered Parts.
3) Assign
the
parts to be played only
by
the
MIDI
synthesizer
to
the
remaining
Part
numbers as needed.
Here
is
an
example using
the
CX5M's
8
internal voices
and
a completely independent
set
of
8
other
voices being played by a MIDI
synthesizer:
PART
1:
BASS
(poly=
1)
PART
2:
BRASS (poly=3)
PART
3:
PIANO (poly=3)
PART
4:
FLUTE (poly=
1)
PART
5:
STRINGS (poly= 3)
MOON=
1;
VOL=0
PART
6:
SYNTH (poly= 3)
MOON=
2;
VOL=0
PART
7:
GUITAR (poly=2)
MOON=3;
VOL=O
Parts 1 through 4 will be played only by
the
CX5M voices (for a total
of
8 voices), and Parts
5 through 7 will be played only by
the
external
MIDI synthesizer-an FB-01 would be ideal for
this
application-for
an
additional 8 voices.
Now
let's
say
that
we
want
to
double the
MIDI synthesizer
SYNTH
part with
the
CX5M
BRASS part.
We
need
to change
the
order of

the parts, or
we
will lose some
of
the
voices
on
the highest tracks.
If,
for example,
we
simply
assign a MIDI channel to Part 2
and
delete Part
6,
we
will have the following:
By
the time
we
get to Part 5, the
FM
Music Composer will have
counted seven MIDI voices, leaving only
one
voice-and
we
need
four.
(Remember,
once
.the
program counts one MIDI voice, all subsequent
voices are counted
as
MIDI voices.)
Creating Subtle
Harps
Voices
With
The
FB-
01
By Don
F.
Hill
I
use
an
FB-01
FM
tone
module with
my
Yamaha
ME-
50 organ.
The
FB
module has three
harp voices:
3-28
Harp,
7125
Harp2,
and
7126
Harp3. I
was
dissatisfied with these. They didn't
sound the
way
harps ought to sound, especially
in a glissando-where a harpist runs his or her
hands over a series
of
strings, leaving
them
vibrating.
On
a keyboard instrument,
one
can
try to produce a glissando effect, but the "pluck-
ing" and "snapping"
of
the
strings doesn't sound ,
right.
Without other means
of
voicing, it occurred
to
me
to try to create
better
harp sounds using
voices already at
hand
in
the
FB-01.
This
could
be
done
by
stacking in
the
Configuration mode.
I
started
with
the
3/28
Harp
voice
on
Instrument # 1, channel
1,
with 4 notes
as-
signed
as
the
maximum level
of
127. I like the
harp set down
one
octave
(-
1)
on
my
upper
organ keyboard manual, since
the
lower harp
strings are the usual ones
we
hear. To modify
this basic sound, I tried
to
increase
the
plucked
effect, and found
that
if I set instrument
#2
on
channel 1 also and gave it 3 notes, I was left
with 1 note for Instrument
#3
(on
channel
l)
for
another voice.
It
turned out
that
both
were
needed.
On
Instrument
#2,
I experimented until I
located 7I
18
PluckGt.
At
a level
of
116, with
octave at 0 and detune
at
+10, this addition
gave a bit more pluck to the harp string sound.
On
Instrument
#3,
the voice added was
the
7I
22
Lute, also at level 116 and octave 0.
This
combined
harp
sound
seems
much
more harp-like
to
me,
and
one
can
run a finger
over an octave
of
keys, holding
the
last
by
aim-
ing at it
as
one's finger glides-this causes a glis-
FB-0
1
FM
digiwl tone
module.
sando effect
with
more
plucking
sounds
of
strings,
the
way
a harpist catches them along
the
way
up
or
down a glissando.
For
the
sound
of
a softer harp, the same
Configuration
can
be used; but instead
of
7122
Lute
on
Instrument
#3,
use the
7124
SftHarp.
The
above two Configurations are much
alike,
both
recreating
the
sound
of
the harp's
lower strings. For
the
higher harp strings, a
third Configuration
is
needed,
as
follows: For
Instrument #
1,
keep
the
3/28
Harp set at vol-
ume
12
7 and octave - 1
as
before. Add 7I27
SftKoto
on
Instrument
#2,
with a level of 110,
octave ofO, and detune
of+
10.
On
Instrument
#3,
add
7124
SftHarp
at
level 116. Somehow,
this combination produces a higher sound, even
though
the
Instrument # 1 harp voice hasn't
changed.
Evidently,
the
SftKoto creates
the
effect.
These settings will give
you
three additional
harp voices
on
your FB-0
1.
They
can all be
stored
as
Configurations; or, you can store just
the
first
one
as
a Configuration, and make the
slight changes
that
create the
other
two setups
manually.
Setting
Up
An
AlB
Balance
Control
For
The
DX7
II
In
Voice Mode
By
Eugene
Beer
After playing with
my
new DX7
II
for a cou-
ple
of
weeks, I began to wish
that
it had
an
AlB
balance control to set
the
patch balance for
tone
generators
A
and
B in Dual
and
Split
modes.
This
capability
is
provided for in Perfor-
mance mode, but
that
requires
one
to decide in
advance what pairs of patches are to be stored
together
in
Performance memory. I have 64
Single patches, and,
on
the spur
of
the mo-
ment, I want to be able
to
hear any one ofthem
paired with any
other
with adjustable balance.
Continued on
page
20
Vol.
3 No.
8/
AITERTOUCH
17

Questions
Answers To
Questions From
Readers.
By
Tom Darter.
I
own
a
TX81Z,
which
I use primarily
with
my
QXl.
Is
there
any
way
of
accessing
the
Perfor-
mance patches via
MIDI
Program
Changes?
It
seems
that
Program
Changes
only call
up
the
Internal
and
ROM
Voice patches.
The
TX8IZ's
MIDI Program
Change
param-
eter has three basic settings-Off, Common,
and
Individual-which
determine how
the
unit
will respond to Program
Change
messages:
Off:
The
TX81Z
ignores
MIDI
Program
Change
messages.
Common:
The
TX8IZ
looks up
the
correspond-
ing Voice
Number
or Performance Number
in its Program
Change
memory,
and
reacts
accordingly.
Individual:
The
TX8IZ's
"instruments" receive
Program Changes separately (over
the
as-
signed MIDI channels),
and
each looks up
its Voice
Number
from the Program
Change
Table.
If
the
Table entry
is
a Performance
Number, it
is
ignored.
The
TX81Z's internal memory contains 4
banks of 32 permanent (ROM) Voice memo-
ries, I bank of 32 programmable
(RAM)
Voice
memories,
and
I
bank
of
24 programmable
(RAM) Performance memories.
In
the Program
Change Table, these memory locations appear
as
follows:
Memory
Bank
RAM: Voice Bank I (1-32)
ROM: Voice Bank A (1-32)
ROM: Voice Bank B (1-32)
ROM: Voice Bank C (1-32)
ROM: Voice Bank D (1-32)
RAM: Performances (1-24)
Abbreviation
I01-I32
A01-A32
B01-B32
COI-C32
D01-D32
PF01-PF24
When
shipped
from
the
factory,
the
TX8IZ's Program
Change
parameter
is
set
to
"Common,"
and the factory defined Program
Change
Table assigns
the
available Program
Change numbers (1-128)
as
follows:
Program
Change
Number
1-32
33-64
65-96
97-128
TX81
Z
Program
Number
I01-I32
A01-A32
BOI-B32
C01-C32
In order to call
up
Performance memories
using MIDI Program
Change
messages, you
18
AITERTOUCH/Vol. 3
No.8
need to program the TX81Z's Program
Change
Table accordingly.
The
most straightforward
approach
involves
setting
the
TX81Z
to
respond to MIDI Program
Change
numbers
1-
24 by calling
up
Performances 1-24. To do so,
follow these steps:
1)
Press the Utility button.
2) Press
the
left
and
right Parameter keys until
the LCD reads
as
follows:
UTILITY MODE
Midi
Control?
3)
Press
the
+ I /YES
button
to
access
the
MIDI parameters.
4) Press the
~ight
Parameter key (12 times) un-
til the LCD reads:
UT
MIDI
CONTROL
Edit
P.Cng
Tbl?
5) Press
the
+1/YES button.
The
LCD will
now read:
UT
MIDI
CONTROL
PGM
1
I01
6) Press and hold
the
+1I
INC
button
until the
LCD reads
as
follows:
UT
MIDI
CONTROL
PGM
1 =
PF01
7)
Press the right parameter button.
The
LCD
will now read:
UT
MIDI
CONTROL
PGM
2
I01
8) Press and hold the +
1/INC
button
until the
LCD reads
as
follows:
UT
MIDI
CONTROL
PGM
2 =
PF02
Continue
the above process until you have
assigned PF01-PF24 (the TX8IZ's Performance
memories) to Program
Change
numbers I-24 in
the unit's Program
Change
Table. These Table
settings are stored
as
part
of
the
TX81Z's System
Setup memory,
and
will be retained in the unit
even when
the
power
is
turned
off.
Continued on
page
19

My
basic setup consists
of
a
DX7
and
a Korg
DW-8000.
When
I
MIDI
the
two
together,
the
DX7
is
the
master
keyboard,
and
both
units
are set
to
MIDI
channel!.
When
I need
to
disconnect
the
two
(so
that
they
play in-
dependently),
I simply
change
the
Korg
to
MIDI
channel
2.
When
I do this,
though,
the
last notes
or
chords
continue
to
ring
out
of
the
Korg.
The
only way to
stop
this is to
hit
the
"Write"
button
on
the
Korg
(which
resets its
circuitry).
What
gives?
The
basic MIDI messages for a
note
played
on
a keyboard consist
of
two parts: A
Note
On
(transmitted
when
you press down a key)
and
a
Note
Off
(transmitted
when
you let go
of
a
key).
If
you
hold
down a
chord
on
your DX7 when
the
Korg
is
set to receive
on
MIDI
channel
1,
it
receives
the
Note
On
messages for
the
notes in
the
chord
from
the
DX7;
however,
if
you
change
the
Korg
to
MIDI
channel
2 while you
are still
holding
the
chord
on
the
DX7, the Korg
will
not
receive
the
Note
Off
messages
when
you let go
of
the
chord
on
the
OX's keyboard.
The
Note
Off
messages are still being sent
on
MIDI
channel
1 by
the
OX,
but
the
Korg
is
now
set to MIDI
channel
2.
The
solution
is
simple: Always make sure
that
you are not holding
down
any keys
on
the
DX7
when
you
change
the
Korg from MIDI
channel
1
to
MIDI
channel
2. Let go
of
the
chord first {which will cause
the
DX7 to send
Note
Off
messages
to
the
Korg),
and
then
change
the
Korg's MIDI
channel
setting.
This
is
not
an
isolated situation caused by
your particular
combination
of
instruments-it
is
universal
to
all MIDI keyboards.
The
MIDI
slave
unit
must receive
Note
Off
commands
before you
change
its
MIDI
channel
assign-
ment; otherwise, you will be left
with
the
in-
famous "stuck
note"
syndrome.
TET
US
HEAR
FROM
YOU!
We
want
AfterTouch
to
be
an
information
network
Lfor
all
users
of
Yamaha professional musical products, so please
join
in. We're
looking for many different kinds
of
material.
Have
you created
an
incredible
patch
for
the
DX7 II,
the
DXlOO,
or
any
of
the
other
members
of
the
Yamaha FM digital synthesizer family? How about a program
for
the
CX5M
II music
computer
or
a great
pattern
or
voice for
the
RX5?
Send
in
your patches, programs,
and
patterns. If we use your material, we'll give you full
credit
plus
$25.00
for
each
item used.
Have you discovered a trick
that
increases
the
musical flexibility
of
one
of
the
Yamaha
After
Touch
products?
Send
it in to our
"Hot
Tips" column. If we use your
hot
tip, you'll receive full
credit
plus a
check
for $25.00.
Have you developed a
new
approach
to
one
of
the
Yamaha
After
Touch
instru-
ments,
or
have you discovered
an
important
secret regarding
their
use? Put it
on
paper
and
send it to us.
Don't
worry about your writing
style-just
get
the
informa-
tion
down. If we decide to use your material
as
a full article
in
After
Touch, we'll
write it up,
put
your
name
on
it,
and
send you a
check
for $100.00.
(An
After
Touch
article always covers
at
least
one
magazine
page-which
translates to
at
least four
double-spaced pages
of
typescript.)
By
the
way,
we
cannot
assume liability for
the
safe
return
of
unused ideas,
patches,
or
manuscripts.
We
will only be able
to
return
unused material if you
en-
close a self-addressed,
stamped
envelope
with
your submission.
If you just have a question regarding
the
use
of
Yamaha professional musical
products,
send
it along too,
and
we'll do our best to answer it
in
the
pages
of
After
Touch. (We regret
that
we
won't
be able
to
answer questions
through
the
mail,
but
we
will use all
of
your questions to guide
us
in
our choice
of
future topics.)
Finally, if you just
want
to get
something
offyour chest,
or
ifyou'd like to estab-
lish direct
contact
with
other
Yamaha
After
Touch product users, send in
something
to
our
"Letters" column. We'll do our best to print names, addresses,
and
phone
numbers
of
all those
who
are interested
in
starting up regional users groups.
AfterTouch
is
your publication. Let
us
hear
from you!
Write
To:
AFTER-
TOUCH,
P.O.
Box
7938,
Northridge,
CA
91327-7938.
Vol.
3 No.
81
AFTERTOUCH
19

AFTERTOUCH
P.O.
Box
7938
Northridge, CA
91327~
7938
Hot
Tips Continued from page
17
This
would require 4096 Performance memories
to
set
the
pairs
of
patches
up
in
advance, assign-
ing balance
to
CS
1.
Fortunately, there
is
a way
to
achieve
A/B
balance
control
while
not
in
Performance
mode. It requires editing MIDI IN
Control
Vol-
ume
in
each
of
the
voices for
which
Dual mode
operation
is
desired.
Once
this
parameter
is
changed,
it
is
important
to
note
that
these
voices will
not
sound
at
all
in
Single
or
Dual
modes unless a MIDI cable
is
used as described
below. Follow these steps:
1)
Connect
the
MIDI
OUT
of
the
DX7
II
to
its
own
MIDI
IN.
(If
the
OX
is
controlling
another
tone
generator,
connect
the
MIDI
OUT
of
the
OX
to
the
MIDI IN
of
the
tone
generator,
and
connect
the
MIDI
THRU
of
the
tone
generator
to
the
MIDI IN
of
the
OX.)
2) Press
the
Edit
button,
and
then
press
the
20 AITERTOUCH!Vol. 3 No. 8
MIDI
1
button
(31)
until
you access
the
MIDI
IN
display;
set
the
MIDI
Control
Number
of
CS1
to 11,
and
set
the
MIDI
Control
Number
of
CS2
to 12.
(Note
that
this
and
the
next
step
involve
global
changes.)
3) Using
the
MIDI 1
button
(31), access the
display
that
includes
the
"Local" parameter,
and
set Local
to
OFF (or you will only get 4-
note
polyphony
from
the
OX
in
Dual mode).
4) Edit all
of
the
Voice memories
that
you
think
you
might
want
in
Dual
or
Split
combina-
tions as follows: Using Voice Edit
button
26,
set
the
MIDI
IN
Control
parameter
to
a
value
of
99.
Now,
when
you call up any
of
these voices in
the
Dual
or
Split Voice modes, CS1 will control
the
volume
of
Voice A, while
CS2
will control
the
volume
of
Voice
B.
Other manuals for QX-3
2
This manual suits for next models
1
Table of contents
Other Yamaha Recording Equipment manuals

Yamaha
Yamaha QX-5FD User manual

Yamaha
Yamaha NUAGE I/O 16A User manual

Yamaha
Yamaha DEQ5E User manual

Yamaha
Yamaha P50-m User manual

Yamaha
Yamaha EME-1 User manual

Yamaha
Yamaha SPX900 User manual

Yamaha
Yamaha CRD-HD1300 User manual

Yamaha
Yamaha CDR-HD1500 User manual

Yamaha
Yamaha PLG150-AP User manual

Yamaha
Yamaha DCU5D User manual

Yamaha
Yamaha QX 21 User manual

Yamaha
Yamaha TG77 User manual

Yamaha
Yamaha QY10 Manual

Yamaha
Yamaha DTXTREME III User manual

Yamaha
Yamaha SPX90 II User manual

Yamaha
Yamaha EMP700 User manual

Yamaha
Yamaha MLA-200 User manual

Yamaha
Yamaha QX-7 User manual

Yamaha
Yamaha MagicStomp User manual

Yamaha
Yamaha GEP50 User manual