YI Dome U Pro User manual

Thank you for choosing the YI Dome U Camera Pro
Manufacture: Shanghai Xiaoyi Technology Co.,Ltd.
Address: Building 18, Lane 55, Chuanhe Road, China(Shanghai) Pilot Free
Trade Zone, Shanghai, China, 201203 72-XH60GA-DFUC2
FCC ID: 2AFIB-YHS6021
IC: 20436-YHS6021

1
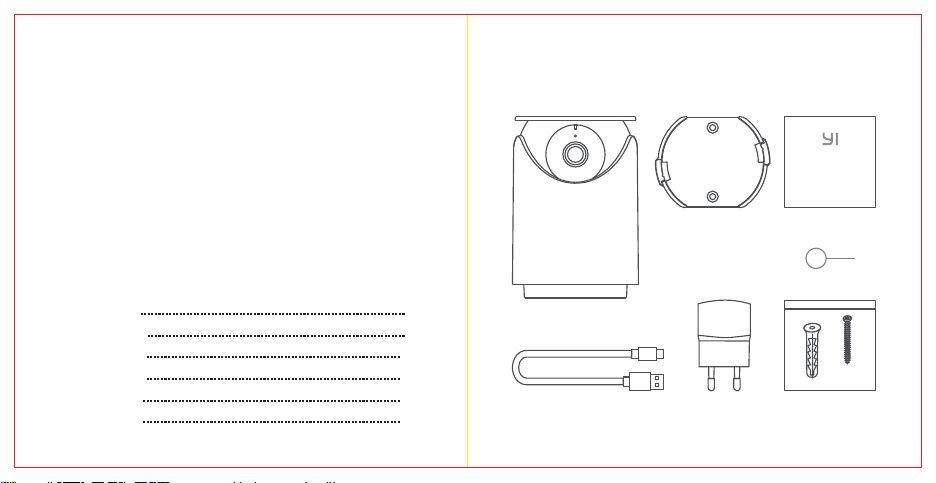
1. What’s in the box
Manual x1
Adapter x1
YI Dome U
Camera Pro x1
Camera Wall
Mount x1
Power Cable x1 Installation
Hardware x1
1. English
2. Français
3. Deutsch
4. Español
5. Italiano
Table of Contents
1
11
21
31
41
6. Русский 51
Reset Pin x1

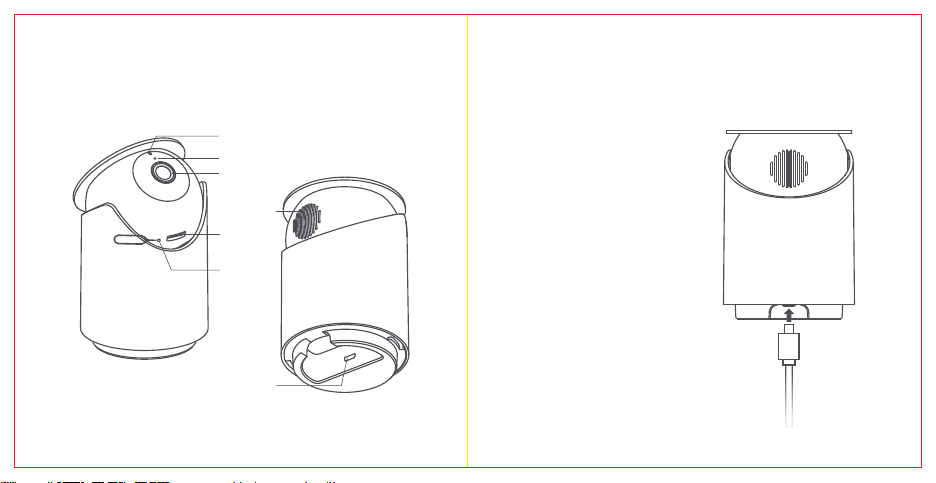
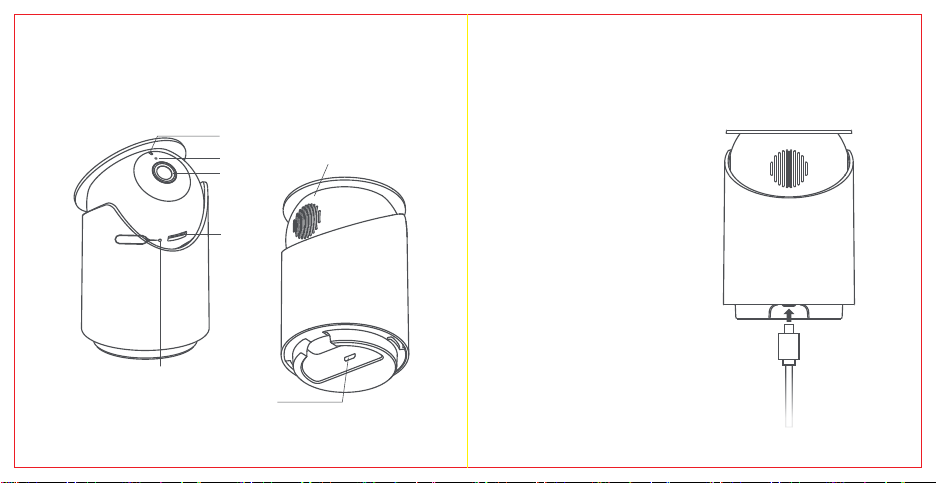
2. Getting to Know Your Camera
microSD
Card Slot
Reset
Button
Indicator Light
Lens
Microphone
Speaker
Power Port
3. Pairing your Camera
a) Prerequisite
2 3
• Ensure that your cell phone
is connected to a 2.4 GHz
Wi-Fi network.
• Download the YI Home App
from the Apple App Store or
Google Play.
• Register a YI Home account
or log on to an existing YI
account.

b) Installation:
4 5
Step 1
Connect the power adapter to an outlet to activate the
camera. The camera indicator will flash yellow and you will
hear the introductory message "Welcome to YI home",
followed by "Waiting to connect". When you hear "waiting to
connect", tap "I heard waiting to connect".
Note: To install a camera that is previously installed on a
different network or if you change your password, you must
reset your camera. Press the reset button that is located at
the bottom of the camera.
Step 2
Log into the YI Home App, you can tap the "+" sign to
select your device or scan the camera QR code with your
phone.
Step 3
Enter the password of the same Wi-Fi network that is
connected to your phone, then use the YI Dome U Camera
Pro to scan the QR code that will be generated.
Step 4
Tap “Next Step”. You will hear “Pairing is successful” and
then the YI Dome U Camera Pro is ready to use.

6 7
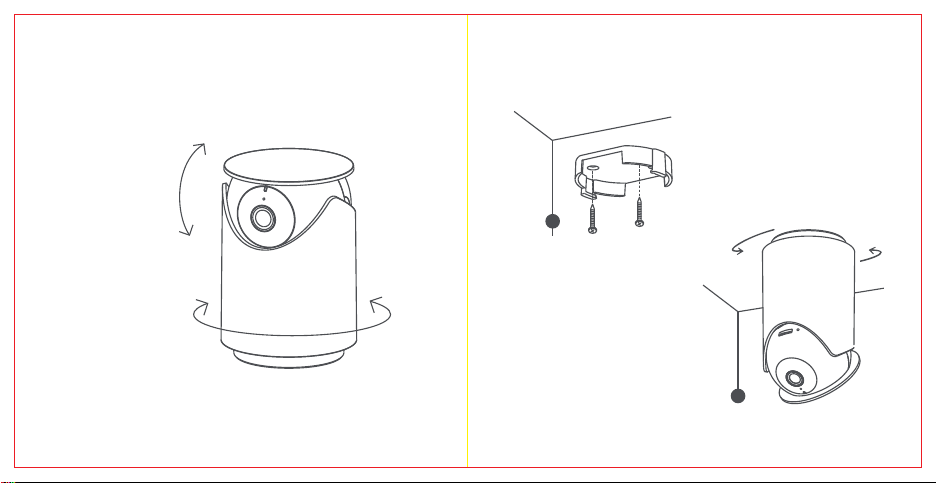
4. Mounting Your Camera
(optional)
2
1
Secure the mount with screws
c) Pan/Tilt/Zoom (PTZ) Angle
Range of Activity:
Pan 0° - 350°, tilt up 53°, tilt down 10°.
Tilt
Up 53°
Down 10°
Pan 350°
Zoom
Directly from the livefeed on your YI Home App
Prerequisite:
• Ensure that the camera is
facing the desired direction prior
to mounting.
• Ensure that the included USB
cable can reach the desired
mounting location.
Step 1
Use the included screws to install
the camera mount on a flat ceiling.
Step 2
Install the camera by twisting and
locking it into the mount base.

8 9
6. Important Safety Guidelines
1. Read these instructions carefully.
2. Clean only with a dry cloth.
3. This camera is for indoor use only.
4. Only use the attachments/ accessories specified by the
manufacturer.
5. Unplug this apparatus during lightning storms or when
unused for long periods of time.
6
7. Where the plug of the Direct Plug-in Adapter is used
as the disconnect device, the disconnect device shall
remain readily operable.
. To get the best usage out of this product, please
consistently update to the latest versions of our app and
firmware.
Go to: https://www.yitechnology.com/firmware/
5. Switching Wi-Fi Networks
When you need to switch Wi-Fi networks or update your
Wi-Fi password, follow the instructions below:
1. Restore your camera to its default settings by inserting
a paper clip or reset pin into the camera's Reset Port.
2. Open the YI Home app on your phone, and connect
the camera to your phone again. Your videos stored on
your MicroSD card will not be affected.

10 11
7. Specifications
Maximum Resolution: 2304 x 1296
Lens: Wide-Angle
Audio: Built-in Mic and Speaker
Photographic Enhancement: 3D Digital Noise Reduction
Wi-Fi: 802. 11b/g/n, 2.4 G Hz
Alert Modes: Human Detection, Motion Detection, Face
Detection
Night Vision: IR Cut+ Non-invasive Infrared LEDs
Support Platforms: Android, iOS, Mac & PC
Wireless Encryption: WEP/WPA/WPA2
USB Cable Length: 2 Meters
Power Supply: DC 5V/1A
Power Consumption: 3.5W
Pan/Tilt: 350° horizontally, tilt up 53°, tilt down 10°.
Storage: MicroSD Card and YI Cloud Storage
Operating Temperature: 14°F to 122°F (-10°C to 50°C)
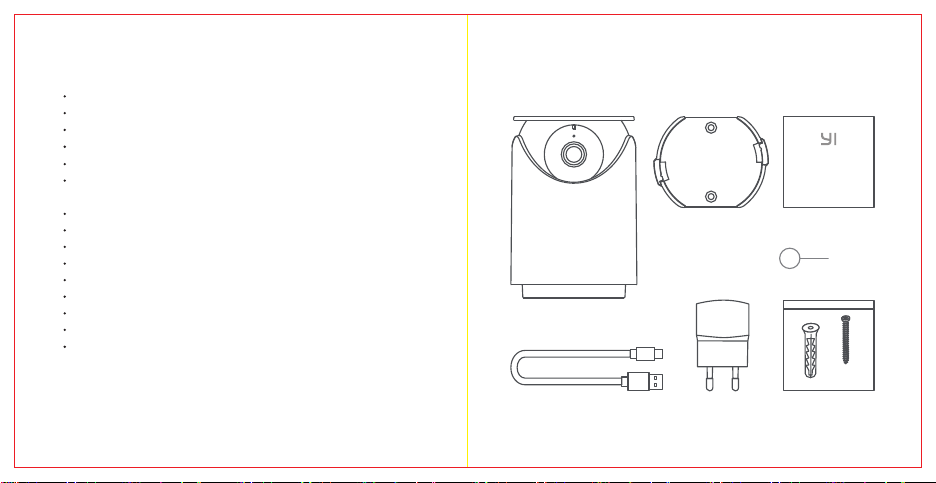
1. Contenu de la boîte
Manuel x 1
Adapter x 1
Caméra YI Dome
U Pro x1
Base de montage
mural x1
Câble USB x1 Sachet de vis x1
outil de réinitialisation x 1

2. Apprenez à connaître votre
appareil photo
Fente
pour carte
microSD
Bouton de Réinitialisation
LED Voyant lumineux
Objectif
Microphone Haut-parle
Port d'alimentation
3. Jumelage de votre caméra
a) Prérequis
12 13
• Assurez-vous que votre
téléphone portable est
connecté à un réseau Wi-Fi
2,4 GHz.
• Téléchargez l'application YI
Home depuis l'App Store
d'Apple ou Google Play.
• Enregistrez un compte
personnel YI ou connect-
ez-vous à un compte YI
existant.

14 15
b) Installation:
Étape 1
Connectez l'adaptateur secteur à une prise pour activer la
caméra.
L'indicateur de l'appareil photo clignotera en jaune et vous
entendrez le message d'introduction «Bienvenue chez YI
home», suivi de «En attente de connexion". Lorsque vous
entendez "En attente de connexion", appuyez sur "I heard
waiting to connect.
Remarque : pour installer une caméra précédemment
installée sur un autre réseau ou si vous modifiez votre mot
de passe, vous devez réinitialiser votre caméra. Appuyez
sur le bouton de réinitialisation situé au bas de la caméra.
Étape 3
Entrez le mot de passe du même réseau Wi-Fi qui est
connecté à votre téléphone, puis utilisez la caméra
panoramique YI Dome U Pro pour scanner le code QR.
Étape 4
Appuyez sur «Étape suivante». Vous entendrez «Le
couplage est réussi», puis la caméra panoramique YI
Dome U Pro est prête à être utilisée.
Étape 2
Connectez-vous à l'accueil de l'application YI, vous pouvez
appuyer sur le signe «+» pour sélectionner votre appareil
ou scanner le code QR.

16 17
c) Angle Pan / Tilt / Zoom (PTZ)
Inclinaison
Jusqu'à 53°
Descente de 10°
Zoom
Directement à partir du flux en direct sur votre application
YI Home.
Domaine d'activité:
Pan 0° - 350 °, inclinaison vers le haut 53°, inclinaison
vers le bas 10 °.
4. Montage de votre caméra
(facultatif)
Fixez le support avec des vis
1
Pan 350°
Prérequis :
• Assurez-vous que la caméra
est orientée dans la direction
souhaitée avant le montage.
• Assurez-vous que le câble USB
fourni peut atteindre l'emplace-
ment de montage souhaité.
Etape 1
Utilisez les vis fournies pour
installer le support de la caméra
sur un plafond plat.
Etape 2
Installez la caméra en la tournant
et en la verrouillant dans la base
de montage.
2

7. Lorsqu'une prise secteur est utilisé comme dispositif de
débranchement, celui-ci doit rester facilement accessible.
18 19
6. Consignes de sécurité
1. Lisez ces instructions.
2. Nettoyez uniquement avec un chiffon sec.
3. Cet appareil photo est destiné à une utilisation en intérieur
uniquement.
4. Utilisez uniquement les fixations / accessoires spécifiés
par le fabricant.
5. Débranchez cet appareil pendant les orages ou lorsqu'il
n'est pas utilisé pendant de longues périodes.
6. Pour tirer le meilleur parti de ce produit, veillez à ce que
l'application et le logicleil de votre caméra sont toujours
à jour.
Connectez vous à:
https://www.yitechnology.com/firmware/
5. Changer de réseau Wi-Fi
Lorsque vous devez changer de réseau Wi-Fi ou mettre
à jour votre mot de passe Wi-Fi, suivez les instructions
ci-dessous:
1. Utilisez le clip livré avec la caméra pour la réinitialiser.
2. Ouvrez l'application YI Home sur votre téléphone et
reconnectez l'appareil photo à votre téléphone. Vos
vidéos stockées sur votre carte Micro SD ne seront
pas affectées.

20 21
7. Paramètres
Résolution maximale: 2304 x 1296
Objectif: Grand angle
Audio: Mic/Haut-parleur intégrés
Amélioration photographique: Réduction du bruit
numérique3D
Wi-Fi: 802. 11b/g/n, 2.4 G Hz
Mode d'alerte: Détection humaine, détection de visage
Vision nocturne: IR Cut + LED infrarouges non invasives
Plate-forme de support: Andriod, iOS, Mac & PC
Cryptage sans fil: WEP/WPA/WPA2
Longueur du câble USB: 2 mètres
Alimentation en énergie: DC5V1A
Consommation: 3.5W
Pan / Tilt: 350 ° horizontalmente, inclinación hacia arriba
53 °, inclinación hacia abajo 10 °.
Almacenamiento: tarjeta MicroSD y almacenamiento en
la nube YI
Plage de fonctionnement -10°C to 50°C
1. Im Lieferumfang
Handbuch x 1
Adapter x1
YI Dome U Pro
Kamera x 1
Befestigungsplatte x1
Cable USB x1 Tüte mit
Schrauben x1
Resetnadel x 1

22 23
2. Inbetriebnahme
MicroSD
Kartenslot
Resetknopf
LED Anzeigeleuchte
kameralinse
Mikrofon Lautsprecher
Stromanschluß
3. Kamera koppeln
a) Voraussetzung:
• Vergewissern Sie sich, dass
Ihr Mobiltelefon mit einem
2,4-GHz-WLAN-Netz
verbundenen ist.
• Laden Sie die YI Home-App
aus dem Apple App Store
oder von Google Play
herunter.
• Registrieren Sie ein YI
Home-Konto oder melden Sie
sich bei einem bestehenden
YI-Konto an.

24 25
Schritt 1
b) Installation:
Schließen Sie das Netzteil an einer Steckdose an, um die
Kamera zu aktivieren.
Die Anzeige der Kamera blinkt gelb und Sie hören die
einleitende Meldung "Welcome to YI home", gefolgt von
"Waiting to connect". Wenn Sie "Waiting to connect" hören,
tippen Sie auf "I heard waiting to connect".
Hinweis: Um eine Kamera zu installieren, die zuvor in
einem anderen Netzwerk installiert wurde oder wenn Sie Ihr
Kennwort ändern, müssen Sie Ihre Kamera zurücksetzen.
Drücken Sie die Rücksetztaste, die sich an der Unterseite
der Kamera.
Schritt 3
Geben Sie das Passwort des WLAN-Netzwerks ein, mit
dem Ihr Telefon verbunden ist und verwenden Sie dann die
YI Dome U Pro Kamera für Innenräume, um den QR-Code
zu scannen.
Schritt 4
Tippen Sie auf "Nächster Schritt". Sie hören "Pairing is
successful" und die YI Dome U Pro ist einsatzbereit.
Schritt 2
Melden Sie sich bei der YI Home-App an, tippen Sie auf
"+", um Ihr Gerät auszuwählen oder scannen Sie den
QR-Code.

26 27
4. Kamera montieren (optional)
2
1
Die Schraube befestigen
c) Schwenk- / Neige- / Zoomwinkel (PTZ)
Tätigkeitsbereich:
Schwenken Sie 0 °- 350 °, neigen Sie sich um 53 ° und
neigen Sie sich um 10 °..
Neigung
Bis 53 °
10 ° runter
Zoomen
Direkt vom Livefeed auf Ihrer YI Home App
Pan 350°
Voraussetzung:
• Vor der Montage vergewissern
Sie sich, dass die Kamera in die
gewünschte Richtung zeigt.
• Achten Sie darauf, dass das
mitgelieferte USB-Kabel den
gewünschten Montageort
erreichen kann.
Schritt 1
Verwenden Sie die mitgelieferten
Schrauben, um die Kamerahalter-
ung an der Decke zu montieren.
Schritt 2
Installieren Sie die Kamera, indem
Sie sie in den Halterungssockel
drehen und arretieren.

7. Der Netzstecker wird zur Trennung vom Stromnetz benötigt
und muss sich in einem ordnungsgemäßen Zustand
befinden.
28 29
6. Wichtige Sicherheitshinweise
1. Lesen Sie diese Anweisungen
2. Nur mit trocken Tüchern reinigen.
3. Diese Kamera ist nur für den Innengebrauch.
4. Nur das vom Hersteller empfohlene Zubehör verwenden.
5. Bei Gewitter oder längerer Nichtnutzung sollte das Gerät
ausgesteckt werden.
6. Für eine sicher Nutzung bitte darauf achten, dass die App
und die Firmeware stets aktuell ist.
Gehen sie auf: https://www.yitechnology.com/firmware/
5. WLAN wechseln
Wenn Sie das Netzwerk wechseln möchten, fgehen Sie
bitte wie folgt vor:
1. Benutzten Sie beigelegte Nadel um die Mini-Kamera
zurückzusetzten.
2. Öffnen Sie die YI Home App und verbinden Sie die
Kamera erneut. Videos auf der Speicherkarte
bleiben erhalten.

30 31
7. Spezifikationen
Maximale Auflösung: 2304 x 1296
Objektiv: Weitwinkel
Audio: Eingebautes Mikrofon / Lautsprecher
Optische Aufbereitung: 3D DigitalRauschunterdrückung
Wi-Fi: 802. 11b/g/n, 2.4 G Hz
Alarmmodus: Personenerkennung, Gesichtserkennung
Night Vision: IR Cut+ Non-invasive Infrared LEDs
Betriebssysteme: Android, iOS, Mac & PC
WLAN Verschlüsselung: WEP/WPA/WPA2
Länge des USB-Kabels: 2 Meter
Stromversorgung: Gleichstrom 5 V / 1 A
Energieverbrauch: 3.5W
Schwenken / Neigen: 350 ° horizontal, 53 ° nach oben,
10 ° nach unten kippen.
Storage: MicroSD Card and YI Cloud Storage
Betriebstemperatur: -10°C to 50°C
1. Contenido de la caja
Manual x1
Cámara de vigilancia
YI Dome U Pro x 1
Base x1
Adaptador x1
Cable USB x1 Bolsa de
tornillos x1
Pin de r
establecimiento x1

32 33
2. Conocer la cámara
Ranura
para
tarjeta
microSD
Luz LED indicadora
Lente
Micrófono
Altavoz
Ranura de corriente
3. Emparejar la cámara
a) Requisitos previos:
Botón para Resetear
• Asegúrese de que su
teléfono esté conectado a
una red Wi-Fi de 2,4 GHz.
• Descargue la aplicación YI
Home desde Apple App Store
o Google Play.
• Registre una cuenta de
inicio de YI o inicie sesión
con una cuenta de YI
existente.

34 35
b) Instalación:
Paso 1
Conecte el adaptador de corriente a una toma de corriente
para activar la cámara.
El indicador de la cámara parpadeará en amarillo y
escuchará el mensaje introductorio "Bienvenido a YI
home", seguido de "Esperando para conectar". Cuando
escuche "esperando para conectar", toque "escuché
esperando para conectar".
Nota: Para instalar una cámara que se instaló previamente
en una red diferente o si cambia su contraseña, deberá
restablecer su cámara. Pulse el botón de reinicio que se
encuentra en la parte inferior de la cámara."
Paso 2
Inicie sesión en la aplicación YI Home, puede tocar el signo
"+" para seleccionar su dispositivo o escanear el código
QR.
Paso 3
Introduzca la contraseña de la misma red Wi-Fi que está
conectada a su teléfono, a continuación, use la cámara YI
Dome U Pro para escanear el código QR.
Paso 4
Toque "Siguiente paso". Escuchará "El emparejamiento se
realizó correctamente" y, a continuación, la cámara YI
Dome U Pro estará lista para usarse.

36 37
4. Montaje de su cámara
(opcional)
2
1
Fije el tornillo
c) Ángulo de panorámica / inclinación /
zoom (PTZ)
Rango de actividad Rotación
horizontal: 0 - 350° Inclinación hacia arriba: 53°
Inclinación hacia abajo: 10°
Hacia arriba: 53°
Hacia abajo: 10°
Enfocar:
Directamente de la transmisión en vivo de su aplicación
YI Home
Rotación
horizontal: 350°
Requisitos previos:
• Asegúrese de que la cámara
esté orientada en la dirección
deseada antes de montarla.
• Asegúrese de que el cable
USB incluido pueda llegar a la
ubicación de montaje deseada.
Paso 1
Utilice los tornillos incluidos para
instalar el soporte de la cámara en
un techo plano.
Paso 2
Instale la cámara girándola y
fijándola en la base de montaje.
Table of contents
Languages:
Other YI Security Camera manuals