manuals.online logo
Brands
  1. Home
  2. •
  3. Brands
  4. •
  5. yuna
  6. •
  7. Ventilation Hood
  8. •
  9. yuna ALEA 60Z User manual

yuna ALEA 60Z User manual

This manual suits for next models

1

Other yuna Ventilation Hood manuals

yuna KIM SH60A User manual

yuna

yuna KIM SH60A User manual

yuna DUANA User manual

yuna

yuna DUANA User manual

Popular Ventilation Hood manuals by other brands

Gorenje S3 IHGC963S4X manual

Gorenje

Gorenje S3 IHGC963S4X manual

KOBE ISX2136SQB-1 Installation instructions and operation manual

KOBE

KOBE ISX2136SQB-1 Installation instructions and operation manual

U.S. Products ADVANTAGE-100H Information & operating instructions

U.S. Products

U.S. Products ADVANTAGE-100H Information & operating instructions

Kuppersberg DUDL 4 LX Technical Passport

Kuppersberg

Kuppersberg DUDL 4 LX Technical Passport

Framtid HW280 manual

Framtid

Framtid HW280 manual

Thermador HGEW 36 FS installation manual

Thermador

Thermador HGEW 36 FS installation manual

Electrolux LFT769X user manual

Electrolux

Electrolux LFT769X user manual

AEG X69453MVO UK user manual

AEG

AEG X69453MVO UK user manual

Broan B5836SS manual

Broan

Broan B5836SS manual

Heinner HDCH-6060RGBK quick start guide

Heinner

Heinner HDCH-6060RGBK quick start guide

Baumatic AS35SS instruction manual

Baumatic

Baumatic AS35SS instruction manual

Franke FTF 604 XS V2 Instructions for use and installation

Franke

Franke FTF 604 XS V2 Instructions for use and installation

Best UCB3I30SBW installation instructions

Best

Best UCB3I30SBW installation instructions

Gram EFU 503-90 X instruction manual

Gram

Gram EFU 503-90 X instruction manual

CIARRA CBCS6803 Installation and user manual

CIARRA

CIARRA CBCS6803 Installation and user manual

sauter SHG501 Instructions for installation and use

sauter

sauter SHG501 Instructions for installation and use

Franke 392-17 User instructions

Franke

Franke 392-17 User instructions

FALMEC Polar Black 35 Instruction booklet

FALMEC

FALMEC Polar Black 35 Instruction booklet

manuals.online logo
manuals.online logoBrands
  • About & Mission
  • Contact us
  • Privacy Policy
  • Terms and Conditions

Copyright 2025 Manuals.Online. All Rights Reserved.

INSTRUCTION MANUAL
COOKER HOOD
ALEA Z ALEA Z
2
INDEX
1. Safety Precaution......................................................................................4
2. Installation for T Shape Hood....................................................................8
3. Operation................................................................................................11
4. Maintenance...........................................................................................13
5. Troubleshooting..................................................................................... 16
6. Technical Data........................................................................................ 18
7.DismantlingandDisposal.........................................................................20
Thank you for choosing this cooker
hood.
This instruction manual is designed
to provide you with all required ins-
tructions related to the installation,
use and maintenance of the appli-
ance. In order to operate the unit
correctly and safety, please read this
instruction manual carefully before
Dear customer!
installation and usage.
The cooker hood use high quality ma-
terials, and is made with a streamli-
ned design. Equipped with large pow-
er electric motor and centrifugal fan,
it also provides strong suction power,
low noise operation, non-stick grease
lter and easy assembly installation.
3
Do not dispose of this appliance together with your domestic was-
te. The appliance must be disposed of at a collecting centre for re-
cyclable electric and electronic appliances. Do not remove the sym-
bol from the appliance.
The gures in this instruction manual may dier in some details from the
current design of your appliance. Nevertheless follow the instructions in
such a case. Delivery without content.
Any modications, which do not influence the functions of the appliance.
shall remain reserved by the manufacturer. Please dispose of the packing
with respect to your current local and municipal regulations.
The appliance you have purchased may be an enhanced version of the unit
this manual was printed for. Nevertheless, the functions and operating con-
ditions are identical. This manual is therefore still valid. Technical modica-
tions as well as misprints shall remain reserved.
EU - Declaration of Conformity
The products, which are described
in this instruction manual, comply
with the harmonized regulations.
The relevant documents can be re-
quested from the nal retailer by
the competent authorities.
4
Safety instructions
Read the safety instructions carefully before you operate the appliance for the
rst time. All information included in those pages serve for the protection of the
operator. If you ignore the safety instructions, you will endanger your health
and life.
1
Store this manual in a safe place so
you can use it whenever it is nee-
ded. Strictly observe the instruc-
tions to avoid damage to persons
and property.
Check the technical periphery of the
appliance! Do all wires and connec-
tions to the appliance work proper-
ly? Or are they time-worn and do not
match the technical requirements of
the appliance? A check-up of exis-
ting and newlymade connections
must be done by an authorized pro-
fessional. All connections and ener-
gy-leading components (incl. wires
inside a wall) must be checked by a
qualied professional. All modica-
tions to the electrical mains to ena-
ble the installation of the appliance
must be performed by a qualied
professional.
The appliance is intended for priva-
te use only.
The appliance is intended for extrac-
ting/recirculating cooking vapours
in a private household only.
The appliance is intended for in-
door-use only.
The appliance is not intended to be
operated for commercial purposes,
during camping and in public trans-
port.
Operate the appliance in accordan-
ce with its intended use only.
Do not allow anybody who is not fa-
miliar with this instruction manual
to operate the appliance.
DANGER! indicates a hazardous
situation which, if ignored, will result
in death or serious injury.
CAUTION! indicates a hazardous
situation which, if not avoided, may
result in minor or moderate injury.
WARNING! indicates a hazardous
situation which, if ignored, could re-
sult in death or serious injury.
NOTICE! indicates possible
damage to the appliance.
MAKE SURE THAT THIS MANUAL IS AVAILABLE TO ANYONE USING THE APPLIANCE AND
MAKE SURE THAT IT HAS BEEN READ AND UNDERSTOOD PRIOR TO USING THE DEVICE.
5
DANGER
Do not operate the appliance when
it does not work properly, is visibly
damaged, has dropped down or the
power cord/plug are damaged.
The power cord must be replaced by
a qualied professional only.
Never repair the appliance yourself.
Do not operate any room-air depen-
dent replaces while operating the
appliance; otherwise harmful gases
will get from the replace into your
home.
Whenever the hood is operated to-
gether with chimney-vented repla-
ces (e.g. coal furnace), ensure there
is sucient air supply in the room
where the appliance is installed in.
Always consult your local chimney-
sweep master. When you operate
the appliance in recirculating mode,
you can simultaneously run room-
air dependent replaces.
If gas is set free in your home:
Open all windows.
Do not unplug the appliance and do
not use the control panel.
Do not touch the appliance until the
gas has gone.
Otherwise sparks can be generated
which will ignite the gas.
1
2
5
3
4
6
WARNING!
Whenever you use extractor hoods
in combination with non electrical-
lyoperated appliances ( gas and
oil-red appliances ) , the negative
pressure of the corresponding
room must not be more than 4 Pa
(4 * 10-5 bar).
An electrical supply of 220-240V
AC / 50 Hz is required. Do not use
a socket board or a multi socket or
an extension cord when operating
the appliance with 220–240 V/50
Hz (AC). All electrical connections
which may be damaged must be re-
paired by a qualied professional.
Only connect the appliance to a
properly grounded and dedicated
socket.
The appliance must be grounded.
Only use a proper safety socket
to minimize risk of electric shock.
The technical data of your energy
supply must meet the data on the
rating label.
Your domestic circuit must be
equipped with an automatic circuit
breaker.
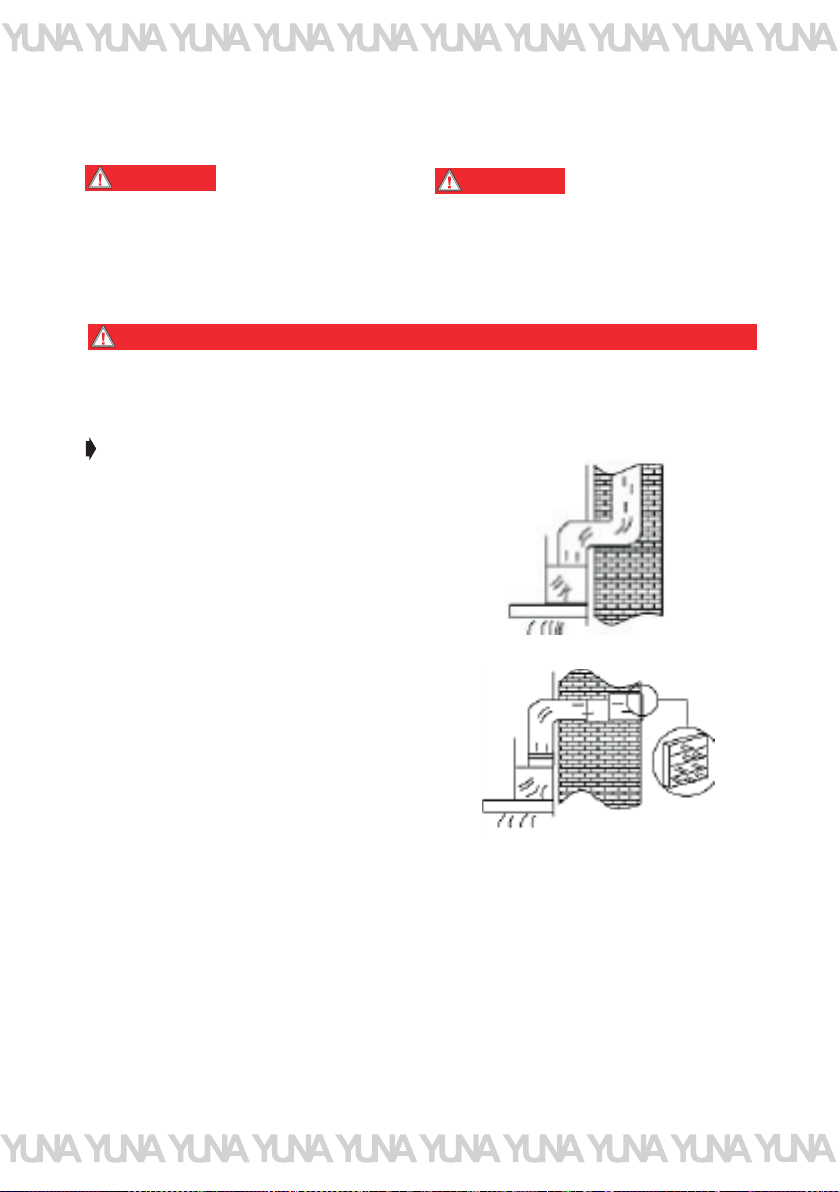
Strictly observe the minimum dis-
tance between hood and hob:
1
2
3
4
5
6
8
10
11
12
13
9
Minimum distance hood to
Ceramic-glass rings/hotplates 65 cm
Gas cooker 75 cm
Coal / oil / stove wood ring 85 cm
Do not cook a la flambé dishes be-
low the extractor hood. The flames
may damage your appliance and/
or cause re.
Do not operate the gas jets of a gas
hob without cookware. The flames
may damage your appliance and/
or cause re.
If you fry, permanently keep an eye
on the oil as it can catch re. The
risk of auto-ignition rises when
using the oil many times.
Do not carry out any procedures on
the hob using naked light or re.
The flames may damage your ap-
pliance and/or cause re.
The exhaust hose must not be
made of flammable materials or
contain any flammable materials.
The extracted air must not be con-
ducted by an exhaust pipe of a
heater or similar, not electrically-
operated appliances.
Operate the appliance with inser-
ted grease lters only. Otherwise
recirculatingtransported
fat will deposit in the appliance
and the exhaust system. RISK OF
7
7
14
15
16
17
FIRE! Clean or replace the lters
regularly.
Disconnect the appliance from the
mains before cleaning and main-
tenance.
While unpacking, the packaging
materials (polythene bags, poly-
styrene pieces, etc.) should be
kept away from children. CHOKING
HAZARD!
This appliance may be operated
by children aged from 8 years
and above as well as by persons
with reduced physical, sensory
and mental capabilities or lack of
experience and knowledge if they
are supervised or have been in-
structed concerning the safe use of
the appliance and do comprehend
the hazards involved. Children
must not play with the appliance.
Cleaning and usermaintenance
must not be carried out by children
unless they are supervised.
Always supervise children so they
will not play with the appliance.
CAUTION!
Accessible parts of the hood may
become hot while cooking.
Carry out the installation of the ap-
pliance with at least two persons.
Risk of damage. RISK OF INJURY!
1
2
NOTICE!
The appliance must be transpor-
ted and installed by at least two
persons.
Unpack the parts of the chimney
very carefully; otherwise you will
damage the chimney.
Remove the complete packaging
materials before initial operation.
The appliance may be equipped
with a transportation lock. Remove
the transportation lock complete-
ly. When removing be very careful.
Do not use any aggressive deter-
gents to remove residues of the
transportation lock.
Clean and maintain the appliance
regularly to enable its proper ope-
ration and optimal performance.
Take the enclosed parts from the
packaging and its polystyrenecom-
ponents.
Check that the power cord and the
appliance are not damaged before
electrical connection.
1
2
3
4
5
6
8
INSTALLATION
2
For extracting the exhaust air al-
ways observe the current legal re-
gulations.
The diameter of the exhaust hose
must meet the diameter of the con-
necting ring.
If your appliance is equipped with
a carbon lter, remove the carbon
lter before you operate the appli-
ance in the extraction mode. The
carbon lter should be used in the
recirculating mode only.
The exhaust duct should be as short
and straight as possible. The dia-
meter of the exhaust hose should
be at least 120/150 mm (look at
chapter TECHNICAL DATA). Other-
wise you have to expect increased
noise and decreased performance
of your appliance.
The proper maximum bending ang-
le outwards is 120°.
Use smooth tubes or flexible, non-
inflammable exhaust hoses only.
When the exhaust duct is connec-
ted horizontally, a minimum falling
gradient of 1 cm/m or an inclination
of 2° is required. Otherwise con-
densate will get into the motor of
the hood.
When an exhaust duct is used, the
ending of the exhaust hose must be
adjusted into the direction of flow.
If the exhaust duct passes through
cool areas (e.g. an attic), a tempe-
rature gradient may occur in the dif-
ferent parts of the exhaust duct so
condensate will be generated. Pro-
per insulation of the corresponding
parts of the exhaust duct will then
be needed. Equip such an exhaust
duct with a condensate trap if need
be.
Depending on the model the hood
is equipped with one ( top ) or two (
top, back ) outlets.
The idle outlet is covered by a plas-
tic cap. You can remove this cap by
turning it anticlockwise. Use the
cap to cover the idle outlet.
1
2
3
4
5
6
7
8
9
WARNING!
Do not lead the exhaust air into a chimney which is used for extracting exhaust
air of appliances operated by gas or other combustibles.
10
11
9
Installation steps
WARNING! Failure to install the
screws or xing device in accordance
with these instructions may result in
electrical hazards.
WARNING! Do not damage the
wiring in the wall while drilling
NOTICE!
Two assistants are required for installation.
You can lay the exhaust hose as fol-
lows:
Vertically: Lay the exhaust hose to
a roof cap*.
Horizontally: Lay the exhaust hose
to an exhaust outlet equipped with
an air grille*.
*: Not included in delivery.
10
Drill three 8 mm holes to x the suspension device. Tighten the suspending
bracket using the supplied screws and dowels on the wall.
1
1. Drill holes 2. Dowels
3. Suspending bracket 4. Screws 4x30 mm
Suspend the hood on the suspending bracket.
2
Put the upper chimney into the lower chimney. Pull out the upper chimney.
Adjust the upper chimney relevant to the height you desire.
3