Zachry INW-E295BT User manual

Zachry Electronics
INW-E295BT User Manual
For the proper operation and safety of the machine,please read it before using.
Video
AUX Bluetooth
FM
File
Settings IE
Prev Next
More
Play
QQ Music
IQIYI Video

Thank you for selecting INW-E295BT wall-mounted music controller,this manual introduce all functions of INW-
E295BT, it’s
easily manipulated, let you fully enjoy the music.Please read it before using.
INW-E295BT is a intelligent operating system music controller launched only by our companywith good quality and
reasonable price, powerful, simple interface and high-class. It is HD player, support multiple video formats to play movie.
New independence development of application software, RJ45, built-in Wi-Fi, abundant information for entertainment
and
study. You can do what you want to do, and it willenrich your music life.
INW-E295BT adopt wall-mounted installation,do not take any space and do notnfluence the decoration, make
your
home full of music.Hope our products create more value for you.
1
Foreword Page Down
About the functions, please use the product as standard, we will continue to offer new functions and without notice. The
user manual is protected by copyright,without prior written permission by our company,please do not copy,we have the
right to do the final explaining about the manual and relevant data.
There are some inevitable errors and omissions existing in this manual, please forgive and comments and
corrections welcome here.
If you meet any questions when using our products,please contact with local distributors.Thank you for your support.

1、Security and maintenance
Security and maintenance
1.1.Power supply: AC90V~AC250V.
1.2.Please wiring follow the installation guide,if it is wrong connection,it will destroy the machine.
1.3.Please do not install it at some places where the temperature is above 50℃ or too humid.
1.4.Only can turn on the unit unless assuring all the cables are right connected.
1.5.Please back up important data in your machine.
1.6.It is hi-tech electronics product,please do not dismantle,repair and modification by yourself.
1.7.Please do not uninstall applications in this system to avoid that this equipment or some functions
are not available.
1.8.We will not be held responsible for any data lost or damaged caused by faulty operation,
maintenance and other accidents.
1.9.About the functions,please use the product as standard,we will continue to offer new functions and
without notice.
1.10.If you meet any questions when using our products,please contact with local distributors or our
company customer service.
2
Page Up /
Page Down

stallation2.1.In
1) Take down the terminals,wiring the cables to the terminals.
2)Install metal fastening into the back box and tighten the screws.
3)Please aim four square holes to drag
hook and screw hole of metal fastening
(as shown below:1.2.3.4)to install the
machine,after they fit perfectly,put the
machine slowly into the back box.
4)Installation finished,push the power
switch to right to power on.
2.2.Demolition:
1)Push the machine up.
2)Pull out the terminals.
3
12
3 4
2.Security and maintenance
Security and maintenance Page Up /
Page Down

2.3.Wiring Introduction:
4
Wiring Introduction Page Up /
Page Down
1)Input power:power cable:1-2mm2 Single-stranded copper core
2)RJ45 network:LAN cable
3)RS485:LAN cable

5
Wiring Introduction Page Up /
Page Down
4)AUX audio input:audio cable(two-core shielded cable):Rvvp2×0.75.
5)Speaker(left/right channel)output:speaker cable:RVH2×100 RVH2×200
6)Subwoofer output::audio cable(two-core shielded cable): Rvvp2×0.75.
7)Speaker(left/right channel)output:speaker cable:RVH2×100 RVH2×200
8)FM radio antenna:single-stranded core cable,diameter is not less than 1mm,
the length is not less than 1m.

3、Functions Interface and Buttons Introduction
6
Functions Interface and Buttons Introduction Page Up /
Page Down
Sleep Button
IR
Back
Home
Volume
up
Volume
down USB OTG
RESET TF Card
Power
Switch

1 2 3
4 5 6
7 8 9
.0DEL
ok
POWER
MUSIC FILM RADIO PROG
HOME
MENU RETURN
TV MODE MOUSE
16
2
3
7
10
14
15
1
5
4
6
8
9
11
12
13
17
3.3.Remote Control
7
Remote Control Page Up /
Page Down
1. POWER press this button to power on,again
is power off.
2. MUSIC press this button to listen to music.
3. FILM press this button into film manager.
4. RADIO press this button to listen to FM radio.
5. PROG press this button into application lists
6. HOME press this button back to main interface
7. MENU press this button into sub-menu
8. RETURN press this button back to previous menu
(ON/OFF)
9. Direction key press this button to move cursor
/confirm key toright/ left/up/down,then select
option in the menu and press
confirm key to enter.

8
Remote Control Page Up /
Page Down
10. TV MODE press this button,it will display”Output mode”,”video output” and”
audio output”,you can choose it.
11. MOUSE press this button to shift mouse operation
12. Prev/next song press this button when playing music,prev or next song,press for
long is fast forward or fast backword.
13.pause,play press this button to pause when playing,press again to play.
14.VOL+ VOL-,mute press this button to adjust the volume or mute.
15.numeric key press this keys to choose the songs and channels when playing
music or listening to FM radio.
16.“.” press this button to switch play modes.
17.DEL when type website,if wrong,you can press this button to delete it.

9
Features Page Up /
Page Down
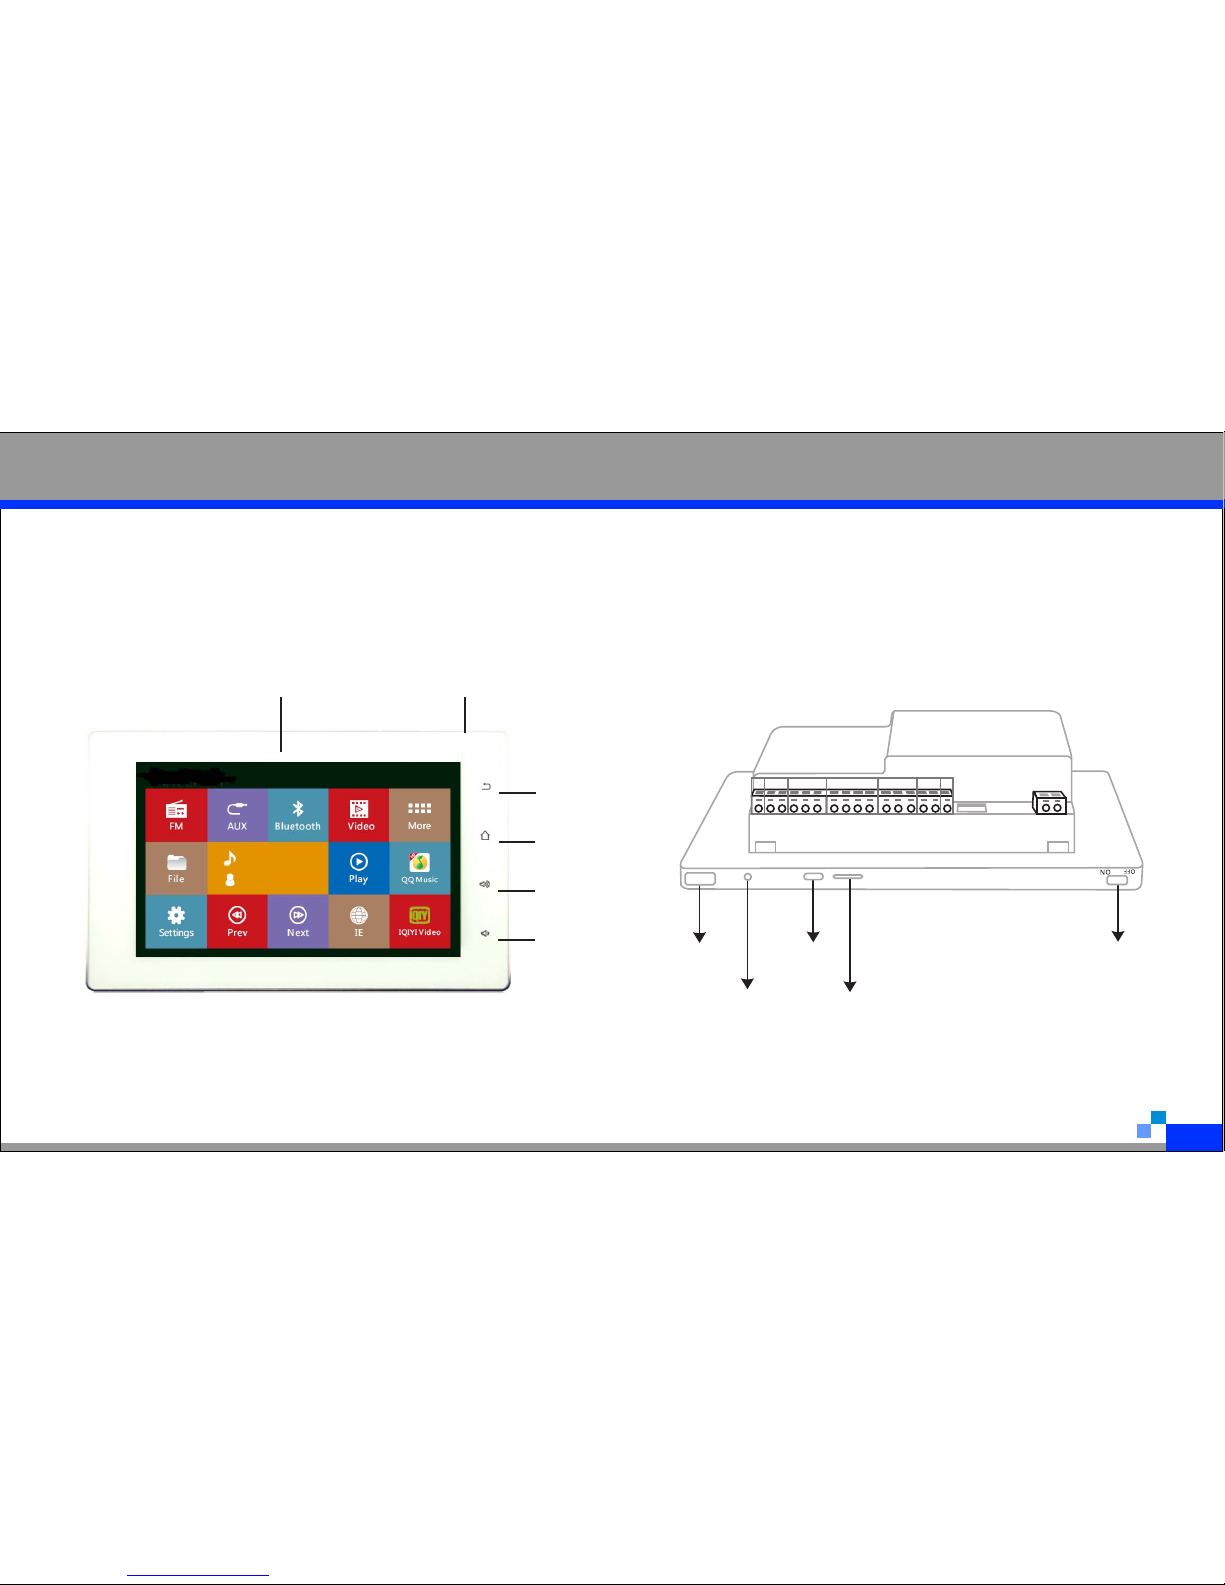
1.Beautiful outlook:simplicity and nobility,7" touch screen,TFT 1024*600 HD resolution screen,
Hi-Fi stereo,24 bit Hi-Fi audio output,easy-operation.
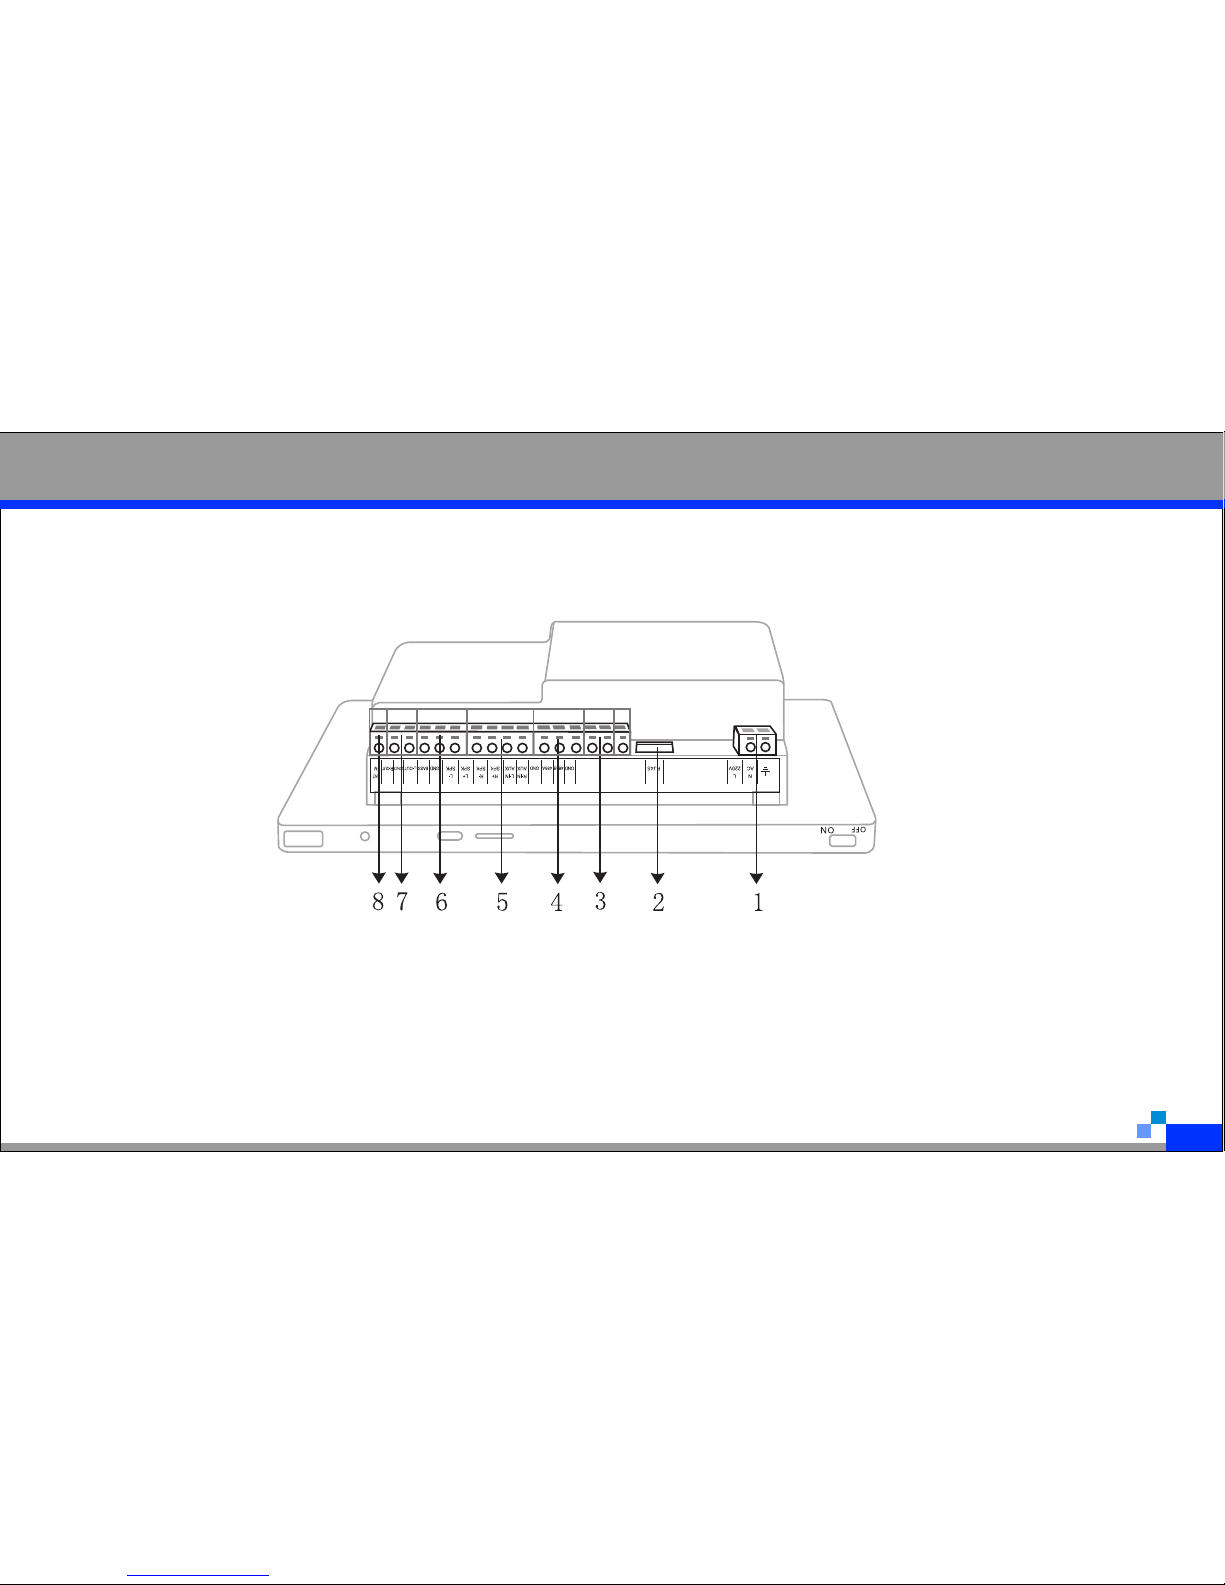
2.Network connection:standard RJ45 network port,built-in Wi-Fi.
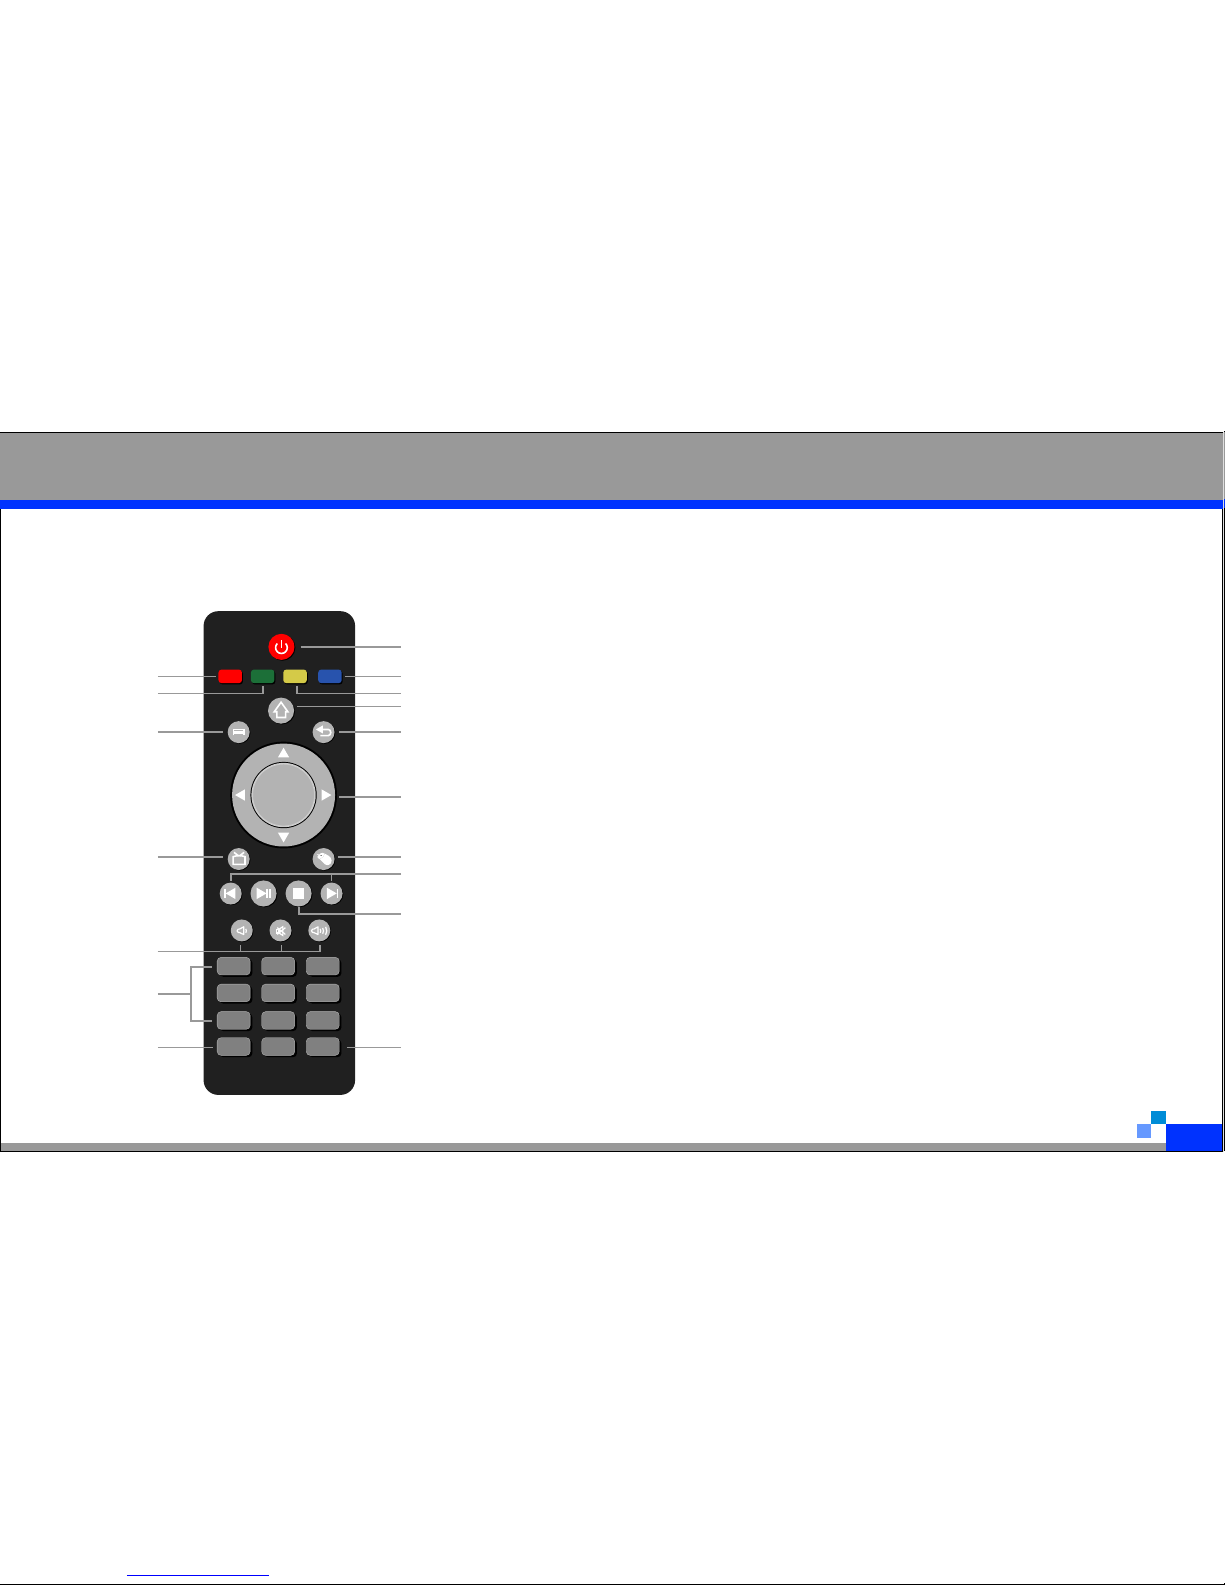
3.Multi-operation:support USB/wireless keyboard and mouse,remote control,touch button
and touch screen to operate.Support for RS485,Samba to share the online database,they can
search sources among them.
4. OTG:you can plug in U disk and mobile HDD to listen to music and watch movie.
5.Network resource:abundant network resources for your entertainment and study,online
movie,music,real-time news,education channel,weather forecast,etc.
6.App:new application software.
7.Play music:new user interface,you can use the remote control to choose the
songs;support for mkv,mov,mp4,ts,avi,mpg,vob,dat,tp,flv,rm,rmvb,etc.
8. Multiple audio sources:RAM+internet radio/online music+TF card+HOST USB+AUX1

10
Features/ON-OFF Page Up /
Page Down
8. Play video:support 1080P,720P,RM,AVI,MP4,MOV,VOB,FLV,WMV,etc.
10.E-photo:you can browse the pictures easily(JPG,BMP,GIF,PNG),set your favorite
picture as background.
11.FM Radio:FM manual/automatic select the channels,pre-set 30 channels,internet
audio(listen to internet radio all over the world with different language).
12.recording:built-in microphone,you can record your message and storage.
13.Camera(option):HD camera.
14.Switch on/off:you can set any song and time to power on or off.
15.Firmware upgrade:to realize functional expansion,you can enjoy the add-value
servicesfor free.
5.Basic operation:
5.1ON/OFF
After confirming wiring is right,push the switch to right,the screen will display the text
"welcome",it will automatically enter into HOME.when it is ON,press

11
Main Interface Display Page Up /
Page Down
5.2.Main display interface:click the icon enter into the functions,or operate it on the
remote control

5.Play music3.
1) After enter into music player,it will play music in local disk.if there is no file in local disk,it will
play music from TF/USB.
2) Click”music”on the main interface to play music,you can choose “Local”,”TF”,”USB”,”AUX”,
”FM” on the interface of music player to play music, when connecting the internet, it can
download lyric automatically,you can also
download the lyric manually”*LRC”and store
it,e.g.:My Heart Will Go On.MP3,LRC need
be:My Heart Will Go On.LRC.
3) It can play music in the background , 3D
sound,bass, treble, play mode, EQ modes,
etc.you can search local music and download
lyric manually.
12
Page Up /
Page Down
Play music
/Sdc ar d/ MU ISC

5.Play video and browse picture4.
Click”movie”into file list,there is on
on the file is video,select one and
play it,as shown as below:
Others are picture,select one to browse,at
the top-right corner,there is function menu,
you can choose slideshow/edit/rotate left
/rotate right/crop/set picture as/details.
5.5.FM radio:
Click”Radio”into it,as shown as below:
13
Page Up /
Page Down
Play video / browse picture / FM

You can search channels automatically
and manually,storage channels or set
different areas to listen to different
channels . you can slide the radio ruler
to choose channels fastly,long press the
5.6. :File Management
Click”file management”enter into it,you can
find all videos,audios,pictures,e-books and
downloaded apks,select object file and long
press,it will pop-up function menu,you can
sort,copy,paste,cut,delete,rename,add new
catalogue,etc,as shown as below.
14
Page Up /
Page Down
FM / File Management / Recording
channel to delete and add it , as shown in
below picture.

15
Page Up /
Page Down
Recording / Camera(option)
Video
AUX Bluetooth
FM
File
Settings IE
Prev Next
More
Play
QQ Music
IQIYI Video
record your message
Click” to start recording,click to stop,
once finished,it will popup”Discard”and”Done
” for choosing,if choose Discard,it will not be
saved , if Done , it will be saved to specific
folder,click the middle icon to play recording,
you can find the recording in the “Sound
Recorder”in local disk.
Camera(option):
Click”camera”enter into it,as shown as
below:
If you want to take a picture,click“ ”if shoot a
video,click“ ”,pictures and videos will be
saved to local disk,open file management,click
local memory,click DCIM,then you can view the
videos and pictures.
5.7. :Recording(option)
Click”Recorder”enter into it,as shown as
below:

16
Page Up /
Page Down
Video Output
Video output:
After confirming connected between machine and TV , you can press “ TV MODE ” on the
remote control , it will display Output mode to choose video output or audio output , select
“ HDMI 1080P 60Hz ” , you can also enter into setting→display→Display output mode , as
shown as below:
The output mode should be the same as TV input signal,support double-screen display
(INW-E295BT and TV),In HDMI output mode,pull out of the cable to exit TV-OUT.
Note:if you switch the video play into TV-OUT,INW-E295BT will not display the video,it
can just display options,you can touch the screen to operate it.
Video
AUX Bluetooth
FM
File
Settings IE
Prev Next
More
Play
QQ Music
IQIYI Video
Output Mode Selection
Disp lay output m ode
Only th e local display Audi o output
Audi o output mod e
YPbPr 720P 60Hz
HDMI 10 80P 60Hz

17
Page Up /
Page Down
Browser/Timer switch ON/OFF
When INW-E295BT connecting internet
or Wi-Fi,click”browser”,you can browse
websites.As shown as below:
Timer switch ON/OFF
Click”App”into application list,click””clock”
→set alarm→add alarm,as shown as below
Timer switch on:click→add alarm→switch
on→set time/audio/volume→OK.
Timer switch off:click→add alarm→switch
off→set time→OK.

18
Page Up /
Page Down
Timer switch ON/OFF / RS485 / Browser
Rs485:
Click”App”enter into application list,
click”Rs485 settings” ,as shown as
below.
You can set any group ID and machine ID,
when the group ID is 0000,you can control
all the machines which the group ID is also
0000. Every machine has the only ID and
cannot be changed.when the machine ID
is not 0000 , the group ID and machine ID
get matched.
WIFI connected
Click”setting”enter into setting list,as shown
as below:

19
Page Up /
Page Down
RJ45 Network Port/Connect USB to PC/setting
Wi-Fi is on,
The machine will automatically search
Wi-Fi which are nearby to you.click it
and automatically obtain an IP address,
if it needs password,type the password,
then click connect,it will automatically
obtain an IP address and connect.
Ethernet connection:
Connected this machine to PC with
cat5e,when Wi-Fi is off,INW-
E295BT will automatically obtain
an IP address to connect to the
Ethernet,you can check status of
Ethernet from settings
→more....
Connect USB to the PC.
When INW-E295BT is on,you can use USB
data
cable to connect INW-E295BT to PC,it will
popup “USB connected”,click”Turn on USB
storage”, after connected,you can copy and
delete files(note:click at the bottom right of
screen, it will popup”Connected as an
installer”,you can select other modes. )
Table of contents