ZANKER ZKS 5619 IE User manual

Geschirrspüler ZKS 5619 IE
Dishwasher
Lave-vaisselle
Afwasmachine
Bedienungsanleitung
Instruction book
Mode d’emploi
Gebruiksaanwijzing

PID38GB
20
CONTENTS
Warnings . . . . . . . . . . . . . . . . . . . . . . . . . . . . . . . . . . . . . . . . . . . . . . . . . . . . . . . . . . . . . . . . . . . . . . .page 21
Installation . . . . . . . . . . . . . . . . . . . . . . . . . . . . . . . . . . . . . . . . . . . . . . . . . . . . . . . . . . . . . . . . . . . . . .page 22
Positioning, water outlet connection, water supply connections . . . . . . . . . . . . . . . . . . . . . . . . . . . . . . . .page 22
Electrical connections . . . . . . . . . . . . . . . . . . . . . . . . . . . . . . . . . . . . . . . . . . . . . . . . . . . . . . . . . . . . . . . .page 22
Use . . . . . . . . . . . . . . . . . . . . . . . . . . . . . . . . . . . . . . . . . . . . . . . . . . . . . . . . . . . . . . . . . . . . . . . . . . . . .page 23
Control panel . . . . . . . . . . . . . . . . . . . . . . . . . . . . . . . . . . . . . . . . . . . . . . . . . . . . . . . . . . . . . . . . . . . . . .page 23
The water softener . . . . . . . . . . . . . . . . . . . . . . . . . . . . . . . . . . . . . . . . . . . . . . . . . . . . . . . . . . . . . . . . . .page 25
Use of rinse aid, use of detergent . . . . . . . . . . . . . . . . . . . . . . . . . . . . . . . . . . . . . . . . . . . . . . . . . . . . . . .page 26
Loading the machine, use of the lower basket, use of the upper basket . . . . . . . . . . . . . . . . . . . . . . . . .page 27
Adjusting the height of the upper basket . . . . . . . . . . . . . . . . . . . . . . . . . . . . . . . . . . . . . . . . . . . . . . . . .page 28
Helpful hints . . . . . . . . . . . . . . . . . . . . . . . . . . . . . . . . . . . . . . . . . . . . . . . . . . . . . . . . . . . . . . . . . . . .page 29
Washing programmes . . . . . . . . . . . . . . . . . . . . . . . . . . . . . . . . . . . . . . . . . . . . . . . . . . . . . . . . . . .page 30
Operating sequence . . . . . . . . . . . . . . . . . . . . . . . . . . . . . . . . . . . . . . . . . . . . . . . . . . . . . . . . . . . . . . . . .page 31
Maintenance and cleaning . . . . . . . . . . . . . . . . . . . . . . . . . . . . . . . . . . . . . . . . . . . . . . . . . . . . . .page 32
Cleaning the central filters, cleaning the large filter, internal and external cleaning . . . . . . . . . . . . . . . . .page 32
Prolonged periods of non-operation, frost precautions, moving the machine . . . . . . . . . . . . . . . . . . . . . .page 32
Servicing . . . . . . . . . . . . . . . . . . . . . . . . . . . . . . . . . . . . . . . . . . . . . . . . . . . . . . . . . . . . . . . . . . . . . . .page 33
Building-in . . . . . . . . . . . . . . . . . . . . . . . . . . . . . . . . . . . . . . . . . . . . . . . . . . . . . . . . . . . . . . . . . . . . . .page 35
TECHNICAL SPECIFICATIONS
DIMENSIONS Width 59.6 cm
Height 81.8 ÷ 87.8 cm
Max depth 55.5 cm
Max depth with door open 111.4 cm
ELECTRICAL CONNECTION Voltage 220-230 V/50Hz
MOTOR RATING DURING WASHING 150 W
POWER OF HEATING ELEMENT 2800 W
OVERALL POWER 2950 W
WATER SUPPLY PRESSURE minimum 0.5 bar
maximum 8 bar
CAPACITY (STANDARD IEC PLACE SETTINGS) 12
CONSUMPTION: Water 17 lt
Electricity 1.3 kW/h
This appliance complies with the following E.E.C. Directives:
- 73/23 of 19.2.73 (Low Voltage Directive) and subsequent modifications;
- 89/336 of 3.5.89 (Electromagnetic Compatibility Directive) and subsequent modifications.

21
WARNINGS
PAV02GB
It is most important that this instruction book
should be retained with the appliance for future
reference. Should the appliance be sold or trans-
ferred to another owner, or should you move
house and leave the appliance, always ensure that
the book is left with the appliance in order that the
new owner can get to know the functioning of the
appliance and the relevant warnings.
These warnings are provided in the interest of
safety. You MUST read them carefully before
installing or using the appliance.
Installation
■This appliance is heavy. Care should be taken
when moving it.
■It is dangerous to alter the specifications or attempt
to modify this product in any way.
■Care must be taken to ensure that the appliance
does not stand on the electrical supply cable.
■Any plumbing work required to install this appliance
should be carried out by a qualified plumber or
competent person.
■Any electrical work required to install this appliance
should be carried out by a qualified electrician or
competent person.
■Built-in dishwashers only: the appliance must be
secured to the underside of the worktop using the
brackets provided. Failure to do this could result in
an unstable appliance which may cause damage or
injury.
Child Safety
■This appliance is designed to be operated by adults.
Children should not be allowed to tamper with the
controls or play with the product.
During Use
■These dishwashers are designed to be used for
washing normal household utensils. Items that are
contaminated by petrol, paint, steel or iron debris,
corrosive, acidic or alkaline chemicals are not to be
washed in a dishwasher.
■Under no circumstances should you open the door
whilst, the appliance is in operation. Always turn off
the appliance before opening the door.
■When finishing loading or unloading close the door,
as an open door can be a hazard.
■It is dangerous to lean or to sit on the dishwasher
door.
■Unplug the appliance and turn off the water after
use.
■Care should be taken when cleaning the bottom
door seal and hinge area as any exposed metal
edges may cut if care is not taken.
■Under no circumstances should you attempt to
repair the machine yourself. Repairs carried out by
inexperienced persons may cause injury or serious
malfunctioning.
■This appliance should be serviced only by an
authorised Service Centre and only genuine spare
parts should be used.
Conservation
In the interests of the Environment:
■When disposing of your old appliance:
■Help to keep your country tidy - use authorised
disposal sites for your old appliance.
■The materials used on this appliance marked with
the symbol are recyclable.
■Check with your local Council or Environmental
Health Office to see if there are facilities in your
area for re-cycling this appliance.
■When the appliance is to be scrapped, cut off
power supply cable and make the door closing
device unusable to prevent young children from
being trapped inside.

PIN21GB
22
Remove all packaging before positioning the
machine.
Positioning
If possible, position the machine next to a water tap
and a drain.
This dishwasher is designed to be fitted under a
kitchen counter or sink.
Water outlet connection
The end of the drain hose can be connected as
follows:
- To the sink outlet siphon, securing it if necessary
with a clip;
- To a wall outlet provided with vent-hole, minimum
internal diameter 4 cm;
The waste connection must be at a height of between
30 cm (minimum) and 100 cm (maximum) from the
floor.
It makes no difference which way the drain hose
faces, either to the right or left of the dishwasher.
Avoid bending or kinking the hose as this could
prevent or slow down the discharge of water.
If you use a drain hose extension it must be no longer
than 2 metres and its internal diameter must be no
smaller than the diameter of the hose provided.
Likewise the internal diameter of the couplings used
for connection to the waste outlet must be no smaller
than the diameter of the drain hose.
Water supply connections
This dishwasher may be fed with either hot (max. 60°C)
or cold water.
Nevertheless we advise you a cold water supply.
A hot water supply is not always efficient with very
soiled crockery as it shortens the washing programmes
a lot.
Feeding the appliance with a hot water supply (max.
60°C) will allow you to obtain considerably shorter
programmes.
For making the connection itself, the coupling nut fitted to
the machine's supply hose is designed to screw
onto either a 3/4 inch gas thread spout, or to a
purpose-made quick-coupling tap such as the Press-
Block.
The water pressure must be within the limits given in
the technical specifications, as it will not function
correctly if pressure is outside these specifications.
The water supply hose is fitted with a safety device,
which prevents water from entering the machine
should the inner hose split, due to wear.
The problem is signalled by a red or yellow indicator
which appears in window (B).
If this happens, close the water tap and have the hose
replaced.
Warning: the retaining ring (A) must be properly fitted
so as to avoid water leaks.
Note: Only for water supply hoses with lock-fast
safety device to prevent inadvertent loosening.
To detach the hose press yellow lever (C) and turn the
retaining ring anti-clockwise ➁.
Note: the end of the hose
connected to the machine
can be positioned as re-
quired, by simply slackening
the retaining ring.
Re-tighten the ring securely
to avoid water leaks.
Avoid bends or kinks in the hose, which could prevent
or slow down the flow of water.
If the machine is connected to new pipes or pipes
which have not been used for a long time, you are
advised to run the water for a few minutes before
connecting the inlet hose. This will prevent deposits of
sand or rust clogging the inlet hose filter.
Electrical connection
Before plugging the appliance into the wall socket,
make sure that:
1. the mains voltage corresponds to the voltage given
in the technical specifications;
2. the meter, fuses, mains power supply and wall
socket can all take the maximum load required.
Make sure that the socket and plug are compatible
without having to use any type of adapter. If necessary,
have the domestic wiring system socket
replaced.
Safety standards require the appliance to be
earthed.
The Manufacturer accepts no liability for failure to
observe the above safety precautions.
B
A
B
A
C
CA13
12
CS05
min 30 cm
max 100 cm
+ 2 m max
min 4 cm
Ø 21
Ø 18
Ø 18
Ø 21
CA06
INSTALLATION

The controls
In this fully integrated appliance the controls are locat-
ed on top of the door. When selecting a programme,
the door needs to be partially opened.
Audible signals have been introduced to help indicate
which operations the dishwasher is performing.
Short «instruction accepted» signal
When any of the buttons is pressed: a short audible
signal informs you that the machine has accepted the
instruction given; if no signal is heard when a button is
pressed, this means that a programme is already run-
ning or that the programme selected does not include
this function.
Long «programme run» signal
A continuous audible signal lasting about one second,
heard only when you close the dishwasher door, in-
forms you that the wash programme is starting.
Intermittent «end of programme» signal
An intermittent audible signal, lasting in total five sec-
onds, informs you that the wash programme has ended.
If you wish to deactivate these audible signals, press
both the “CANCEL” and “DELAYED START” but-
tons together for about 3 seconds, until three short signals
are heard.
To reactivate the audible signals, press both buttons
together again for about 3 seconds, until the «short
instruction accepted» signal is heard.
1. ON/OFF button
On
Press this button to preset the dishwasher to accept
settings (selection of wash programmes, drying
options, delayed start, etc.).
The salt pilot light and the rinse aid light comes on if
salt or rinse aid are low and the programme selector
light flashes.
The number «1» corresponding to the first selectable
programme (Rinse and Hold) appears in the digital
display.
Off
When the wash programme has ended, the dishwasher
stops automatically (an intermittent audible signal
lasting about 5 seconds informs you of this) and two
zeros «00» appear in the display window.
To switch off the dishwasher at the end of the pro-
gramme, press this button again.
2. Indicator lights
- Rinse aid indicator light
This pilot light comes on when the rinse aid has run
out, to remind you to top it up.
- Salt indicator light
This pilot light comes on when the salt has run out, to
remind you to top it up.
If your water is level «0» there is no need of salt,
therefore the salt indicator light will always remain on.
3. Digital display
USE
PPC45GB
23
12
3
45 6789
Control panel
SO196

4. Programme selector button
To select the required programme, press this button
until the number corresponding to the chosen pro-
gramme appears in the digital display (see wash pro-
gramme guide). To start the programme, simply close
the dishwasher door. A long audible signal (about one
second) informs you that the programme is starting.
5. Hot prewash indicator light
This pilot light comes on when the programmes with a
hot prewash are selected, to remind you that these
programmes require an extra dose of detergent to be
placed on top of the detergent dispenser cover. Fol-
low the dosing instructions in the "Wash Programme"
chart on the following pages.
Warning: when the “HALF LOAD” option is selected
the “hot prewash indicator light” comes on only with
the “Intensive” programme (programme 2).
6. Half load button
By pressing this button, washing can be confined to a
single basket instead of both. The pilot light corre-
sponding to the basket selected comes on.
This is very useful and economical when only a few
dishes need washing.
Remember to load all the dishes into the basket se-
lected.
Do however follow the instructions given in the sec-
tion “Loading your machine”.
If both lights are out, washing will be carried out
in both baskets.
7. Economy drying button
No drying button
By pressing these buttons you can opt to shorten (symbol
illuminated) or completely eliminate (symbol illumi-
nated) the hot air drying cycle, so making a considerable
energy saving.
The pilot light corresponding to the option selected
comes on.
If both pilot lights are out, the full drying cycle will
be carried out.
8. Delayed start button
Allows the start of the programme to be delayed by a
minimum of 1 hour, up to 9 hours.
How to set the delayed start
When the button is pressed, the number 1 followed by
the letter H (hours) appears in the display window;
starting of the programme has thus been delayed by 1
hour .
Press the button again to select the number of hours
by which you wish to delay the programme start, up to
a maximum of 9.
Press the button again to return to «programme set»
mode.
Close the dishwasher door to start the countdown: a
long audible signal (about one second) informs you that
the function is active. If you open the door again you will
see, in the display, how long there is to go (in hours) be-
fore the programme starts. The flashing letter «H» in the
digital display means that the delayed start function has
been activated. Opening the door has no effect on a
countdown which has already been started.
If, during the countdown, you wish to see the pro-
gramme number selected in the display, press the
«programme selector» button.
9. Programme cancel / change button
If you wish to cancel a programme which is already
running or a setting which has just been made, press
this button for about two seconds until the short «in-
struction accepted» signal is heard. Two zeros will ap-
pear in the display to indicate that the dishwasher has
been reset and that a new programme and new op-
tions may be selected.
PPC46GB
24
Upper basket
Lower basket
SO205

The water softener
Water contains varying amounts of lime and mineral
salts depending on the area in which you live: these
are deposited on the dishes leaving white marks.
The higher the content of these salts, the harder your
water will be. The «hardness» level is measured on 3
equivalent scales: French Degrees, German Degrees
or Parts Per Million.
This appliance is supplied with a test strip «Aqua
test» so that you can test the water hardness up to
22°dH.
With water hardness beyond 22°dH ask the exact wa-
ter hardness degree to the local Water Authority.
The dishwasher is equipped with a softener which uses
special dishwasher salt to provide lime-free (softened)
water. The softener can treat water hardness up to 50
German degrees via 9 adjustment levels.
Find on the table below the level corresponding to the
hardness of your water and the required adjustments:
*The water softener is factory set at level 4 as this suits most users.
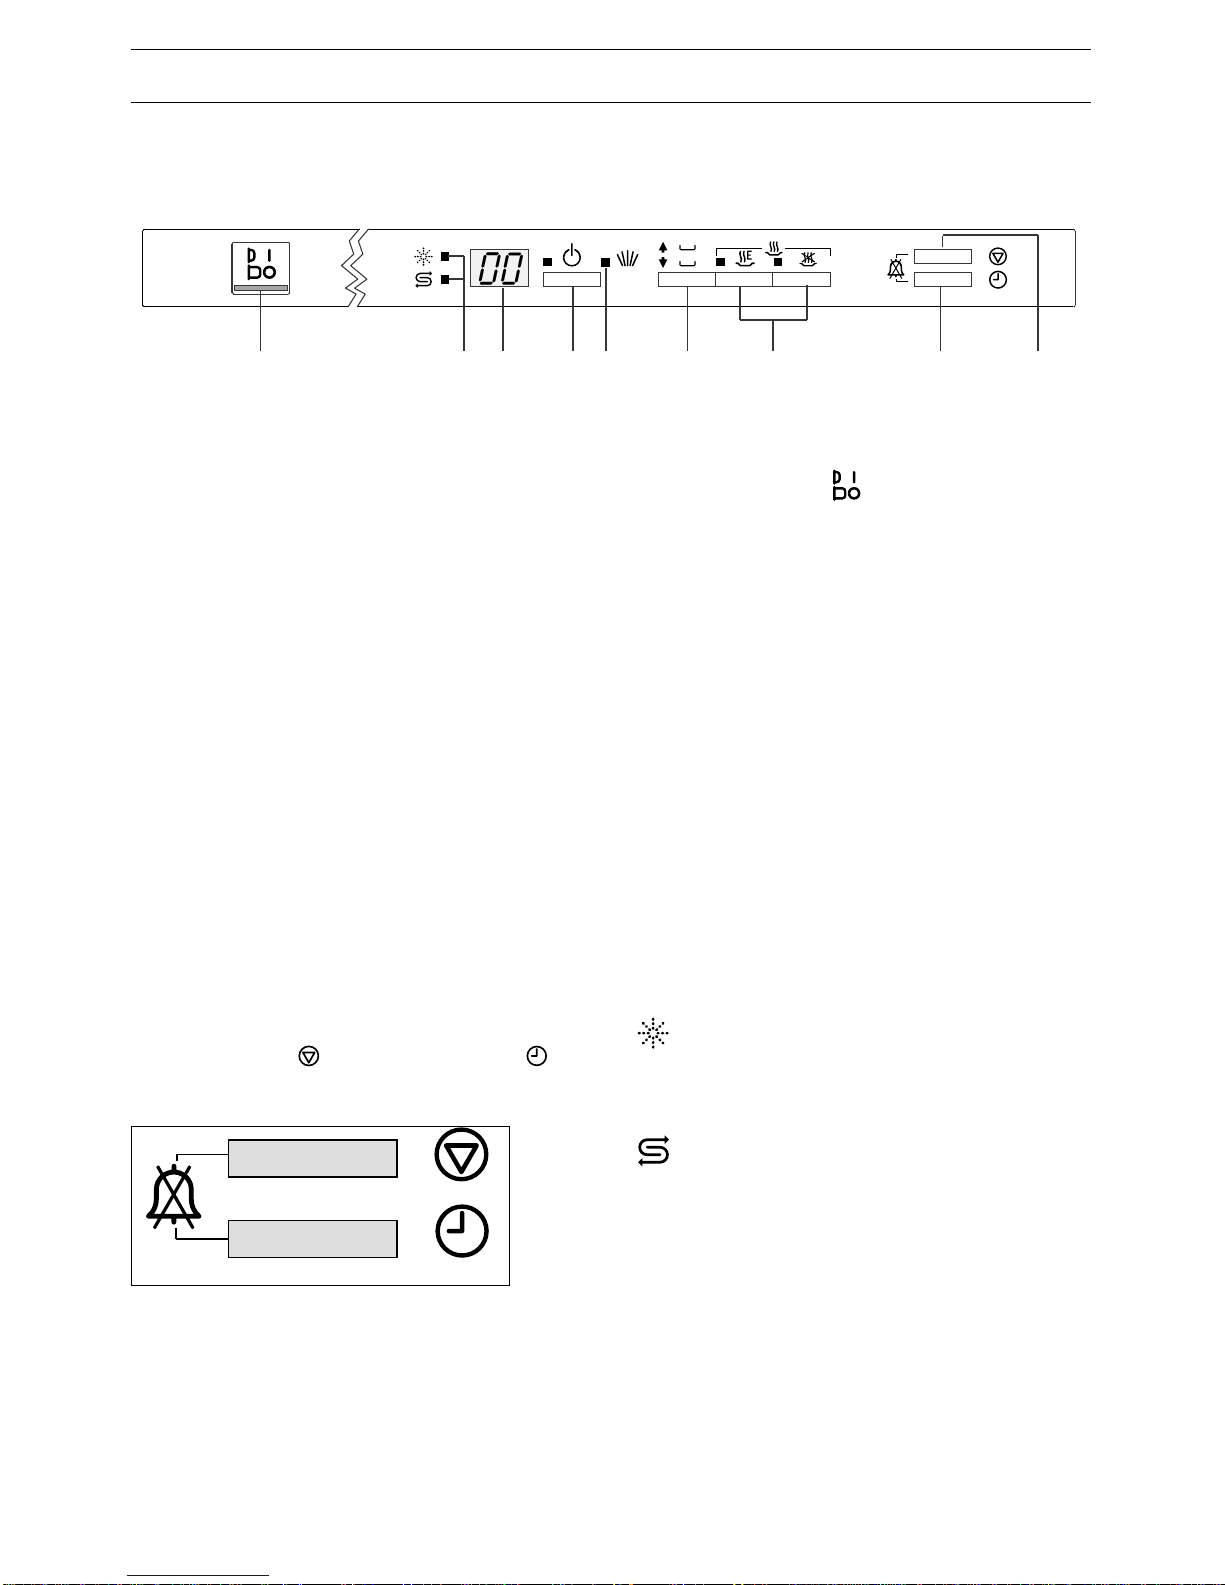
To set the dishwasher to a different level, proceed as
follows:
- Press the ON/OFF button to turn the dishwasher on.
- Press the “Half Load” and “Delayed start”
simultaneously for about 5 seconds until the short
«instruction accepted» signal is heard; an “L” followed
by number 4 (the hardness level set in factory) will
appear in the digital display.
- Press the “Half load” button as many times as
necessary to make the required level appear in the
display. The level increases by 1 each time the
button is pressed.
- 5 seconds after this button has last been pressed,
the machine returns to programme setting mode
and memorises the level set.
Important
Salt MUST be used regularly from level 1 upward.
If your water is «level 0» it is already soft and therefore
there is no need to use salt.
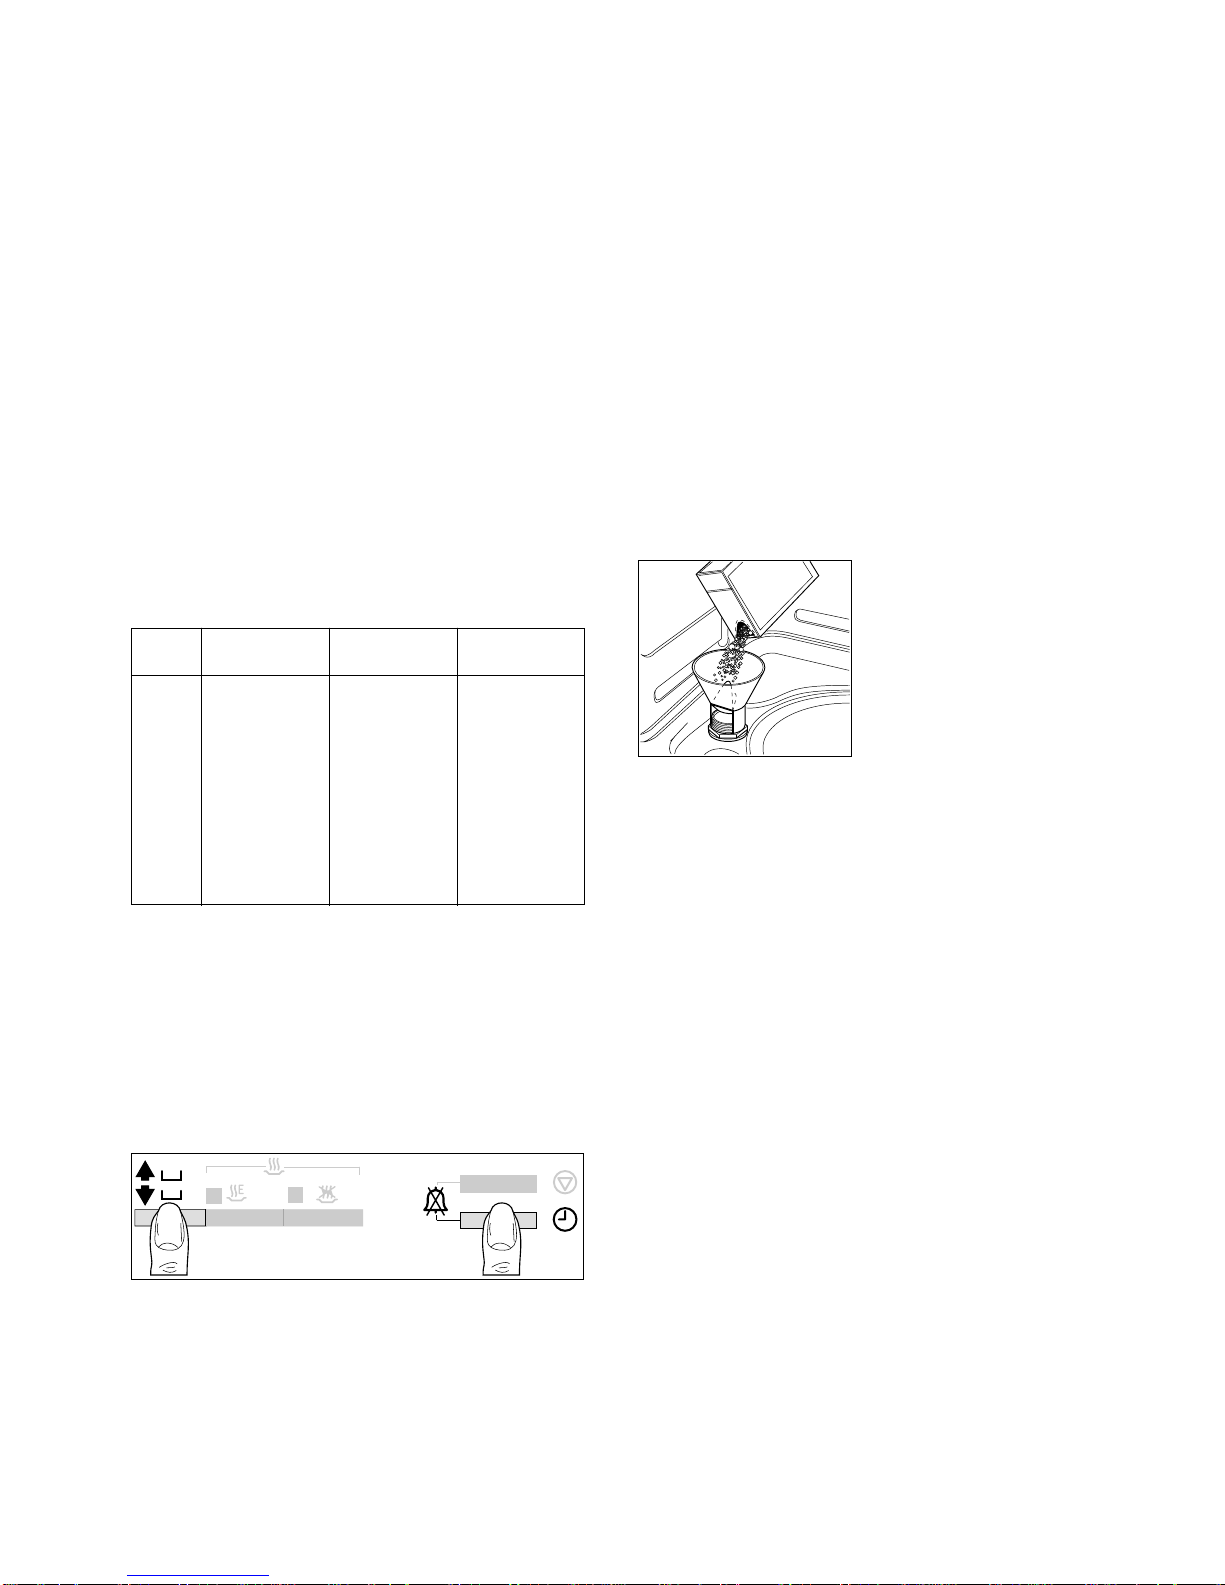
Filling with Salt
Only use salt designed specifically for use in dish-
washers. Other types of salt i.e.: table/cooking salt
contain high percentages of other substances which
may reduce the efficiency of the softener. To fill with
salt, unscrew the cap of the salt container.
Pour about half a litre of water inside the container, or
until it is full (this is necessary only before filling with
salt for the first time).
Then, using the funnel pro-
vided, pour in the salt until
the container is full (approx.
1,5÷1,8 kg). Do not worry if
water over flows from the
unit when filling with salt this
is quite normal.
Replace the cap making sure that there is no trace of
salt on the screw thread or on the gasket.
Screw the cap on tightly.
If you have inadvertently spilled salt select a wash
programme immediately after.
All that is then required is to periodically top up the
container with salt. You are reminded of this by the
«salt indicator light»; on the control panel illuminates
when the salt has finished.
The salt container always has some water inside
which will normally overflow when refilling with salt.
Important: The «salt indicator light» on the control
panel can remain illuminated for 2-6 hours after the
salt has been replenished, assuring the dishwasher
remains switched on. If you are using salts that take
longer to dissolve then this can take longer. The func-
tion of the dishwasher is not affected.
Caution: Only fill with salt just before starting one of
the complete washing programmes (not the Rinse
and Hold programme). This will prevent any grains of
salt or salty water, which may have been spilled,
remaining on the bottom of the machine for any period
of time. This could cause corrosion.
PAA24GB
25
Level French Degrees
(°TH) German Degrees
(°dH) ppm
(Parts per Million)
0
1
2
3
*4
5
6
7
8
9
0- 4
5- 8
9-11
12-17
18-22
23-28
29-33
34-39
40-45
46-50
0- 8
9-14
15-20
21-30
31-40
41-50
51-60
61-70
71-80
81-90
0- 80
81-140
141-200
201-300
301-400
401-500
501-600
601-700
701-800
801-900
SO197
SALE
SALT
SALZ
SEL
SR06

PBR22GB
26
Rinse aid
The use of this liquid ensures thorough rinsing, spot
and streak free drying, making the water run quickly
off the dishes for sparkling results. It is automatically
added during the hot rinse. The dispenser, which is
positioned inside the door, holds about 110 ml of rinse
aid, which is sufficient for 16-40 dishwashing
programmes, depending upon the dosage setting.
Filling with rinse aid
Open the container by turning the lid (A) anticlockwise.
Add rinse aid until the container is completely full
(approx. 110 ml). The indicator (B) will be completely
dark.
Top up with rinse aid when the «rinse aid indicator
light» on the control panel flashes (approx. 70 - 80
ml).
Remember to CLOSE the lid after every refill.
Caution
Clean up any rinse aid spilt during filling with an
absorbent cloth to avoid excess foaming during the
next wash.
Adjusting the Dose
According to the finish and drying results obtained,
adjust the dose of rinse aid by means of the 6 position
selector (C) (position 1 - minimum dose, position 6
maximum dose). (Start from position 3). Gradually
in crease the dose if there are drops of water or lime
spots on the dishes after washing. Reduce it if there
are sticky whitish streaks on the dishes.
Caution: Do not put liquid detergent into the rinse aid
compartment
Use of detergent
Before starting any of the dishwashing programmes,
except for the Rinse and Hold programme, load the
detergent in the dispenser.
Use only tablets, powder or liquid detergents specifi-
cally designed for domestic dishwashers.
Unsuitable detergents (such as those for washing by
hand) do not contain the right ingredients for machine
washing and hamper correct functioning of the
machine.
To open the dispenser lid, pull the catch (D).
To help you to correctly dose the right amount of de-
tergent, inside the container there are two reference
marks:
- MIN = 15 ml
- MAX = 30 ml
All the programmes with prewash required a small ex-
tra amount of detergent to be poured over the dis-
penser’s lid as shown in the picture.
The amount of detergent to be used varies depending
on how soiled the dishes are and the type of dishes
being washed. We recommend the amounts shown in
the programme chart .
After filling the dispenser with detergent, close
the lid.
At the end of any washing programme the lid is always
open, ready for the next wash.
Since not all detergents are the same, you should
also consult the instructions on the packet.
Remember that insufficient quantities of detergent will
produce poor washing results whereas an excessive
amount of detergent does not improve washing
results and is also wasteful.
Using no more than the correct amount of detergent
also contributes to reducing pollution.
Phosphate free detergents with enzymes
In these low-alkaline compact powders the environ-
ment unfriendly components have been replaced by
natural enzymes and other more biodegradable sub-
stances. The enzymes deploy their full dirt dissolving
power at a temperature as low as 50°C.
By choosing the Bio-programme you can therefore
achieve the same cleaning results that would other-
wise be achievable only with 65°C programmes and
conventional detergents.
These new compact powders are generally
phosphate-free. As phosphates have water softening
properties, we suggest you add salt to the salt
container even if the hardness of your water is as low
as 4 °dh (7 °TH).
This will avoid lime deposits on crockery and the inner
tub.
6
5
4
3
2
1
6
5
3
2
1
C
B
BR04 A
D
MIN
MAX
DE07
DE02

PCE21GB
27
Loading your machine
Before placing dishes in the machine, remove any
scraps of food from the plates (small bones,
toothpicks, fish bones, scraps of meat and vegetables,
fruit skins etc.) to avoid clogging the filters and
consequently reducing performance.
Open the door and slide out the baskets to load the
dishes.
Use of the lower basket
The lower basket is designed to take saucepans, lids,
plates (up to 27 cm in diameter), salad bowls, cutlery etc.
Serving dishes and large lids should be arranged
around the edge of the basket, ensuring that the
upper spray arm can turn freely.
Cutlery should be placed in the removable cutlery
basket with the handles facing downwards. If the
handles protrude from the bottom of the basket,
obstructing the lower spray arm, load the cutlery with
the handles facing upward.
Mix spoons with the other cutlery to prevent them
sticking together.
Place teaspoons and other small cutlery on special cut-
lery racks on both sides of the cutlery basket.
The two rear rows of prongs on the lower basket can
be easily lowered to allow you to load pots, pans and
bowls.
To lower the prongs:
slightly pull them upward and let them drop down (see
picture); to bring them back to the standing position,
just pull them up again.
UI33 IEC 436 / DIN 44990
UI19
UI18
UI03

Use of the upper basket
The upper basket is designed for plates (dessert
plates, saucers, dinner plates up to 24 cm in diame-
ter), salad bowls, cups and glasses; these should be
arranged as shown in the pictures. Glasses with long
stems can be placed upside-down in the raised cup-
racks.
Caution
When loading the dishes,
ensure that you do not cover
the water inlet funnel in the
middle of the upper basket.
Adjusting the height of the upper basket
If washing very large plates (over 27 cm and up to 31
cm in diameter) you can load them in the lower
basket after moving the upper basket to the higher
position as follows:
- pull out the basket;
- grasp it on the two sides
and pull it upwards until
the mechanism is en-
gaged and the basket is
stable.
When the top basket is in the higher position it will on-
ly take plates up to 20 cm in diameter and you will not
be able to use the raised cup-racks.
To put the basket back in the lower position, grasp the
two sides, pull upwards again, then allow the basket
to drop back down slowly, keeping hold of it.
Warning: never lift or lower the basket on one side
only.
PCE28GB
28
IEC 436 / DIN 44990
US14
US12
US16
US16
Before closing the door, ensure that the spray
arms can rotate freely.
RC04

For best washing results:
Before loading, remove all scraps of food and soak
very heavily soiled pots and pans.
Always arrange saucepans, cups and glasses etc. up-
side-down.
Tilt items with convex or concave surfaces so that the
water drains off easily.
Long items of cutlery such as ladles, carving knives
etc. should be positioned horizontally in the upper
basket.
Avoid contact between the dishes as far as possible;
correct arrangement of the items will give better
washing results.
Light items (plastic bowls etc.) should be loaded in the
upper basket and arranged so that they do not move
during washing.
Operating your dishwasher economically
and with regard for the environment
Do not prewash dishes under running water.
Place dishes in the machine immediately after every
meal and wait until the dishwasher is full before wash-
ing.
If necessary run the Rinse and Hold programme (see
Programme Chart on the following pages), so that any
food scraps do not become caked on the dishes while
you are waiting to run the complete wash programme.
If you use the modern «compact» powders containing
enzymes, we recommend that you select a “Bio 50°C”
programme in place of the “Normal 65°C” programme.
Select an economic programme when the baskets are
not very full and/or when the dishes are not very
soiled, following the instructions given in the “Pro-
gramme chart”.
Select an “Economy Drying” or “No Drying”.
Drying will obviously be less effective in this case.
You will improve drying results by leaving the dish-
washer door ajar for at least 15-30 minutes as soon
as the programme finishes.
If you find that drying results are acceptable even
without rinse aid, there is no need to use this product.
Dishwasher performance will not be affected.
Items not suitable for dishwashers
The following should not be washed in the dishwasher:
Cutlery or dishes with wooden or horn handles or
glued parts.
Handmade items, wooden objects, antiques or hand-
painted china.
Certain types of decoration can discolour when
washed in a dishwasher.
Crystal-ware and plastic objects, if not guaranteed
dishwasher-proof, should be washed by hand. You
are advised to place them in the upper basket and to
select a delicate programme.
Certain types of glass can also become opaque after
being washed several times in a dishwasher.
Silver cutlery tends to go black if mixed with steel cut-
lery. Place it in the cutlery basket separate from the
others.
Iron and cast iron objects can rust and stain other
items.
Aluminium tends to go black; copper, pewter and
brass tend to stain.
Caution: You are advised not to load very small
items which can fall through the baskets.
Note: When buying new dishes, ensure that they are
dishwasher-proof.
HELPFUL HINTS
PCL28GB
29

PTP41GB
30
Washing programmes
Programmes Type of
load Quantity of food scraps
Type of soil
3.
Normal
with prewash
2.
Intensive
Crockery
Glassware
Delicate
china
Heavily soiled, also dried up and/or containing starch
(i.e. pasta, rice, semolina, potatoes, egg, sauces, roast).
4.
Normal
no prewash
5.
Bio
with prewash
6.
Bio
no prewash
8.
Delicate
with prewash
9.
Delicate
no prewash
10.
Plate
warmer
Normally or heavily soiled, also dried up and/or
containing starch (i.e. pasta, rice, semolina, potatoes,
egg, sauces, roast).
Lightly soiled, not dried up and starchless (i.e. pasta, rice,
semolina, potatoes, egg, sauces, roast).
Lightly soiled, not dried up and starchless (i.e. meat,
cooked or uncooked vegetables, milk, coffee, drinks).
*7.
Quick Wash Crockery
Party crockery
Normally soiled, not dried up and starchless (i.e. meat,
cooked or uncooked vegetables, milk, coffee, drinks).
Delicate china and glassware, not resistent to high washing
temperatures. Few scraps not dried up and starchless (i.e.
drinks, sweets, salads, cakes).
Delicate china and glassware, not resistent to high
washing temperatures. Few scraps not dried up and
starchless (i.e. drinks, sweets, salads, cakes).
This is a programme designed both to heat plates before serving or remove
dust from dishes which have not been used for a long time.
Lightly soiled not dried up and starchless (i.e. drinks, cakes
and pastry, salad, sliced ham, cheese).
1.
Rinse and hold Partial load to be complete later.
This programme does not require any detergent.
Recommended quantity
of detergent ***
in the
dispenser
on the door on the
dispenser lid
Cycle description
Consumption values **
25 g
20 g
25 g
20 g
25 g
25 g
15 g
15 g
//
/
/
/
/
/
/
Main wash up to 65°C
2 cold rinses
1 hot rinse up to 65°C
Hot air drying
Cold prewash
Main wash up to 50°C
2 cold rinses
1 hot rinse up to 65°C
Hot air drying
Prewash up to 50°C
Main wash up to 70°C
2 cold rinses
1 hot rinse up to 65°C
Hot air drying
Prewash up to 50°C
Main wash up to 65°C
2 cold rinses
1 hot rinse up to 65°C
Hot air drying
Main wash up to 50°C
2 cold rinses
1 hot rinse up to 65°C
Hot air drying
Main wash up to 50°C
1 cold rinse
1 hot rinse up to 55°C
Hot air drying
Prewash up to 40°C
Main wash up to 45°C
1 cold rinse
1 hot rinse up to 60°C
Hot air drying
Main wash up to 45°C
1 cold rinse
1 hot rinse up to 60°C
Hot air drying
1 hot rinse up to 70°C
Hot air drying
1 cold rinse
(to avoid food scraps from sticking
to the crockery).
Pots - Pans
Crockery
Any
10 g
10 g
10 g
5 g
This programme is equivalent to IEC436/DIN44990:
Programme 3 with detergent type A and programme 5 with detergent type B;
Recommended setting of rinse aid: 3
Standard place settings: 12
Recommended quantity of detergent: 20 g in the dispenser
10 g over the dispenser lid.
* This is a special programme for quick washing (approx. 42 minutes) a full load of lightly soiled dishes, glasses and crockery (except pots) so that
you may re-use them promptly.
** These specifications are indicative values and depend on the pressure and temperature of the water, and also on voltage variations.
*** If you select washing in one basket only (“Half load” button), reduce the quantity of detergent by about one third.
Programme
duration in
minutes
Energy
consumption
in kWh
Water
consumption
in litres
80 1,8 22
10 0,1 4
75 1,3 17
70 1,3 15
80 1,2 17
75 1,2 15
42 0,9 13
55 0,9 15
50 0,9 13
28 0,9 5

PSO34GB
31
Operating Sequence
1. Check that the filters are clean
(see cleaning instructions)
2. Depress the ON/OFF button
The «Programme Selector» indicator light flashes.
3. Check that there is salt and rinse aid
The indicator lights will flash if they need topping up.
4. Load the dishes
Remove any scraps of food.
Pull the lower basket out and arrange the saucepans,
plates and cutlery in it.
Pull the upper basket out and arrange the plates,
saucers, glasses and cups etc. in it.
Slide the baskets back into the machine.
Ensure that the spray arms can rotate freely.
5. Measure out detergent
Pour the required amount of detergent into the
dispenser according to the indications in the “Washing
programmes” chart and close the lid.
6. Set the programme
Press the «Programme selector» button until the num-
ber corresponding to the required programme appears
in the display. The indicator light continues to flash until
the programme starts.
You may also select:
- Washing in a single basket, by pressing the “Half
load” button. The indicator light corresponding to the
basket selected will come on. Remember to load
dishes into this basket only.
- “Economy drying” or “no drying”, by pressing the
“Drying” buttons. The indicator light corresponding to
the option selected will come on.
- “Delayed start” button, by repeatedly pressing the
relevant pushbutton to set the required time delay.
7. Starting the wash programme
Open the water tap.
Close the dishwasher door.
An audible signal lasting about 1 second informs you
that the programme has started.
If a delayed start has been selected, the dishwasher
starts the countdown and the number of hours to go
before the programme starts appears in the display. A
flashing H indicates that the function is active. Once
the set delay has elapsed, the programme starts
automatically.
If you wish to interrupt the wash programme at any
time, open the door and press the ON/OFF button. To
restart the machine, press this button again and close
the door; the wash programme will resume at the
point at which it was interrupted, or may increase the
time by a few minutes, depending on which phase
was in progress.
8. At the end of the wash programme
The machine stops automatically. An intermittent audi-
ble signal lasting about 5 seconds informs you that
the programme has finished. In the digital display ap-
pears two zeros. This signal remains until another but-
ton is pressed.
Switch of the dishwasher by opening the door and
pressing the ON/OFF button.
Turn off the water tap, and switch off at the mains
supply.
Wait a few minutes before removing the dishes; in this
way they will be cooler and the drying will be
improved.
Empty the lower basket first and then the upper one;
this will avoid water dripping from the upper basket
onto the dishes in the lower one.
Caution
In general it is not advisable to open the door while
the machine is working; if the door is opened however,
a safety device ensures that the machine stops.
9. Cancel the wash programme
To cancel a wash programme which is running, press
the «Cancel» button until the short «instruction
accepted» signal (about 2 seconds) is heard. The two
zeros appear in the digital display indicating that the
previous setting has been cancelled and a new pro-
gramme can now be selected.
SO166

Cleaning the central filter
(After each wash)
Scraps of food can sometimes accumulate in the cen-
tral filter (A) and should be periodically removed by
rinsing the filter under running water.
To remove the filter, simply pull it outward by the handle.
Once cleaned, refit the filter by pushing it back to
its original position until it engages.
Cleaning the large filter
(Every two months)
If necessary clean the large filter (B) on both sides
under running water, using a brush.
To take it out remove the spray arm by pulling it up-
ward on one side, turn the column (C) anticlockwise
by 90° and then slide out the filter.
Once cleaned refit it following the above instructions
in reverse order.
Ensure the filter is in its original position, the handle of
filter (A) should be pointing towards the front of the
appliance.
Caution: the dishwasher must not be used
without filters.
Incorrect repositioning of the filters will produce
poor washing results.
Cleaning of the filters is vital to ensure correct
operation of the machine.
Internal and external cleaning
You must ensure that the seals around the door, the
detergent and rinse aid dispensers are cleaned
regularly with a damp cloth.
We recommend you carryout a maintenance wash
every 3 months, by running a 65° C wash programme
without dishes using detergent.
Clean the external surfaces of the machine and
control panel with a soft damp cloth. If necessary use
only neutral detergents. Never use abrasive products,
scouring pads or solvents (acetone, trichloroethylene
etc...).
Prolonged periods of non-operation
If you are not using the machine for any period of time
you are advised to:
unplug the appliance and turn off the water;
fill the rinse aid dispenser;
leave the door ajar to prevent the formation of
unpleasant smells;
leave the inside of the machine clean.
Frost precautions
Avoid placing the machine in a location where the
temperature is below 0°C.
If this is unavoidable, empty the machine, close the
water inlet tap, disconnect the water inlet pipe and
empty it.
Moving the machine
If you have to move the machine (you are moving
house etc...):
unplug it;
turn off the water tap;
remove the water inlet and discharge hoses;
pull the machine out together with the hoses.
Caution: avoid over tilting the machine during
transport.
MAINTENANCE AND CLEANING
PMA13GB
32
A
MA04
C
90°
B
MA05

Certain problems are due to lack of simple mainte-
nance or oversights and can be solved easily without
having to call out an engineer. Therefore before call-
ing the Service, consult the check list here below.
The following alarms, (A3, A5, A6, A1, A2, A7) flash in
the digital display window. The dishwasher fails to
start or stops during operation; all the lights are out
except for the alarm in the digital display, all buttons
are inoperative except for the ON/OFF button.
If the dishwasher displays the following fault codes
please carry out the following checks.
If A3 is displayed or the dishwasher stops
■The spray arms are not rotating. Check the crockery is
loaded correctly.
■The filters are blocked. Clean the filters and press
the start button.
If A5 is displayed or the machine will not
fill with water
■The water tap is off. Turn the water tap on and
press the start button.
■The water supply has been cut off. Wait for it to be
restored then press the start button.
■The inlet hose is kinked. Straighten the hose and
press the start button.
■The water inlet hose is blocked. Clean the filter at
the end of the inlet hose and press the start button.
■The filters are blocked. Clean the filters and press
the start button.
If A6 is displayed or the machine will not
drain
■The drain hose is kinked. Straighten the hose and
press the start button.
■The sink drain is blocked. Clear the blockage and
press the start button.
■The drain hose extension is not correct. Follow the
instructions for connecting to the waste and press
the start button.
■There is no air vent in the end of the drain hose.
If after these checks the fault codes remain displayed
or the fault codes A1, A2, A4 or A7 appear contact
your local Service Centre.
For washing or drying problems, please carry out
the checks listed below:
The dishes are not clean (poor wash);
■The baskets are too full.
■The dishes have not been arranged correctly.
■The spray arms do not rotate.
■The spray arms are blocked.
■The water inlet funnel in the centre of the upper
basket is covered by dishes.
■The filters are clogged.
■The filters are not in position.
■Not enough detergent has been used, or it is
unsuitable.
■The detergent is old or has gone hard.
■The salt container cap is not properly closed.
■The washing programme selected is too gentle.
Visible lime deposits or white film on the
dishes
■There is no salt or the softener has not been adjusted
to the hardness of the water.
The machine is noisy;
■The dishes are rattling against each other.
■The spray arms are knocking against the dishes.
The dishes are not quite dry;
■The dishes have been left too long inside the
machine.
■The rinse aid has run out or too little is being used.
The door is difficult to close;
■The dishwasher is not level or is not properly built-
in.
SERVICING
PRA02GB
33

If, after the above checks the fault persists, call your
local Service Centre. Please make sure you give the
model and serial number of the appliance. This infor-
mation can be found on the rating plate located on the
right-hand side of the dishwasher door (see picture).
Original spare parts can be purchased from Service
Centres.
In guarantee customers should ensure that the above
checks have been made as the engineer will make a
charge if the fault is not a mechanical or electrical
breakdown.
Please note that proof of purchase is required for any
in-guarantee service calls.
Protection against flooding
In order to prevent water floods, the machine has
been provided with two additional devices, having the
following characteristics:
1. In the water inlet hose (see “Water connection”):
the device comes into operation as a result of any
damage to the water inlet hose and stops the water
inflow. It functions even with the machine off.
2. In the bottom of the machine: the device comes
into operation as a result of any water leaks in the
machine and it functions only with the machine on.
To repair the machine, call the Service Centre.
PRA36GB
34
Prod.No.
........
Ser. No.
.........
Mod.
........
RA01

PII17GB
35
BUILDING-IN
Building-in features
This dishwasher is designed to be fitted under a kitchen
counter or sink.
In either case, it is essential that the recess dimensions
indicated in the picture are followed.
No further openings for venting of the dishwasher are
required, but only to let the water fill and drain hoses
and power supply cable pass through.
The recess height may be anywhere between 820
and 880 mm from the floor since the dishwasher in-
corporates levelling feet adjustable over a wide range
(max 60 mm).
Adjust the height of the appliance by turning these
feet.
A distance of 2 mm should be allowed between the
top of the dishwasher and the counter top.
Two pads are also supplied
to make sliding-in or slid-
ing-out of the appliance
easier.
Fit the pads by pressing
them on the feet.
Fitting the vapour protecting strip
Screw the vapour protect-
ing strip onto the front part
of the worktop using four
3,5 x 16 screws.
Fitting the sealing strips to the sides of
the appliance To ensure closer contact
with the adjacent kitchen
units, fit the plastic sealing
strips down both sides of
the front of the machine
before inserting it into the
recess.
Fitting under a counter (kitchen worktop
or sink)
It is absolutely essential that the dishwasher is
disconnected from the electricity supply before gaining
access to any internal component.
Fit the dishwasher into the appropriate housing space
and connect it. Make sure that the water fill and drain
hoses and the power supply cable are not bent or
kinked.
Fitting the panel onto the door
The door on this model is designed for the overlay of
a panel having the following dimensions:
Width: 596 mm
Height: 644 to 714 mm max
Thickness: 20 mm max
Weight: 2 to 7.5 kg max
Note:
The panel height should not be more than what
indicated, otherwise complete opening of the door will
no longer be possible as the panel hits against the
dishwasher plinth.
Mounting of decor panel onto the door
The height of the panel depends on the height of the
plinth of adjacent kitchen units (see kitchen plinth
adjustment). The panel must be fitted
with a handle, as the dish-
washer handle will be hid-
den by the panel.
Drill the panel with a Ø 2 x
12 bit according to the di-
mensions indicated in the
figure.
Fix the cross bar onto the panel using four 3.5 x 16
screws provided. If for aesthetic matching the
panel is provided with a false
drawer (fitted or carved on
the panel itself), the two
brackets provided should al-
so be used.
Fix the brackets according to
the measurements shown in
the figure, by using four 3.5 x
16 screws.
Mount the decor panel by in-
serting the two pivots of the
cross-bar into the slotted
holes of the door.
Lift the decor panel until per-
fect alignment with the facia
panel is obtained: if the two
brackets have also been
used, they will automatical-
ly engage in the special
holes provided on the dish-
washer door.
818 ÷878
555
596
600
820 ÷880
II28
max
0 ÷60mm
II07
II19
**
550
30 172
596 max
40
596 max
546
==
30 40
30
II17
II12
II20
600 mm
600 mm
II25
A
A A
A
II23

PII18GB
36
Once the correct position has
been found, open the door
and fasten the decor panel
on the lower section by
means of two long 4 x 40
screws provided, using the
holes through the inner door.
Fixing to the adjacent units
Insert the two fixing brackets into the slots provided in
the top front part of the dishwasher, as shown in the fig-
ure. Secure the brackets to adjacent units using two
3,5 x 16 screws for each bracket.
Important!
The dishwasher must be secured against tilting.
Therefore, make sure that the counter it is fitted
under, is suitably secured to a fixed structure
(adjacent kitchen cabinets, wall).
Attention!
When the dishwasher is secured to the kitchen
cabinets, do not drill any holes into the sides of
the machine.
Adjusting the door balance
The door of the dishwasher is balanced when it is
open in any position.
Fitting the decor panel may sometimes affect this bal-
ance. In this case it will be necessary to adjust the
balance as follows:
Half-open the door and regulate the screws located on
the kick plate.
By screwing or unscrewing these screws, the tension
of the door balancing springs is increased or
decreased respectively.
Attention!
The weight of the panel should be within the limits
given in the "dimensions of the panel", otherwise
balancing the door will not be possible.
Levelling
Make sure that the dishwasher door closes properly,
without rubbing on sides. Otherwise level the machine
by slightly screwing or unscrewing the two front feet
until perfect closure of the door is reached.
Kitchen plinth adjustment
To allow correct opening of
the door it is sometimes
necessary to cut the
kitchen plinth. Refer to the
cutting table below.
According to dimensions of
(a) and (b) as shown on
the figure, you will find on
the following table the
depth (x) of the cut to be
made on the plinth.
The dimensions (a) and (b) of the table are those
more frequently used in the kitchen furnitures.
II54
II10
II59
a
b
II15
II08
170 160 150 140 130 120 110 100
136 131 125 118 110 100 93 85
135 131 125 118 110 102 92 85
137 132 125 118 110 102 94 85
138 134 128 120 110 104 95 85
139 130 124 115 105 98 88
138 129 120 110 100 90
135 125 115 105 95
/
/ /
/
40
50
60
70
80
90
100 / /
Height (a)*
Depth (b)*
X
X
600 mm
(minimum)
Dimensions of the cut on the plinth
*dimensions in mm

152991 13/0 0/1197
Total Chlorine free
de en fr nl
Table of contents
Other ZANKER Dishwasher manuals

ZANKER
ZANKER ZKS 5650 IL User manual

ZANKER
ZANKER KDI10001XK User manual

ZANKER
ZANKER ZKS 5653 User manual

ZANKER
ZANKER ZKS5453IE User manual

ZANKER
ZANKER ZKI1410 User manual

ZANKER
ZANKER KDT11002FK User manual

ZANKER
ZANKER KDT10042FK User manual

ZANKER
ZANKER ZKS5653XL User manual

ZANKER
ZANKER KDT10053FK User manual

ZANKER
ZANKER ZKDW14 User manual

ZANKER
ZANKER KDV10031FA User manual

ZANKER
ZANKER KDT10004FB User manual

ZANKER
ZANKER ZKS 5619 SX User manual

ZANKER
ZANKER ZKV1530 User manual

ZANKER
ZANKER ZKVS 1530 User manual

ZANKER
ZANKER KDI10000XK User manual

ZANKER
ZANKER KDT10000 User manual

ZANKER
ZANKER ZKS5642 User manual

ZANKER
ZANKER KDT10012FK User manual

ZANKER
ZANKER KDT 10032FK User manual