Zanussi Electrolux ZGF 98 User manual


12
Important Safety Information
Installation
zThis appliance must be installed and serviced by a
competent person as stated in the Gas Safety
(Installation and Use) Regulations Current Editions
and the IEE Wiring Regulations.
zRemoveallpackagingbeforeusingthehob.
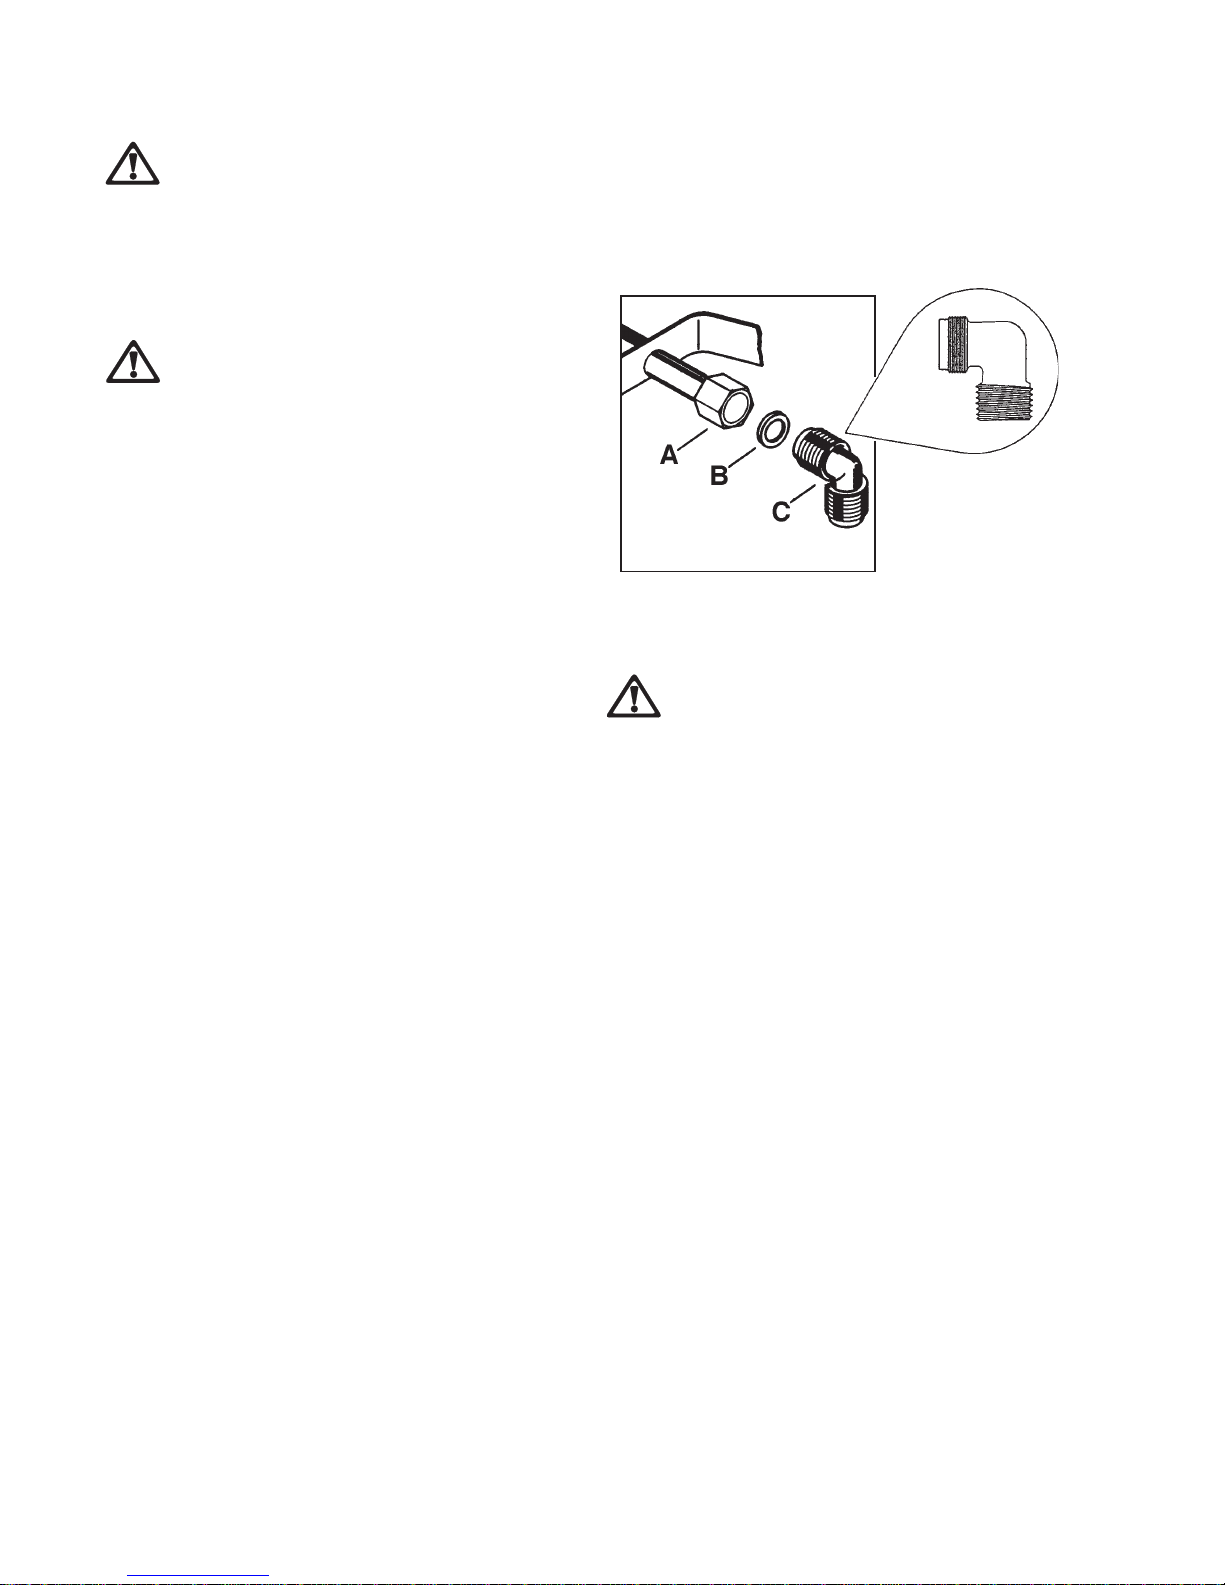
zEnsure that the gas and electrical supply complies
with the type stated on the rating plate, located near
the gas supply pipe.
zDo not attempt to modify the hob in any way.
Child Safety
zThis hob is designed to be operated by adults. Do
not allow children to play near or with the hob.
zThe hob gets hot when it is in use.
zChildren should be kept away until it has cooled.
zChildren can also injure themselves by pulling pans
or pots off the hob.
During Use
zThis hob is intended for domestic cooking only. It is
notdesignedfor commercial or industrial purposes.
zThis appliance is not connected to a combustion
productsevacuationdevice. It must be installedand
connected in accordance with current installation
regulations.Particularattention shall be given tothe
relevantrequirementsregardingventilation.
zWhen in use a gas cooking appliance will produce
heat and moisture in the room in which it has been
installed. Ensure there is a continuous air supply,
keeping air vents in good condition or installing a
cookerhoodwith a venting hose.
zWhen using the hob for a long period time, the
ventilationshouldbeimproved,byopeningawindow
orincreasing the extractor speed.
zDo not use this hob if it is in contact with water.
Do not operate the hob with wet hands.
zEnsure the control knobs are in the ‘OFF’ position
when not in use.
zWhen using other electrical appliances, ensure the
cabledoesnotcomeinto contactwiththe hotsurfaces
ofthecooking appliance.
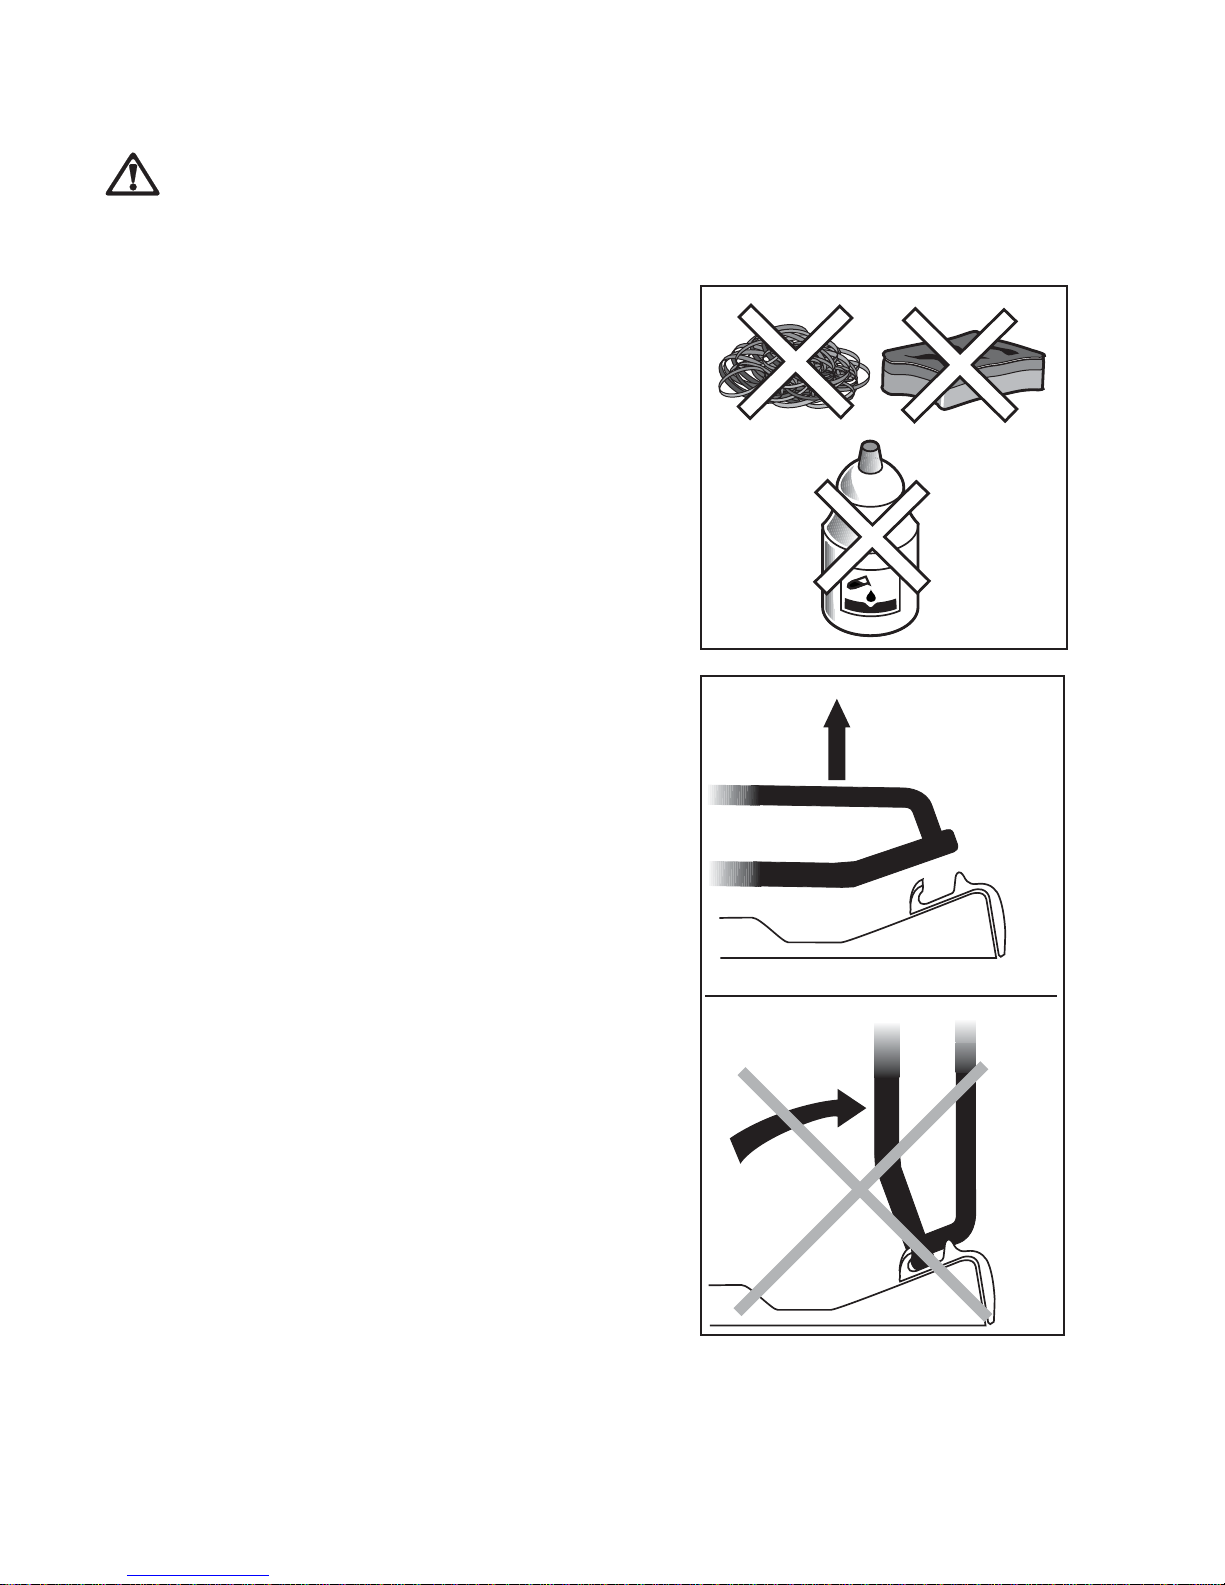
zUnstable or misshapen pans should not be used on
the hob as unstable pans can cause an accident by
tippingorspillage.
zNever leave the hob unattended when cooking with
oil and fats.
zNeveruseplasticor aluminiumfoildishesonthehob.
zPerishable food, plastic items and areosols may be
affected by heat and should not be stored above or
belowthe hob unit.
Service
zThis hob should only be repaired or serviced by an
authorised Service Engineer and only genuine
approvedsparepartsshouldbeused.
Environmental Information
zAfter installation, please dispose of the packaging
withdueregardtosafety and the environment.
zWhendisposingofanoldappliance,makeitunusable,
by cutting off the cable.
zThesymbol on the product or onits packaging
indicates that this product may not be treated as
household waste. Instead it shall be handed over to
the applicable collection point for the recycling of
electricalandelectronicequipment.Byensuring this
productisdisposedofcorrectly, you will help prevent
potentialnegativeconsequences fortheenvironment
andhumanhealth,whichcouldotherwisebecaused
by inappropriate waste handling of this product. For
more detailed information about recycling of this
product, please contact your local city office, your
householdwastedisposalserviceortheshopwhere
youpurchasedthe product.
Keep this instruction book for future reference
and ensure it is passed on to any new owner.
Guide to Use the instructions
The following symbols will be found in the text to guide
youthroughoutthe Instructions:
SafetyInstructions
Step by step instructions for an operation
Hintsand Tips
EnvironmentalInformation
))
))
)
These warnings are provided in the interest of safety. You MUST read them carefully before
installing or using the appliance. It is most important that this instruction book should be
retained with the appliance for future reference. Should the appliance be sold or transferred,
always ensure that the book is left with the appliance in order that the new owner can get to
know the functions of the appliance and the relevant warnings.

13
Thisappliancecomplieswith the following
E.E.C.Directives:
* 73/23 - 90/683
(LowVoltageDirective);
* 93/68 (GeneralDirectives);
* 89/336 (Electromagnetical
CompatibilityDirective);
* 90/396 (GasAppliances),
andsubsequentmodifications
For the User
Contents
For the Installer
Description of the Hob
ImportantSafetyInformation 12
Description of the Hob 13
Operation 14
Maintenanceand Cleaning 15
Something Not Working? 16
Service and original spare parts 16
Instructions for the Installer 17
Important safety requirements 18
Installation 19
Conversion from LPG to Natural Gas 19
Commissioning 20
Electrical connections 20
BuildingIn 21
1. AuxiliaryBurner
2. Semi-rapidBurners
3. Ultra-rapidTriple-crownBurner
4. RapidBurner
5. Controlknobs
2
13
4
5
2

14
Operation
Hob burners
Tolight a burner:
zturn the relevant control knob anticlockwise to the
maximum position, then push it down to ignite the
burner;
zthen, check the flame is regular and adjust it as
required.
Ifyoucannotlighttheflameevenafterseveralattempts,
check the "cap" and “crown” (see Fig. 1 - letterAand
B) are in the correct position.
To put the flame out, turn the knob to the symbol z.
Whenswitchingonthemains,afterinstallationor
a power cut, it is quite normal for the spark
generatortobeactivated automatically.
To ensure maximum burner efficiency, you should only
use pots and pans with a flat bottom fitting the size of
theburnerused (see table).
Burner minimum maximum
diameter diameter
Ultra-rapid
(triple-crown) 180mm 260 mm
Large(rapid) 180mm 260mm
Medium(semi-rapid) 120mm 220mm
Small(auxiliary) 80 mm 160mm
))
))
)
If you use a saucepan which is smaller than
the recommended size, the flame will spread
beyond the bottom of the vessel, causing the
handle to overheat.
Take care when frying food in hot oil or fat,
astheoverheated splashes couldeasilyignite.
As soon as a liquid starts boiling, turn down the
flame so that it will barely keep the liquid
simmering.
Ifthecontrolknobs become difficulttoturn,please
contactyour local Service Force Centre.
A- Burnercap
B- Burnercrown
C- Ignition electrode
A
B
C
Triple-crown Burner
Fig. 1

15
Maintenance and Cleaning
Beforeanymaintenanceorcleaningcanbecarried
out, you must DISCONNECT the hob from the
electricity supply.
The hob is best cleaned whilst it is still warm, as
spillage can be removed more easily than if it is
left to cool.
The Hob Top
Regularly wipe over the hob top using a soft cloth well
wrungoutinwarmwatertowhichalittlewashingupliquid
hasbeenadded. Avoidtheuseof thefollowing:
- householddetergentandbleaches;
- impregnatedpadsunsuitablefornon-sticksaucepans;
- steel wool pads;
- bath/sinkstainremovers.
Should the hob top become heavily soiled, it is
recommendedthatacleaningproductsuchasHobBrite
or Bar Keepers Friend is used.
The Burners
Theburnercapsandcrownscanberemovedforcleaning.
Washtheburnercapsandcrownsusinghotsoapywater,
and remove marks with a mild paste cleaner. A well
moistenedsoapimpregnatedsteelwoolpadcanbeused
with caution, if the marks are particularly difficult to
remove.
After cleaning, be sure to wipe dry with a soft cloth.
Ignition electrode
The electric ignition is obtained through a ceramic and
metal electrode (Fig. 1 - letter C). Keep these
components very clean, to avoid lighting difficulties, and
check that the burner crown holes are not obstructed.
Cast Iron Pan Supports
The hob has cast iron pan supports.
Takecarewhenremovingthem.Theyareveryheavyand
coulddamagethe hob or your kitchen furniture ifyoulet
themfalldown.
To keep the pan supports in the correct position, they
are hooked into hinges at the back of the hob. When
removingthe pansupports, liftthem up as shownin the
diagram.Neverturnthepansupports on thehinges,this
coulddamagethem.
Wash the pan supports using hot soapy water. If
necessary, apastecleaner orasoapimpregnated steel
wool pad can be used with caution.
After cleaning, be sure to wipe dry with a soft cloth.
YES
NO

16
Something Not Working?
If the hob is not working correctly, please carry out the following checks before contacting your local Service Force
Centre.
SYMPTOM
There is no spark when lighting the gas
Thegasringburnsunevenly
SOLUTION
Check that the unit is plugged in and the electrical
supply is switched on
Check that the RCCB has not tripped (if fitted)
Check the mains fuse has not blown
Checktheburnercapandcrownhavebeen
replacedcorrectly, e.g. aftercleaning.
Check the main jet is not blocked and the burner
crown is clear of food particles.
Checktheburnercapandcrownhavebeen
replacedcorrectly, e.g. aftercleaning.
If after all these checks, your hob still does not operate
correctly, contact your local Service Force Centre.
Please note that it will be necessary to provide proof of
purchase for any in-guarantee service calls.
In-guarantee customers should ensure that the
above checks have been made as the engineer will
make a charge if the fault is not a mechanical or
electrical breakdown.
Service and original spare parts
This machine, before leaving the factory, has been
tested and studied by many experts and specialists, in
order to give you the best results.
Any repair work which needs to be carried out should
be done with the utmost care and attention.
For this reason we recommend that for any problem
youcontact the dealer who solditto you, or ournearest
authorizedService Centre, specifyingthe nature ofthe
problem, the appliance model (Mod.), the product
number (Prod. No.) and the serial number (Ser. No.)
marked on the identification plate.
Original spareparts, certified by the product
manufacturer and carrying this symbol are only
available at our Service Centre and authorized
sparepartsshop

17
OVERALL DIMENSIONS
Width: 860mm
Depth: 510mm
CUT OUT DIMENSIONS
Width: 830mm
Depth: 480mm
SUPPLY CONNECTIONS
Gas:
R 1/2 inch (1/2 inch male) Rear right hand corner
Electric:
220 V 50 Hz supply, 3 core flexible cable with non
rewireableplug.
Rear Left Burner (semi rapid)
HeatInput 2.0 kW
Front Left Burner (auxiliary)
HeatInput 1.0 kW
Rear Right Burner (semi rapid)
HeatInput 2.0 kW
Front Right Burner (rapid)
HeatInput 3.0 kW
Central Burner (Ultra-rapid Triple-crown)
HeatInput 4.0 kW
Burner Dia.TapBy-pass
1/100 mm
Auxiliary 28
Semi-rapid 32
Rapid 40
Ultra-rapid 56
Aerationadjustmentnone
Instructions for the Installer
Engineers technical data
APPLIANCE CLASS : 3
APPLIANCE GAS SUPPLY:gas G28-30 / 37mbar
BURNER RAPID SEMI-RAPID AUXILIARY
(large) (medium) (small)
POSITION MAX MIN MAX MIN MAX MIN MAX MIN
NOMINALTHERMAL
POWER kW 3.0 0.65 2.0 0.45 1.0 0.33 4.0 1.2
NOMINALFLOW
RATE m3/h 0.286 0.062 0.190 0.043 0.095 0.031 0.381 0.114
NOZZLE REFERENCE 119 Adjust. 96 Adjust. 70 Adjust. 146 Adjust.
NOMINALTHERMAL
POWER kW 2.8 0.65 2.0 0.45 1.0 0.33 4.0 1.2
NOMINALFLOW
RATE g/h 202 47 144 32 72 24 288 86
NOZZLE REFERENCE 86 40 71 32 50 28 98 56
NATURAL GAS
20 mbar TYPEOF
GAS
CHARACTERISTICS
LPG GAS
28-30/37 mbar
1/100 mm
1/100 mm
VALUE = 49.92 MJ/Kg VALUE= 37.78 MJ/m3
Ws - 50.7 MJ/ m3
ULTRA-RAPID
(triple-crown)

18
FITTINGTHE GAS HOB
WITHOUTACOOKERHOODABOVE
FITTINGTHE GAS HOB
WITHACOOKERHOODABOVE
700 mm
400 mm
400 mm
100 mm
55 mm
50 mm 50 mm
600 mm
700 mm
400 mm
400 mm
100 mm
55 mm
600 mm
50 mm 50 mm
FO 2369*
FO 2231*
Important safety requirements
This hob must be installed in accordance with the Gas
Safety(InstallationandUse)Regulations(CurrentEdition)
andtheIEEWiring Regulations (Current Edition).
Provision for ventilation
The hob should not be installed in a bed sitting room
with a volume of less than 20 m3. If it is installed in a
room of volume less than 5 m3an air vent of effective
area of 110 cm2is required. If it is installed in a room of
volume between 5 m3and 10 m3an air vent of effective
area of 50 cm2is required, while if the volume exceeds
11 m3noair vent is required.
However,ifthe room has a doorwhich opens directly to
the outside no air vent is required even if the volume is
between5m3and 11 m3.
If there are other fuel burning appliances in the same
room,shouldbeconsultedtodeterminetherequisiteair
ventrequirements.
Location
The hob may be located in a kitchen, a kitchen/diner or
bedsittingroom, but not in abathroom,showerroom or
garage.
Before making the cut out in the worktop ensure that
thereisaminimum distance of 55 mm betweentherear
edge of the hob and the wall.
A minimum distance of 100 mm must be left between
the side edges of the hob and any adjacent cabinets or
walls.
Theminimumdistancecombustiblematerialcan befitted
above the hob in line with the edges of the hob is 400
mm. If it is fitted below 400 mm a space of 50 mm must
beallowed from the edges ofthehob.
Theminimumdistancecombustiblematerialcan befitted
directly above the hob is 700 mm.

19
Installation
IMPORTANT:
This hob must be installed by a
competentpersontotherelevantGasStandards.
Any gas installation must be carried out by a
competentperson.
The manufacturer will not accept liability, should
the above instructions or any of the other safety
instructionsincorporatedin this book be ignored.
WHEN THE HOB IS FIRST INSTALLED
Oncethehobhasbeeninstalled,it is importantto
removeany protective materials, whichwereput
on in the factory.
On the end of the shaft, which includes the G 1/2"
threaded elbow, adjustment is fixed so that the washer
is fitted between the components as shown in the
diagram. Screw the parts together without using
excessiveforce.
Gas Connection
Connectiontothe gas supply should bewith either rigid
or semi-rigid pipe, i.e. steel or copper.
The connection should be suitable for connecting to R
1/2" (1/2 BSP male thread).
Whenthefinalconnectionhasbeen made, it is essential
that a thorough leak test is carried out on the hob and
installation. Ensure that the main connection pipe does
not exert any strain on the hob.
A) End of shaft with nut
B) Washer
C) Elbow
It is important to install the elbow correctly, with
theshoulderontheend of the thread, fitted to the
hobconnectingpipe.
Failuretoensurethe correct assembly will cause
leakageofgas.
FO 0814
FO 0264
Conversion from LPG to Natural Gas
IMPORTANT
Thereplacement/conversionofthegashobshouldonly
beundertaken by a competent person.
Itisimportantto note that this model is designedforuse
with LPG gas but can be converted for use with Natural
gasprovidingthecorrect injectors are fitted and thegas
rate is adjusted to suit.
Method
• Ensure that the gas taps are in the 'OFF' position
• Isolate the hob from the electrical supply
• Removeallpansupports,burnercaps, rings, crowns
andcontrol knobs.
• Withtheaidofa7mmboxspannertheburnerinjectors
can then be unscrewed and replaced by the
appropriateNatuaralgasinjectors.
To adjust the gas rate
To adjust the minimum level of the burners, proceed as
follows:
•Lighttheburner.
•Turn the knob on the minimum position.
•Removetheknob.
•With a thin screwdriver, adjust the by-pass screw.
If changing from LPG to natural gas unscrew about
1/4turntheby-passscrew,until a small regular flame
is obtained.
If changing from natural gas to LPG, completely
tighten clockwise the screw, until a small regular
flameis obtained.
•Finallycheckthe flame does not gooutwhen quickly
turning the knob from the maximum position to the
minimumposition.
Thisprocedure can easilybe carried out,anyhow the
hob has been positioned or built in the working top.

20
Commissioning
Whenthehob has beenfullyinstalleditwill benecessary
to check the minimum flame setting. To do this, follow
theprocedurebelow.
- Turn the gas tap to the MAX position and ignite.
- Set the gas tap to the MIN flame position then turn
the control knob from MIN to MAX several times. If
the flame is unstable or is extinguished follow the
procedurebelow.
)Procedure:
- Re-ignitethe burner and set toMIN.
- Remove the control knob and use a thin bladed
screwdrivertoturntheadjustmentscrewuntiltheflame
is steady and does not extinguish, when the knob is
turnedfromMINtoMAX.
- The adjustment screw may be located at the centre
of the gas tap control shaft or on the gas tap body,
leftof the control shaft orbelow(see diagram).
- Repeattheadjustmentprocedureforallburners. Adjustment
screw
)
Pressure Testing
- Remove left hand pan support and front left burner
capandcrown.
- Fitmanometertubeover the injector.
- Turn on the burner gas supply and ignite another
burner.
- The pressure reading should be nominally 20mbar
andmustbe between 17 mbar and 25mbar.
- Turnofftheburnersupplies.
Electrical connections
Neutral
Earth (yellow/green)
The appliance is designed to be connected to 220 V
monophase electricity supply.
The connection must be carried out in compliance with
the laws and regulations in force.
Beforetheappliance isconnected:
1) checkthatthemainfuseandthedomesticinstallation
can support the load (see the rating label);
2) check that the power supply is properly earthed in
compliancewith the currentrules;
3) check the socket or the double pole switch used for
theelectricalconnectioncanbeeasilyreachedwith
theappliance built in the forniture unit.
Connecttheplug,abletosupporttheloadmarkedonthe
identificationplate,tothecable.Theplughastobefitted
in a proper socket.
Ifconnectingtheappliancedirectlytotheelectricsystem,
it is necessary that you install a double pole switch
betweentheapplianceand the electricity supply, with a
minimumgapof3mm.betweentheswitchcontactsand
ofatypesuitablefortherequiredloadincompliancewith
thecurrentrules.
Theearthcable(yellow/green)mustnotbeinterruptedby
theinterrupter.
The connection cable has to be placed in order that, in
each part, it cannot reach a temperature of 90 °C.
The brown coloured phase cable (fitted in the terminal
blockcontactmarkedwith"L")mustalwaysbeconnected
to the network phase.

21
FO
2564 FO 2044
3
Dimensionsaregiveninmm.
Building In
Building over a cupboard or
drawer
Ifthehobistobeinstalledaboveacupboardordrawerit
will be necessary to fit a heat resistant board below the
baseof the hob onthe underside ofthe work surface.
It is also recommended to carry out the electrical
connection to the hob as shown in diagrams 1 and 2.
Building over a kitchen unit with
door
Proper arrangements must be taken in designing the
furnitureunit, inorderto avoidanycontactwiththebottom
ofthehobwhichcan be heated when it is operated.The
recommendedsolution is shown in diagram3.
The panel fitted under the hob ("a") should be easily
removable to allow easy access if technical assistance
is needed. The space behind the kitchen unit ("b") can
beused for connections.
1
FO 2563
2
)
Fitting the Hob into the worktop
Carry out the building in of the hob as follows:
• place the seals supplied with the hob on the
side edges of the cut out and at 8 mm from the
front and rear edges, as shown in the diagram,
taking care that the seals meet without
overlapping;
• place the hob in the cut out, taking care that it
is centred;
• fix the hob with the relevant fixing clamps and
screws, as shown in the diagram. When the
screwshavebeentightened,the excess seal can
beremoved.
Theedgeofthehob forms a double sealwhichprevents
the ingress of liquids.
FO 0199
a
Seal
Cut Out Size
Thedimensionsof the cut-out are given inthediagram.
Rectangular cut-out size for hob
FO 2349
830
480
30
150 min
Dimensionsaregivenin mm.


Grafiche MDM - Forlì
35692-6601AM 05/06
Table of contents
Other Zanussi Electrolux Hob manuals
Popular Hob manuals by other brands

Sirius Satellite Radio
Sirius Satellite Radio S-DDH3 Use and installation manual

Bosch
Bosch HND612LS81 installation instructions

AEG
AEG HG65SY4551 user manual

Electrolux
Electrolux EHED 63 CS user manual

Electrolux
Electrolux EGC3320NOK Instructions for the installation and use

Electrolux
Electrolux GK78TSICN user manual

Electrolux
Electrolux EHS 6650 P Installation and operating instructions

AEG
AEG EKMUE 4.77 Installation and operating instructions

Indesit
Indesit IP 641S (IX) GH (EE) operating instructions

STATESMAN
STATESMAN ECH77TC instruction manual

NEFF
NEFF T16 D56 Series INFORMATION FOR USE

Electrolux
Electrolux EGC3313NOK user manual