Zastone ZT-V9 User manual

Contents
Introduction…………………………..............................................………………………1
Included.………………....................................................................................................…2
Table of Spare Parts ……………………………………................................................…2
Main Features …………………………………………..............................................……3
Technical Specifications………………….........................................…..…………………4
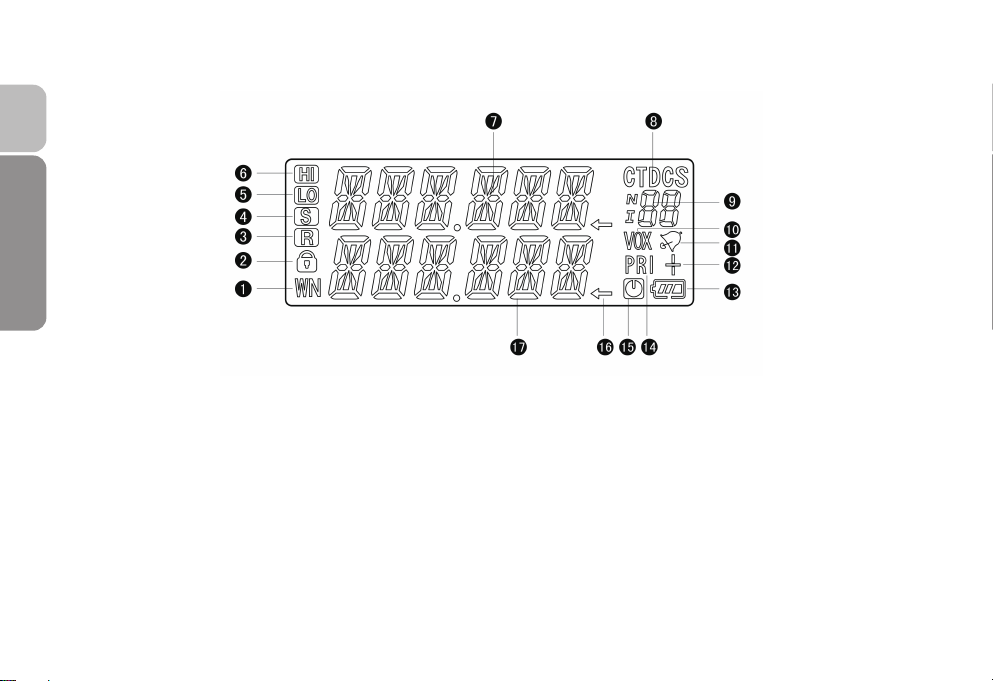
Know The Radio………………….........................................…………............…..............5
Preparation for Use ……………………….........................................………....…............8
Menu Contents………………………….........................................………...............……12
Operation Guide………………………….............................................…………………20
Auxiliary Functions Description…………….........................................………..………28
Programming Functions…………………….........................................………..….……33
Maintenance…………………….........................................…………..........……….……36
Troubleshooting …………………….....................................……………………………37
Appendix:CTCSS/DCS List………..........................................…………………………38

01
Introduction
Introduction
Thanks for purchasing ZASTONE ZT-V9 Handheld U/V Band Radio. Please read this manual
carefully to learn its functions and operations before using.
With elegant design, stable performance, and easy-to-use feature, transceiver ZT-V9 is developed
for wide using. It offers you a normal communication when you are in the rural area, forest zone,
pasturing area or sea area. The fine appearance of ZT-V9 meets your needs of personality.
Thank you for your support and interest in our products.

02 Included
Included
Please take the transceiver from the carton carefully. Please check if the package including the
spare parts as below. If there are any items lost or damaged during moving,please submit claim
immediately to the delivery.
Table of Spare Parts
Spare Parts Unit quantity
Antenna PC 1
Belt Clip PC 1
Li-ion Battery Pack Pack 1
Adaptor PC 1
Charger PC 1
User Manual PC 1
Warranty Card PC 1
Hang Rope PC 1

03
Features
Features
1. Frequency:VHF(136MHz-174MHz)
and UHF(400MHz-470MHz)
2. LCD Menu Display
3. Battery: Chargeable 7.4V 1500mAh
4. Wide/Narrow Selectable 25K/12.5K
5. High/Low power Selectable:5w/1w
(VHF),4w/1w(UHF)
6. CTCSS:50 /DCS :104
7. ANI Function
8. 99 Channels ,One Emergency ,Can
not be deleted.
9. Scrambler
10. TOT
OFF-15/30/45/60/75/90.../600S
11. VOX
12. Emergency Call
13. PRI
14. BCLO
15. Free Setting V/U Band
16. DW
17. OFF SET
18. CTCSS/CDCSS
19. STEP5/6.25/10/12.5/15/20/25K
20. Scan: VFO/Channel Scanning
21. SQL:0-9 Level
22. Light :On/Off
23. SAVE
24. MONITOR
25. Turn on and Automatic Check and
Display the Voltage
26. Low Battery alert
27. Key Tone/Lock
28. APO
29. FM(87.0MHz~108.0MHz)
30. PC Programmed and manually Input
31. Wired Clone

04 Specification
Specification
General
Frequency 136-174MHz
400-470MHz
Channels 99
Channel Space 12.5kHz or 25kHz
Temperature -20℃~+60℃
Voltage 7.4V
Standby Current about 15mA
Transmit
Output Power VHF≤5W UHF≤4W
Current HI≤1.6A
Modulation FM
Maximum
Frequency Error
≤±5kHz or
≤±2.5kHz Selectable
Residual Radiation <-60dB
Sensitivity ≤-122dBm(12dB
SINAD)
SNR ≤0.16uV
Inter-modulation
Rejection 60dB
Audio Power ≥500mW
Mission ≤140mA
Standby Current 15mA
Receive

05
LCD Definition
Know The Radio
LCD Definition
1.Wide/Narrow Band
Selectable
2.Keypad Lock
3.Scrambler Function
4.Power Save
5.Low power
6.High Power
7.Frequency Group A
8.DCS Setting /CTCSS Setting
9.CTCSS Indicator
10.Vox
11.Tone Setting
12.Frequency Offset
13.Low Battery alert
14.Priority Channel Scan
15.APO
16.Using Frequency Group
17.Frequency Group B

06
Know the Radio
1.Antenna 2.PTT
3.Monitor/FM 4.Emergency Call
5.Down
6.MIC
7.MENU 8.Battery Buckle
9.Battery Pack 10.Number Keypad
11.Up 12.LCD
13.MIC/SP Waterproof Cover
14.Indicator light 15.Volume Knob
16.Belt clip
17.Hand strap hole

07
Know the Radio
Key Instruction
1. [PTT]:Press to Transmit ,Release to Receive.
2. [MONI/FM]:Press FM for 1.5 Seconds to turn on FM short press to turn on moni.
3. [CALL]:Press for 1.5 Seconds to Call ;No use for Short press.
4. [MENU]: Menu/Confirm
5. [0]~[9]:Number Keys
6. [UP]/[DOWN]:Up/Down
7. [#/MR]:Press for 1 Second to store the Channels; Hold this to change the VFO and
Channels.
8. [*/BAND]:Press for 1 Second to switch Main Frequency A/B ; Short press to quit.

08 Preparation for Using
Preparation For Using
Install the Antenna
Install the antenna as picture shows and
rotate it clockwise till tight.
Note:
Note: Don’t hold the antenna or hang the keys or
external mic on the Antenna ,in case of
destroying the performance of radio .
Install the battery
Install the batter along the rear case of radio
properly as following pictures show:
P1
P2

09
Preparation for Using
Disassembling of battery
Press the fixed buckle of the battery(P1),then
push down the battery off the transceiver(P2)
P1
P2
Install and take off the belt clip
If necessary ,fix the belt clip with two
screws (3*6) as picture shows:
Assembly Taking Off
Note:1.When installing the belt clip , do not use
any glue to fix screws,otherwise, it will damage
the housing.
2. Take off the belt before disassembling the
battery.

Install external microphone
Install the microphone as picture shows,
Charging
The battery pack is not fully charger when finished,and please charge it before using.
The battery can not reach the normal capacity for the first time charging after purchasing or
storing it more than two months.However,it will return the normal capacity after charging and
discharging repeatedly 3-5 times.
10 Preparation for Using

11
Preparation for Using
Charging steps as below:
1. Insert the AC adaptor line to the charging hole of desk-top .
2. Connect the power with AC adaptor.
3. Put Li-ion battery or Radio with battery on the desk top.
As following pictures show .
P1 P2 P3
Note: 1.Please make sure the battery connect with the touching piece of the charging terminal.
2.Green light indicates power on or the battery is full.Red light indicates the charging just
beginning. Charge in power-off mode, the indicate red light is on, and it is off when finish charging.
3. Do not short-circuit the battery terminals or dispose of batteries in fire.
4.Do not disassemble the housing of the battery.
5. It will take 6 hours for full charge.

Menu Contents
1.Keypad Combination
Buttons( Silkprinting) Instruction Display
[MENU]+[0] Scrambler On/Off “S” Flashes
[MENU]+[1] DW On/Off DW
[MENU]+[2] BCLO On/Off BCLO
[MENU]+[3] Backlight On/Off LIGHT
[MENU]+[4] Key Tone On/Off KTONE
[MENU]+[5] APO On/Off APO
[MENU]+[6] Power Save On/Off S
[MENU]+[7] ANI On/Off ANI
[MENU]+[8] Power HIGH/LOW POWER
[MENU]+[9] PRI ON/OFF PRI
[MENU]+[#/MR] Scan Function SCAN
[UP]/[DOWN] Menu and Others
Press [MENU]More than 1s Key Lock
12 Menu Contents

Press [#/MR] More than 1s Channel Storing/FM Channel Storing
Press [*/BAND] More than 1s Main Frequency Switch A/B
Press [MENU] Enter MENU
Press [#/MR]On Switch working mode :VFO/Channel
Short Press [*/BAND] Quit
1.1 SCRM
When turn on this function ,the information has been encrypted .Only same setting radio can get
the information .If not ,others can not be done.
★Press [MENU],“Menu” display on the Screen ,next line would be blank .
★Press [0] , “SCRM” display on the Screen ,corresponding status would show next line :On or
Off. Each Operation action would change status.
★A/B set separately .It is useful under Channel Mode.
1.2 DW
Turn on DW ,Two Frequency would be shown on Screen(A/B). But only can transmit by
Frequency on the Main Screen.
★Press [MENU],“Menu”display on the Screen ,next line would be blank .
★Press [1] , “DW”display on the Screen ,corresponding status would show next line :On or
13
Menu Contents

Off. Each Operation action would change status.
★It is useful under Channel Mode.
1.3 BCLO Setting
BCLO can inhibit radios working when other Signal comes in, in case of stopping other
communication .
★Press [MENU],“Menu” display on the Screen ,next line would be blank .
★Press[2], “BCLO”display on the Screen ,corresponding status would show next line :On or
Off. Each Operation action would change status.
★A/B set separately .It is useful under Channel Mode.
1.4 Back light
After turning on the Light , it would keep. If this function is off ,press this button can show the
light ,but it would be off without any operation 5 seconds.
★Press [MENU],“Menu” display on the Screen ,next line would be blank .
★Press[3], “LIGHT”display on the Screen ,corresponding status would show next line :On or
Off. Each Operation action would change status.
★It is no use under Channel Mode.
1.5 KTONE
Turning on this function, you can bear the keytone every time you press the keypad . If
14 Menu Contents

turning off ,no voice prompts.
★Press [MENU],“Menu” display on the Screen ,next line would be blank .
★Press[4], “KTONE”display on the Screen ,corresponding status would show next line :On or
Off. Each Operation action would change status.
★It is no use under Channel Mode.
1.6 APO
Turning on APO ,if no conduction or any signal received for the radio ,it would be power off
automatically.
★Press [MENU],“Menu” display on the Screen ,next line would be blank .
★Press[5], “APO”display on the Screen ,corresponding status would show next line :On or
Off. Each Operation action would change status.
★It is no use under Channel Mode.
1.7 SAVE
Radio would enter into sleeping mode if no operations or any signal received within 12
seconds ,and checking receiving signals periodically when Power save turns on. If there is radio calling
on the channel,it would keep active status ,then back to sleeping mode. Power save can reduce the
battery cost effectively .
★Press [MENU],“Menu” display on the Screen ,next line would be blank .
15
Menu Contents

★Press[6], “SAVE”display on the Screen ,corresponding status would show next line :On or
Off. Each Operation action would change status.
★It is no use under Channel Mode.
1.8 ANI
The steps for setting ANI on /off:
★Press [MENU],“Menu” display on the Screen ,next line would be blank .
★Press[7], “SAVE”display on the Screen ,corresponding status would show next line :On or
Off. Each Operation action would change status.
★It is no use under Channel Mode.
1.9 HIGH/LOW POWER
This function is for the setting of transmitting power.
★Press [MENU],“Menu” display on the Screen ,next line would be blank .
★Press[8], “POWER”display on the Screen ,corresponding status would show next line :High
or Low. Each Operation action would change status.
★A/B set separately .It is no use under Channel Mode.
1.10 PRI
The steps for setting the PRI:
★Press [MENU],“Menu” display on the Screen ,next line would be blank .
16 Menu Contents

★Press[9], “PRI”display on the Screen ,status would show next line :On or Off. Each
Operation action would change status.
Turning on PRI ,supposed Priority Channel is 1 under Channel Mode,then scanning is
1-2-1-3-1-4…….
1.11 SCAN
Turn on this function to scan VFO and Channel:
★Press [MENU],“Menu” display on the Screen ,next line would be blank .
★Press [#/MR], “SCAN” would display on the screen, next line would be “ON”,that
means ,Scanning function is turning on .
★When scanning ,choose [UP]/[DOWN] to change scan direction, and then press other
buttons to exit.
When FM mode, Scanning function can be used to scan the frequency .Scanning would be
suspended when radios scanned .If need to quit scanning ,do the above again.
1.12 Keypad Lock
When turning on the Key Lock ,other buttons can not be used except the
[MENU]/[PTT]/[CALL] .Press [MENU] more than one second till display on screen ,then press
[MENU] more than 1 second till disappearing ,that means Key Unlock.
1.13 Memory Channel
17
Menu Contents

Storing the Channels under VFO mode:
★Under VFO Mode, Select frequency needed to store,then press [#/MR] more than 1 second,
“MEMORY”would display on the screen ,next line would be “01”.
★Press [UP]/[DOWN],you can store channels (01-09).Or type in two digits as the channel
number .
★Press [MENU] to store the channel and exit . If press [*/BAND] to exit and not stored.
★It is no use under channel mode,only can store channels under VFO mode.
1.14 Storing FM channels Under VFO mode
★Under FM Mode, Select frequency needed to store,then press [#/MR] more than 1 second,
“FM MEM”would display on the screen ,next line would be “01”.
★Press [UP]/[DOWN],you can store channels (01-16).Or type in two digits as the channel
number .
★Press [MENU] to store the channel and quit . If press [*/BAND] out of storing .
1.15 Main Frequency Exchange A/B
Press [*/BAND] for 1 second, switch two main frequency ,then select A/B for transmitting and
setting .
18 Menu Contents

19
Menu Contents
2.Menu Contents
Item Instruction Contents
01 “RX QT” Main Fre. RX QT
02 “TX QT” Main Fre. TX QT
03 “SQL” 0-9(Separately setting on A/B ,Corresponding setting)
04 “TOT” OFF/15--600S
05 “STEP” 5/6.25/10/12.5/20/25K(Separately setting on A/B,
Corresponding setting)
06 “WN” WIDE/NARROW(Separately setting on A/B,
Corresponding setting)
07 “OFFSET” 0.0MHz~69.9MHz(Separately setting on A/B,
Corresponding setting)
08 “SHIFT” 0/+/-
09 “SCAN M” TO/CO/SE
10 “VOX” OFF/1/2/3/4/5
11 “CALL” 01/CURRENT
12 “TX MODE” BUSY/MASTER
Table of contents
Other Zastone Radio manuals