5
Armaturen Zazzeri
Gebrauc stemperatur max 80°C empfo len 60° ± 5°C
Zufü rungsdruck min 0,5 bar max 3 bar kontinuirlich - 5 bar gelegentlich
Untersc ied des Drucks warm/kalt max1.5 bar empfo len die niedrigste
Im Falle von Druck über 5 bar, einen zentralisierten Druckminderer installieren.
Ratsc läge zur Installation
Vor dem Montieren einer Armatur, ist es immer notwendig, die Rohre durchzuspüle, besonders bei
neuen Anlagen. Die allgemeinen Degradierung des Trinkwassers beachtend, ist es immer empfeh-
lenswert, die Installation eines vorher zentralisierten Filters vorzunehmen oder alternativ unter dem
Waschbecken Eckventile mit Filter zu installieren. Die Installation von Filtern ist jedoc unver-
zic tbar für das Montieren von traditionellen Armaturen mit Keramikinnenteilen und
Ein andmisc er.
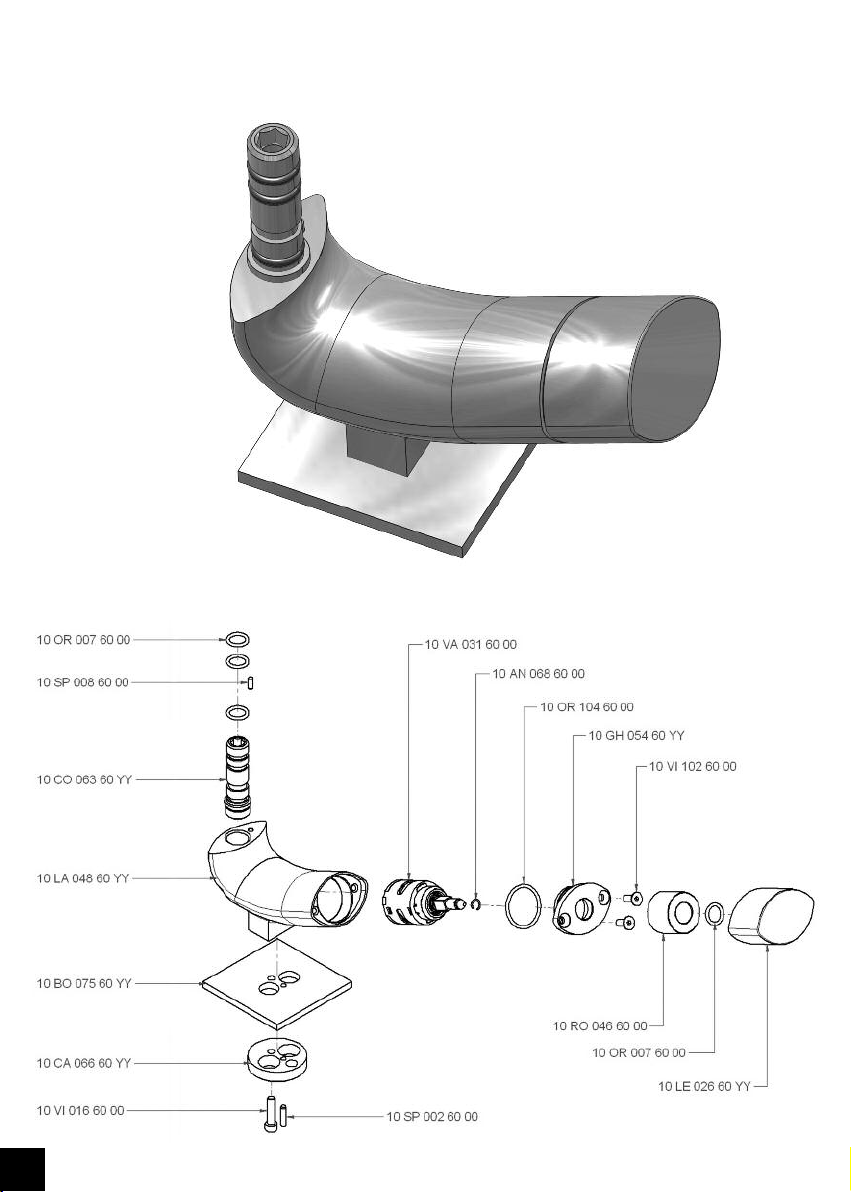
Montage Patrone
Das Gehäuse auf den Körper des Wasserhahnes muss sauber sein und es darf keine Schlacke,
Hobelspan oder Unreinheiten enthalten, besonders dort nicht, wo die Verzierungen angebracht
sind; Man sollte den Gebrauch von Fett, Öl, Farbe oder Verdünnungsmittel vermeiden. Die diame-
tralen O-Ringe mit Silikonneutralem Fett beschmieren. Das Schliesen der Zwinge muss frei statt-
finden können, aber ohne Spiele; die Zwinge muss sich auf die ganze Fläche der atrone aufleh-
nen. Mit einem aar von 10 ÷ 12 Nm abschliessen. Unnatürliche Übergewichte auf dem Hebel ver-
meiden ujnd zwar sowohl während des Benutzens, als auch während des Verpackens, des
Transports und der Installation.
Reinigung
Ein weic es Tuc ist ideal für die Reinigung der Wasser ä ne. In keinem Fall raue , ätzende oder
aggressive Substanzen benutzen.
C rom - Die chromierten Oberflächen sollten mit einem sanften Reinigungsmittel oder mit Wasser
und Seife gereinigt werden. Um Kalk zu entfernen, sollte man keine Reinigungsmittel benutzen, die
Mineralsäuren ( z.B. Chlorsäure ) oder aggressive organische Säurenz.B. Acidsäure), diese letzte-
ren falls nicht verdünnt, enthalten. Es wird das Benutzen von rodukten empfohlen, die auf der Basis
von Citriosäure hergestellt sind. Nach der Reinigung ist es wichtig, den Wasserhahn gut abzu-
spühlen und ihn sorgfältig abzutrocknen.