ZEN Cedar User manual

Cedar Hot Tub Assembly, Installation &
Maintenance Instructions
Introduction:
Thank you for selecting a Zen Bathworks tub! Your hot
tub will provide many years of soaking enjoyment. Even
if you purchased your tub factory pre-assembled, or are
hiring someone else to assemble it for you, please read
and understand these instructions as they contain many
relevant sections. Having an understanding of how your
tub went together and works is important, and will
increase your ability to maintain your hot tub properly. If
you are assembling your tub from a kit, assembly will be
easier if you follow the correct sequence of steps and use
the proper tools. Please take the time to read the
instructions completely and carefully.
How wooden tubs hold water: The tub is
assembled dry. When saturated with water the dry
wood will swell significantly. As the wood expands,
all the joints compress tightly allowing the tub to
hold water, provided it was assembled properly.
Special note: It is important to keep the tub floor and
staves (The staves are the vertical wood parts that make
up the sides of the tub) stored in a dry place until
assembly time . If the tub gets wet prior to assembly, the
wood may swell to a larger size making assembly much
more difficult and encumbering the sealing of the tub.
Figure 1.1: Left to Right: Cover, floor sections, staves,
retention bands, bench segments.
Section 1: Packing List
Locate the enclosed packing list to identify and confirm
that all items are included. A copy of the packing list is
inside the packaging. See Figure 1.1 to help identify the
major parts.
Section 2: Tools and Supplies Needed
A few basic tools and items are needed to complete the
assembly of your new tub. Gather what you will need
before you start.
Figure 2.1 tools required
✔
A large rubber mallet (handle the length of a normal
hammer, head the size of a soup can)
✔
Small tape measure
✔
Screw gun
✔
Torx® T25 bit for screw gun
✔
#2 Square drive bit for screw gun
✔
Carpenters’ level (2’ or longer)
✔
15/16” open end, deep socket, or adjustable wrench
✔
Vise Grip pliers, channel locks, or large crescent
wrench
✔
Caulking gun or squeeze tube of clear silicone
✔
Medium sized pipe wrench
✔
4” x 6” timbers for floor support - referred to as “chine
joists” in this manual
Section 3: Site Preparation
Before assembling your tub, prepare a suitable spot for it.
Hot tubs will weigh from 1500 to 8000 lbs. when full of
water - so a stable foundation is essential. Cedar tubs
should be installed outdoors. You must provide for good
drainage and a solid foundation .
Outdoor installation: Good drainage is vital so that
water from splashing, overflow, cleaning and draining
operations can be carried away from the site. If not,
debris will collect around the lower areas of your hot tub
causing wood deterioration over time. Remember, wood
lasts longest either fully submerged, or ventilated .
Prolonged dampness will cause wood rot over time and
should be avoided wherever possible.
1 of 16

There are four basic styles of foundation for your tub.
You may consider a concrete pad, a gravel pad, piers
made of concrete or treated wood, or a deck.
See Figures 3.3.1 through 3.4.2 for ideas.
3.1 A concrete pad forms an excellent base for your tub.
A properly poured 4” reinforced pad will be stable and
resistant to frost heave. Size the pad so that the sides are
at least as long as the diameter of the tub. Consider
making it larger to suit your needs for entry/exit, etc.
Example: For a tub 6’ in diameter, pour a pad that is at
least 6’ x 6’.
3.2 A gravel pad can be a simple foundation for a tub in
some cases. If the ground on the site is compact and
stable soil, sand, gravel or rock; a layer of pea gravel (or
coarse sand) on top can be used to establish a level
foundation for your tub. However, if the soil is unstable,
soft, duffy or muskeg, a gravel pad will settle unevenly
under the weight of the tub and is not a good choice. If
you choose a gravel pad, make it larger than the diameter
of the tub by about 3 feet. Example: For a 6’ tub, make
the pad 9’ in diameter. The thickness can vary depending
on how much gravel is needed to level the site. Typically,
2 to 4 inches is sufficient. Smooth with a rake and check
with a carpenter’s level. Compacting in layers with a plate
compactor is recommended.
3.3 Another alternative is to use adjustable concrete pier
blocks as a foundation. This type of pier block is
available at most home improvement stores and allows
you to adjust the level of the tub after it is in place. Piers
can be set into the ground to make a solid foundation for
the tub.
We recommend using chine joists (wood timbers), 4” x 6”
size and supporting each with two pier blocks. Refer to
section 4 for more info on chine joists. The bottom of the
piers must rest on stable soil as discussed in 3.2 above.
See Figure 3.3.
Figure 3.3 Pier block foundation
3.4 Another option is to install the tub on a deck. Be sure
that your deck has been designed to support the
weight of a full tub (1500 - 8000 lbs. depending on
the size of the tub). Have the deck inspected by a
qualified architect or building engineer prior to
proceeding. See Figures 3.4.1 and 3.4.2 for deck
installation.
Figure 3.4.1 Tub on top of deck, where the beauty of the
tub can be fully appreciated.
Figure 3.4.2 Tub fully recessed into deck. This hides all
the plumbing and makes tub entrance easy. Note the gap
around the tub; decking should have a 1”+ clearance and
should not be tight against the tub.
Figure 3.4.3 Tub with partial surround deck and stairs on
one side. This arrangement allows for much of the tub’s
beauty to be appreciated while still hiding the plumbing.
Note the gap around the tub; decking should have a 1”+
clearance and should not be tight against the tub.
2 of 16

IMPORTANT: If you choose to put a partial or full
surround deck next to your tub, build it with a 1”+
gap from the outside of the tub. There should be no
contact between the deck and your tub. As your
foundation settles and your chine joists and tub floor
compress under load, changes in any contact with the
deck can cause lateral stress on the tub staves which will
cause tub leaks. Also, a tight fit creates a place for debris
and moisture to be trapped against the tub and cause
decay. Finally, you need the gap for clearance for the
skirt on your hot tub cover, which centers your cover and
holds in heat. Remember to also make 4 reach-through
cutouts to hook your cover hold down bands.
Regardless of the type of foundation you choose, make
sure it is level before proceeding.
NOTE: During assembly, you will need about 3 feet of
space all around the tub for the tightening process. If
necessary, assemble the tub a few feet away from its final
position, then lift, slide or lower it into position (with
enough helpers)!
Section 4: Tub Supports - Chine Joists
Time needed: Approximately 40 minutes
Once your site is selected and the foundation is complete
you’re ready to begin working on the tub supports.
Important! Choose a dry day to assemble your tub. The
floor of your tub is supported by chine joists (not
included). The recommended dimension is 4” x 6”. Refer
to Figure 4.1 for the proper number and length of the
chine joists for your size tub.
Tub size, shape
# of joists
Joist max.
lengths (inches)
4’ circle
3
30, 43, 30
5’ circle
4
33, 48, 48, 33
6’ circle
4
34, 62, 62, 34
7’ circle
5
48, 72, 78, 72, 48
8’ circle
5
52, 78, 90, 78, 52
4’ ellipse
3
20, 40, 20
5’ ellipse
3
30, 52, 30
6’ ellipse
4
34, 62,62, 34
7’ ellipse
4
42, 72, 72, 42
8’ ellipse
4
48, 80, 80, 48
Figure 4.1 Chine joist specifications - Note: lengths are
approximate
The chine joists must be 4”x6” or larger (do not use
4x4s) . Pressure treated lumber is recommended because
it will not decay. The joists will be placed with the 6” side
vertical to get the full height. NOTE: We are using the
call-out dimensions here. As with all construction lumber,
actual finished dimensions are less (e.g. a 4x6 is actually
3-½” x 5-½”).
Prepare the chine joists by cutting them to the proper
length. REMEMBER: 4x6 chine joists will be placed on
edge so that the long side of the cross-section is vertical.
Consider adding a moisture barrier, such as tar paper, to
the bottom edges of the chine joists.
The tub floor will sit directly on the chine joists. This
allows air space under the tub and allows the drain
enough clearance to pass under the staves. The weight
of the tub must be borne on the floor of the tub which is
supported on the chine joists. The staves do not bear
the weight of the tub. Chine joists are NOT optional.
Warranty is void if a tub is improperly supported.
Figure 4.2 Level the chine joists
Once again: DO NOT SUPPORT THE WEIGHT OF
THE TUB ON THE BOTTOM OF THE STAVES.
The flat floor of the tub should be directly on the joists.
Use your level to get the joists level in all directions
(Figure 4.2.) Chine joists must run perpendicular (at
right angle to) the floor seam. Warranty is void if a tub
is improperly supported.
3 of 16

See Figure 4.3 for the proper position. Take care that the
joists do not interfere with the preferred position of the
floor drain. If necessary, move the chine joists slightly. It
is not necessary to glue or nail the chine joists in place.
NOTE: Chine joist spacings are about 16” - 24” apart.
Adjust as necessary. Note the optional 45°end cuts. They
allow for maximum surface contact.
Figure 4.3 Typical placement and orientation of chine
joists, drain, and floor seam. 6’ Round tub, as seen from
below.
Section 5: Drain & Floor Assembly
Time needed: approximately 20 minutes
Drain:
Install the floor drain and drain pipe at this time in the
recessed hole in one of the floor sections. The recess is
on the topside of the floor. Put a medium sized bead of
silicone around the corner of the recessed hole, and a
small amount on the threads of the drain (Figure 5.1.)
Press the drain in place with the rubber gasket on the top
side (inside the tub) and tighten the large nut underneath
hand tight. You may need to tap the drain down into place
with a mallet. It is a tight fit. Finish with 1/4 turn past
hand tight with a pipe wrench - do not over tighten! The
floor will swell thicker when filled. Next, thread the
adapter in place. Do not use teflon tape or hardening
sealant. Cement the provided 3” down pipe, 90° elbow,
and 14” drain pipe in place, OR change pipe lengths
and/or install any adapters or fittings you wish for a
custom installation. Use 1” schedule 40 PVC.
Figure 5.1 Drain assembly and silicone bead being
applied to the recessed hole.
Make sure the drain pipe is extending beyond the
perimeter of the tub for easy access. Install the rubber
drain plug inside the tub - press down by hand to achieve
a tight fit.
Tips:
1. You can attach a garden hose adapter fitting to the end
of the drain pipe so that a standard garden hose can be
used to direct the drained water to the desired location.
2. Or you can extend the plumbing with a 1” PVC coupler
and 1” pipe (either flexible or rigid). Use schedule 40.
If you follow the Zen Bathworks sanitation regimen,
water from your tub is safe for watering lawns or other
landscape plants.We do not recommend using it for plants
intended for human consumption.
Floor:
A 1/16” x 1” inch stainless steel spline has been inserted
into the slot on the edge of one half of the floor. Place a
thin 1/8” bead of silicone in the corner on the underside
of this spline in the corner against the wood. Insert the
two dowels in the pre-cut dowel holes below the spline.
The sole purpose of the spline and dowels is to keep the
floor sections aligned with each other.
Place the floor sections upon the chine joists with the
BEVEL SIDE DOWN, nicely sanded side up, so the floor
seam runs perpendicular to (right angle to) the chine
joists. Note: The bevel is the angled corner around the
perimeter of the floor.
4 of 16

Check that the drain is placed properly and that the joists
do not interfere with it. At this time consider the
placement of the benches as well - making sure that the
drain will not be underneath a bench where it will be hard
to access. See Figure 4.3 for the relationship between the
drain, benches and floor. Make adjustments now as
needed.
Be sure that the mating edges of the floor are clean and
free of debris. Make sure you have a consistent bead
(1/8” inch diameter) on the underside of the floor spline
before assembly.
Figure 5.2 Floor seam, dowels and silicone
Align the floor panels and use a mallet to tap them
together so spline and dowels line up and the seam is as
tight as possible. If you have access to a long enough
pipe clamp(s) you can use it to squeeze the panels
together. A small gap between the panels is acceptable
and will swell shut when water is introduced.
Use the two small pieces of scrap plywood provided as
temporary floor braces and lay them across the floor seam
several inches from each side of the tub. Temporarily
screw them directly to the top of the floor with the four
short screws provided. (Figure 5.3) This will keep the
center seam from opening up during assembly. They will
be removed in a later step after the tub is assembled.
Failure to use these braces will cause problems during
assembly. The small holes caused by the screws will
swell closed later, once the wood is wet.
Figure 5.3 Temporary floor braces
Now check that the floor is level and oriented as you want
it. Reminder: the floor seam needs to be
perpendicular to the chine joists. Also check that the
ends of the chine joists are at least 2 inches inside the
edge of the tub floor (inside of the bevel) so that they will
not interfere with the placement of staves.
Once the floor is level and stable, proceed to section 6.
Section 6: Staves
Time needed: approximately 45 minutes
The staves are the vertical wood parts that make up the
wall of the tub. Sort through the staves and separate out
the special staves (spare(s), suction ports, jet ports, light
port(if applicable)) and set them aside. We have numbered
the staves in a default layout. If you have a custom
layout in mind , now is the time to plan where you want
the staves with ports placed on your tub. With a pencil,
mark the rim of the floor where the suctions and jets will
work best in your installation. Otherwise you can skip this
and simply place them in the order we have labeled them.
Review the instructions for the type of heating system for
your tub for more details before continuing.
Your packing list shows the correct number of staves for
your tub. Count the staves now and make sure you have
the correct number. In some cases, we include a SPARE
stave, which is not to be used unless it is necessary to
replace one that is damaged. (Contact us first).
Next take note that your staves have been numbered on
the bottom ends and the floor has been marked to match.
Find stave #1 and its location on the floor. The dado
(groove cut across the inside of the stave) fits over the
edge of the floor. With the rubber mallet, give the stave a
light tap on the outside about 4 inches up from the
5 of 16

bottom, directly over the dado, until it just meets the
pencil line that has been scribed about 9/16” from the
edge of the top of the tub floor.
The stave should then stand on its own from the friction
of the tapered joint. The amount of force to use at this
point is moderate - just enough to get the stave to bite the
floor enough to stand on its own. Don’t worry - you’ll get
to hit them harder soon!
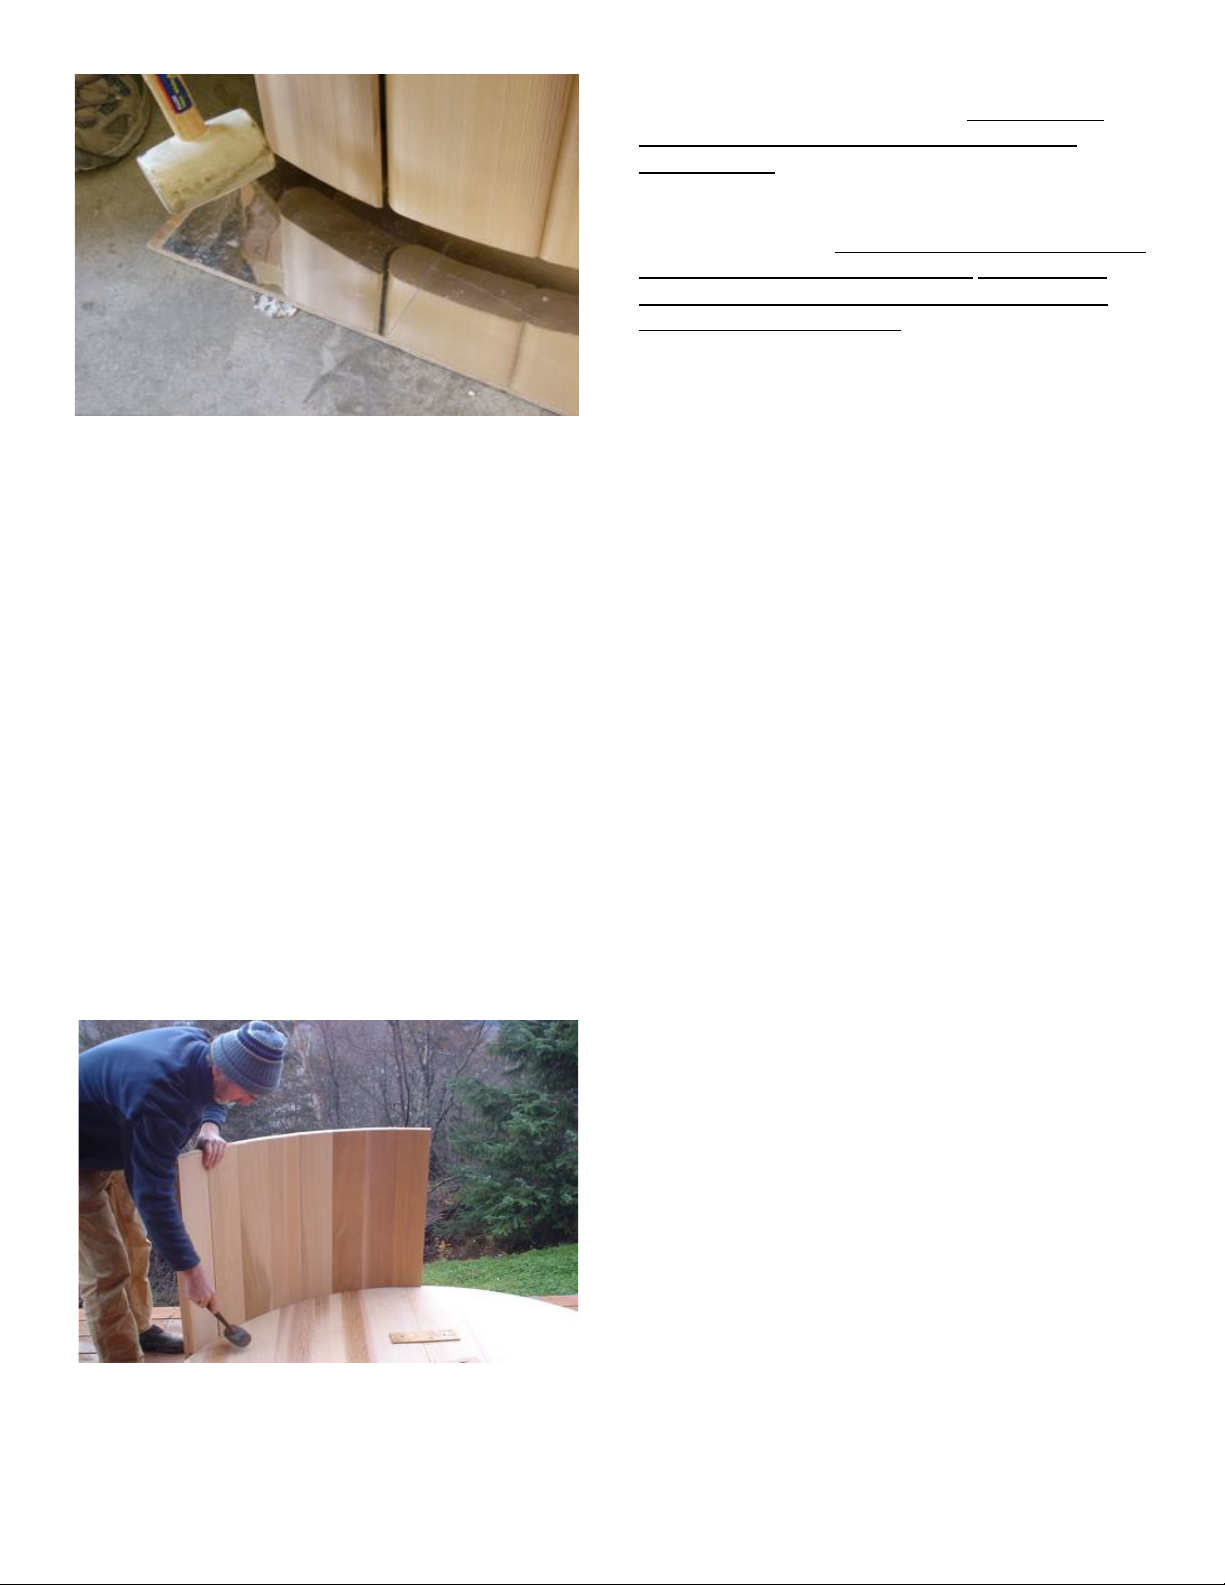
Figure 6.1 Floor seams should be straddled by staves to
ensure the tub will seal.
NOTE: 4’elliptical tub has one piece floor and no floor
seam, all others have either 1 or 2 seams.
AS YOU PROCEED - Check the edges of each stave
and remove any dirt or wood particles that could
interfere with a good seal.
VERY IMPORTANT! Use of the small mirror
included in the kit: A reflective mirror approximately 4”
x 10” is used to see what is happening on the bottom of
the staves. The mirror may have a protective plastic sheet
over the reflective surface – Peel this layer off. Place the
mirror on the ground directly under the staves you are
adding. Use it to observe how tight and consistent the
gap is between staves. Use the mirror and mallet to adjust
this gap to keep it tight and consistent as you proceed.
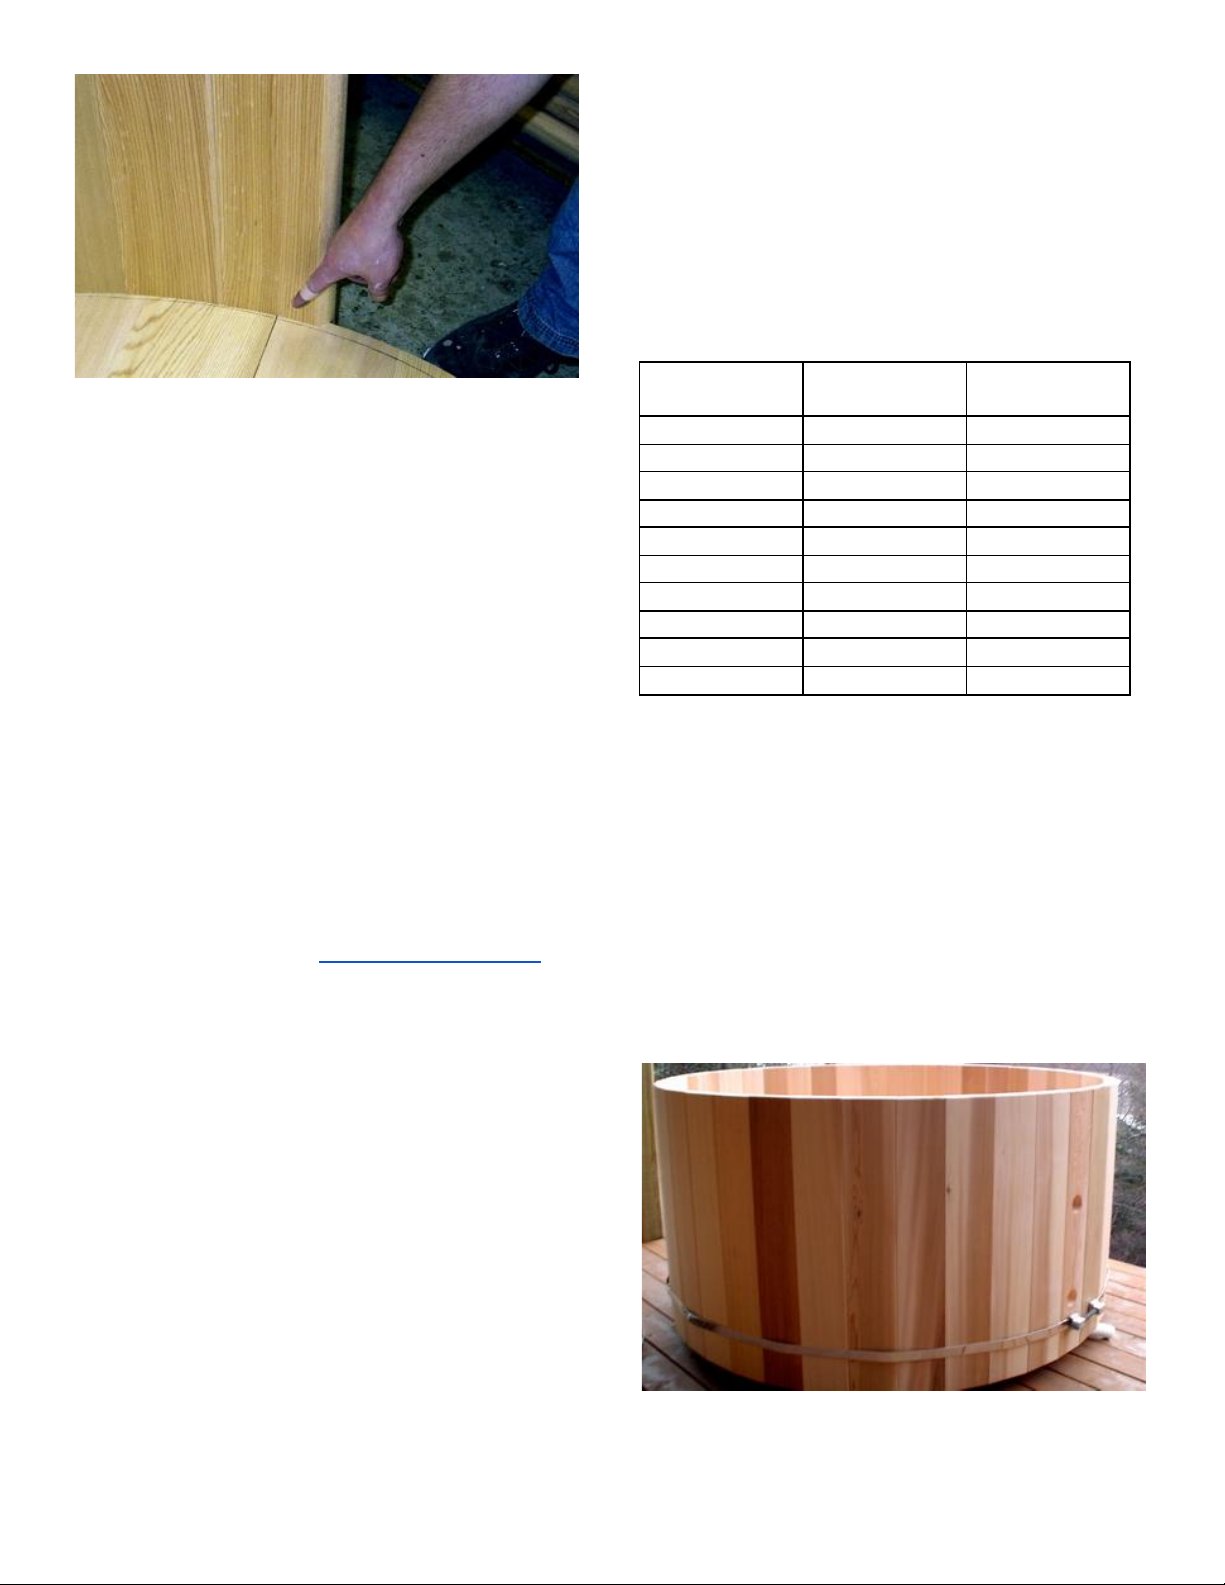
Now work aerial view clockwise (to your left) and add a
second stave next to the first. Proceed with stave #2 going
clockwise around the tub (from aerial view), and so on.
NOTE: Proceeding in a clockwise direction is important
as it allows you to tap on the bead edge (convex edge) of
the staves with the mallet and not the fragile cove edge
(concave edge).
We have arranged the suction and jet staves in a standard
layout that makes installing the plumbing and benches as
easy as possible and is based on keeping the span with
plumbing minimized while still allowing for effective
plumbing installation and use. If a different plumbing
layout is desired, you can certainly install the staves out
of order as necessary. Retaining the factory order of the
staves will minimize the slight differences in stave
heights, causing the rim to not be perfectly smooth.
However some slight differences will still be present.
Placing the staves out of order may slightly increase these
height differences. Either way, you may wish to sand the
top rim again after you have installed and tightened the
retention bands. However, this does not affect tub
function or longevity, but rather is a cosmetic option.
DO NOT put silicone between the staves. Use the mallet
to gently tap each new stave first sideways - mating the
convex “bead” edge (ball) and convex “cove” edge
(socket) - until snug with the first stave inside and out,
then tap it inward gently until it stays in place on its own.
Remember you should be working towards your left
(clockwise from aerial). This ensures you are placing
each new stave, cove edge first. Tap the staves only on
the bead edge, NOT the cove edge which is more fragile
and could be damaged by the mallet. Add the third stave
the same way - always snug them tight sideways first,
then inward. The best technique for introducing each new
stave somewhat resembles a door hinging. Leave them so
both edges line up with the line drawn near the edge of
the tub. After this, on every second stave for 4’ and 5’
tubs and on every third stave for 6’ - 8’ tubs, do your best
to put in a very small gap of about 1/32”. Make the others
tight against each other as best you can. This is an
important step so take your time. Use the mirror and your
tape measure to judge the gap.
There’s another helpful option you can consider using,
which is to use playing cards as shims. Slide them from
below between the staves and below the floor and place
them between every stave. If they still slide up and down
pretty easily with just very slight friction, this is pretty
close to the overall gapping you’re trying to achieve.
These will be removed after all staves are on and before
the stave tightening sequence is begun. NOTE: One card
between each stave may not be the perfect amount. When
you reach the end you will still have to assess and
possibly go back and space some staves a bit more (add 2
cards to some seams every so often) or a bit less (take
some cards out), depending on how it works out.
IMPORTANT: All presence or lack of gaps between
staves should be viewed and judged from the bottom
ends of the staves NOT the tops. The tops won’t come
into place until after retention band tightening. See
Figures 6.1.1 and 6.2
Continue in this fashion to work your way around the tub
adding staves.
6 of 16

Figure 6.1.1 Mirror allows you to see the bottom of the
staves. USE IT!
After each set of about five staves is added, go back and
ensure the previous staves aren’t bulging outward and still
appear properly gapped. If they have moved, use the
mallet to tap them back into place. Remember to use the
scribed pencil line near the edge of the floor to keep track
of how things are aligned. Also remember a small gap
(1/32”) every second or third stave is ideal. Use the mirror
to continually check for consistent stave seam gapping.
Until the staves are driven on tight, the circle which the
staves collectively form, is bigger than it will be at the
end, hence the gaps. Small and equally distributed gaps
around the perimeter of the tub will close tight as the
staves are later driven on. During that later process the
circle will shrink. If you put them all tight together now,
when you get to the last one you’ll have a “big gap”. “Big
gaps” (more than 1/16”) will not close as they should.
Instead the staves will bind as they are driven (wedged)
onto the floor tightly. Staves do not “scoot” sideways as
they’ve driven on.
Figure 6.2 Adjusting staves
Remember, a spot that needs special attention is the
opposite end(s) of the floor seam(s). You must avoid
having the floor seam line up directly with a seam
between staves. If you followed our numbering, we have
accounted for this already. If not, sort through the staves
and find a couple of narrower or wider staves to switch in
to solve the problem. If necessary, start over and shift the
first stave over to correct the problem. Arrange so the
floor seam and stave seam are a minimum of 3/4 inch
apart. This is very important! See Figure 6.3.
Keep an eye on the floor seam in the process of installing
staves. It should stay closed. If it spreads a bit - rap the
opposing sides of the floor with your mallet. Make sure
that the temporary plywood braces are in place and doing
their job.
Take your time and work your way around the tub adding
staves until you get back near the starting point. Stop
periodically to tap inward any staves that have loosened in
the process of adding others. Check the pencil reference
line to judge that you are putting the staves on the correct
amount. Again, continually use the mirror to check for
consistent gapping, ensuring no gaps are any larger
than 1/16” . The set of staves were custom cut to fit your
particular tub, so the last stave will fit right in if you have
been careful to place the staves in this way. Small tubs
need more gaps, large tubs need fewer. The total
cumulative gap with all staves at the 9/16” pencil line is
about ⅝”. So your goal is to distribute this amongst the
staves you have; insert however many 1/32” (ideal) to
1/16” (absolute maximum) gaps are required, spread out
equally around the tub. Place the remaining staves tight
together.
If the last stave seems a loose fit (more than 1/16” gap),
you will need to distribute that excess space (gap) around
the tub by adjusting the position of the staves. Use the
mirror and mallet to work the staves sideways so that the
excess is distributed among several small gaps of 1/32” to
1/16” or less. In other words, we want several tiny gaps
instead of one or two large ones. You may have to
backtrack, taking several staves off and starting again.
Remember, if the gaps are correct they will disappear
when the staves are driven inward and the tub is
tightened. If you have to go back and redistribute, you
may need to remove 4 or 5 staves at a time and then place
them back on, while adding more frequent gaps than
before.
7 of 16

Figure 6.3 Make sure that the floor seam(s) are straddled by
staves on both sides.
I f the last stave seems too big to fit , it probably means
the staves have been driven too far inward prematurely or
there is too much accumulated gap between the staves.
To resolve, close up any noticeable gaps between staves
to make more room. Do this by using the mallet on the
inside and your hand on the outside to tap the staves
sideways. Driving them inward only makes the circle
smaller and compounds the problem. Use your mirror to
find larger gaps and adjust as needed. It may seem
counter-intuitive, but loosen the staves by lightly tapping
out from inside first, then snug them together sideways to
close the excess gap. Check all around the tub with the
mirror and fix any problem areas. Now see if your last
stave fits in. Repeat if necessary. Your tub kit was
individually custom-fit in our shop and checked for
proper fit before shipment.
If this does not solve the problem, do not force things,
instead stop and email us at [email protected] or
give us a call for assistance 888-810-7717.
PRO TIP: At this point you can continue to retention band
placement (Section 7) or you can first apply the wood
finishing oil (Section 10). Choosing to apply finish now
will keep your stainless steel retention bands clean. This
may or may not matter to you. The choice is yours.
Section 7: Retention Bands Placement
Time needed: approximately 20 minutes
Once all the staves are in place then you are ready for the
bottom retention band.
But first, let us stress once again , if you aren’t
comfortable with your stave gaps, DO NOT force it and
just try it to see if it works. No gaps more than 1/16”!
Double check. Be sure. Don’t continue if it doesn’t seem
right. It’s much harder to fix later and can be the
difference in a tub that seals up quickly or a tub that has
persistent leaks for years. Take your time and get this part
right. You’ll thank yourself later.
Once you’re confident you’re ready, proceed as follows:
First, locate the stainless steel retention bands. They
supply the external support needed to keep the tub
compressed, directing the force of swelling to cause the
wood pieces to come together, instead of just outward.
Refer to the table below for the proper number of bands
for your tub.
Tub Shape,
Size
Tub Heights
# of bands
4’ Circle
29 36 42 48
2, 2, 3, 3
5’ Circle
29 36 42 48
2, 3, 3, 4
6’ Circle
29 36 42 48
3, 3, 4, 4
7’ Circle
29 36 42 48
3, 4, 5, 5
8’ Circle
29 36 42 48
4, 5, 5, 6
4’ Ellipse
29 36 42 48
2, 2, 3, 3
5’ Ellipse
29 36 42 48
2, 3, 3, 4
6’ Ellipse
29 36 42 48
3, 3, 4, 4
7’ Ellipse
29 36 42 48
3, 4, 4, 5
8’ Ellipse
29 36 42 48
4, 5, 5, 6
Locate the large 8” x 5/8” bolts for the clamps. Remove
the nuts. We strongly recommend putting a little
anti-seize, grease, etc. on the nut threads so they will not
corrode and seize in the future. With your helper, fit the
first band around the tub at 4.75 inches measured from the
bottom of the staves to the top of the retention band. This
measurement is crucial so that pressure is applied directly
over the floor’s edge. The fit may be tight, but you will be
able to pull the ends close enough to slip the bolt in place
and get the nut started. See Figure 7.1. Use your 15/16”
socket wrench to take up a little slack so the band will
stay in place - only a few turns.
Figure 7.1 first retention band loosely in place.
Now install the other bands and position as shown in
Figure 7.2. The position of each bolt clamp should be
8 of 16

staggered. Also, t he bolt clamp should straddle a seam
between staves.
Alternative band technique: Loosen bolt almost all the
way, but leave attached – maximizing the diameter. Two
or three people should be able to drop the band over the
top of the tub and into position.
The bottom band should always be at 4 3/4 inches from
the bottom, measured from the bottom of the stave to the
top of the band. Use your wrench to slightly tighten each
band enough so they hold their position. Go around the
tub with a tape measure and check the height of each
band in several places all around to make sure they are
level, moving them up or down as needed.
Figure 7.2 Proper placements of bands and bolts. Note
how bolts straddle a seam between staves and are
staggered.
Tub Height
# of
bands
Measurements from stave
bottoms (inches)
29
2
4.75, 24
29
3
4.75, 14, 24
29
4
4.75, 11, 17.5, 24
36
2
4.75, 30
36
3
4.75, 17.75, 30
36
4
4.75, 13, 21.5, 30
36
5
4.75, 11, 17, 23.5, 30
42
3
4.75, 20, 36
42
4
4.75, 15, 25, 36
42
5
4.75, 12, 20, 28, 36
48
3
4.75, 23.5, 42
48
4
4.75, 16.5, 28.5, 42
48
5
4.75, 14, 23.5, 32.5, 42
48
6
4.75, 12.25, 19.5, 27, 34.5, 42
Heights of retention bands measured from bottom of
stave to the top of the band.
Section 8: Retention Bands Tightening
Time needed: approximately 30 minutes
This step is best done with two people, however it can be
done with one.
VERY VERY Important. Look under the tub rim (with
mirror) and confirm again that any gaps between staves
are still evenly distributed around the circumference of
the tub. Gaps larger than 1/16 inch should be addressed.
The goal at this point is to have any gaps between the
bottom of staves be no more than 1/16” AND distributed
evenly around the tub circumference. NOT all in one
section. If necessary, use your mallet to strike the staves
from the INSIDE OUT using a glancing blow to adjust
the gaps around the perimeter of the tub to achieve this
even distribution.
Now you can tighten each band a little at a time, starting
with the bottom one. Tighten the staves incrementally in
stages - bottom first, then upper(s); this will be repeated
several times. One person will be tightening the bolt
clamp as the other person uses the rubber mallet and starts
on the side opposite the bolts, rapping each stave with
moderate force on the lower band where the staves and
floor join, driving them inward. Constantly monitor with
the mirror to confirm that the joints are getting tight.
Always start opposite the bolts and do one half of the tub,
then the other. Have your helper take up the slack in the
bands by tightening the bolts as you do this. The staves
should be driven on slowly. The object is to set the staves
evenly around the tub. Each stave will be rapped upon
multiple times. Don’t try to drive each one fully in one
session. Work from the opposite side toward the bolts in
one direction, then from the opposite side toward the bolts
in the other direction. In this way the tub is tightened
evenly.
Work around the tub, hitting each stave with a firm rap
right on the bottom band. You will see each stave seat a
little tighter. After one round of tightening the bottom
band, stop and take up slack in the upper band(s) so they
stay in position. Note: do not over tighten the upper
bands; they do not require as much tension as the
bottom one, especially at this time. Just enough to
keep them from slipping downward.
9 of 16

Figure 8.1 Hitting staves directly on the band.
Double-check the vertical placement of the bands now
before things get too tight. It is easier to move the bands
now. Use a tape measure to readjust the bands so they are
placed as shown in Figure 7-2 and the table of band
heights. Step back and make sure that the bands look
level. Adjust as needed.
Now do another round of rapping with the mallet while
tightening the bottom bolt. Use the mirror continuously
to monitor any gaps as you go. This time, hit each stave a
little harder - a good full swing on each one as your
helper tightens the bolts. Alternate tightening each band
a little bit, so that you can keep some tension on the upper
bands so they stay in position.
Figure 8.2 Using a wrench or pliers to hold the blocks
straight as you tighten the bolt.
Turn your attention to the tops of the staves. They should
be lined up nicely giving a smooth interior. If any need
alignment, use the mallet to hit them inward or outward to
bring them into adjustment. Just light taps. You’ll likely
hear them pop into place. Do another revolution of hitting
each stave a little harder now as the bottom band is
tightened. Don’t be afraid to hit pretty hard. Continue
tightening with a wrench. At this point using the mirror,
any gaps should be virtually gone. If not, stop, back up a
few steps – loosen the bands a bit and distribute the gap
as described earlier.
Now do a final tightening - but don’t overdo it. The
bottom band is pressing against the floor on the inside, so
it will reach a point where you can tell it is very tight -
don’t force it beyond that. Use a wrench or pliers to
prevent the aluminum block that the bolt passes through
from twisting as you do the final tightening. Stop when
further tightening becomes significantly more difficult and
you see noticeable deflection of the aluminum blocks.
This indicates the bottom band is tight enough. As you
tighten the upper bands check the staves from the top end
and make sure their bead to cove interfaces are all well
aligned. Lightly bumping it with your hand can release
tension if they aren’t. The upper bands don’t need to be
quite as tight as the bottom, but still quite snug. If they
feel tight, they are. Do a final adjustment on the top of the
staves at this time. Remember - the wood will swell to
tighten all joints further once water is introduced.
TIP: If you have a torque wrench – the bottom band
should be tightened to about 40 foot lbs. of torque
(similar to a lug nut on a vehicle), the next band up
should be at about 30 foot lbs. the upper ones to a lesser
amount - about 25 foot lbs. of torque. However sometimes
the bolt is too long for even a deep socket. Don’t sweat it.
A torque wrench is optional. Use the preceding
explanations to understand how tight to make things.
Next climb inside the tub and remove the temporary floor
braces.
Your tub is now ready for installation of the heating
system and any other accessories.
Section 9: System Components &
Accessories
Install any accessories in this order :
1. Spa Control System - see separate instructions for
your type of system.
2. Benches - see below
3. Topside Controller Mount
4. Tub Access Steps - see below
5. Tub Cover - see below
Benches:
The bench system is simple. These instructions are
specifically for circular tubs.
NOTE: The elliptical tub benches fit at the end(s), and the
larger ellipse tubs (6 or 7 foot) have one or two additional
side benches, respectively.
Each bench is one section of the circle. See the table
below for the arrangement of benches for your size tub.
10 of 16

Tub Diameter
(feet)
Number of
benches
Bench
arrangement
4 round
1
One end
5 - 8 round
3
Full circle
4 ellipse
1
One end
5 ellipse
2
Opposite ends
6 ellipse
3
Opposite ends,
one side
7 & 8 ellipse
4
Opposite ends,
two sides
Figure 9.2 Aligning and attaching bench blocks – DO
NOT drive a screw into a seam between staves! This will
cause a leak.
A bench is typically held in place with four blocks, which
act as legs, which are screwed directly to the inside of the
staves with the included 3” stainless screws. The bench is
then screwed down to the top of those four blocks with 3”
deck screws. Place the benches in the tub on the floor.
Adjust them to the orientation you desire. Consider
placing the benches so the drain is accessible. Then set
the blocks on top of the benches to gauge where they will
be later after the benches are above and the blocks below.
This just makes it easier to see your alignment with gaps
in the benches (for vertical screws) and the stave seams
(for horizontal screws). The vertical screws will go down
through the bench braces (underside frame pieces),
between the seating surface boards, into the top of the
blocks. Don’t forget to adjust as necessary to eliminate
any screw to stave seam interferences. Then lightly mark
with a pencil where your bench blocks will go. See Figure
4.3 for typical orientation of benches and drain. See
Figure 9.2 for the installation of bench blocks.
Once the proper location for all blocks is determined,
remove the benches; attach bench blocks to the side of the
tub with 3” screws. IMPORTANT: Do not drive a
screw into the seam between two staves! This will
cause a leak.
Consider using packaging foam or cardboard to protect
the floor of the tub if you decide to enter the tub for this
step.
Finally attach the benches to the blocks by placing the
bench segments on top of the bench blocks, apply
downward pressure and then drive the 3” screws between
the bench boards, through the braces, and into the top of
the bench blocks. See Figures 9.3 and 9.4.
Figure 9.3 Attach benches to bench blocks with 3” stainless
screws between the bench boards, through the braces, and into
the tops of the bench blocks
Figure 9.4 Benches installed
Tub Access Steps:
If you purchased steps from us, they are intended to be
placed next to the tub and should be held in place with
two stainless screws. Drive the screws through the steps
and right into the side of the tub to provide stability.
Alternatively, you can build a set of steps that work best
for your site design.
Cover:
The vinyl and foam cover is the main insulation for your
tub. It should provide years of good service. Avoid
punctures or tears, which could allow water to get inside
the cover. If you live in a high wind area, you will need
to secure the cover so it doesn’t blow off. This can be
11 of 16

done by using the attached hold-down bands or by other
means. To use the hold-down bands, let each hang down
along the outside of the tub. Use a pencil and mark the
bottom of each buckle on the side of the tub. Next
separate the buckle (two parts) and screw the bottom part
to the side of the tub at your mark with small (3/4”)
screws (included).
Cover security: Included with the cover is a small plastic
“key” that can be used to lock the band buckles to help
ensure they don’t come apart on their own.
Please note that this is not intended to prevent someone
from getting in the tub. To prevent children or others
from getting in the tub you will need to install the tub in a
secure area, such as a secure fenced in area.
Section 10: Finishing the Exterior of your
Tub
We highly recommend that you protect your tub from
the long-term effects of sun, wind and weather, by
regularly applying oil to the exterior and top rim of the
tub. This will preserve the beauty of cedar. You can
prolong the beautiful color of the tub by treating the
outside and rim only (never the inside) with a coat of teak
oil.
We recommend a product used on the decks of wood
boats called Daly’s Seafin Teak Oil. Teak oil can be found
at a general hardware store, marine supply shop, etc. An
alternative is a 50:50 mixture of mineral oil and
turpentine or mineral spirits. Mineral oil is readily
available in drug and grocery stores. Apply when the tub
is dry with a brush, roller, or rag and allow to soak in. Do
this often to maintain the beauty of the cedar, especially at
first. The best regimen is to apply as much as the tub will
absorb once or twice during installation, and then another
time within a month or two. After that twice annually, or
as required is recommended. Over-oiling is not a risk to
be concerned with. Take care not to get any oil inside the
tub.
Finally, apply a generous coat of plain soft furniture wax
to the top rim (end grain) of the tub. This will act to seal
the exposed end grain on the staves – and prolong the life
of the tub. Repeat the wax treatment on the end grain
similarly to the teak oil schedule. Often at first.
Note: There’s no harm in over-oiling or over-waxing.
If the wood doesn’t look slick and shiny, don’t hesitate
to oil and wax more.
Oiling and waxing the tub is particularly important in
dry and sunny climates.
Section 11: Adding Water
A new wooden tub is like a new wooden boat. It will leak
until the wood swells so be prepared for a few leaks at
first. These will slow and stop as the wood swells. Some
tubs will hold water quickly while others may take much
longer (especially if the fundamental elements of the tub
assembly were not performed well). Your tub will
continue to swell and tighten for several days.
Once your tub is completely assembled, with the heater
plumbed and the benches installed, you can begin the
process of adding water. Here’s how:
First, install the rubber stopper in the drain plug, press
down evenly, hand tight.
Use a garden hose to begin filling the tub. If the tub was
put together correctly you will almost immediately have a
few dripping leaks. Sometimes there will be no leaks.
Sometimes two or three small running leaks. If your tub
has leaks more significant than this, you probably had
over-sized stave gaps. Stop filling and check your stave
gaps again. If you don’t see any gaps on the bottoms of
the staves, proceed.
Be very patient , and stay the course. Fill the tub to about
1” below the rim. Don’t try to tighten the retention
bands or hit the staves with the mallet when the tub is
full of water. The leak rate will slow over time. Check it
as needed and add water if needed. Most of the sealing
will happen in the first 48 hours of the tub being kept full.
You should only have two or three slow drip leaks at the
end of 2 days, perhaps less. The swelling process
continues for at least two weeks . There’s no need to be
concerned about two or three small drips during this time
period.
Warm water accelerates the swelling of wood. If you
have access to fill the tub with warm or hot water, don’t
hesitate to do so. Also, if the tub is holding water well but
you have a few persistent leaks, and your heater is set up,
12 of 16

you can heat the tub and that will help swell the wood
tighter.
Remember the swelling process continues for about two
weeks . Give it time.
This is a good time to check all your plumbing and
heating connections for leaks. Tighten or repair as
needed. Double check that the drain plug is in place and
not leaking.
After two weeks or more, if you still have slow dripping
leaks (which are unlikely), included with your tub is a
bag of fine cedar sawdust (aka “cedar flour” for its
flour-like consistency). It can be used to seal the tub:
Important: remove the filter from the filter cartridge
during this procedure, otherwise it will clog.
Add a cup (smaller tubs) or two (bigger tubs) of fine
sawdust to the water or to the floor of an empty tub before
filling. Then wait two days with the tub heated before
putting the filter back in. The wood flour will be naturally
drawn to places where the water is seeping out and will
help to stop or slow stubborn leaks. The sawdust is
harmless and the excess will be flushed out the first time
you drain and rinse the tub (don’t do this for at least a
week after adding). Note: It may take more than one
treatment to slow or fix the leak, but this method works in
almost every case.
If you still have any leaks after these processes and time
periods, something is wrong. Contact us for help. In order
to best serve you, please email us a video showing us the
full set up of your tub and system and showing us your
leak location(s) and pace(s). Another great option is to
schedule a video call appointment with us to show us in
real-time.
Tea-colored water: The natural oils and tannins in woods
(especially red cedar) will cause the water to turn
tea-colored when the tub is new. This is normal and
harmless, even health beneficial, in fact. Also, the aroma
of cedar is due to these oils. Change the water frequently
(weekly or biweekly) at first to help clarify the water. This
effect will diminish slowly with time. Once this is
complete it will be crystal clear. It will likely take a few
months. Another option to assist in this is to use a clarifier
product such as Leisure Time Bright and Clear®.
Section 12: Water Sanitation Instructions
It is important to keep the water clean. Failure to do so
can cause growth of bacteria and possible skin irritation.
Some people prefer not to use chemicals and simply
change the water frequently - cleaning the tub between
heavy uses.
As you care for your hot tub, keep in mind that a hot tub
is not merely a small pool. Due to high water temperature
and small amount of water, 4 people in a tub is
equivalent to 300 people in a backyard pool. For this
reason, it is important to properly sanitize your tub.
Keeping the water clean and safe involves three things –
your filter, the ozone system, and the included chemicals.
1. Fill the tub with fresh water.
2. Important! Test water to get pH in the 7.2 to 7.6
range (7.4 - 7.5 is ideal.)
3. Ozone system: If your tub has an ozone system, adjust
it according to the specific instructions included with your
heating system. Ozone is added to the water only when
the water pump is running.
4. Shock the tub water twice per week with two
tablespoons of fast dissolving granulated chlorine
(typically called “Spa 56”) supplied with your tub. Do
NOT USE a different type of chlorine, such as a
non-dissolving continuous use type – the supplied product
is formulated for wooden tubs. Other types of chlorine
can do damage.
Other Important Water Sanitation and Safety
Information:
● Never heat your tub water above 104 degrees -
higher temperatures can cause health problems.
● Always shower before using the tub.
● Always read the label instructions prior to using a
product and use only as directed.
● Never add chemicals when people are in the tub.
The best time is right after using the tub prior to a
long duration of un-use.
● Store chemicals in a cool dry location out of
direct sunlight.
13 of 16

● We recommend that you change tub water every 4
to 8 weeks.
Section 13: Tub Safety
Your tub will give many years of enjoyment. Please note
the following general safety points:
1. Tub safety is your responsibility.
2. Never allow unsupervised children to use your
tub. Be sure that a responsible adult is in control at all
times. IT IS YOUR RESPONSIBILITY TO
PREVENT ACCIDENTAL DROWNING.
3. Hot tubs are for sitting in only. Do not allow
diving or horseplay.
4. Children should use the tub at lower
temperatures than adults, typically no more that 100
degrees. Consult your physician for advice on hot
tubbing for children.
5. Pregnant women, people with heart
conditions, high blood pressure or other health
conditions must always consult with a physician before
using a hot tub.
6. Consult your physician about their
recommendations regarding your ability to soak and
at what temperature. Never soak in water warmer
than 104 degrees Fahrenheit.
7. To avoid risk of accidental drowning, never
allow hot tubbing alone.
8. Do not consume alcohol in excess while hot
tubbing.
9. It is important to keep the water in your tub
clean by changing the water, replacing the filter,
maintaining the sanitizer system, cleaning the tub, and
using disinfecting and sanitizing chemicals. Skin
irritation is a sign of bacteria in the water. See the
instructions on water quality. If you need to reorder
supplies, they are widely available online and at pool and
spa stores.
Section 14: Tub Maintenance
Your tub should last for many years with a little
maintenance. Here are a few recommendations.
Keep the tub filled whenever possible. Remember that a
wooden tub is a dynamic object and the wood will swell
and shrink with exposure to water or lack of it. Like a
wooden boat, it will seep water at first, then swell shut.
Leaving the tub empty for a few days for maintenance or
cleaning is normal and fine. (keep the cover in place when
possible to minimize drying).
Leaving the tub unused for extended periods of time . If
you need to leave the tub unused while on vacation or for
other reasons, that is ok. The tub will not be permanently
damaged by drying out, but will have to swell again to
hold water. Drain the tub and the heating system
including any filters or pumps in the system. Secure the
cover on the tub and wrap the tub with a tarp to protect it
and prevent excessive drying.
Avoid leaving the tub dry for extended periods . It is fine
to leave the tub empty for several days for maintenance.
In general, you want to keep the tub wet as much as
possible. This keeps the wood from drying out, shrinking
and opening up the seams. If you need to drain the tub in
cold weather or when you are away for an extended
period, leave 1 - 2 inches of water in the bottom so the
floor seam and floor to stave perimeter seam will not dry
out. If the 1 - 2 inches of water freezes solid, it will not
cause any damage provided there’s no water in the
plumbing system.
Make sure the water level is low enough so water doesn’t
enter the plumbing through the suction ports.
If the tub does dry out during vacation or winter closure :
While empty, check to see if the retention bands can be
tightened up a bit. Tighten the bottom band first, then the
upper ones. Do not over tighten the upper bands - they do
not get tightened as much as the bottom one. NEVER
tighten the bands when the tub is full of water! Then add
water slowly and allow the tub to swell.
See the Retention Bands Tightening and Adding Water
sections.
Freezing . Never let the tub freeze solid when full of
water!!!! Since water expands when frozen, this will put
enormous strain on the bottom, sides, hardware, plumbing
and heating system. If you are going to be away during
freezing weather, or you want to shut your tub down
during a cold snap, or for the entire winter, follow these
steps:
1. Drain the tub leaving 1 - 2 inches in the
bottom. This small amount of water will not
cause freeze damage and will keep the floor seam
tight. be sure the water is low enough to not enter
the plumbing system through the suction ports.
The next step will see to this.
14 of 16

2. Drain ALL parts of the heating system. This
includes pump, filter, heater and pipes. Open the
plumbing at union connections closest to the
lowest point in the plumbing to help with this.
3. If practical, disconnect and store the heating
system in a warm dry place.
Preserving the beauty of cedar. Re-apply wood oil (e.g.
teak oil) to the exterior and rim and furniture wax to the
rim as per the “Finishing the Exterior of your Tub”
section in this manual.
Section 15: Tub Troubleshooting
If your tub develops a significant leak. Follow these
steps in order. If the first one doesn’t work, go on to the
second and so on.
1. If your tub develops a leak (not just a drip) that it
didn’t have before, something has changed. Do some
investigation to discover the cause. The most common
causes are the tub was not assembled and installed
properly. Review this manual and check that the tub was
installed and assembled properly.
Another common cause is the tub has dried out after
being empty for a period of time. If this is the case, follow
the tub swelling process found in the “Adding Water”
section of this manual.
If these aren’t the causes it is most likely that the tub
foundation has settled causing the tub to have an uneven
base or the tub wall to press into something nearby.
2. If the tub has dried out from being left empty, check
the retention bands for tightness. If the wood has dried
enough to show signs of shrinkage, it is a good idea to
take up the slack with the tightening bolts. NEVER
tighten the bands when the tub is full of water! Tighten
the retention bands according to the “Retention Bands
Tightening” section of this manual.
3. Check the floor of the tub with a level and inspect the
foundation and chine joists under the tub. If the
foundation is uneven, the tub will need to be drained and
moved, and the foundation problem fixed.
4. Once more substantial problems have been ruled out
and if the tub has been full of water for at least two
consecutive weeks, persisting leaks (drips, not runs) can
be solved by flour-consistency wood sawdust. It is a
simple and effective way to stop leaks. This is a
technique borrowed from wooden boat builders. The
wood dust will find its way into the leak because of the
water movement, and help to stop the leak.
Included with your tub was a small bag of fine wood
sawdust. If you can’t find it or need more, you may be
able to find some locally at a woodshop or we can send
some to you. It doesn’t have to be cedar, but it does have
to be flour-like consistency; very fine.
Important: remove the filter from the filter cartridge
during this procedure, otherwise it will clog.
Add a cup or two of fine sawdust to the water, or if the tub
is empty, spread it around the bottom corner all around
the tub and then fill with water.. The wood flour will be
naturally drawn to places where the water is seeping out
and will help to stop or slow stubborn leaks. The sawdust
is harmless and the excess will be flushed out the first
time you drain and rinse the tub. Note: It may take more
than one treatment to slow or fix the leak, but this method
works in almost every case. Give it time , a week per
treatment, and if necessary 2 or 3 treatments.
5. If the above solutions have not worked, drain the tub
and allow the inside to dry for a few hours. Apply a small
amount of silicone to the leaking area on the inside of the
tub, and around the inside corner where the floor meets
the sides. The surface of the wood must be dry for the
silicone to adhere.
For troubleshooting information related to the hot tub
system, please see the manual(s) specific to that
equipment which was provided.
15 of 16

Section 16: Warranty Information
Your tub has a limited warranty for two years against defects in material and workmanship. This warranty excludes
damage caused by errors in assembly, installation, or maintenance, normal wear and tear, or modifications made to the tub.
The cover has a manufacturers’ limited warranty of four years.
Heating and pump equipment has a limited warranty of one year.
The warranties, when valid, will only cover replacement parts and materials. Under no circumstances will Zen Bathworks
be held liable for any cost of labor or damage.
Section 17: Parts & Supplies:
The photos below are to help you identify your tub parts not depicted above. See system manuals for those parts
and components.
Cedar Flour
Temporary Floor Brace
Bench Blocks
(long for 42” tubs
short for 36”)
Mirror for seeing bottom of
staves during assembly
Floor Drain Assembly
16 of 16
Other manuals for Cedar
1
Table of contents
Other ZEN Hot Tub manuals
Popular Hot Tub manuals by other brands

Iberspa
Iberspa Hotel Spa manual

Aquatic
Aquatic HOTSOAK 84 AI7236SVHS Specification sheet

HOT TUBS
HOT TUBS Muskoka user manual

treesse
treesse minipool Quarz Operating and maintenance manual

Whitehall
Whitehall E-27-S Instructions for operation and care

VANITY PLANET
VANITY PLANET ULTIMATE SKIN SPA Instruction manuals

LMS
LMS AM-628TS Pre-Delivery Guide

American Standard
American Standard CADENZA ELITE 6060E SERIES installation instructions

Image
Image renew 455 831.104550 user manual

infinite spa
infinite spa CHAMPION 6 places operating manual

Polhus
Polhus Polar Tub Royal Assembly

Master Spas
Master Spas INT EVO COMPACT owner's manual