Zenisu Keisoku ZS-6228-8N Series User manual

-
1
-
ZS-6228-8N Series
USB-Photocoupler Adapter
User’s Manual
Zip code: 183- 27
2-13-37, Hinmachi, Fuchu, Tokyo, Japan
TEL: +81-( )42-368-2126
FAX: +81-( )42-364- 67

-
2
-
◆ Table of Contents
◆
1.Outline ..................................................................................................................................... 3
2.Specification ............................................................................................................................ 3
2.1.Operation environment .................................................................................................... 3
2.2.USB ................................................................................................................................... 3
2.3.Product specification ......................................................................................................... 4
2.4.Photocoupler ..................................................................................................................... 4
2.5.Appearance ........................................................................................................................ 4
3.Install ....................................................................................................................................... 5
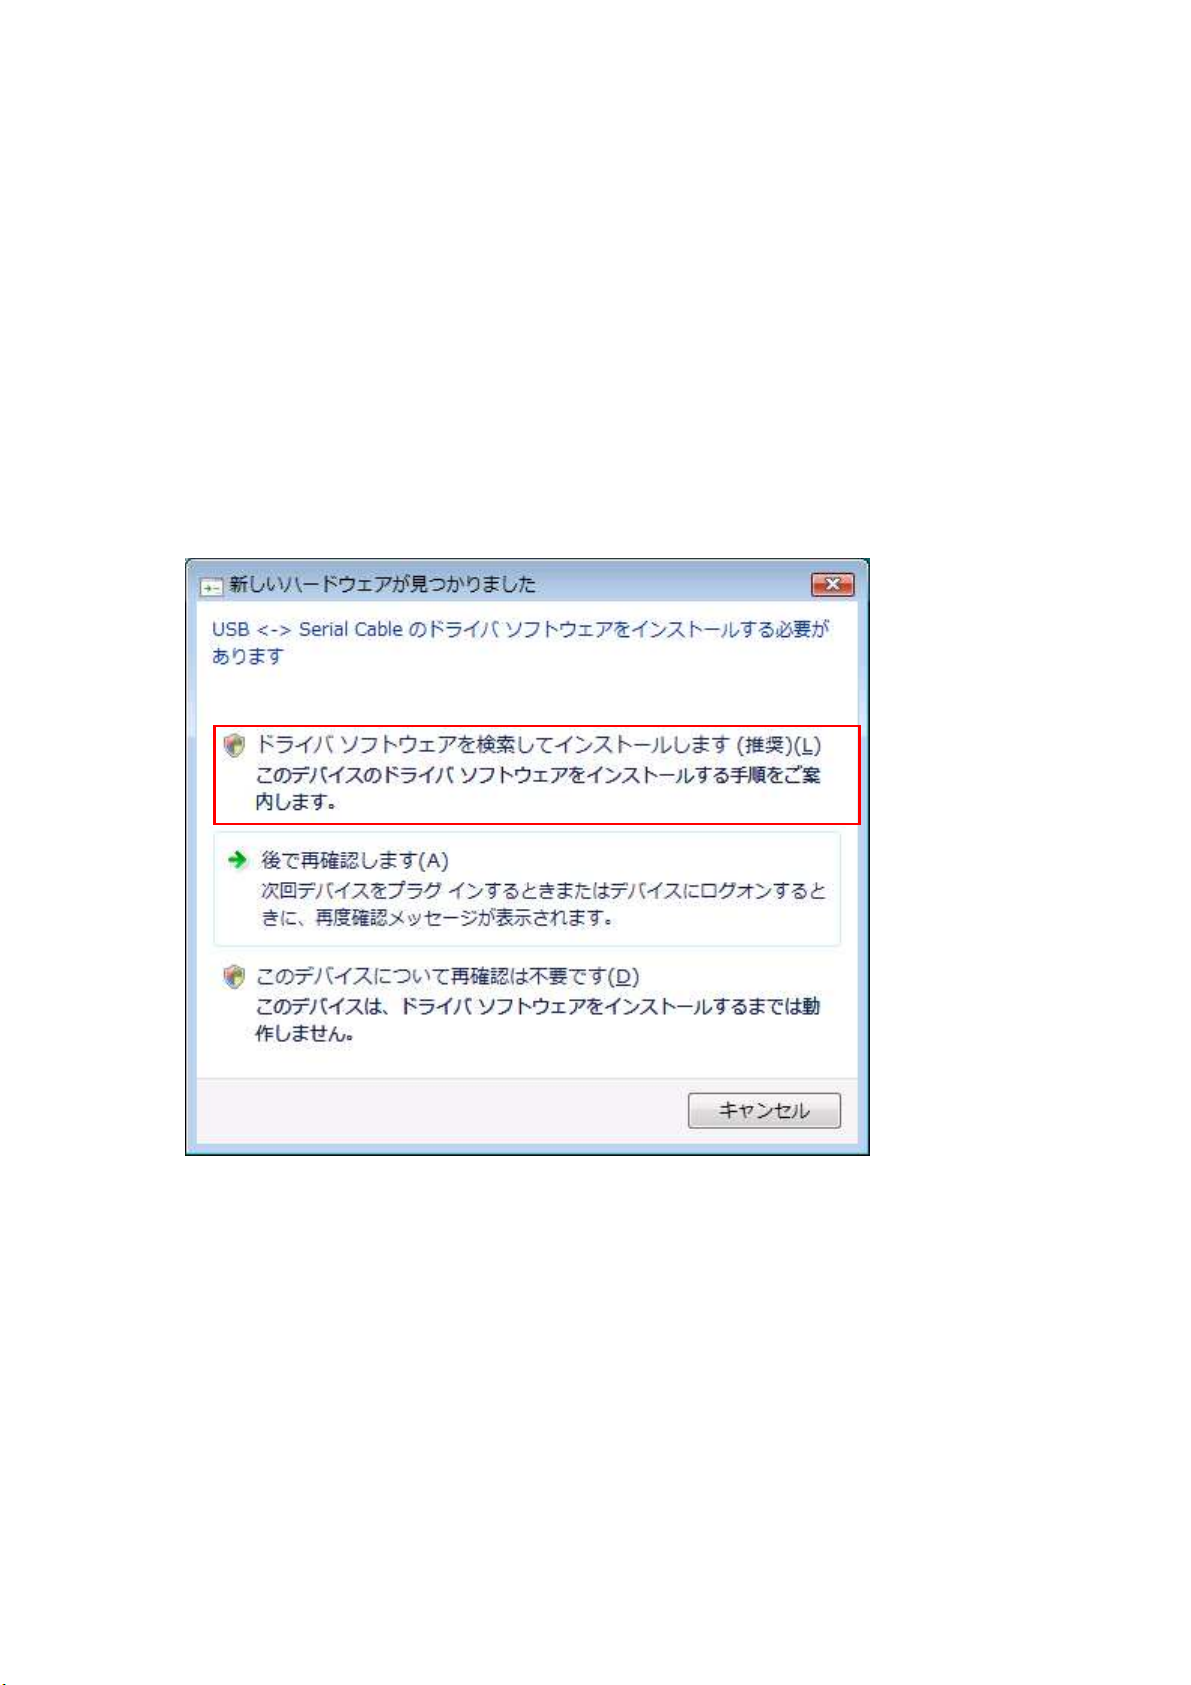
3.1.Windows Vista / 7 .............................................................................................................. 5
3.2.Windows XP/2 ........................................................................................................... 11
4.Operation ............................................................................................................................... 18
4.1.Preparation ..................................................................................................................... 18
4.2.Function .......................................................................................................................... 18
4.2.1. FT_Open .................................................................................................................. 18
4.2.2. FT_OpenEx .............................................................................................................. 18
4.2.3. FT_Close .................................................................................................................. 19
4.2.4. FT_SetBitMode ....................................................................................................... 19
4.2.5. FT_SetBaudRate ..................................................................................................... 19
4.2.6. FT_GetBitMode ....................................................................................................... 2
5.Connector ............................................................................................................................... 21
6.Warranty………………………………………………………………………………………...…….22

-
3
-
1.Outline
ZS-6228-8N is a unit with 8 photocoupler built-in. By connecting to the personal computer and
operating the photocoupler and operating the photocoupler, circuit isolation, level conversion,
can be performed.
USB/DIO conversion
USB
2
5
8
11
14
17
20
22
23
24
I/O connector side
+5V
2.Specification
2.1.Operation environment
PC : IBM PC/AT compatible machine (USB port required)
OS : Microsoft Windows 2 , XP , Vista , 7, 8
: Linux
: Mac
Note) Linux and Mac do not check the operation.
2.2.USB
Compliant with USB2. standard.

-
4
-
2.3.Product specification
Model ZS-6228P-N ZS-6228S-8N
Feature Printed circuit board type Small case built-in type
Data connector
24P Amphenol connector 24P Amphenol connector
Power supply
USB bus power DC4.75V to 5.25V 100mA or less
Environment Temperature 0℃ to 50℃ Humidity 85% or less
Temperature 0℃ to 50℃ Humidity 85% or less
Storage Temp
-20℃ to 80℃ -20℃ to 80℃
Size 100×74×20H 150×100×30H
Accessary Data connector 57-30240 Data connector 57-30240
2.4.Photocoupler
Photocoupler PS2801-4
Input voltage DC5V to DC24V
2.5.Appearance

-
5
-
3.Install
3.1.Windows Vista / 7
In order to use this product, it is necessary to install hardware and device drivers.
1Turn on the power to the PC and start Windows.
2Connect the PC and this product with USB cable.
3Install the device driver.
4Installation is completed.
The “Device driver installation method” is explained as below. The display of sentences may
differ depending on personal computer, but it is basically the same.
When connecting this product to the computer at first, the following screen will be
displayed.
Click “Search and install driver software".

-
6
-
When the following indication displayed, insert the attached CD as instructed. The driver
may be automatically installed without displaying the following screen when the personal
computer is connected to the internet.
It will be displayed “It can not verify the publisher of the driver software”, but there is no
problem. Click “Install this driver software”.

-
7
-
The following screen will be displayed.
The following screen will be displayed when installation of device driver is completed. Click
“Close” button.

-
8
-
The following screen will be displayed.
Click “ Search and install driver software”.
The following screen will be displayed. Click “NEXT” button.

-
9
-
There is no problem. Click “Install driver software”.
The following screen will be displayed.

-
1
-
Installation of driver is completed. Click ”Close” button.

-
11
-
3.2.Windows XP/2
In order to use this product, it is necessary to install hardware and device drivers.
1Turn on the power to the PC and start Windows.
2Connect the PC and this product with USB cable.
3Install the device driver.
4Installation is completed.
The “Device driver installation method” is explained as below. The display of sentences may
differ depending on personal computer, it is basically the same.
When connecting this product to the computer at first, the following screen will be displayed.
Select “No, it does not connect this time(T) and click “NEXT”.

-
12
-
Select “Install from list or specific location” and click the “NEXT” button.
Insert the attached CD into the PC and select “Search for the driver in the following places”.
Click “Include the following location”, select “driver/Windows” in the CD driver from the
reference, and click the “NEXT” button.

-
13
-
The following screen will be displayed (Only XP), but there is no problem click “Continue”
button.
The following screen will be displayed.

-
14
-
The following screen will be displayed when installation of the device driver is completed.
Click “Finish” button.
The following screen will be displayed.
Select “No, it does not connect this time(T)” and click the “NEXT” button.

-
15
-
Select “Install from list or specific location” and click the “NEXT” button.
Refer to the same place as before and click the “NEXT” button.

-
16
-
There is no problem click the “Continue” button.
The following screen will be displayed.

-
17
-
The following screen will be displayed when installation of the device driver is completed.
Installation of the device driver is completed. Click “Finish” button. Since it may be required
to restart depending on the configuration of the PC, restart according to the instructions on
the screen. Even if you connect to the computer from the next time, there screen will not be
displayed.

-
18
-
4.Operation
4.1.Preparation
ZS-6228-8N uses API made by FTDI inc, depending on each programming language, include
the following files.
Visual Basic :D2XX_Module.bas
Visual C++ :FTD2XX.H、FTD2XX.lib
Delphi :D2XXUnit.pas
4.2.Function
In order to input photocoupler, use the following function. See D2XXPG34.pdf for detail on
this function.
FT_Open :Open the USB port.
FT_OpenEx :Open the USB port when using multiple units.
FT_Close :Colse the USB port.
FT_SetBitMode :Set the I/O of the 8-bit port.
FT_SetBaudRate :Set the rewrite time of 8 bits.
FT_GetBitMode :Load photocoupler.
4.2.1. FT_Open
Function
Open the USB port and initialized.
Format
FT_Open (int iDevice, FT_HANDLE *ftHandle)
iDevice :Set ” ”
ftHandle :If FT_Open is successful, the handle number will be returned.
Use this handle number when using other functions.
Return value
FT_OK :In case of “ ”, success
Other than “ ” :Error
4.2.2. FT_OpenEx
Function
Open the USB port and initialized.
In case of using multipul units, execute”FT_OpenEx” for each one. It is possible to
control by acquiring the handle number of each and using that number when using
other function.
Format
FT_OpenEx (PVOID pvArg1, DWORD dwFlags, FT_HANDLE *ftHandle)
pvArg1 :Set the product serial number (K-xxxxxx).
dwFlags :Set “FT_OPEN_BY_SERIAL_NUMBER”.
ftHandle :If FT_Open is successful, the handle number will be returned.
Use this handle number when using other functions.
Return value
FT_OK :In case of “ ”, success
Other than “ ” :Error

-
19
-
4.2.3. FT_Close
Function
Close the USB port and execute driver termination processing.
Format
FT_Close (FT_HANDLE ftHandle)
ftHandle :Set the handle number.
Return value
FT_OK :In case of “ ”, success
Other tham “ ” :Error
4.2.4. FT_SetBitMode
Function
Set I/O of 8 bits
Format
FT_SetBitMode (FT_HANDLE ftHandle, UCHAR ucMask, UCHAR ucMode)
ftHandle :Set the handle number
ucMask :Set HEX( ), :Input, 1:Output
Since “8 bits” are Photocoupler, set “ ”.
ucMode :Set “1”
Return value
FT_OK :In case of “ ”, success
Other than “ ” :Error
4.2.5. FT_SetBaudRate
Function
Set the rewrite time of output data.
Format
FT_SetBaudRate (FT_HANDLE ftHandle, DWORD dwBaudRate)
ftHandle :Set the handle number
DwBaudRate :Set “96 ”
When set to 96 , data is rewritten at 1 / (96 × 16) = 6.51 µs
cycle. If there is no data in the buffer, the previous output is
continued.
Return value
FT_OK :In case of “ ”, success
Other than “ ” :Error

-
2
-
4.2.6. FT_GetBitMode
Function
Load photocoupler
Format
FT_Read (FT_HANDLE ftHandle, PUCHAR pucMode)
ftHandle :Set the handle number
pucMode :Set “1” when the photocoupler is ON, “ ” is OFF, and execute
Byte output. Bit assignments are as follows.
D7 D6 D5 D4 D3 D2 D1 D0
Photocoupler input_1
Photocoupler input_2
Photocoupler input_3
Photocoupler input_4
Photocoupler input_5
Photocoupler input_6
Photocoupler input_7
Photocoupler input_8
Return value
FT_OK :In case of “ ”, success
Other than “ ” :Error
This manual suits for next models
2
Table of contents
Other Zenisu Keisoku Adapter manuals

Zenisu Keisoku
Zenisu Keisoku ZS-6216E User manual

Zenisu Keisoku
Zenisu Keisoku ZS-6222A Series User manual

Zenisu Keisoku
Zenisu Keisoku ZS-6822A Series User manual

Zenisu Keisoku
Zenisu Keisoku ZS-6822 User manual

Zenisu Keisoku
Zenisu Keisoku ZS-6123BP User manual

Zenisu Keisoku
Zenisu Keisoku ZS-6222 Series User manual

Zenisu Keisoku
Zenisu Keisoku ZS-6225 Series User manual

Zenisu Keisoku
Zenisu Keisoku ZS-6144AF User manual