Zennio Flat Sensato v2 User manual

Flat Sensato v2
https://www.zennio.com Technical Support: https://support.zennio.com
2
CONTENT
Content.......................................................................................................................................... 2
1 Introduction ............................................................................................................................. 3
1.1 Flat Sensato v2................................................................................................................ 3
1.2 Installation...................................................................................................................... 4
2 Configuration ........................................................................................................................... 5
2.1 General ........................................................................................................................... 5
2.2 Humidity ......................................................................................................................... 7
2.3 Internal Temperature Sensor ......................................................................................... 8
2.4 Notification LED............................................................................................................ 11
2.4.1 Configuration........................................................................................................ 11
2.5 Inputs............................................................................................................................ 13
2.5.1 Binary Inputs......................................................................................................... 13
2.5.2 Temperature Probe.............................................................................................. 13
2.5.3 Motion Detector................................................................................................... 13
2.6 Logic Functions............................................................................................................. 14
ANNEX I. Communication Objects............................................................................................... 15

Flat Sensato v2
https://www.zennio.com Technical Support: https://support.zennio.com
3
1INTRODUCTION
1.1 FLAT SENSATO V2
Flat Sensato v2 is a sensor with a flat design to measure ambient temperature,
relative humidity and to calculate dew point for the sending of humidity, temperature
and condensation.
The most outstanding features and functions of the device are:
Measurement of dry air temperature.
Measurement of relative air humidity indoor.
Calculation of dew point temperature.
Alarms of maximum and minimum temperature and relative humidity.
Condensation monitoring on surfaces.
Relative humidity LED notification.
2 analogue/digital configurable inputs.
10 customisable, multi-operation logic functions
Heartbeat or periodical “still-alive” notification.

Flat Sensato v2
https://www.zennio.com Technical Support: https://support.zennio.com
4
1.2 INSTALLATION
Figure 1 shows the connection outline of the device:
Figure 1. Schematic diagram
Flat Sensato v2 does not need any external supply, as it is powered through the KNX
bus.
A short press on the Programming Button (5) will make the device enter the
programming mode. The Programming LED (4) will then light in red. On the contrary,
if this button is held while the device gets connected to the bus, Flat Sensato v2 will
enter the safe mode. In such case, the programming LED will blink in red colour.
For detailed information about the technical features of the device, as well as on
security and installation procedures, please refer to the device Datasheet, bundled
within the original packaging of the device and also available at www.zennio.com.
3
2
7
5
4
6
1
1. Humidity notification LED.
2. KNX connector.
3. Sensor.
4. Programming LED.
5. Programming Button.
6. Inputs connector.
7. Fixing clips.

Flat Sensato v2
https://www.zennio.com Technical Support: https://support.zennio.com
5
2CONFIGURATION
After importing the corresponding database in ETS and adding the device into the
topology of the desired project, the configuration process begins by entering the
Parameters tab of the device.
2.1 GENERAL
From the “General” tab enabling additional functions available for the device is possible.
ETS PARAMETERISATION
Figure 2 General settings.
Notification LED [disabled/enabled]
1
: enables or disables the “Notification
LED” tab in the tree on the left, depending on whether this functionality is
required or not. See section 2.4 for details.
Inputs [disabled/enabled]: enables or disables the “Inputs” tab in the tree on
the left, depending on whether the device will or will not be connected any
external accessories. See section 2.5 for details.
Logic Functions [disabled/enabled]: enables or disables the “Logic
Functions” tab in the tree on the left, depending on whether this functionality
is required or not. See section 2.6 for details.
Heartbeat (Periodical Alive Notification) [disabled/enabled]:this parameter
lets the integrator incorporate one-bit object to the project
1
The default values of each parameter will be highlighted in blue in this document, as follows:
[default/rest of options].

Flat Sensato v2
https://www.zennio.com Technical Support: https://support.zennio.com
6
(“[Heartbeat]Object to Send ‘1’”) that will be sent periodically with value “1”
to notify that the device is still working (still alive).
Figure 3. Heartbeat (Periodical Alive Notification)
Note: The first sending after download or bus failure takes place with a delay
of up to 255 seconds, to prevent bus overload. The following sendings match
the period set.

Flat Sensato v2
https://www.zennio.com Technical Support: https://support.zennio.com
7
2.2 HUMIDITY
Flat Sensato v2 is capable of measure and monitor humidity measurements, as well as
send these values to the bus and report high / low humidity situations. To that
end, it is necessary to configure a set of parameters.
Please refer to the “Humidity” user manual, available in the Flat Sensato v2 product
section, at the Zennio website (www.zennio.com).

Flat Sensato v2
https://www.zennio.com Technical Support: https://support.zennio.com
8
2.3 INTERNAL TEMPERATURE SENSOR
Flat Sensato v2 is capable of measure and monitor temperature measurements, as
well as send these values to the bus and report high / low temperature situations.
To that end, it is necessary to configure a set of parameters.
ETS PARAMETERISATION
Figure 4. Temperature - Configuration
Temperature Sensor Calibration [-50…0…50] [0.1 ºC]: defines an offset to
be applied to the measurement received from the probe to correct deviations
due to external factors.
Temperature Sending Period [0…600…65535] [s]: sets every how much
time the value of the current temperature should be sent to the bus (through
“[Internal Temp. Probe] Current Temperature”). The value “0” leaves this
periodical sending disabled.
Send with a Temperature Change [0…255] [0.1 ºC]: defines a threshold so
that whenever a new reading of the current temperature is found to differ
(from the last value sent to the bus) more than such threshold, an extra
sending will take place and the sending period will restart if configured. The
value “0” leaves this sending with a temperature change disabled.
Temperature Protection: drop-down list with the following options:
➢[No]: no temperature protection is required.

Flat Sensato v2
https://www.zennio.com Technical Support: https://support.zennio.com
9
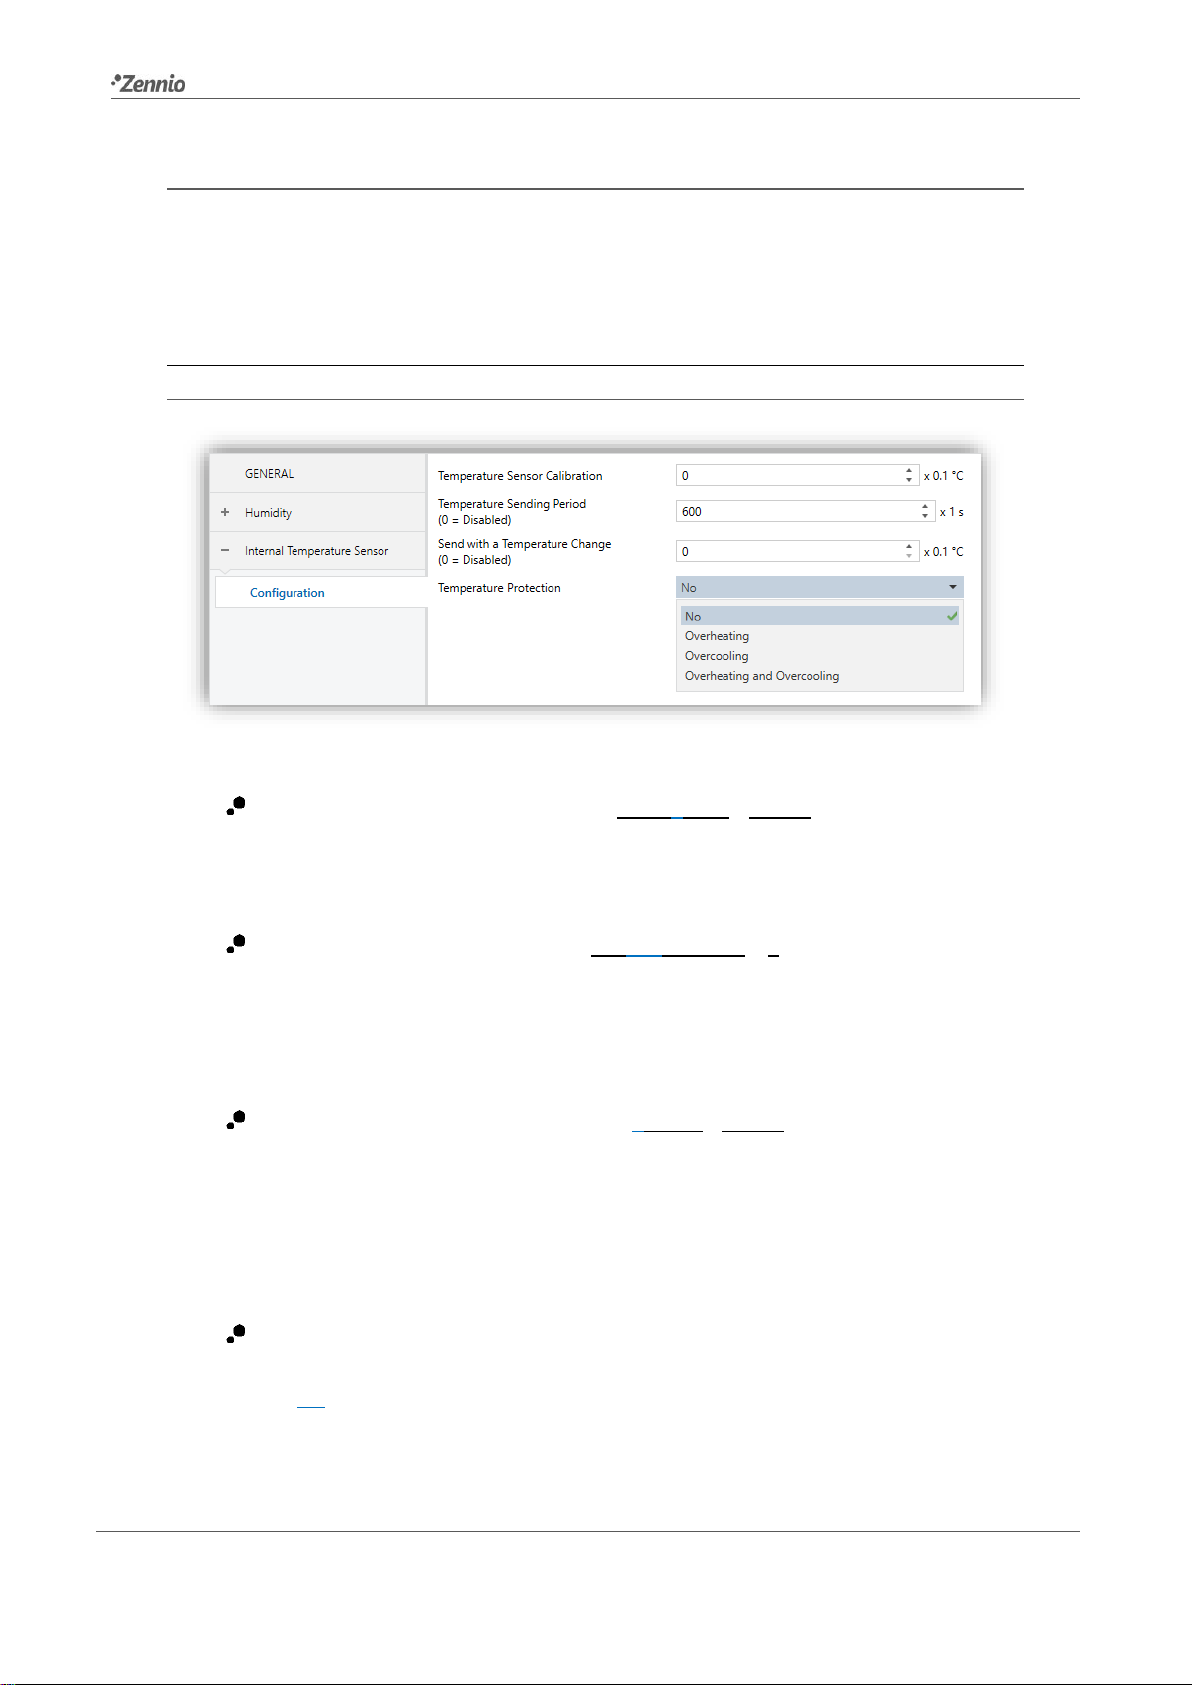
➢[Overheating]: overheating protection is required. Two extra parameters
will come up:
•Overheating Temp. [-30…40…125] [ºC]: maximum temperature
permitted. Temperature readings greater than this will be considered
overheat, and therefore a “1” will be periodically sent through object
“[Internal Temp. Probe] Overheating”. Once the overheat is over, a
“0” will be sent (once).
•Hysteresis [1…20…200] [0.1 ºC]: dead band or threshold around the
overheat temperature defined above. This dead band prevents the
device from sending the overheat alarm and no-alarm over and over
when the current temperature keeps fluctuating around the overheat
limit (T): once the overheat alarm has been triggered, the no-alarm will
not be sent until the current temperature is lower than that T minus the
hysteresis. After that, if the current temperature reaches T again, the
alarm will be re-sent.
➢[Overcooling]: overcooling protection is required. Two extra parameters
(analogous to the above two) will come up:
•Overcooling Temp. [-30…10…125] [ºC]: minimum temperature
permitted. Temperature readings lower than this will be considered
overcool, and therefore a “1” will be periodically sent through object
“[Internal Temp. Probe] Overcooling”. After the overcool is over, a “0”
will be sent (once).
•Hysteresis [1…20…200] [0.1 ºC]: dead band or threshold around the
overcooling temperature. As for the overheat, once the alarm has been
triggered, the no-alarm will not be sent until the current temperature is
greater than T plus the hysteresis. After that, if the current temperature
reaches T again, the alarm will be re-sent.
➢Overheating and Overcooling: both overheating and overcooling protection
are required. The following three parameters will come up:
•Overheating Temp.
•Overcooling Temp.

Flat Sensato v2
https://www.zennio.com Technical Support: https://support.zennio.com
11
2.4 NOTIFICATION LED
2.4.1 CONFIGURATION
Flat Sensato v2 has a LED to notify, through colours, the ranges of the current humidity
values. The colour to notify the humidity ranges can be two (green and yellow) or three
(green, yellow and red).
It is possible to modify by parameter the humitidy thresholds of the range
corresponding to each colour. The following figure shows an example with the default
threshold values:
Figure 5. Default colors of Notification LED.
In addition, LED notification can be activated or deactivated via a binary object that is
always available, even if the functionality is not enabled after programming. In this
case, the colours and humidity thresholds to be set will be the default ones.
ETS PARAMETERISATION
After enabling Notification LED (see section 2.1), a new tab will be incorporated into
the tree on the left.
0
20
40
60
80
100
Humidity %
Green and Yellow
0
20
40
60
80
100 Green, Yellow and Red

Flat Sensato v2
https://www.zennio.com Technical Support: https://support.zennio.com
12
Figure 6. Notification LED –Green, Yellow and Red
The parameters available in this tab are:
Colours Shown [Green and Yellow/Green, Yellow and Red]: allows selecting
whether the notification LED comprises two or three colours.
Red / Yellow / Green: humidity value (0-100%) from which the notification LED
will display the indicated colour. The limit values (0% and 100%) are not
editable. Default values are shown in the following figures.
Note: The threshold values should be set from highest to lowest (from top to
bottom). If this indication is not met, default values will be taken. In addition,
an alert message will be shown: Incorrect yellow threshold values. The
default values will be downloaded in case of an incorrect parameterisation.
The notification LED can be enabled or disabled at any time by means of the binary
object "[LED] Notification LED". Thus:
If the functionality starts enabled after programming, the LED will maintain
the configuration set by parameter against enable/disable actions performed
via the object.
If it is started disabled, the object will allow its activation, using the default
colours and thresholds for notification.

Flat Sensato v2
https://www.zennio.com Technical Support: https://support.zennio.com
13
2.5 INPUTS
Flat Sensato v2 incorporates two analogue/digital inputs, each configurable as a:
Binary Input, for the connection of a pushbutton or a switch/sensor.
Temperature Probe, for the connection of a temperature sensor from
Zennio.
Motion Detector, for the connection of a motion detector from Zennio.
2.5.1 BINARY INPUTS
Please refer to the “Binary Inputs” user manual, available in the Flat Sensato v2
product section, at the Zennio website (www.zennio.com).
2.5.2 TEMPERATURE PROBE
Please refer to the “Temperature Probe” user manual, available in the Flat Sensato v2
product section, at the Zennio website (www.zennio.com).
2.5.3 MOTION DETECTOR
It is possible to connect motion detectors from Zennio to the input ports of Flat Sensato
v2.
Please refer to the “Motion Detector” user manual, available in the Flat Sensato v2
product section, at the Zennio website (www.zennio.com).

Flat Sensato v2
https://www.zennio.com Technical Support: https://support.zennio.com
14
2.6 LOGIC FUNCTIONS
This module makes it possible to perform numeric and binary operations with incoming
values received from the KNX bus, and to send the results through other
communication objects specifically enabled for this purpose.
Flat Sensato v2 can implement up to 10 different and independent functions, each
of them entirely customisable and consisting in up to 4 consecutive operations each.
The execution of each function can depend on a configurable condition, which will be
evaluated every time the function is triggered through specific, parameterisable
communication objects. The result after executing the operations of the function can
also be evaluated according to certain conditions and afterwards sent (or not) to the
KNX bus, which can be done every time the function is executed, periodically or only
when the result differs from the last one.
Please refer to the “Logic Functions” user manual (available in the Flat Sensato v2
product section at the Zennio homepage, www.zennio.com) for detailed information
about the functionality and the configuration of the related parameters.

Flat Sensato v2
https://www.zennio.com Technical Support: https://support.zennio.com
15
ANNEX I. COMMUNICATION OBJECTS
“Functional range” shows the values that, with independence of any other values permitted by the bus according to the object size, may be of any use or have a particular
meaning because of the specifications or restrictions from both the KNX standard or the application program itself.
Number
Size
I/O
Flags
Data type (DPT)
Functional Range
Name
Function
1
1 Bit
C - - T -
DPT_Trigger
0/1
[Heartbeat] Object to Send '1'
Sending of '1' Periodically
2
1 Byte
I
C - W - -
DPT_Percent_V8
[Hum] Sensor Calibration
-12% ... 12%
3
2 Bytes
O
C R - T -
DPT_Value_Humidity
-12% - 12%
[Hum] Current Humidity
Humidity Sensor Value
4
2 Bytes
O
C R - T -
DPT_Value_Temp
-273.00º - 670433.28º
[Hum] Dew Point Temperature
Dew Point Temperature Value
5
2 Bytes
I
C - W - -
DPT_Value_Humidity
-12% - 12%
[Hum] High Humidity Alarm Threshold
Value of High Humidity Alarm
Threshold
6
2 Bytes
I
C - W - -
DPT_Value_Humidity
-12% - 12%
[Hum] Low Humidity Alarm Threshold
Value of Low Humidity Alarm
Threshold
7
2 Bytes
I
C - W - -
DPT_Value_Temp
-273.00º - 670433.28º
[Hum] Surface Temperature
Input Surface Temperature Value
8
1 Bit
O
C R - T -
DPT_Alarm
0/1
[Hum] High Humidity
0 = No Alarm; 1 = Alarm
9
1 Bit
O
C R - T -
DPT_Alarm
0/1
[Hum] Low Humidity
0 = No Alarm; 1 = Alarm
10
1 Bit
O
C R - T -
DPT_Alarm
0/1
[Hum] Condensation
0 = No Alarm; 1 = Alarm
11
1 Bit
I
C - W - -
DPT_Enable
0/1
[Led] Notification Led
0 = Disable; 1 = Enable
12
2 Bytes
O
C R - T -
DPT_Value_Temp
-273.00º - 670433.28º
[Internal Temp. Probe] Current
Temperature
Temperature Sensor Value
13
1 Bit
O
C R - T -
DPT_Alarm
0/1
[Internal Temp. Probe] Overcooling
0 = No Alarm; 1 = Alarm
14
1 Bit
O
C R - T -
DPT_Alarm
0/1
[Internal Temp. Probe] Overheating
0 = No Alarm; 1 = Alarm
15
1 Byte
I
C - W - -
DPT_SceneNumber
0 - 63
[Motion Detector] Scene Input
Scene Value
16
1 Byte
C - - T -
DPT_SceneControl
0-63; 128-191
[Motion Detector] Scene Output
Scene Value
17, 46
1 Byte
O
C R - T -
DPT_Scaling
0% - 100%
[Ix] Luminosity
0-100%
18, 47
1 Bit
O
C R - T -
DPT_Alarm
0/1
[Ix] Open Circuit Error
0 = No Error; 1 = Open Circuit
Error
19, 48
1 Bit
O
C R - T -
DPT_Alarm
0/1
[Ix] Short Circuit Error
0 = No Error; 1 = Short Circuit
Error
20, 49
1 Byte
O
C R - T -
DPT_Scaling
0% - 100%
[Ix] Presence State (Scaling)
0-100%
21, 50
1 Byte
O
C R - T -
DPT_HVACMode
1=Comfort
2=Standby
3=Economy
4=Building
[Ix] Presence State (HVAC)
Auto, Comfort, Standby, Economy,
Building Protection

Flat Sensato v2
https://www.zennio.com Technical Support: https://support.zennio.com
16
Protection
22, 51
1 Bit
O
C R - T -
DPT_Switch
0/1
[Ix] Presence State (Binary)
Binary Value
1 Bit
O
C R - T -
DPT_Start
0/1
[Ix] Presence: Slave Output
1 = Motion Detected
23, 52
1 Bit
I
C - W - -
DPT_Window_Door
0/1
[Ix] Presence Trigger
Binary Value to Trigger the
Presence Detection
24, 53
1 Bit
I
C - W - -
DPT_Start
0/1
[Ix] Presence: Slave Input
0 = Nothing; 1 = Detection from
slave device
25, 54
2 Bytes
I
C - W - -
DPT_TimePeriodSec
0 - 65535
[Ix] Presence: Waiting Time
0-65535 s.
26, 55
2 Bytes
I
C - W - -
DPT_TimePeriodSec
0 - 65535
[Ix] Presence: Listening Time
1-65535 s.
27, 56
1 Bit
I
C - W - -
DPT_Enable
0/1
[Ix] Presence: Enable
According to parameters
28, 57
1 Bit
I
C - W - -
DPT_DayNight
0/1
[Ix] Presence: Day/Night
According to parameters
29, 58
1 Bit
O
C R - T -
DPT_Occupancy
0/1
[Ix] Presence: Occupancy State
0 = Not Occupied; 1 = Occupied
30, 59
1 Bit
I
C - W - -
DPT_Start
0/1
[Ix] External Motion Detection
0 = Nothing; 1 = Motion detected
by an external sensor
31, 36, 41, 60, 65, 70
1 Byte
O
C R - T -
DPT_Scaling
0% - 100%
[Ix] [Cx] Detection State (Scaling)
0-100%
32, 37, 42, 61, 66, 71
1 Byte
O
C R - T -
DPT_HVACMode
1=Comfort
2=Standby
3=Economy
4=Building
Protection
[Ix] [Cx] Detection State (HVAC)
Auto, Comfort, Standby, Economy,
Building Protection
33, 38, 43, 62, 67, 72
1 Bit
O
C R - T -
DPT_Switch
0/1
[Ix] [Cx] Detection State (Binary)
Binary Value
34, 39, 44, 63, 68, 73
1 Bit
I
C - W - -
DPT_Enable
0/1
[Ix] [Cx] Enable Channel
According to parameters
35, 40, 45, 64, 69, 74
1 Bit
I
C - W - -
DPT_Switch
0/1
[Ix] [Cx] Force State
0 = No Detection; 1 = Detection
75, 81
1 Bit
I
C - W - -
DPT_Enable
0/1
[Ix] Input Lock
0 = Unlock; 1 = Lock
76, 82
1 Bit
C - - T -
DPT_Switch
0/1
[Ix] [Short Press] 0
Sending of 0
1 Bit
C - - T -
DPT_Switch
0/1
[Ix] [Short Press] 1
Sending of 1
1 Bit
I
C - W T -
DPT_Switch
0/1
[Ix] [Short Press] 0/1 Switching
Switching 0/1
1 Bit
C - - T -
DPT_UpDown
0/1
[Ix] [Short Press] Move Up Shutter
Sending of 0 (Up)
1 Bit
C - - T -
DPT_UpDown
0/1
[Ix] [Short Press] Move Down Shutter
Sending of 1 (Down)
1 Bit
C - - T -
DPT_UpDown
0/1
[Ix] [Short Press] Move Up/Down
Shutter
Switching 0/1 (Up/Down)
1 Bit
C - - T -
DPT_Step
0/1
[Ix] [Short Press] Stop/Step Up Shutter
Sending of 0 (Stop/Step Up)
1 Bit
C - - T -
DPT_Step
0/1
[Ix] [Short Press] Stop/Step Down
Shutter
Sending of 1 (Stop/Step Down)
1 Bit
C - - T -
DPT_Step
0/1
[Ix] [Short Press] Stop/Step Shutter
(Switched)
Switching of 0/1 (Stop/Step
Up/Down)
4 Bit
C - - T -
DPT_Control_Dimming
0x0 (Stop)
0x1 (Dec. by 100%)
...
0x7 (Dec. by 1%)
[Ix] [Short Press] Brighter
Increase Brightness

Flat Sensato v2
https://www.zennio.com Technical Support: https://support.zennio.com
17
0x8 (Stop)
0xD (Inc. by 100%)
...
0xF (Inc. by 1%)
4 Bit
C - - T -
DPT_Control_Dimming
0x0 (Stop)
0x1 (Dec. by 100%)
...
0x7 (Dec. by 1%)
0x8 (Stop)
0xD (Inc. by 100%)
...
0xF (Inc. by 1%)
[Ix] [Short Press] Darker
Decrease Brightness
4 Bit
C - - T -
DPT_Control_Dimming
0x0 (Stop)
0x1 (Dec. by 100%)
...
0x7 (Dec. by 1%)
0x8 (Stop)
0xD (Inc. by 100%)
...
0xF (Inc. by 1%)
[Ix] [Short Press] Brighter/Darker
Switch Bright/Dark
1 Bit
C - - T -
DPT_Switch
0/1
[Ix] [Short Press] Light On
Sending of 1 (On)
1 Bit
C - - T -
DPT_Switch
0/1
[Ix] [Short Press] Light Off
Sending of 0 (Off)
1 Bit
I
C - W T -
DPT_Switch
0/1
[Ix] [Short Press] Light On/Off
Switching 0/1
1 Byte
C - - T -
DPT_SceneControl
0-63; 128-191
[Ix] [Short Press] Run Scene
Sending of 0 - 63
1 Byte
C - - T -
DPT_SceneControl
0-63; 128-191
[Ix] [Short Press] Save Scene
Sending of 128 - 191
1 Bit
I/O
C R W T -
DPT_Switch
0/1
[Ix] [Switch/Sensor] Edge
Sending of 0 or 1
1 Byte
C - - T -
DPT_Value_1_Ucount
0 - 255
[Ix] [Short Press] Constant Value
(Integer)
0 - 255
1 Byte
C - - T -
DPT_Scaling
0% - 100%
[Ix] [Short Press] Constant Value
(Percentage)
0% - 100%
2 Bytes
C - - T -
DPT_Value_2_Ucount
0 - 65535
[Ix] [Short Press] Constant Value
(Integer)
0 - 65535
2 Bytes
C - - T -
9.xxx
-671088.64 - 670433.28
[Ix] [Short Press] Constant Value
(Float)
Float Value
77, 83
1 Byte
I
C - W - -
DPT_Scaling
0% - 100%
[Ix] [Short Press] Shutter Status
(Input)
0% = Top; 100% = Bottom
1 Byte
I
C - W - -
DPT_Scaling
0% - 100%
[Ix] [Short Press] Dimming Status
(Input)
0% - 100%
78, 84
1 Bit
C - - T -
DPT_Switch
0/1
[Ix] [Long Press] 0
Sending of 0
1 Bit
C - - T -
DPT_Switch
0/1
[Ix] [Long Press] 1
Sending of 1
1 Bit
I
C - W T -
DPT_Switch
0/1
[Ix] [Long Press] 0/1 Switching
Switching 0/1
1 Bit
C - - T -
DPT_UpDown
0/1
[Ix] [Long Press] Move Up Shutter
Sending of 0 (Up)

Flat Sensato v2
https://www.zennio.com Technical Support: https://support.zennio.com
18
1 Bit
C - - T -
DPT_UpDown
0/1
[Ix] [Long Press] Move Down Shutter
Sending of 1 (Down)
1 Bit
C - - T -
DPT_UpDown
0/1
[Ix] [Long Press] Move Up/Down
Shutter
Switching 0/1 (Up/Down)
1 Bit
C - - T -
DPT_Step
0/1
[Ix] [Long Press] Stop/Step Up Shutter
Sending of 0 (Stop/Step Up)
1 Bit
C - - T -
DPT_Step
0/1
[Ix] [Long Press] Stop/Step Down
Shutter
Sending of 1 (Stop/Step Down)
1 Bit
C - - T -
DPT_Step
0/1
[Ix] [Long Press] Stop/Step Shutter
(Switched)
Switching of 0/1 (Stop/Step
Up/Down)
4 Bit
C - - T -
DPT_Control_Dimming
0x0 (Stop)
0x1 (Dec. by 100%)
...
0x7 (Dec. by 1%)
0x8 (Stop)
0xD (Inc. by 100%)
...
0xF (Inc. by 1%)
[Ix] [Long Press] Brighter
Long Pr. -> Brighter; Release ->
Stop
4 Bit
C - - T -
DPT_Control_Dimming
0x0 (Stop)
0x1 (Dec. by 100%)
...
0x7 (Dec. by 1%)
0x8 (Stop)
0xD (Inc. by 100%)
...
0xF (Inc. by 1%)
[Ix] [Long Press] Darker
Long Pr. -> Darker; Release ->
Stop
4 Bit
C - - T -
DPT_Control_Dimming
0x0 (Stop)
0x1 (Dec. by 100%)
...
0x7 (Dec. by 1%)
0x8 (Stop)
0xD (Inc. by 100%)
...
0xF (Inc. by 1%)
[Ix] [Long Press] Brighter/Darker
Long Pr. -> Brighter/Darker;
Release -> Stop
1 Bit
C - - T -
DPT_Switch
0/1
[Ix] [Long Press] Light On
Sending of 1 (On)
1 Bit
C - - T -
DPT_Switch
0/1
[Ix] [Long Press] Light Off
Sending of 0 (Off)
1 Bit
I
C - W T -
DPT_Switch
0/1
[Ix] [Long Press] Light On/Off
Switching 0/1
1 Byte
C - - T -
DPT_SceneControl
0-63; 128-191
[Ix] [Long Press] Run Scene
Sending of 0 - 63
1 Byte
C - - T -
DPT_SceneControl
0-63; 128-191
[Ix] [Long Press] Save Scene
Sending of 128 - 191
1 Bit
O
C R - T -
DPT_Alarm
0/1
[Ix] [Switch/Sensor] Alarm: Breakdown
or Sabotage
1 = Alarm; 0 = No Alarm
2 Bytes
C - - T -
9.xxx
-671088.64 - 670433.28
[Ix] [Long Press] Constant Value (Float)
Float Value
2 Bytes
C - - T -
DPT_Value_2_Ucount
0 - 65535
[Ix] [Long Press] Constant Value
(Integer)
0 - 65535
1 Byte
C - - T -
DPT_Scaling
0% - 100%
[Ix] [Long Press] Constant Value
0% - 100%

Flat Sensato v2
https://www.zennio.com Technical Support: https://support.zennio.com
19
(Percentage)
1 Byte
C - - T -
DPT_Value_1_Ucount
0 - 255
[Ix] [Long Press] Constant Value
(Integer)
0 - 255
79, 85
1 Bit
C - - T -
DPT_Trigger
0/1
[Ix] [Long Press/Release] Stop Shutter
Release -> Stop Shutter
80, 86
1 Byte
I
C - W - -
DPT_Scaling
0% - 100%
[Ix] [Long Press] Dimming Status
(Input)
0% - 100%
1 Byte
I
C - W - -
DPT_Scaling
0% - 100%
[Ix] [Long Press] Shutter Status (Input)
0% = Top; 100% = Bottom
87, 91
2 Bytes
O
C R - T -
DPT_Value_Temp
-273.00º - 670433.28º
[Ix] Current Temperature
Temperature Sensor Value
88, 92
1 Bit
O
C R - T -
DPT_Alarm
0/1
[Ix] Overcooling
0 = No Alarm; 1 = Alarm
89, 93
1 Bit
O
C R - T -
DPT_Alarm
0/1
[Ix] Overheating
0 = No Alarm; 1 = Alarm
90, 94
1 Bit
O
C R - T -
DPT_Alarm
0/1
[Ix] Probe Error
0 = No Alarm; 1 = Alarm
95, 96, 97, 98, 99, 100,
101, 102, 103, 104, 105,
106, 107, 108, 109, 110,
111, 112, 113, 114, 115,
116, 117, 118, 119, 120,
121, 122, 123, 124, 125,
126
1 Bit
I
C - W - -
DPT_Bool
0/1
[LF] (1-Bit) Data Entry x
Binary Data Entry (0/1)
127, 128, 129, 130, 131,
132, 133, 134, 135, 136,
137, 138, 139, 140, 141,
142
1 Byte
I
C - W - -
DPT_Value_1_Ucount
0 - 255
[LF] (1-Byte) Data Entry x
1-Byte Data Entry (0-255)
143, 144, 145, 146, 147,
148, 149, 150, 151, 152,
153, 154, 155, 156, 157,
158
2 Bytes
I
C - W - -
DPT_Value_2_Ucount
0 - 65535
[LF] (2-Byte) Data Entry x
2-Byte Data Entry
DPT_Value_2_Count
-32768 -32767
DPT_Value_Tempo
-273.00 –670433.28
159, 160, 161, 162, 163,
164, 165, 166
4 Bytes
I
C - W - -
DPT_Value_4_Count
-2147483648 - 2147483647
[LF] (4-Byte) Data Entry x
4-Byte Data Entry
167, 168, 169, 170, 171,
172, 173, 174, 175, 176
1 Bit
O
C R - T -
DPT_Bool
0/1
[LF] Function x - Result
(1-Bit) Boolean
1 Byte
O
C R - T -
DPT_Value_1_Ucount
0 - 255
[LF] Function x - Result
(1-Byte) Unsigned
2 Bytes
O
C R - T -
DPT_Value_2_Ucount
0 - 65535
[LF] Function x - Result
(2-Byte) Unsigned
4 Bytes
O
C R - T -
DPT_Value_4_Count
-2147483648 - 2147483647
[LF] Function x - Result
(4-Byte) Signed
1 Byte
O
C R - T -
DPT_Scaling
0% - 100%
[LF] Function x - Result
(1-Byte) Percentage
2 Bytes
O
C R - T -
DPT_Value_2_Count
-32768 - 32767
[LF] Function x - Result
(2-Byte) Signed
2 Bytes
O
C R - T -
9.xxx
-671088.64 - 670433.28
[LF] Function x - Result
(2-Byte) Float
This manual suits for next models
1
Table of contents