ZERO-X ZX-G0 User manual
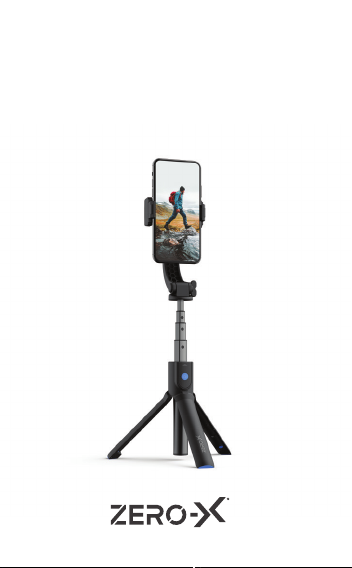
USER MANUAL
ZX-G0


3
CONTENTS
1. Safety Precautions...................................4
2. Important Battery Safety Information......5
3. Product Features .....................................6
4. Charging The Gimbal...............................7
5. Remote Control Battery Installation ........8
6. Power On/Off Gimbal............................11
7. Power On/Off Remote Control ..............11
8. Remote Control Bluetooth Pairing.........11
9. Gimbal Set-Up .......................................11
10. Gimbal Mode.........................................12
11. Portrait And Landscape Modes..............13
12. Selfie And Tripod Functions...................13
13. Specifications ........................................14
14. Troubleshooting.....................................14
15. Warranty................................................15
16. Notes ....................................................21

4
IN THE BOX
1. ZX-G0 Single Axis Gimbal x1
2. Micro USB Charging Cable x1
3. Screwdriver x1
4. Button Cell Battery x1
5. User Manual x1
6. Quick Start Guide x1
1. SAFETY PRECAUTIONS
Please read and understand these safety
precautions before using the gimbal.
• Do not drop, crush, pierce or bend the
gimbal as it may damage and cause it to
malfunction.
• The gimbal is not water-resistant. Do not
use any liquid cleansers to clean it. Use
only a soft dry cloth to wipe clean the
gimbal.
• Ensure that nothing is obstructing the
gimbal when it is in operation.
• Keep the gimbal away from sand and dust
to safeguard the sensors in the motor.
• Only recharge the gimbal with the
supplied USB cable. If you are using a
wall charger, ensure that it is a certified
product in your region with an AC input of
240V 50/60Hz and a 5V output.
• Do not use the gimbal in temperatures
above 55°C.

5
2. IMPORTANT BATTERY SAFETY
INFORMATION
• Do not use any third-party or unknown
accessories or batteries.
• Do not disassemble the battery.
• Do not short circuit the battery. A short
circuit may occur when the battery is in
contact with other metal objects.
• Do not charge the battery in direct
sunlight.
• Always charge the battery in a designated
place away from people and pets.
• Do not leave the battery on a prolonged
charge when not in use.
• Do not charge the battery if the ambient
temperature is below 10°C or above 45°C.
• Always use the supplied charger and
observe manufacturer’s charging
requirements.
• Battery performance is best when it is
within normal room temperature.
• Please fully charge the battery before
first use.
WARNING
KEEP OUT OF REACH OF CHILDREN
THIS PRODUCT CONTAINS A BUTTON BATTERY
If swallowed, a lithium button battery can cause
severe or fatal injuries within 2 hours.
If you suspect your child has swallowed or inserted
a button battery, call the Poisons Information
Centre immediately on 13 11 26 for 24/7 fast,
expert advice. If your child is having any difficulty
breathing, contact 000.
BUTTON/CELL
BATTERY
BUTTON-BATTERY-WARNING-INSERT-90x55.indd 1BUTTON-BATTERY-WARNING-INSERT-90x55.indd 1 16/06/2022 10:18:29 AM16/06/2022 10:18:29 AM
6
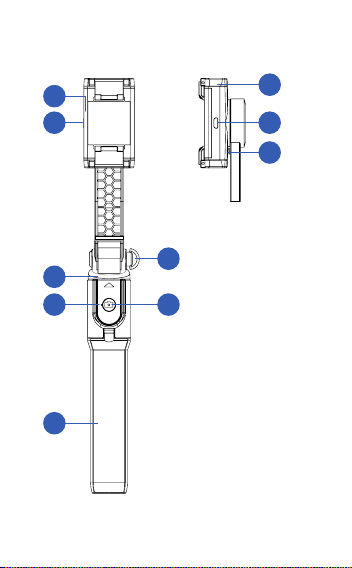
3. PRODUCT FEATURES
6
7
8
10
9
3
2
1
4
5
1. Gimbal status
indicator
2. Gimbal power
button
3. Pole extender
4. Bluetooth remote
control indicator
5. Tripod grip
6. Phone clip
7. Micro USB
charging port
8. Positioning bead
9. Rotation lock
10.Capture/record
button

7
4. CHARGING THE GIMBAL
Use the supplied Micro USB cable and plug
it into the Micro USB charging port to charge
the gimbal. Once charging is complete,
the light on the gimbal status indicator will
change from red to green.
Micro USB
Charging
Port

8
5. REMOTE CONTROL BATTERY
INSTALLATION
Please refer to the illustrations with regard to
the following instructions.
1. Extend the pole extender.
2. Remove the remote control by pushing
it up.

9
3. Unscrew the battery compartment and
slide it out in the direction of the arrow
indicator.
4. Insert a button battery CR1620 into the
battery compartment.

10
5. Replace the battery compartment cover
and fixing screw.
6. Re-install the remote control onto the
gimbal stem.
7. Retract the pole extender.
Table of contents
Other ZERO-X Camera Accessories manuals


Popular Camera Accessories manuals by other brands

Viltrox
Viltrox EF-NEX Mount instructions

Calumet
Calumet 7100 Series CK7114 operating instructions

Ropox
Ropox 4Single Series User manual and installation instructions

Cambo
Cambo Wide DS Digital Series Main operating instructions

Samsung
Samsung SHG-120 Specification sheet

Ryobi
Ryobi BPL-1820 Owner's operating manual


