Zoox Intelligent ATO User manual

User Manual
Intelligent ATO
Auto Tap Water System

Thank you for purchasing Intelligent ATO.
Please read this instruction manual carefully and understand the usage and structure before use.
After reading, keep it in a place where you can read it again at any time.
Safety Guide
The precautions are for the safe and correct use of the product and to prevent harm or damage to
the user or other people.
Attachment are the warning levels with different situations.
Please read carefully to have the best performance and safety.
That is mean it has the possibility of serious injury to people or
death immediately
That is mean it may cause the serious injury to people or death if
keep running in this situation
Attention
Warning
Danger
That is mean it may cause property damge or even damage to
people
Classification of Warning
FORBID FORCE UNPLUG THE POWER
Meaning of Marks
WARNING
HANDLING OF POWER PLUG, POWER CORD & SOCKET
FORBID
The power supply is AC 100V, and
the outlet with a rating of 15A or
more need to be used alone.
Use of an AC outlet other than 100V or using an
outlet with other equipment at the same time may
cause a fire or electric shock.
If you need an extension cord, use the one with the
correct rating. Using cords with amperage and
wattage that are lower than the rating of the
quipment may result in overheating.
Do not forcibly bend, pull, twist, slap,
or place heavy objects on, pinch,
or modify the power cord or power
adapter. The power cord may be
damaged, resulting in fire or electric
shock.
Do not connect or disconnect the
power with wet hands. It may cause
an electric shock.
FORBID
Insert the power adapter securely
to the bottom
Failure to do so may cause fire due
to electric shock or overheating.
Always have a drip loop on the
power cord. Do not allow water
droplets to travel through the cord
and come in contact with the outlet
since it may cause a fire or electric
shock.
DRIP LOOP

Do not overtighten screws
It may cause damage to the product
It may cause electic shock.
When pulling out the power adapter
from the outlet, hold the power
adapter first, then pull it out.
If pulling out the cord while holding it,
that may damage the cord and cause a
fire or electric shock.
Unplug the power adapter when putting
your hands in the aquarium or
performing maintenance
SAFETY GUIDE
WARNING
HANDLING OF POWER PLUG, POWER CORD & SOCKET
Dust on power adapter needed to be
cleaned regularly. Accumulated dust may
cause fire due to moisture. Please
wipe off with a dry cloth.
ATTENTION
INSTALLATION
Do not install in places with the high
temperatures (e.g near a fire, near a
heater, under the scorching sun) or
exposed directly under the sunlight.
It can only be used indoors below 35 ° C.
Do not install in places where the
power cord or ballast may get wet.
It may cause electric shock and
leakage.
WARNING
Be careful when carrying or installing
this product in order to prevent
damage from product.
Do not use or placed at outdoors. It
may cause overheat, explosion, etc.
Do not install this product near to
children, since there is an danger
to children.
WHILE OPERATION
In case of abnormality (burnt smell, etc),
immediately unplug the power and
stop using it. It may cause overheat
or fire. Please contact the retailer that
you purchased or our company.
Do not modify or process this produuct
by yourself. It may cause damage or
injury to people.
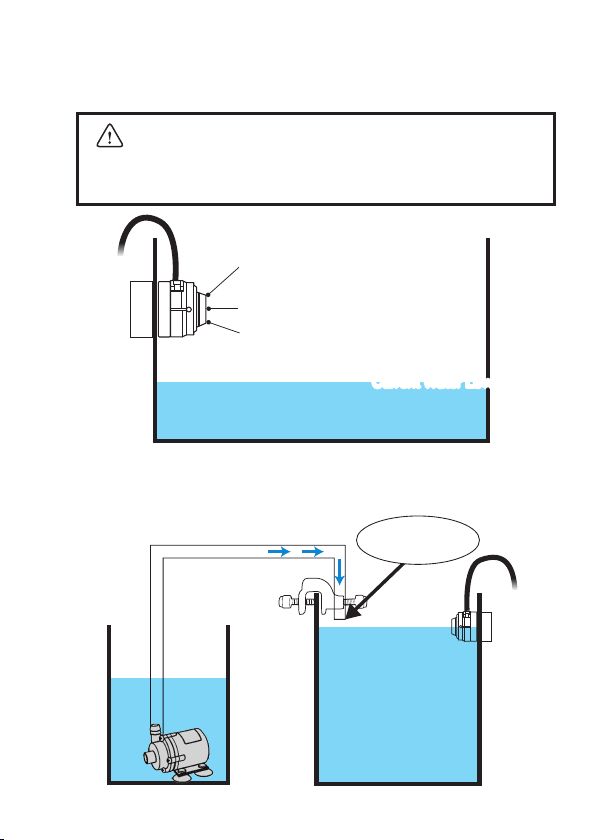
Do not operate when the pump can
not circulate water or the body is
not filled with water. It may cause
damage or fire.
Do not use for any purpose other
than recommendation. It may cause an
unexpected accident or danger.
WARNING
ATTENTION

1
Before using the product, please check and make sure that there are no breaks
or cracks.
●Specification
●Before use
●Contents (Part name)
Sensor body size:27×23mm
With sensor cover:27×31mm
Magnet compatible thickness:〜15mm
Hose fixing clamp compatible thickness:〜15mm
Attached hose:2m
Maximum lift:<2m
Power consumption:(Pump):4w
Maximum flow rate:(Pump):280L/h
Sensor body
Sensor coverMagnet
31mm
●How to use
1. Prepare a container for the additional water, such as a plastic tank or
a small water tank.(* Please prepare the container by yourself.)
・
・
・
・
・
・
・
Sensor (sensor body, magnet)
Sensor protection cover
DC pump
Mount for DC pump (with kiss rubber)
Power adapter
Hose
Hose fixing clamp
Power adapter Mount for DC pump
(With kiss rubber)
DC Pump
Sensor body
Magnet
Hose fixing clamp
Hose(2m)
Sensor protection cover
27mm
23mm
27mm

2
2.
Attach the sensor body to the desired height of the water tank or sump (water
supply start water level) with a magnet so that the cord faces directly upward.
The water level at the time of installation (current water level) must be lower than
the height of the water supply start water level to be set.
Attention
Make sure that the cord is facing straight up.
It will not work properly if it is oblique or upside down.
Also, the optical sensor needs to be kept away from
air bubbles.Bubbles may cause malfunction.
3.
Attach a hose to the DC pump, add the DC pump and install it in a water container.
Fasten the hose to the hose clamp attached to the sump or tank.
At that time, make sure that the outlet of the hose does not come under the
water before or after water supply.
(Water level at which automatic water supply stops for the first time)
High level sensor
Water supply stop water level
Low level sensor
(Water supply start water level)
Current Water Level
DC Pump
Container Sump / Tank
Sensor
Body
Magnet
Hose fixing
Clamp
Hose
Hose mouth don’ t
put into the water

3
The dual optical sensor has
high accuracy and durability,
but it will affect by bubbles
and dirt.
Therefore, a malfunction may
occur. Be sure to use the sensor
cover and clean it regularly.
5. The automatic watering system starts automatically and starts setting the water
level. At the first time, water is supplied to the level at which the high level sensor
operates. At that time, the LED will turn green slowly. (Water supply will exceed
the water level of the water stop line, but this is not a malfunction.)
After that, the automatic water supply will be activated so that the water level is
automatically maintained, so do not move the position of the installed sensor
any more.
The setting is completed when the motor stops.
①
②③
4.
①Connect the sensor cord to the power adapter cord.
② Insert the power adapter into the outlet and turn on the power.
③ Connect the pump cord.
Provide a drip loop in the cord. (See the figure below)
Attention
The order of connecting cords and turning on the
power is very important.Note that if you connect in
a different order, the settings will not work properly.
Attention
※If you move the sensor while setting the sensor water level, an error will occur, and
the sensor cannot be set correctly.
6. After setting, be sure to attach the sensor protection cover.
Align the protrusion on the sensor protective cover with the groove on
the sensor body, and then turn it clockwise to secure it.
ProtrusionGroove

4
●Precautions before Using
●Indicator light display
Intelligent ATO displays the operating status using a lamp the inside of the sensor body.
Green light on
At normal water level
Green light off
High level sensor line is working. Activated during initial setup.
All light off Water level is lower than water supply start water level (water level cannot be detected)
Red light
flashing
Insufficient water in the water supply container
Sensor error
→Water level must be at least 1 cm higher than the set water level
→ (the sensor is less than 1 cm below the water surface)
→ DC pump operation time is too long
Error cancellation
method
Turn on the power again. For the procedure at that time,
refer to “4”of section “How to use”.
Right light on The sensor cannot detect the water level due to bubbles or dirt
Initial setting failed because the sensor was moved after initial setting
●
Twin optical sensors are highly accurate and durable, but may malfunction due to
bubbles and dirt. Be sure to use the sensor cover and perform regular cleaning.
●
Intelligent ATO knows the water level you set initially.
When changing the sump or aquarium, or disconnecting the power outlet or
connection cable, all settings must be reset.
●
To prevent siphoning, add the hose inlet on the water supply side and make sure
that the water level is not higher than the sump or water tank level. (See the figure below)
To prevent malfunction due to bubbles, do not install the hose near the sensor.
If necessary, make a small hole in the non-soaked part of the hose inside the water tank.
Send water with a pump
Tank
Tank
ATO Container
Tank
When you stop the pump,
Water from tank flows back
to the aquarium tube
Tank
Siphon Phenomenon
ATO Container
ATO Container
ATO Container

191211
Clean the sensor part and sensor protection cover once a month.
Using the product with moss or lime algae may cause
malfunction.
●Maintenance
●Reset method
●
If you use a cooling fan, make sure that the
air from the fan does not hit the sensor.
(Right figure)
●
Avoid installing the sensor near water flow
pumps or in places where the water surface
is unstable.
It may cause malfunction. (Right figure)
Disconnect the DC pump from the power adapter.
Then install the sensor in a new sump / tank.
(Please install according to the procedure of "4. How to use.")
Attention
・
・
Be sure to unplug the power adapter from the outlet and make sure to turn the
power off. (Please set again after maintenance)
Do not use detergents or hard sponges or brushes.
・Please clean the power adapter and outlet with a soft, dry cloth.
If you have any troubles or problems, please contact us from our homepage, fill in your
name and problems and your E-mail, or contact the shop where you purchased.
●In case of trouble
・Please note that consumable parts cannot be replaced even during the warranty period because the
frequency of wear varies depending on how you use them.
・We cannot accept any guarantee of death of living organisms due to use of this product.
●About warranty
This warranty does not apply to anyone other than the buyer. Proof of the purchase date / purchase
store is required to execute the guarantee.
This warranty covers only failures caused by defective materials or workmanship that occur during regular use.
Minor scratches and defects that do not affect use are not covered by the warranty. It does not cover
damage caused during shipment, or failure caused by misuse, abuse, negligence, improper installation,
or use for another purpose or structural change. ZOOX Aquarium Ltd. is, incidental result of the use and
development of this product, consequential damages, or incidental generated by infringement of
this guarantee, not responsible for consequential damages. Sales and including compatibility assurance
for a particular application, all explicit and implicit guarantee is limited to the applicable warranty period.
E-mail:[email protected]
Contact Us
Web:http://www.zooxaquarium.com
Table of contents
Popular Water System manuals by other brands

Eco Pure
Eco Pure EPHY Installation and operation manual

Borg
Borg Oasis Studio Kenko Moebius 55 Operation manual

GFL
GFL 2002 operating instructions

Greenway Home Products
Greenway Home Products GRO1025-5-3F Installation instructions & owner's manual

WarmFlow
WarmFlow SFP1 installation instructions

AutoAqua
AutoAqua Smart ATO Duo G2 manual

Julabo
Julabo ED-5A operating manual

DAB
DAB FEKAFOS 280 Instruction for installation and maintenance

Everpure
Everpure Filter Cartridge 2CB-GW Specification sheet

Watts Premier
Watts Premier RO-PURE Installation, operation and maintenance manual

Everpure
Everpure Carbon Filter Wrap CWS-10 Specification sheet

Everpure
Everpure OW4-Plus EV9635-01 Specification sheet