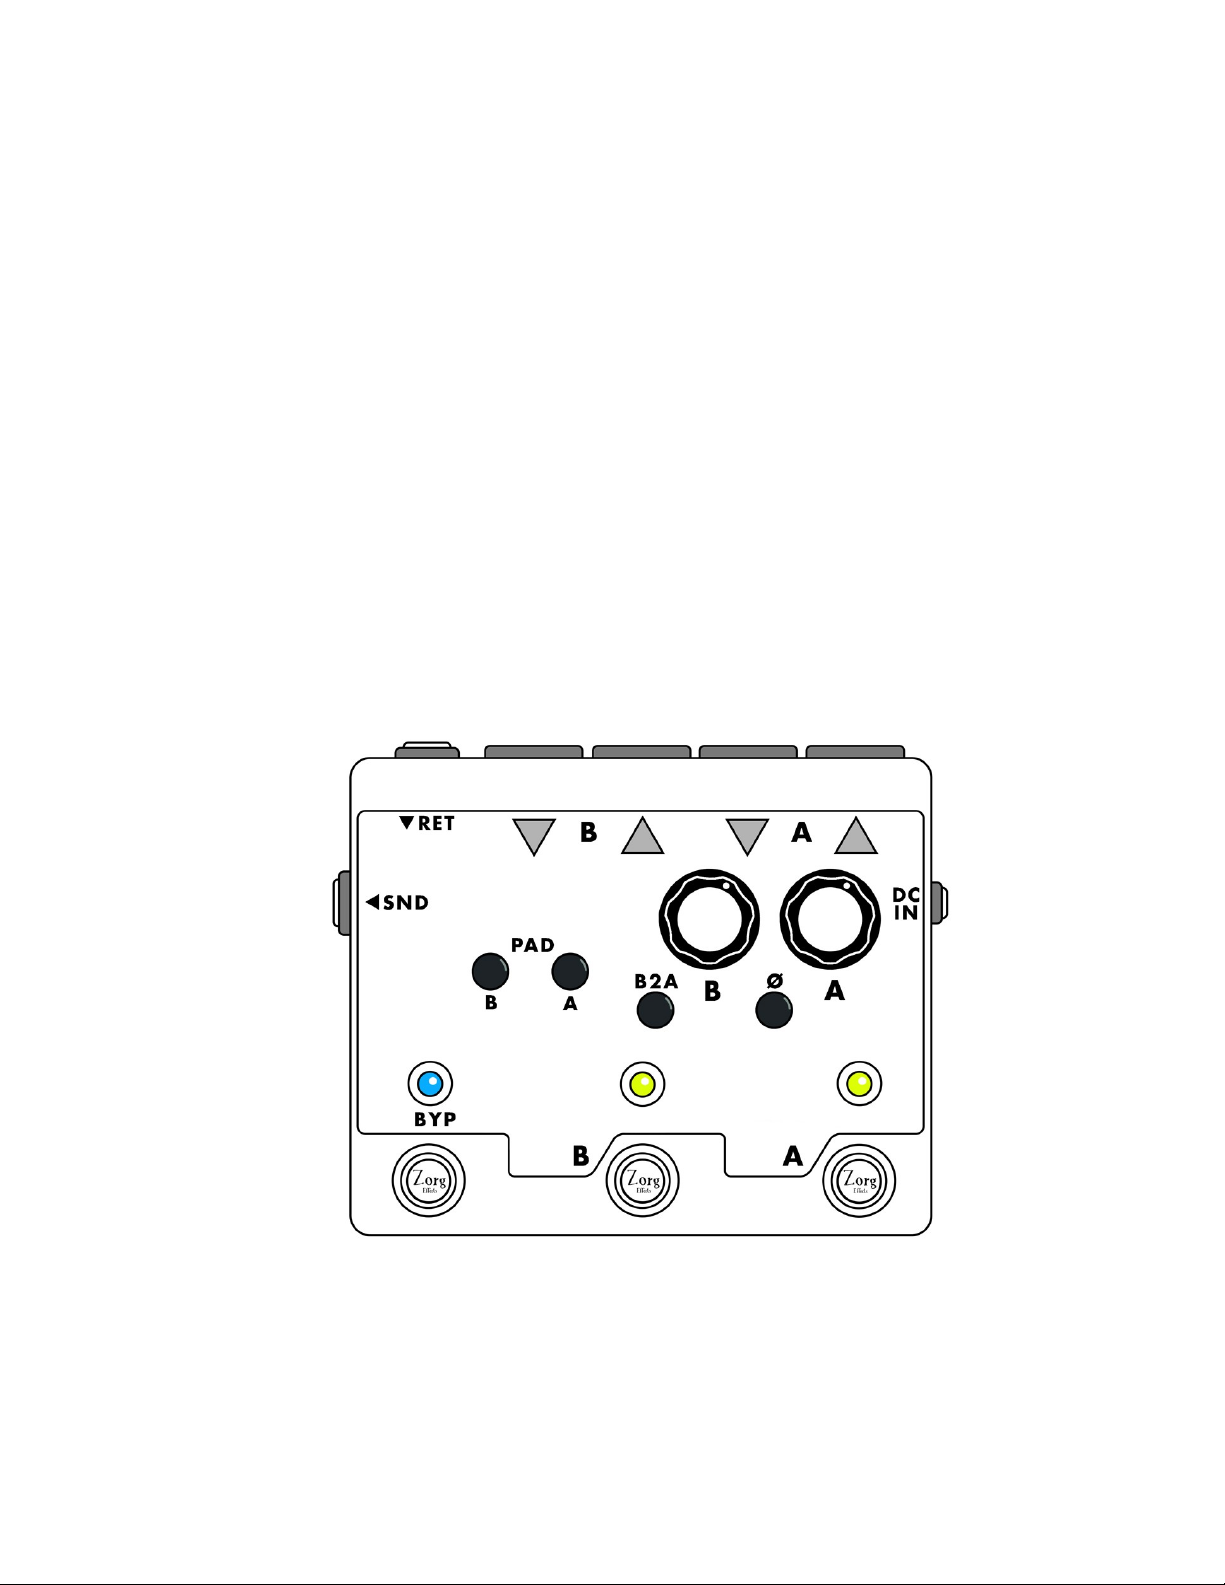
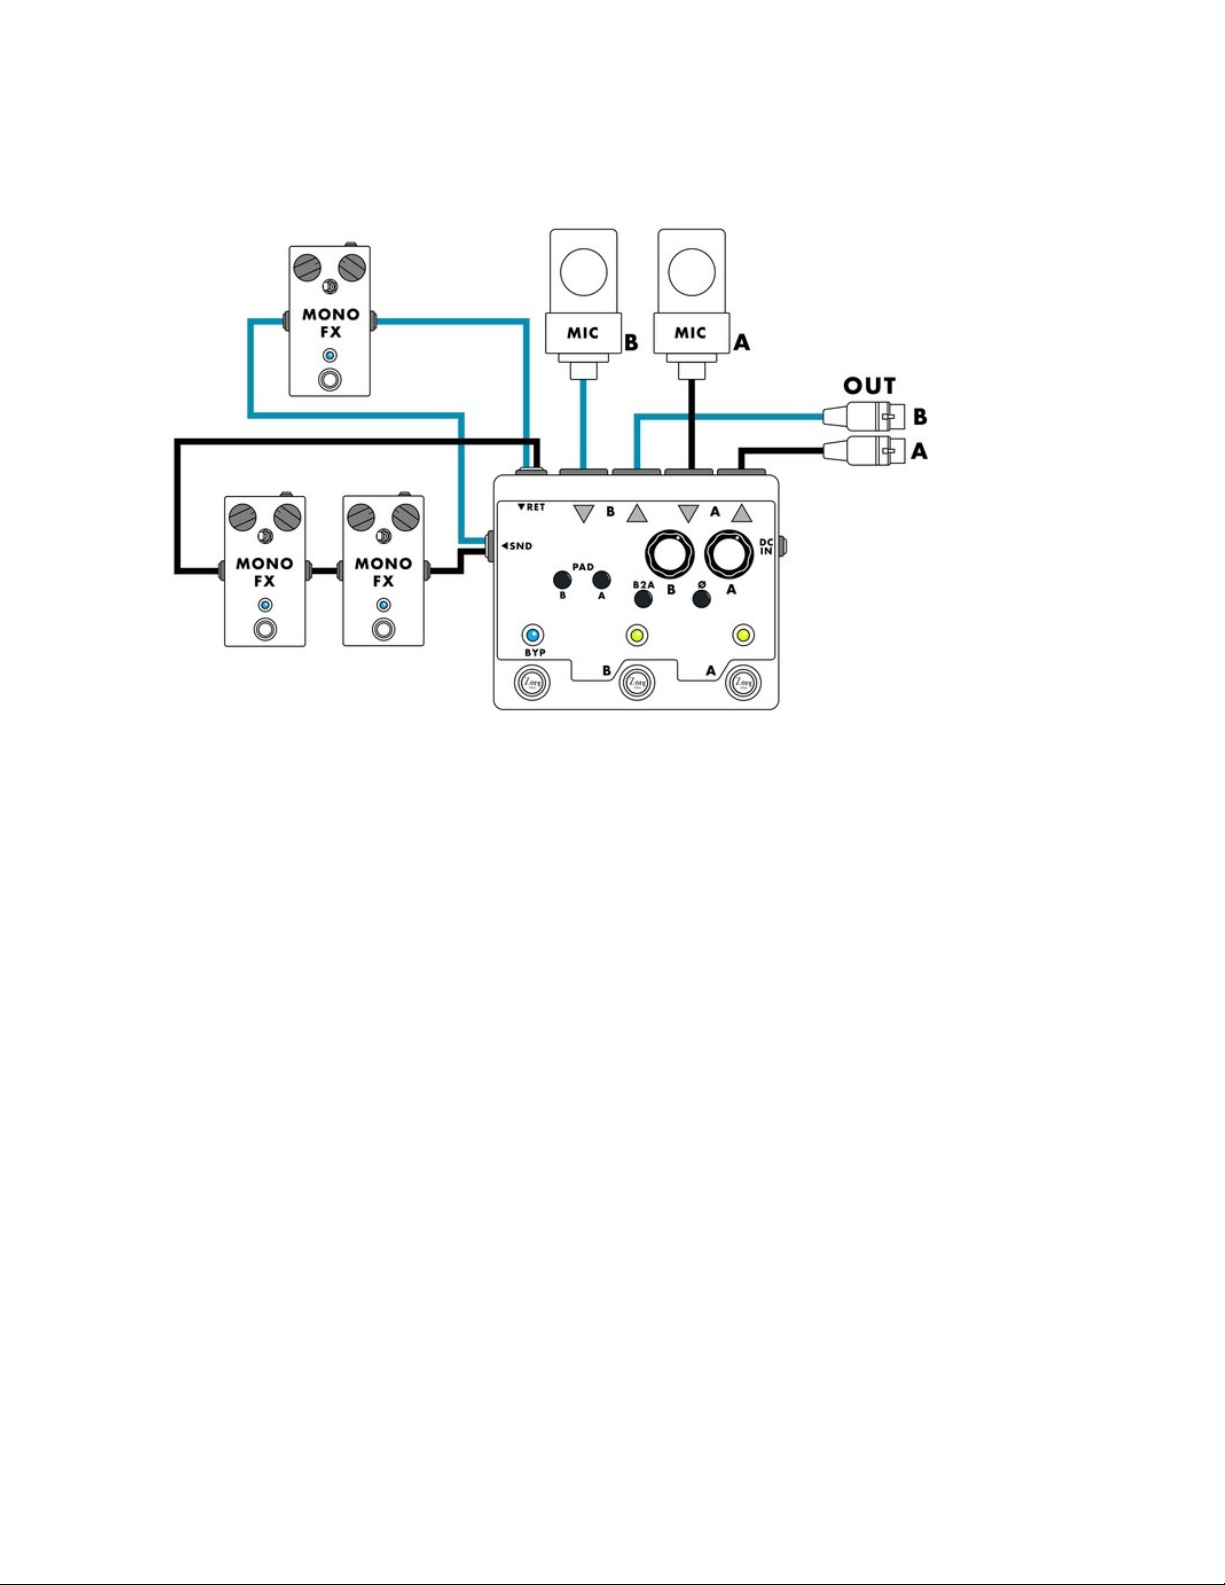
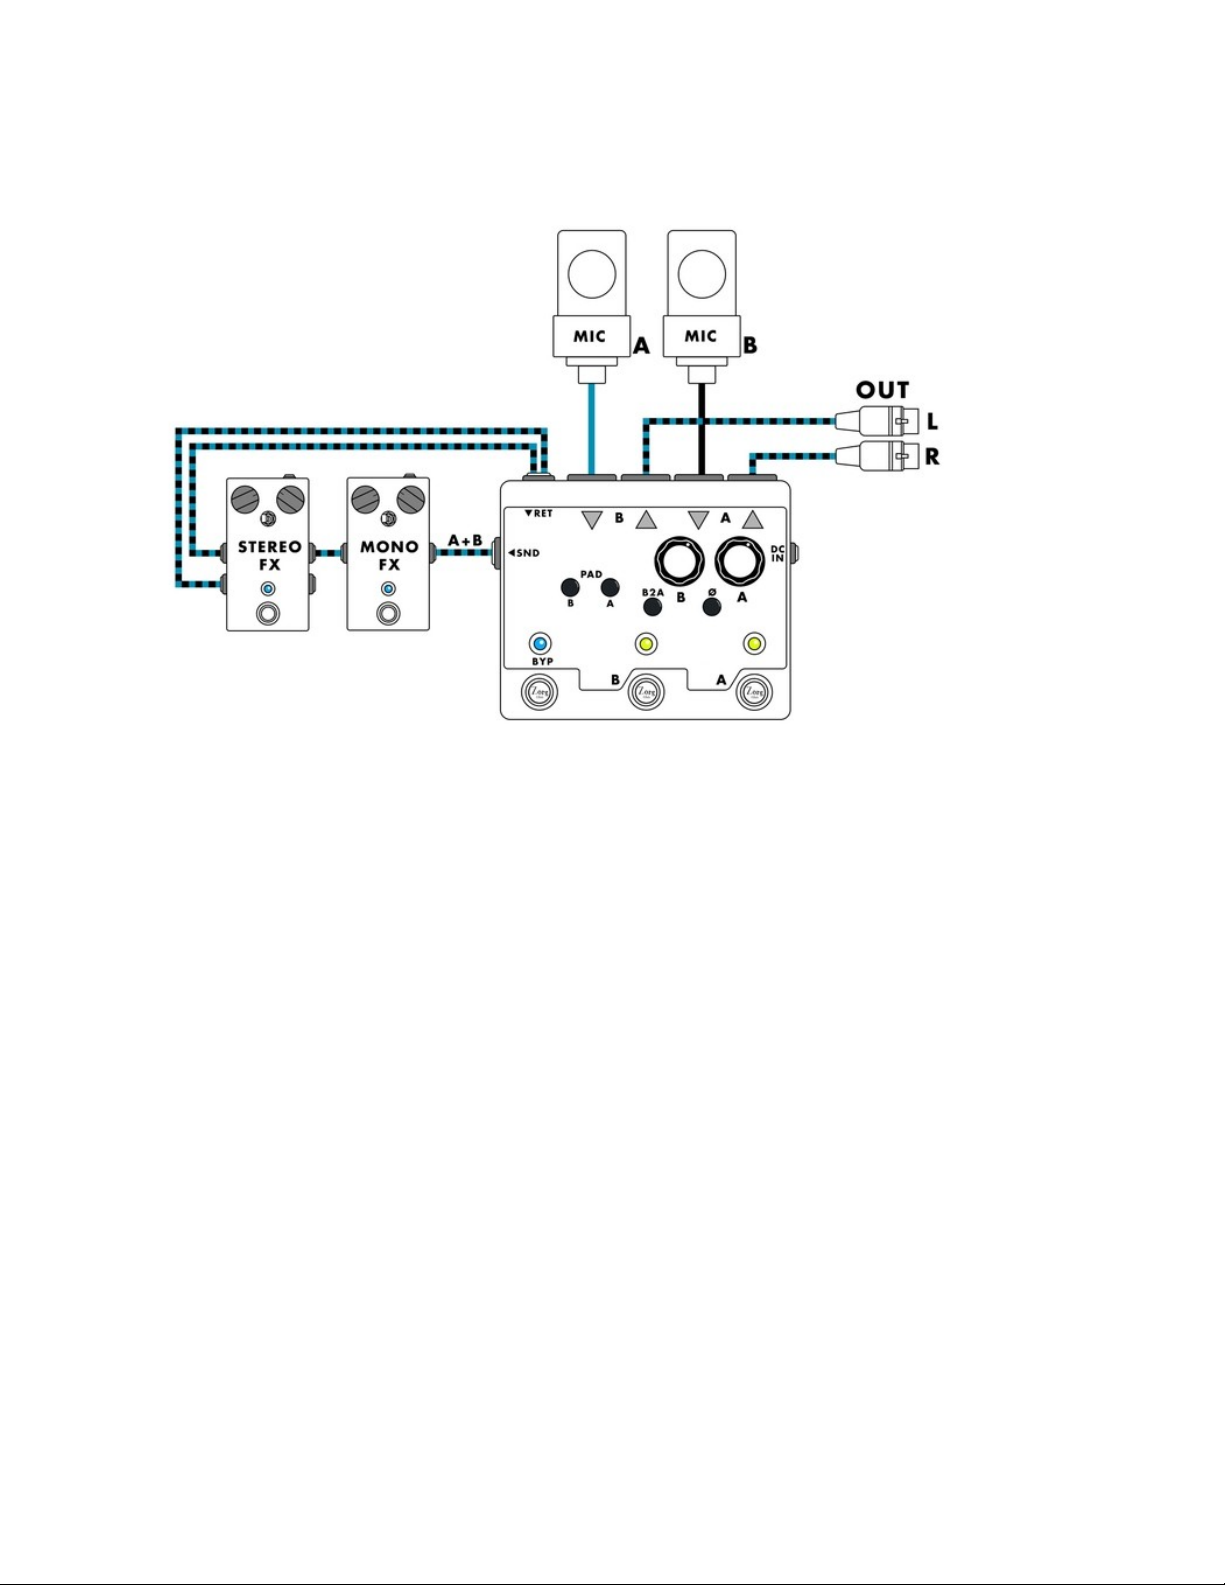
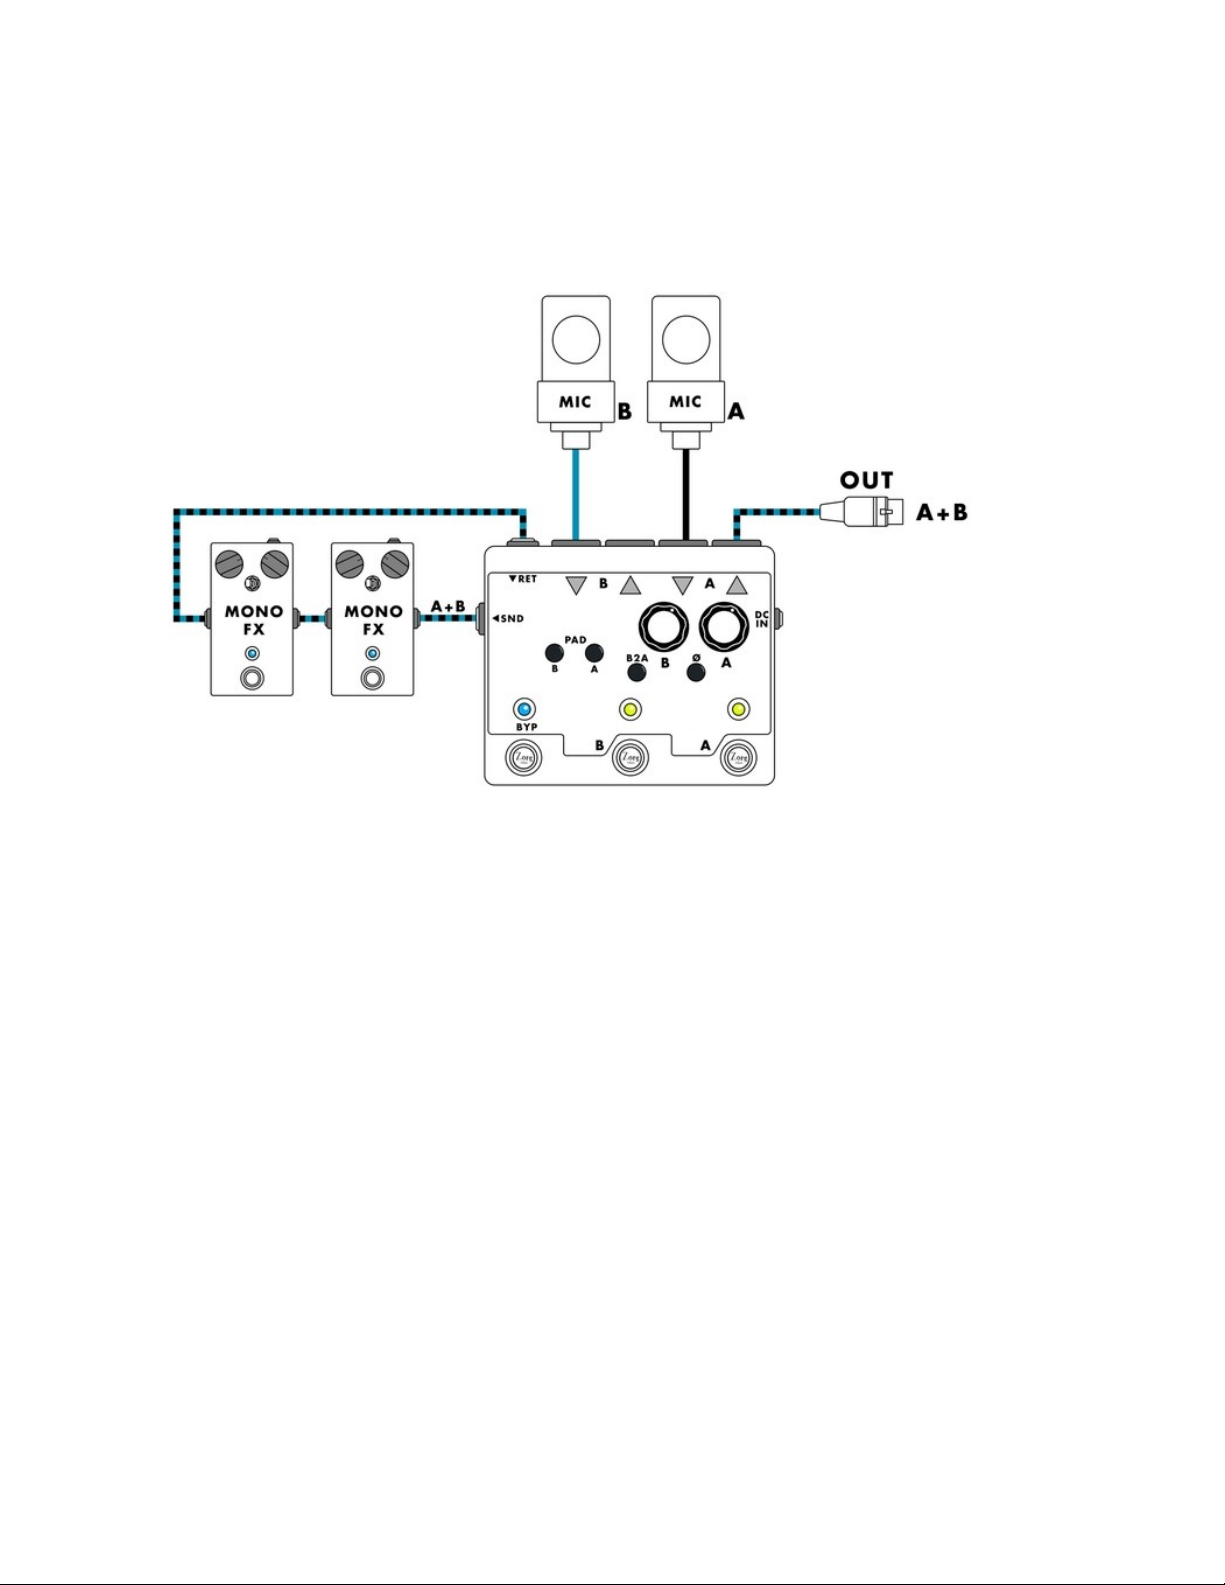
Zorg Effects Blow!Blow!!Blow!!! User manual

Blow!Blow!!Blow!!!
User s manual’
Index
Safety instructions............................................................................................................................... 1
What’s the Blow!Blow!!Blow!!!........................................................................................................... 2
Technical specifications...................................................................................................................... 2
Connections:........................................................................................................................................ 3
What are these kno s ands switches ?.............................................................................................. 3
Leds colors :......................................................................................................................................... 3
Internal settings :................................................................................................................................ 4
(Re) Configure the pedal:.................................................................................................................... 5
Synoptic !............................................................................................................................................ 11
Safety instructions
If your Blow!Blow!!Blow !!! has the phantom power turned on please plug all the audio ca les
efore plugging the DC power ca les and turning it on.
Disconnect or mute your mixing ta le or soundcard in which the pedal is plugged in when
turning the phantom power on or off.
To avoid feed ack, turn down the gains kno s when switching the PADs.
Don’t plug in a guitar or piezo mics into the inputs, it will e crappy.
1

What s the’ Blow!Blow!!Blow!!!
The Blow! Blow!!Blow!!! is a stereo preamp with an interface etween static and dynamic mics
with XLRs inputs and guitar pedals with jacks inputs.
If you're a piano player, a clarinet, a assoon, a multinstrument player, or else. the Blow!Blow!!
Blow!!! will allow you to experiment with guitar pedals without loss in your sound quality.
Guitar pickups eing more powerful than dynamic or condenser mics, the preamps allow to
attack the guitar pedals with the same level as a guitar’s pickup.
Think of this pedal as two preamps, a stereo effect loop and two direct oxes.
Technical specifications
Consumption : 60mA max without phantom. With phantom power turned on on oth inputs:
130mA.
Preamps gain: +6dB to +50dB
Bandwidth : 30Hz – 20kHz.
Pad : -20dB
Output line level (pad off) : +4dBU
2

Connections:
A: Input an output XLRs for static or dynamic mics.
B: Input an output XLRs for static or dynamic mics.
SND: stereo effects send on two 6.35 jacks.
R T: stereo effects return on two 6.35 jacks.
DC IN: center negative 9V DC input.
What are these knobs ands switches ?
A / B knobs: input gain settings for channels A and B. up to +50dB of gain is availa le.
PAD A/B: switches to lower of 20dB the output level of the pedal. Allows to switch the output
level from line level to a mixer input level.
B2A: send output B to output A. Usefull if you’re lazy or need to plug only one output.
(Important : if the effect loop is in mono, channel A must e turned on, or it’ll cut the output...)
Φ (180°): 180° phase rotation etween oth inputs. (it’ll make a short crack when turning it on
or off)
A/B footswitches: turn the A or B channels on or off.
Byp footswitch: activates or ypass the effect loop.
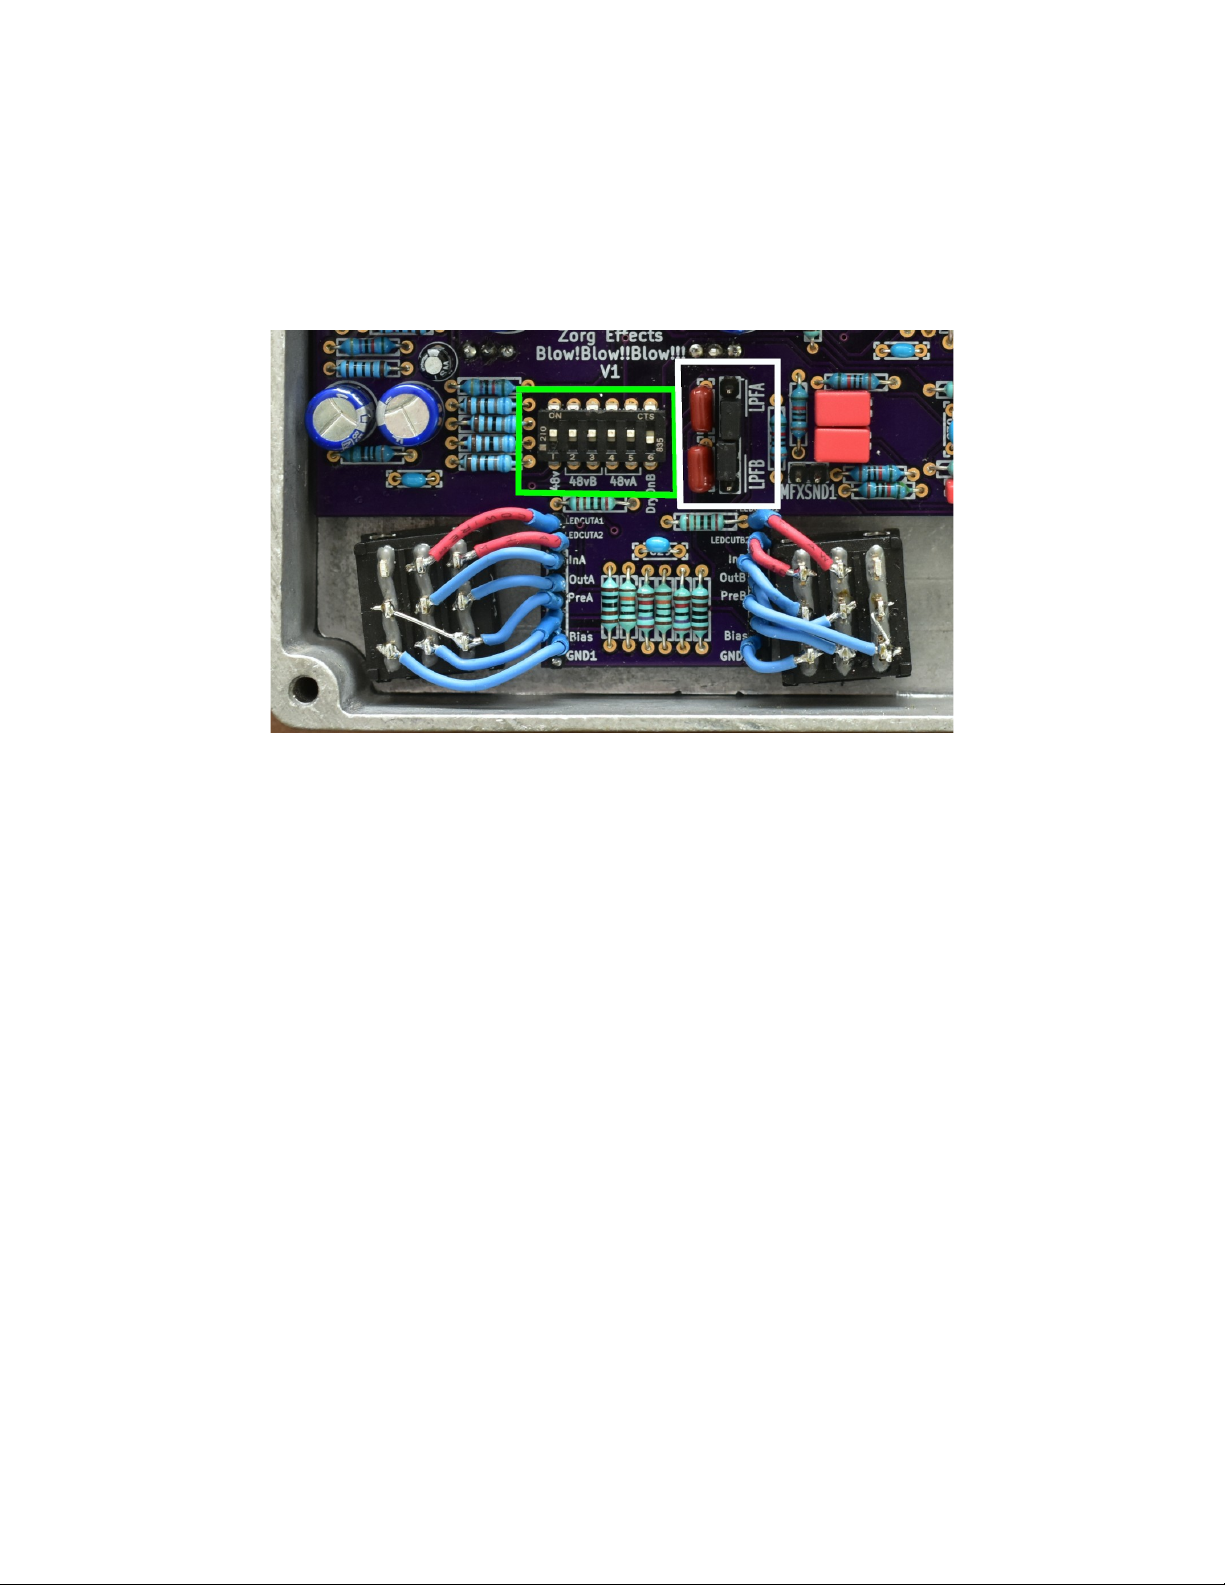
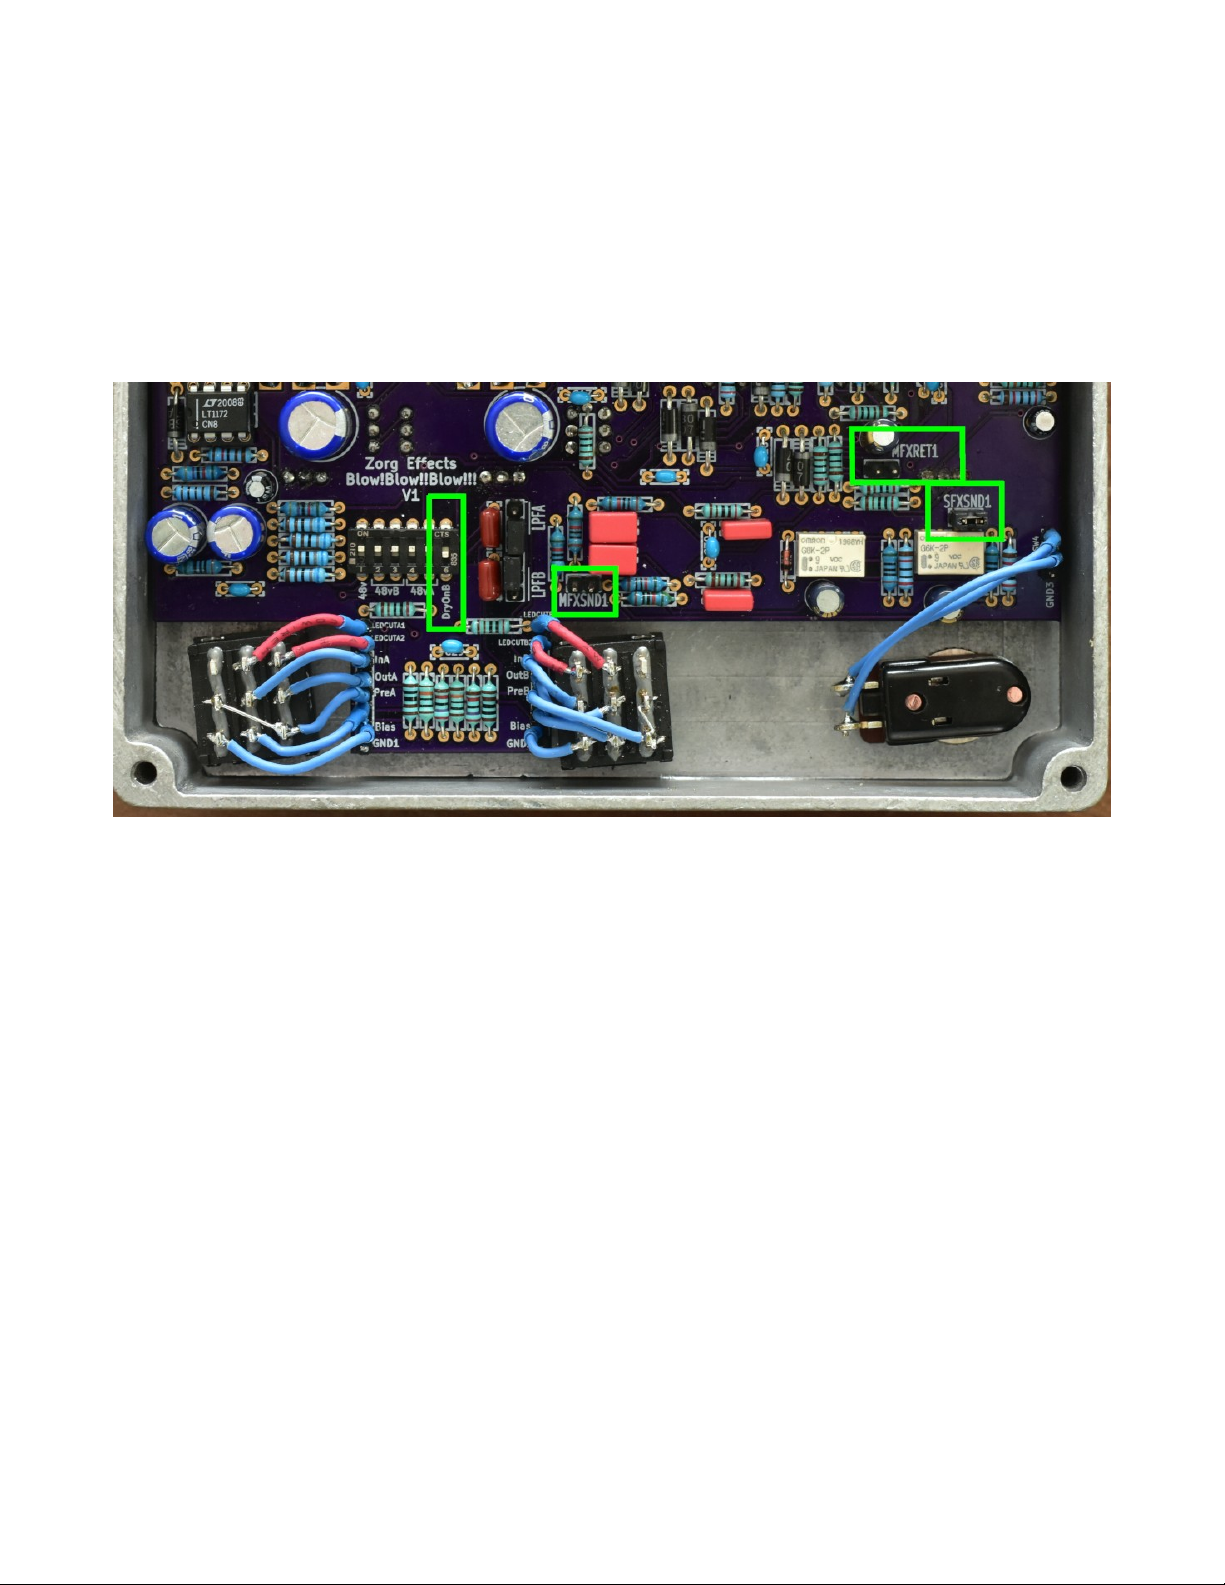
Internal controls :
Phantom power on each channels. Internal configurations jumpers (see internal setting topic
further). High pass filter on each inputs.
eds colors :
A/B channels leds :
Green : The channel is turned ON.
Red : Only when playing if you’re clipping the preamp.
Bypass led:
Blue : the effect loop is activated.
Red : The phantom power is activated.
3

Internal settings :
To change the settings descri ed elow, you’ll need to unscrew the ack plate.
Phantom power: the phantom power can e turned on or off with internal switches. Five
switches are used they’re in the area next to the channel’s footswitches, outlined in green in
the picture elow :
On these mini switches, the five from the left are used for phantom power. The first left
la eled « 48v » is used to turn create the phantom power from the 9V. The next two switches
from the left la eled « 48vB » are used to assign the phantom power to channel B and the last
two la eled « 48vA » assign the phantom power to channel A.
High pass filter : high pass filters cutting at 120Hz are availa le on each input. Locate the
LPFA and LPFB jumpers next to the phantom power switches (outlined in white on the picture
a ove). The filters are activated when a jumper is plugged in front of the white lines left to the
LPFA and LPFB la els. (The picture a ove shows oth filters deactivated)
4

(Re) Configure the pedal:
The Blow!Blow!!Blow!!! can e configured according to your needs. Five configurations are
possi le. For eahc configuration you’ll have to move internal jumpers. The jumpers are la eled
MFXSND1, SFXSND1, MFXRET1, and there’s also th « DryOnB » mini switch right of the
phantom switches. They’re outlined in green on the picture elow:
5

The first case is a full stereo configuration, for example to use with a piano or drums
overheads. In this case you can also use separate effects loops for each mics:
For this configuration you’ll need :
- Jumper on SFXSND1.
- NO jumper on MFXSND1 and MFXRET1.
- DryOnB OFF.
6

The second case allows to use one or two mono effect loops on the mics.
If you’re using two mono effects loops it’s the same case as the previous stereo case :
- Jumper on SFXSND1.
- NO jumper on MFXSND1 and MFXRET1.
- DryOnB OFF.
And in this case, each loop will apply to one input
If you’re using only one mono effects loop, plug the pedals in the A loop and move the
jumpers :
- NO jumper on SFXSND1.
- Jumper on MFXSND1 and MFXRET1.
- DryOnB OFF.
In this case, if the two mics are turned on a the same time, they’ll e sumed into the loop and
output A and B will have the sum of oth (this case is descri ed elow). If they are activated
and played separately, they’ll e sent to their corresponding output.
7

The third configuration sums the two mics in a mono send ut stereo return effect loop:
For this configuration you’ll need:
- NO jumper on SFXSND1 and MFXRET1.
- Jumper on MFXSND1.
- DryOnB OFF.
8

The fourth configuration uses only one mic and a mono loop ut one output has the wet
signal and the other has the dry signal (wet/dry):
Pour cette configuration il faut :
For this configuration you’ll need:
- NO jumper on SFXSND1.
- Jumper on MFXSND1 and MFXRET1.
- DryOnB ON.
- Remove the jumper on the right of the B channel footswitch B.
9

The fifth configuration adds the two mics into a mono loop and outputs the mix in one output.
For example with a clarinet where you have a mic on the pavillion and a mic next to your left
hand :
This is the same configuration as the one mono loop case, ut oth mics are turned on at the
same time. The mix is availa le either on A or B outputs:
- NO jumper on SFXSND1.
- Jumper on MFXSND1 and MFXRET1.
- DryOnB OFF.
10

Synoptic !
11
A
Gain
180°
HPF
Effects Loop
A+Pad Out A
Pad
In A SW A SW A
Byp
B
Gain
HPF
Effects Loop
B+Pad Out B
Pad
In B SW B SW B
Byp
B A
+
MFxSnd1
SFxSnd1
=> Oranges switches are internal jumpers or switches.
DryOnB MFxRet1
48V
Phantom
9v IN
48vA
48vB
48v
Other manuals for Blow!Blow!!Blow!!!
1