Zunidata Systems MB222 User manual

Zunidata Systems Inc.
Model: MB222
Digital Signage
Media Box
User Manual
Version: 0.3
Date: 2013/09/30

1
Content
Declaration............................................................................................................................ 2
Product Instruction................................................................................................................ 2
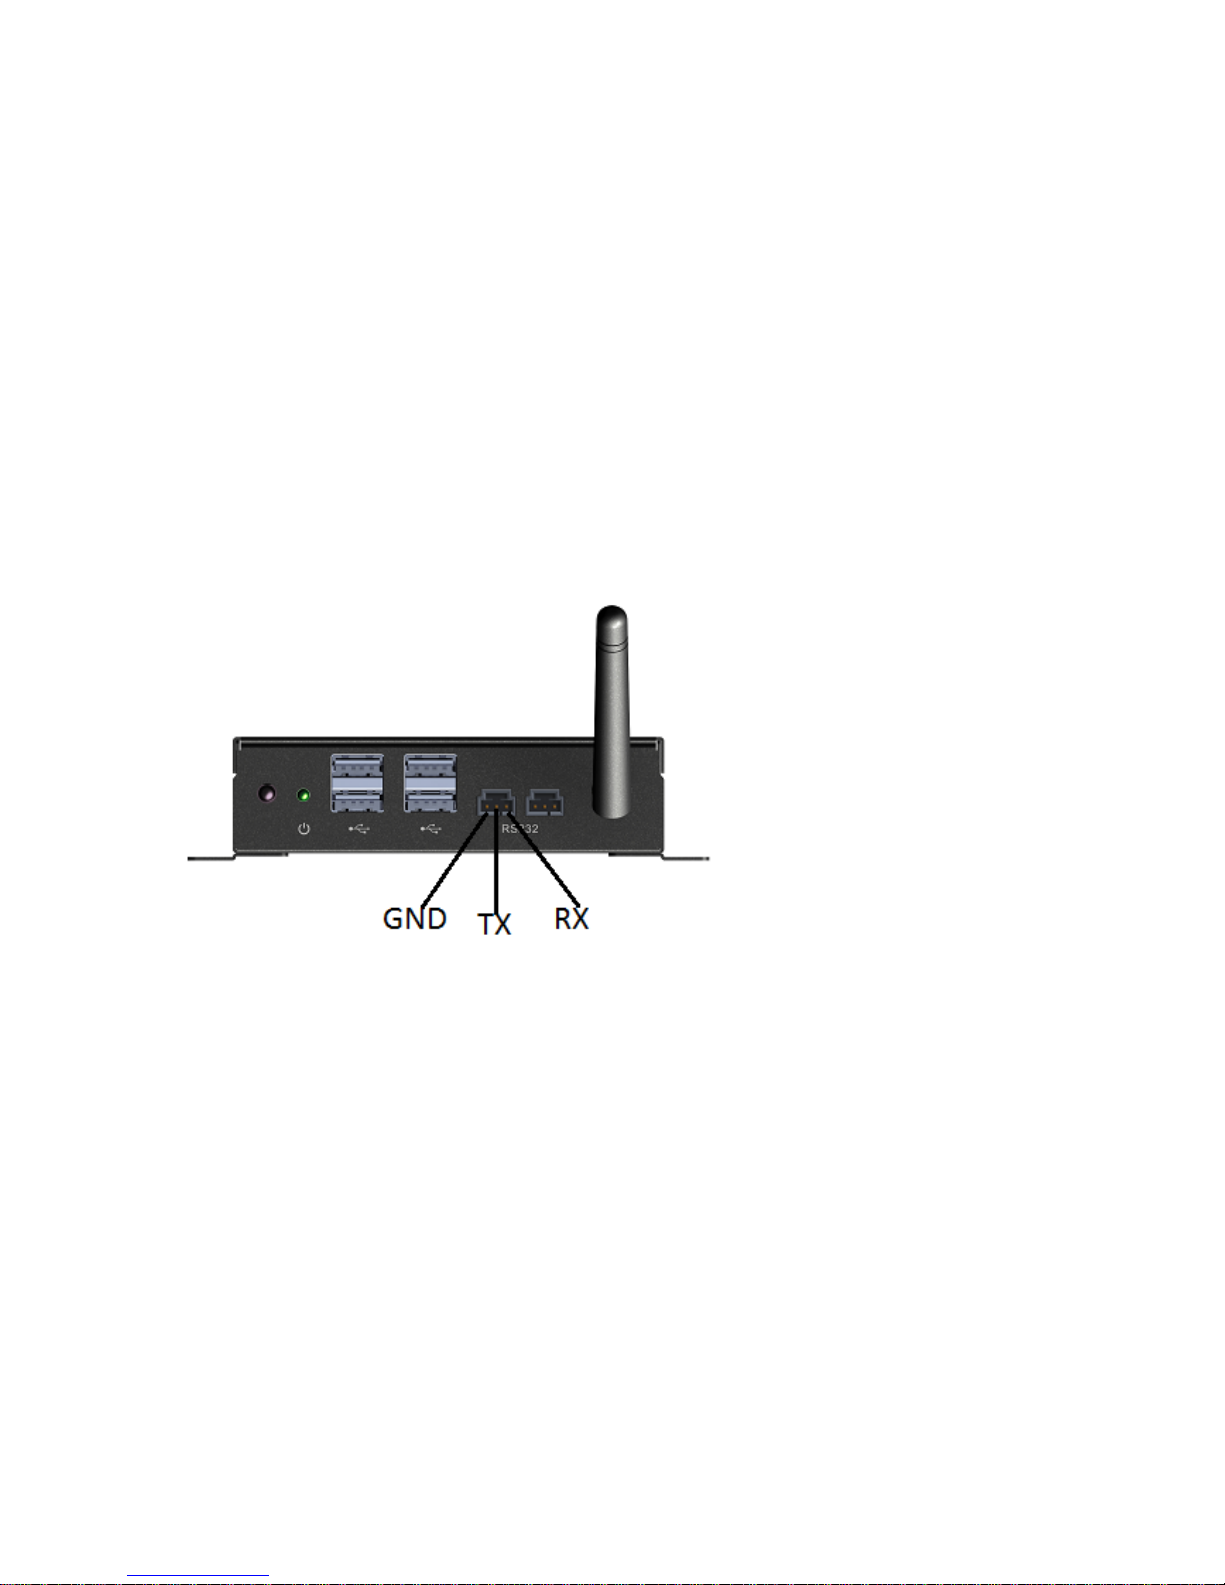
RS-232 Pin Define……………………….………………………………………………….3
RS-232 Cable (optional)..……………….………………………………………………….3
Device Connection................................................................................................................ 4
Boot....................................................................................................................................... 4
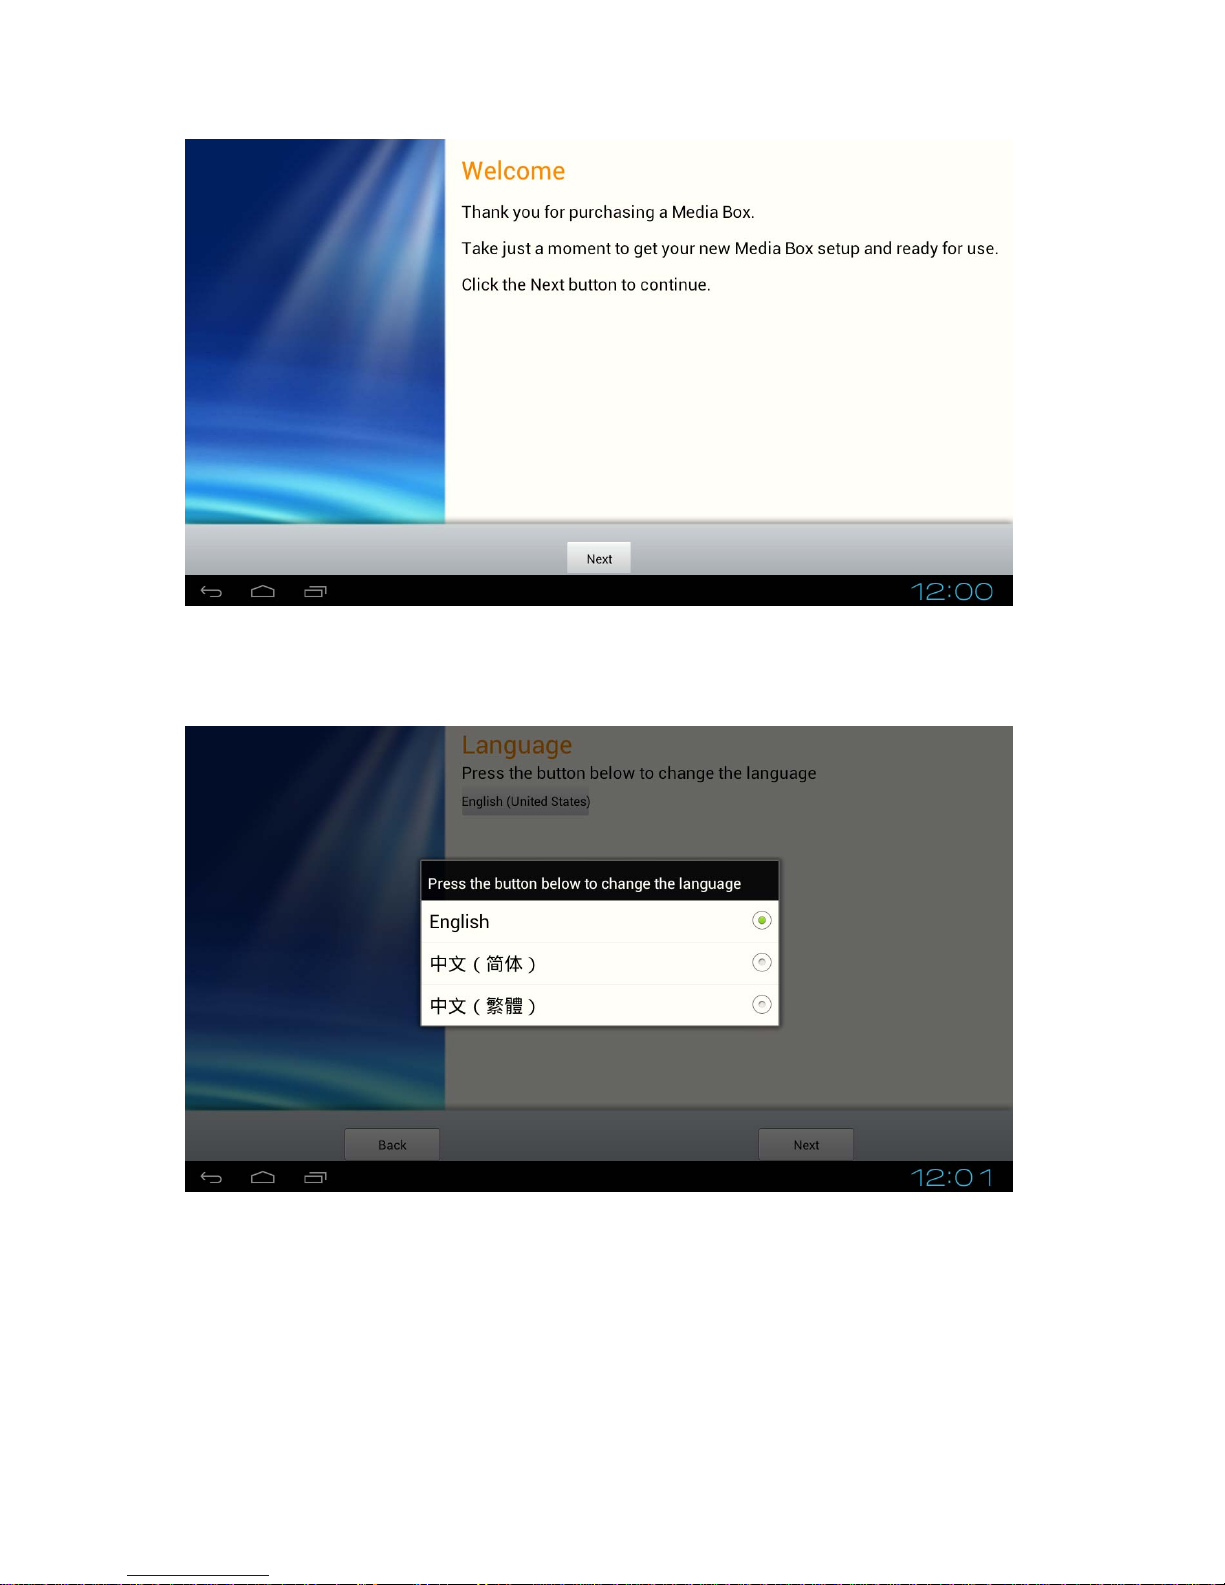
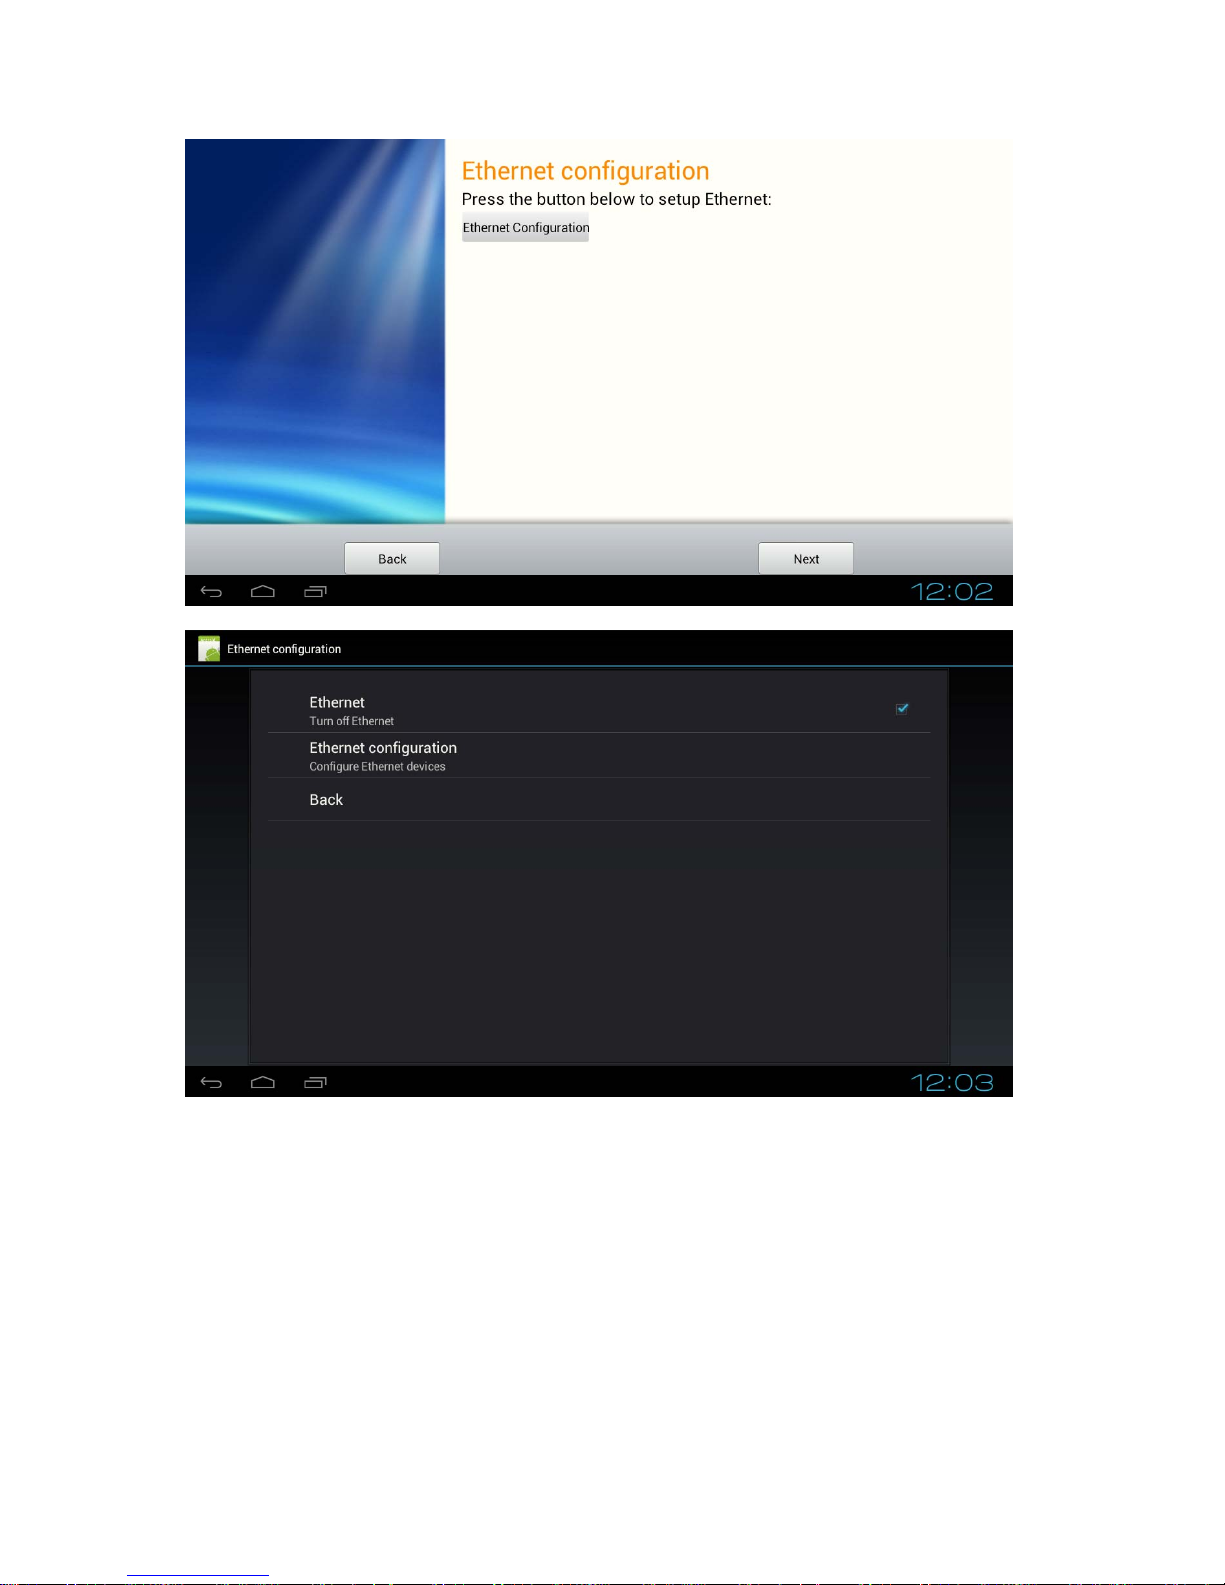
Setup Wizard ......................................................................................................................... 5
Launcher...............................................................................................................................11
Home Screen....................................................................................................................... 12
Combined System Bar......................................................................................................... 13
Use Apps & Widgets........................................................................................................... 15
Settings................................................................................................................................ 17
Wi-Fi .............................................................................................................................. 18
Ethernet (Wired Network).............................................................................................. 18
More Network Settings .................................................................................................. 18
Sound.............................................................................................................................. 18
Display ........................................................................................................................... 18
Storage............................................................................................................................ 19
Apps ............................................................................................................................... 19
Location service ............................................................................................................. 19
Security........................................................................................................................... 19
Language & input........................................................................................................... 19
Virtual Keyboard............................................................................................................ 19
Switch Input Methods .................................................................................................... 20
Backup & reset............................................................................................................... 20
Date & time.................................................................................................................... 21
Accessibility................................................................................................................... 21
Developer options .......................................................................................................... 21
About MediaBox............................................................................................................ 21
Browse Files........................................................................................................................ 21
Install & Uninstall Apps...................................................................................................... 22
Install Apps..................................................................................................................... 22
Uninstall Apps................................................................................................................ 23
Surf Online.......................................................................................................................... 24
Play Media........................................................................................................................... 25
Upgrade System .................................................................................................................. 25
Remote Control................................................................................................................... 27
Q&A.................................................................................................................................... 27
Specification........................................................................................................................ 28

2
Declaration
Please read the instructions carefully before installing and using your equipment.
Do not put the product in high temperature, humid or dusty environment.
Do not drop, knock or disassemble this product.
Do not turn off the device when it’s formatting or upgrading, otherwise it will
cause operation system error.
This product is non-waterproof.
Only use approved accessory enhancements.
Non-professionals are not allowed to disassemble and maintain the product.
Warranty is void if the product has been subject to misuse, abuse, improper
maintenance or repair, or unauthorized modification.
Product Instruction
1. IR: Support remote control
2. LED Indicator: Power supply ON: Blue OFF: Light Off
3. Dual USB port: Supply two USB 2.0 Host type A ports
4. RS232: Supply two EIA RS-232C DB-9 ports
5. Wi-Fi Antenna: Support Wi-Fi 802.11 b/g/n
6. SD Card: SDHC Class10 compatible

3
7. Stereo Line-out: Stereo audio output
8. SPDIF: Optical output
9. RJ45 Ethernet Port: Support one RJ45 Ethernet port
10. HDMI Port: High Definition Multimedia Interface output
11. DC In: 12V/1.5A power
12. Power switch: On/Off switch
13. Reset Button: Press this button for more than 5 seconds to reset to default
settings.
RS-232 Pin Define
RS-232 settings: baud rate: 115,200bps, stop bit: 8, parity: N.
RS-232 cable is custom made, please check with vendor for your inquiries.
RS-232 cable (Optional)
3 pin RS-232 cable on both ends of the cable. Black colored cable should be plugged into
the Ground pin.

4
Device Connection
Step 1 Connect MB222 to the monitor via a HDMI cable.
Step 2 Connect the power adapter to power on MB222.
Step 3 Use a remote control or plug in a mouse or keyboard via USB to operate.
Mouse’s left button for “Enter”, right button for “Back”.
Boot
After connecting MB222 to a monitor with a HDMI cable, the boot logo will appear
on the monitor.

5
After a few seconds, you will enter the system.
Setup Wizard
When using this media box for the first time, a setup wizard will guide you through
the settings after boot up. Click the “Next” button to continue.

6
Language
Press the “English (United States)” button and select your language from the list.
TV display layout
Press the “display position” button to enter the monitor position adjusting page.

7
Press Enter key to switch zoom in/out, and then press the four direction keys to
adjust the monitor position.
After adjusting the position, press Back key to return to the setup wizard.
Ethernet configuration
Press the “Ethernet Configuration” button to change the Ethernet settings.

8
Check the “Ethernet” box to turn on Ethernet function, and click the “Ethernet
Configuration” item below to bring up the Ethernet setting window.

9
Select a connection type from DHCP and Static IP, and fill in relevant information.
After confirming the settings, please click “save” and press Back key to return to
the setup wizard.
Wi-Fi
Press the “Wi-Fi Configuration” button to change the Wi-Fi settings.

10
Check the box to turn on Wi-Fi function, and click the “Wi-Fi settings” item below
to enter the Wi-Fi setting page.
Select an available wireless AP to connect. After setting the Wi-Fi, press Back key
to return to the previous page, and press Back key again to return to the setup
wizard.
Finish
Now the setup for your media box is completed. Click “Finish” button to close the
setup wizard.

11
If you want to enter this setup wizard again, please click the app OOBE to
start.
Launcher
This is a usual launcher for most android systems.

12
Home Screen
In the home screen, you will see some app icons. By long-press an icon, you can
drag it where ever you like on the home screen.
If you want to delete an icon, please drag it to “×Remove” at the top of the screen
until it turns red.
To see other screens with more icons, you can swipe left or right to roll the pages.

13
Press any empty space on the screen, a wallpaper selection window will pop up.
You could choose your wallpaper from Gallery, Live Wallpapers or Wallpapers.
Combined System Bar
Navigation Buttons

14
1. Back: Return to the previous page.
2. Home: Enter the launcher’s home screen.
3. Recent: Switch between recently used apps.
To remove an app from the list, you could long press the icon to select “Remove
from the list”, or directly swipe the app item left or right.
Status Notifications

15
The right side of the combined bar displays system status, such as time, Wi-Fi, SD
card and USB connection etc. Click to open the status window.
Click to show notifications’details.
Use Apps & Widgets
Click to show the applications and widgets page.

16
There are many pre-installed apps, you can open an app by pressing its icon. To
easily access an app, you can create a shortcut by long pressing an icon and drag it
to the home screen.
Click the “WIDGETS” tab, you will see the widgets for the apps.

17
You can also drag the widgets to the home screen for easy access.
System Settings
Click to open the system setting app.
In this app, you can set or check the system parameters according to your own
requirements or preferences, such as network, sound, display, storage, security,
input method, system language and time, etc.

18
Wi-Fi
Switch the Wi-Fi button to ON, and the device will scan available wireless networks
automatically. Select your SSID and input the password to connect.
Ethernet (Wired Network)
DHCP connection: Set the connection type to “DHCP”. Save the configuration.
Static IP connection: Set the connection type to “Static IP”, and input IP address,
netmask, DNS address and Gateway address. Save the configuration.
PPPoE connection: PPPoE connection isn’t provided in “Settings”. You can use a
separate app to set it.
The app “PPPoE” is specifically for setting a PPPoE connection.
Open this app, input User name and Password and save the configuration.
After saving, plug the network cable into the Ethernet port.
More Network Settings
VPN: Before setting VPN network, you must set a lock screen PIN or password.
Click “add VPN network” and configure name, type and server address to set a
VPN connection. MPPE and advanced options such as DNS search domains, DNS
servers and forwarding routes is provided.
Portable hotspot: When Wi-Fi is turned on, the device can be set as a hotspot. Set
a SSID and encryption for the hotspot before turning it on.
Proxy Settings: Set hostname and port for proxy servers. You can also set websites
bypass the proxy server.
Sound
Volumes: Slide left or right to adjust the following three types of volume: Music,
video, games & other media; Ringtone & notifications;Alarms.
Touch sounds: Click to open or close touch tone.
Digital audio output: Click to select one digital audio output modes from PCM
(Pulse Code Modulation) and RAW.
Display
Wallpaper: Click to select wallpaper via Gallery, Live Wallpapers or Wallpapers.
‐Gallery: User’s pictures in storage.
‐Live Wallpapers: System default and user installed live wallpapers.
‐Wallpapers: System default wallpapers.
Output mode: Click to select output resolution and frequency.
HDMI auto output mode: Open or close auto match the best output resolution.
Dual output mode: Click to select CVBS (Composite Video Broadcast Signal)
output resolution.
Display position: Operate as the steps on the pictures to adjust the display position.

19
Font size: Click to select an appropriate front size.
Storage
In this option, you can check out your storages for details, including internal and
external storages. Besides, you can also unmount an external storage to safely
remove it and erase all data on an external storage.
Apps
View and manage the installed applications. Select an app and enter it, you can
force stop, clear its cache or data, change its installation location or uninstall it.
Location service
Let apps use data from sources such as Wi-Fi and Ethernet to determine your
approximate location.
Security
Password: Click to set password visible.
Device administration: Manage device administrators, and choose whether or not
to allow unknown source.
Credential storage: View, install or remove certificates.
Language & input
Language: Setup system language according to your preference. You can also set
spelling correction and personal dictionary.
Keyboard & Input method: System default input methods: Android keyboard
(support English) and Remote controller input method (support English/Chinese).
Click “Default” to change the default input method. You can manually install other
input methods.
Speech: Set the parameters for speech input.
Mouse/Trackpad: Adjust the pointer speed.
Virtual Keyboard
The device provides a virtual keyboard for typing.
When you click in a text input box, the virtual keyboard will appear at the bottom of
the screen.
To collapse the virtual keyboard, you can click in the system bar.
Table of contents