ZWO ASI6200 User manual

ASI6200 Manual
Revision 1.2
Dec, 2019
All materials related to this publication are subject to change without notice and its copyright
totally belongs to Suzhou ZWO CO.,LTD.
Please download the latest version from our Official website.

ASI6200 Manual
2
Table of Contents
ASI6200 Manual.............................................................................................................................1
1. Instruction.....................................................................................................................................3
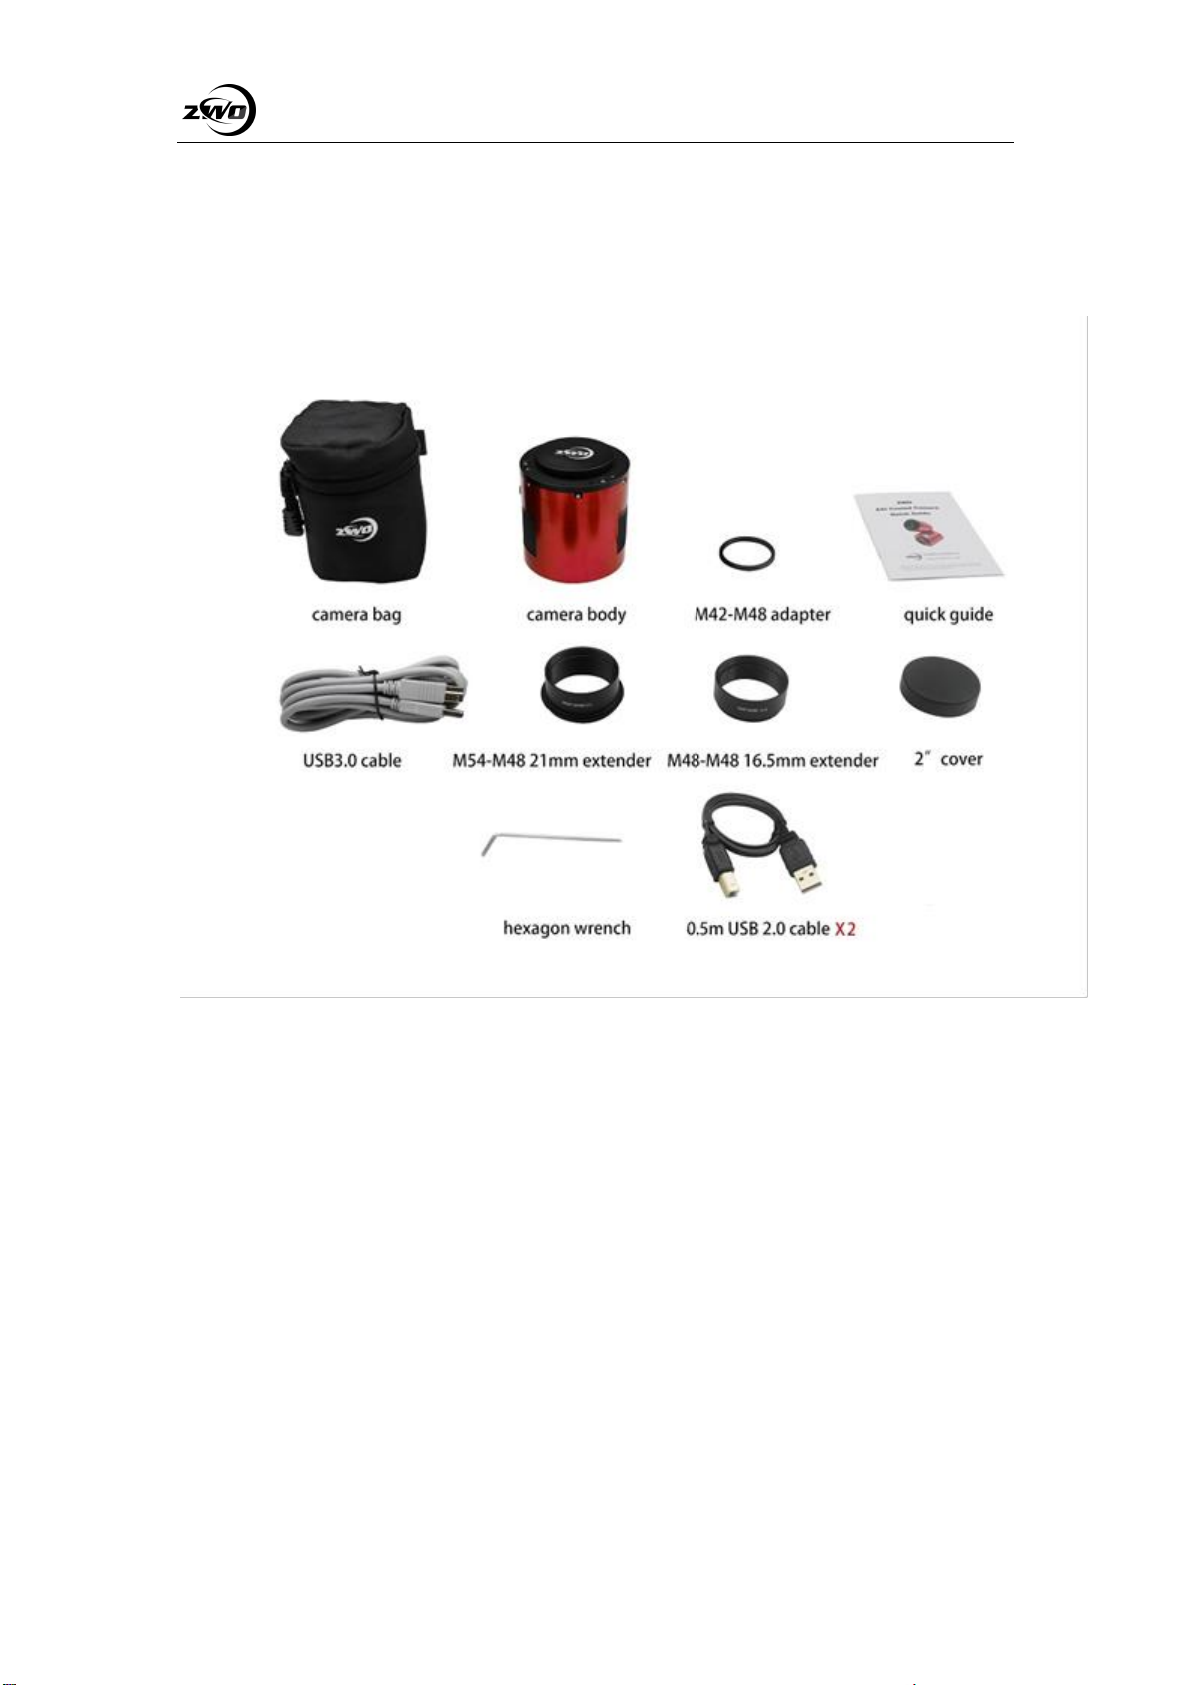
2. What's in the box? .........................................................................................................................4
3. Camera technical specifications....................................................................................................5
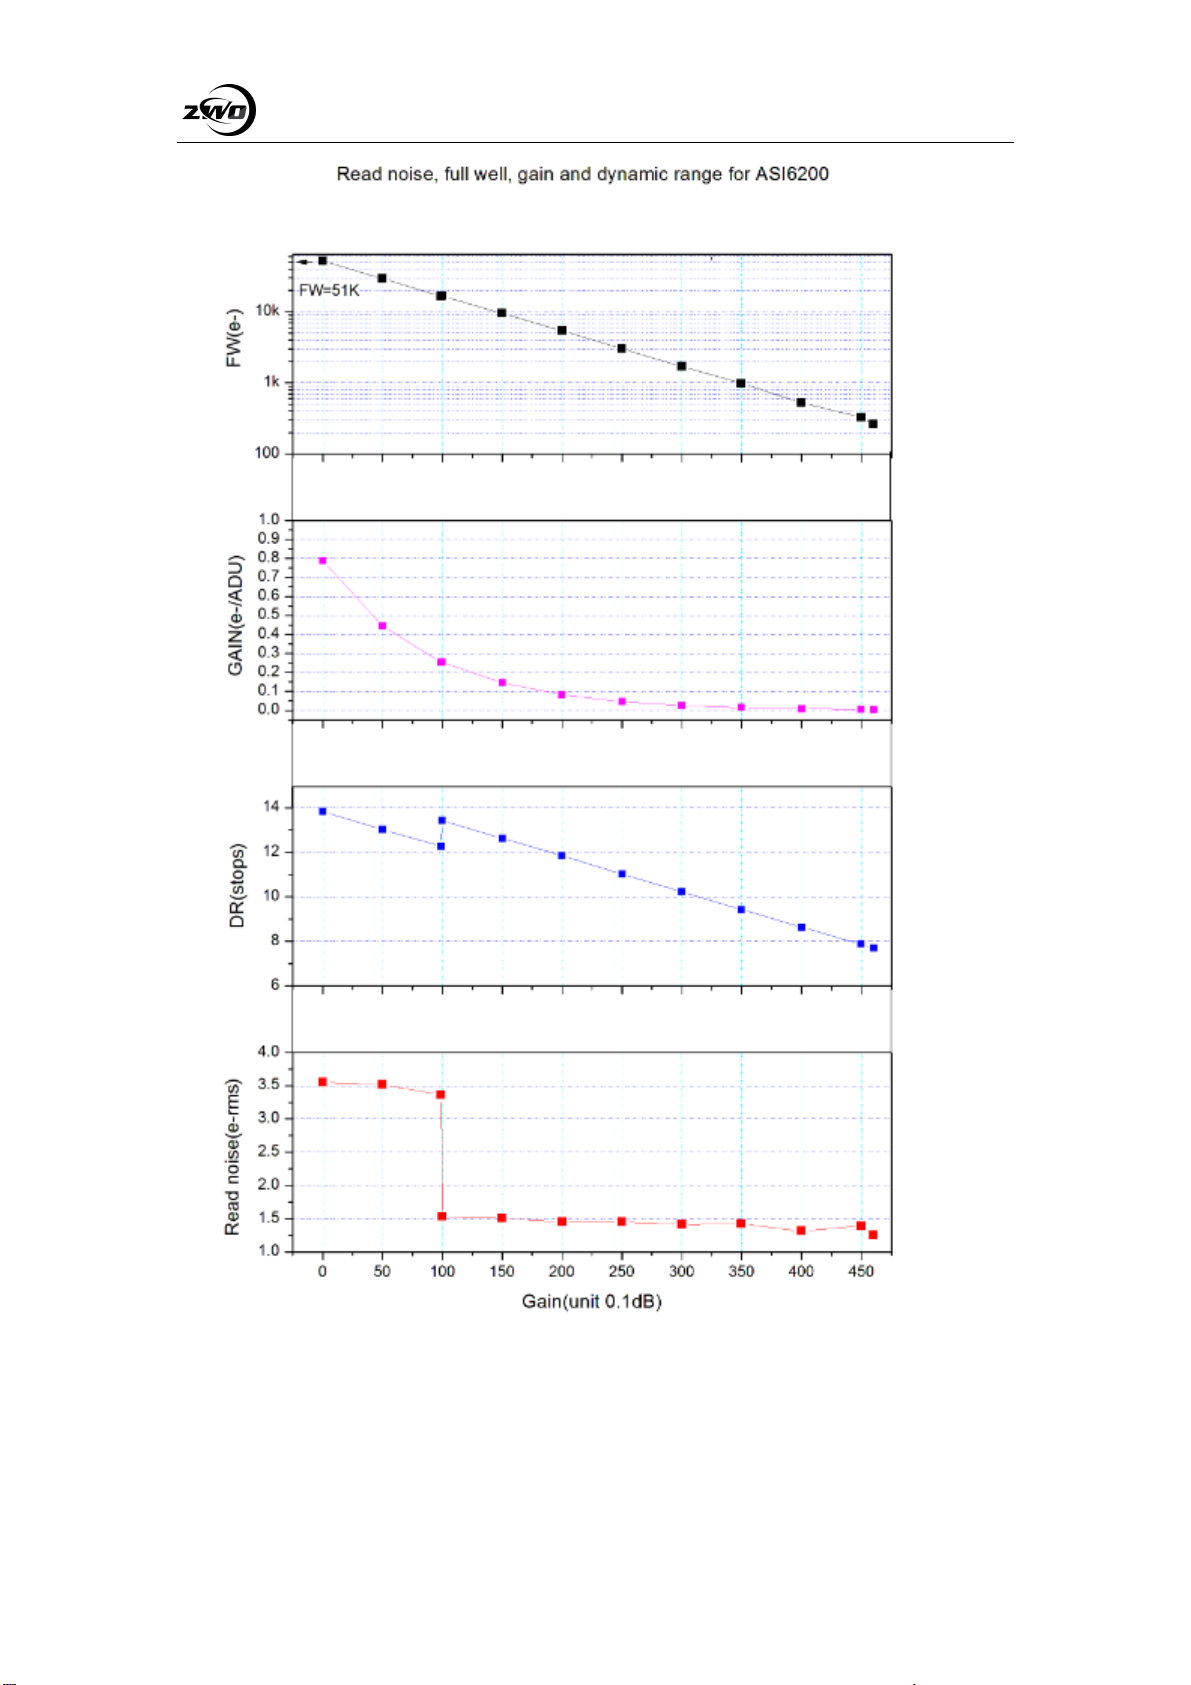
4. QE Graph & Read Noise...............................................................................................................6
5. Getting to know your camera........................................................................................................8
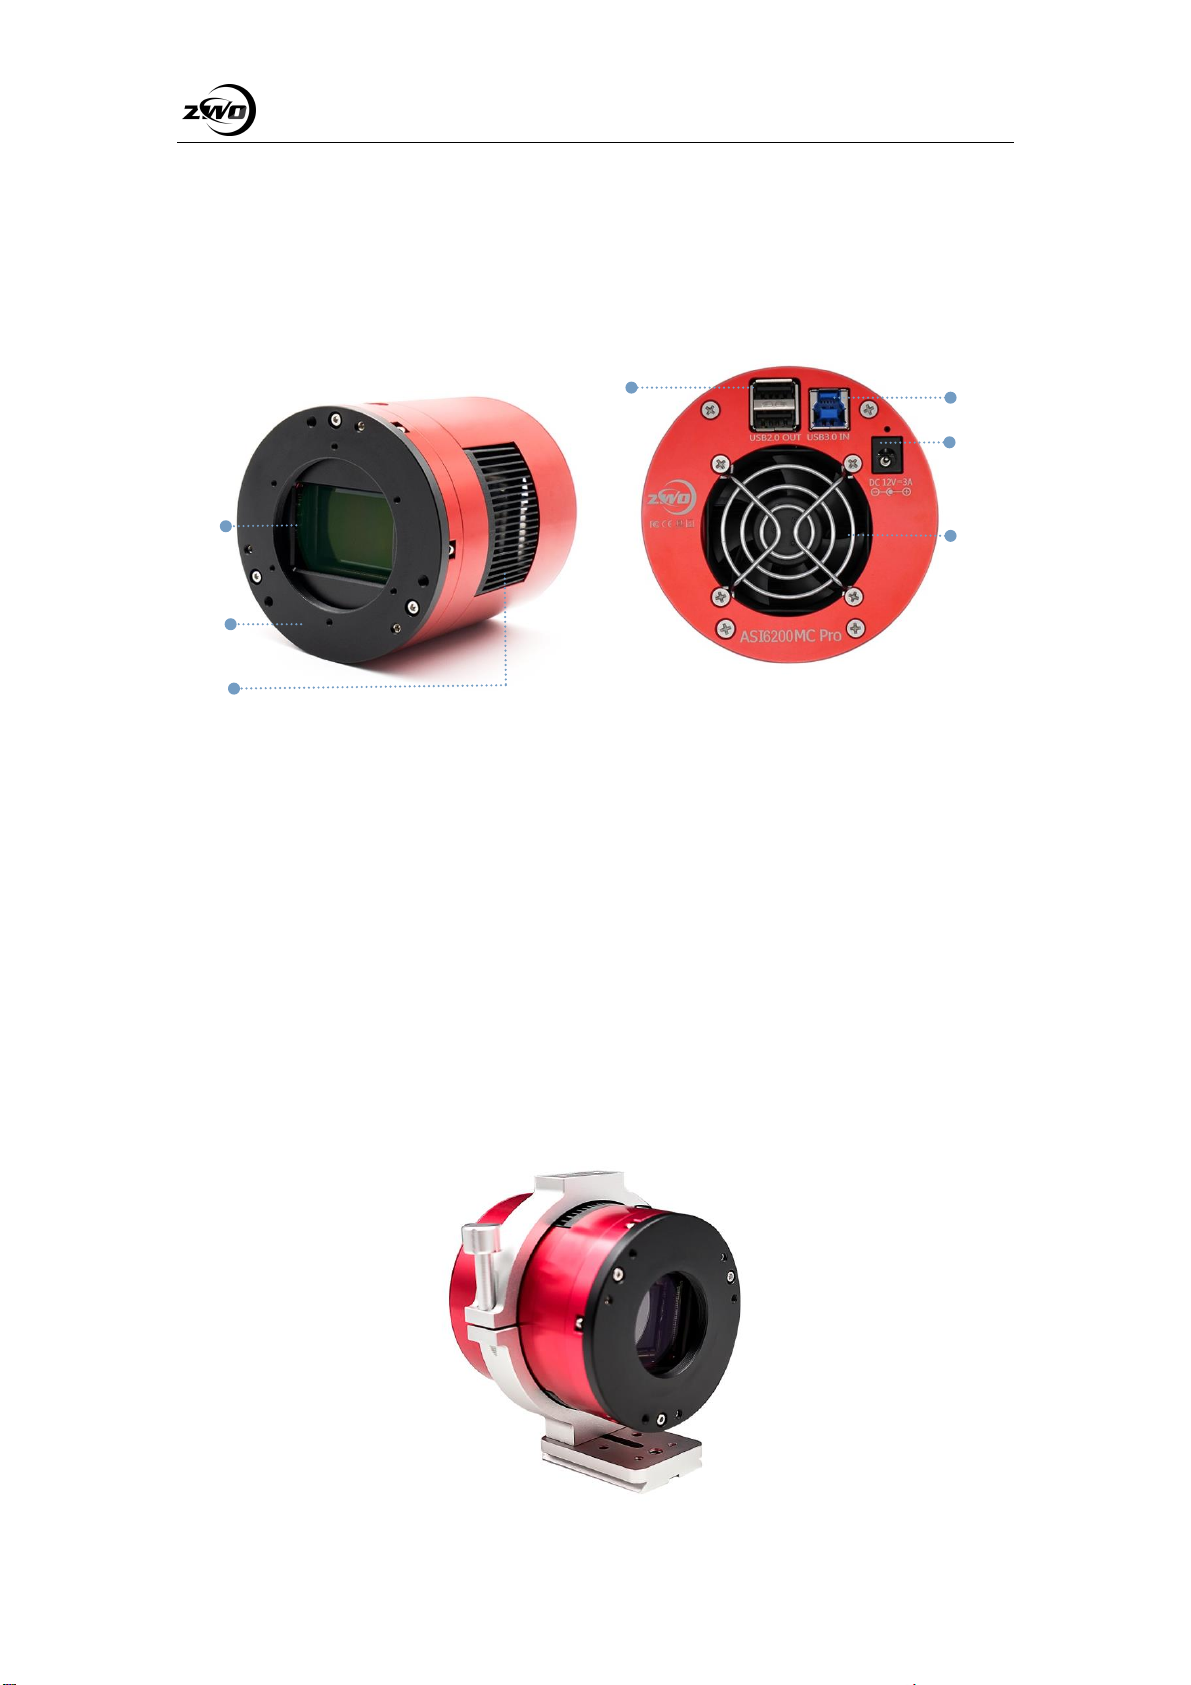
5.1 External View......................................................................................................................8
5.2 Power Consumption............................................................................................................9
5.3 DDR Buffer.........................................................................................................................9
5.4 Cooling System...................................................................................................................9
5.5 Back Focus Distance .........................................................................................................10
5.6 Protective Window ............................................................................................................10
5.7 Analog to Digital Converter (ADC)..................................................................................11
5.8 Binning..............................................................................................................................11
5.9 Tilt Adjustment..................................................................................................................11
6. How to use your camera..............................................................................................................13
7. Cleaning......................................................................................................................................17
8. Mechanical drawing....................................................................................................................18
9. Servicing.....................................................................................................................................19
10.Warranty ....................................................................................................................................19

ASI6200 Manual
3
1. Instruction
Congratulations and thank you for buying one of our ASI Cameras!This manual will
give you a brief introduction to your ASI camera. Please take the time to read it
thoroughly and if you have any other questions, please feel free to contact us at
info@zwoptical.com.
Welcome to join ZWO FB and User Forum below!
Facebook : https://www.facebook.com/ZwoDesignAstronomyCameras
User Forum: https://bbs.astronomy-imaging-camera.com/
ASI6200 Camera is specifically designed for astronomical photography. It is not only
suitable for DSO imaging but also for Planetary imaging You will be impressed by its
superior performance and wide use!
Model
Mono/Color
(TEC)Cooling
DDR3 Buffer
Sensor
ASI6200MM Pro
Mono
Two Stage
256MB
SONY IMX455
ASI6200MC Pro
Color
Two Stage
256MB
SONY IMX455
How to choose cameras?
Normally, mono camera sensors are with higher sensitivity, better at high-demand
shooting tasks. But extra accessories will be needed, such as filter wheel and filters, etc.
Post processing of image is also complicated, thus we recommend the color cameras to
fresh users.
For software installation instructions and other technical information, please refer to
our official website http://zwoasi.com/

ASI6200 Manual
4
2. What's in the box?
ASI6200MM/MC Pro

ASI6200 Manual
5
3. Camera technical specifications
Sensor
SONY IMX455 CMOS
Diagonal
43.3mm
Resolution
62 Mega Pixels
9576*6388
Pixel Size
3.76μm
Image area
36mm*24mm
Max FPS at full resolution
2FPS
Shutter
Rolling shutter
Exposure Range
32μs-2000s
Read Noise
1.5-3.5e
QE peak
Above 80%
Full well
51.4ke
ADC
16bit
DDR3 buffer
256MB
Interface
USB3.0/USB2.0
Adapters
M54*0.75
Protect window
AR window (mono)
IR CUT (color)
Dimensions
90mm Diameter
Weight
0.7kg
Back Focus Distance
17.5mm
Cooling:
Regulated Two Stage TEC
Delta T
35°C below ambient
Cooling Power consumption
12V at 3A Max
Supported OS
Windows, Linux & Mac OSX

ASI6200 Manual
6
4. QE Graph & Read Noise
QE and Read noise are the most important parts to measure the performance of a camera.
Higher QE and Lower read noise are needed to improve the SNR of an image.
For the 6200 Sensor, the peak value for QE is around 80%.
Read noise includes pixel diode noise, circuit noise and ADC quantization error noise. The lower
the better.
As you can see, the Read Noise of the ASI6200 camera is extremely low when compared with
traditional CCD cameras. In addition, it is with Built-in HCG mode, which can effectively reduce
read noise at high gain and keep the same wide dynamic range for this camera as at low gain. When
the gain is 100, the HCG mode will be automatically turned on. Additionally, the read noise is as
low as 1.5e while the dynamic range can still be close to 14bit.
Depending on your target, you can set the gain lower for higher dynamic range (longer exposure)
or set the gain higher for lower noise (such as short exposure or lucky imaging).

ASI6200 Manual
7

ASI6200 Manual
8
5. Getting to know your camera
5.1 External View
1. Protective Window, D60*2mm, AR window for mono camera, IR CUT for color camera
2. Tilt adjustment ring, M54 * 0.75 thread, can be removed
3. Radiator
4. USB2.0 Hub
5. USB3.0/USB2.0 Interface
6. Cooling power supply DC power port: size 5.5 * 2.1mm, positive inside and negative outside,
12V3A power is recommended.
7. Ultra-quiet magnetic levitation fan, will rotate only when the cooling is on.
The camera can be placed on a holder ring for Cooled cameras with a 1/4” thread under the ring.
1
2
3
4
5
5
6
5
7
5

ASI6200 Manual
9
5.2 Power Consumption
ASI6200 camera is with low power consumption, max at 5.75W. USB3.0 cable is recommended for
power supply.
Recommended power supply for cooling: 12V @ 3A DC adapter (5.5×2.1mm, center pole positive).
Also suitable: lithium battery with 9-15V.
Here is the ASI6200 cooling efficiency graph.
5.3 DDR Buffer
The ASI6200 Pro camera includes a 256MB DDR3 memory buffer to ensure the stability of data
transmission. Additionally, the use of a memory buffer minimizes amp-glow, which is caused by the
slow transfer speeds.
5.4 Cooling System
The Cooling system of ASI6200 Pro camera can precisely control the sensor temperature. Unlike
traditional CCD, the ASI6200 camera has ultra-low readout noise, efficient cooling, and adjustable

ASI6200 Manual
10
gain. There is no need to use ultra-long exposures to shoot targets, which significantly reduces the
requirements for the photography system as well as the guide system. However, if you use short
exposures (for example, less than 100ms), the effect of cooling on the image will be little. Cooling
system can be set to a minimum temperature of -35 ℃ below ambient temperature.
Here’s the dark current curve of ASI6200 sensor between -20 ℃ and 35 ℃
5.5 Back Focus Distance
The female flange to the sensor is 17.5mm. You can reach 55mm back focus distance with the 21mm
and 16.5mm extender included in the camera package.
5.6 Protective Window
There is a protective window in front of the 6200camera sensor, with 60mm diameter and 2mm
thickness.
ASI6200MM Pro uses an AR coated filter, while ASI6200MC Pro uses IR CUT filter.

ASI6200 Manual
11
5.7 Analog to Digital Converter (ADC)
The ASI6200 camera has a built-in 16-bit ADC. 12bit ADC mode for output will be used when we
do hardware Bin, This camera also supports a custom ROI partial readout mode, with a faster frame
rate at small ROI resolutions.
Please see below attached different frame rates under different resolutions on USB3.0 and USB2.0
of ASI6200 in 16bit mode.
Resolution
16Bit ADC
USB 2.0
USB 3.0
9576×6388
0.35fps
2.05fps
7680×4800
0.59fps
2.72fps
6400×4096
0.83fps
3.18fps
4096×2160
2.45fps
5.97fps
3840×2160
2.61fps
5.97fps
1920×1080
10.43fps
11.66fps
1280×720
17.10fps
17.10fps
640×480
24.81fps
24.81fps
320×240
45.21fps
45.21fps
5.8 Binning
The ASI6200 camera supports bin2, bin3, bin4 software Binning mode and hardware bin2, bin3, the
best advantage of hardware binning is the faster frame rates. If you don't care about speed, we
suggest you use software binning.
5.9 Tilt Adjustment
There are 3 sets of screws that can be used to tilt the sensor, make it same with the primary mirror
of Newtonian, two screws per set for screw in /out.

ASI6200 Manual
12
You can refer to below:
1. Take a starred image with the camera, you will easily find out the tilt part in the image through
the software, and then adjust one or more sets of flange adjustment screws on the camera
corresponding to the image.
2. Take another image after the sensor tilt adjustment, compare the new image with the previous
one in the software. If the tilt issue is reduced, that means the adjustment is correct. Otherwise, the
adjustment is wrong.
3. Repeat step 2 until the stars in all corners are perfect.

ASI6200 Manual
13
6. How to use your camera
Using an adapter, the ASI6200 camera can be connected to a filter wheel/ telescope, or a camera
lens. Most of the adapters are already included in the package, and the rest can be purchased directly
from our official website below.
https://astronomy-imaging-camera.com/
Nikon /Canon lens Connection Diagram:
1. Nikon-M54 adapter
2. EOS-M54 adapter
3. Nikon lens
4. Canon lens

ASI6200 Manual
14
Mono camera Connection Diagram:
1. ASI6200MM Pro camera
2. 2”Filter Wheel
3. M68 OAG
4. 5mm Tilt adjustment ring
Color camera Connection Diagram:

ASI6200 Manual
15

ASI6200 Manual
16

ASI6200 Manual
17
7.Cleaning
The camera is sealed and comes with an AR protect window to protect the sensor from dusts and
humidity. We don’t recommend customer to open the camera for cleaning. Otherwise, chamber of
the sensor can get wet which will cause the sensor getting dew when do cooling in the future.
To see the dusts, you just need to set up your telescope and point it to a bright place. A Barlow is
required to see these dusts clearly. Then attach the camera and adjust the exposure to make sure not
overly exposed. You can see an image like below if it’s dirty.
The big dim spot on the image (right side) are the shadows of dust on the protect window.
The very small but very dark spot on the image (at left) are the shadows of the dusts on the sensor.
If above situation occurs, it is recommended that the dust on the sensor surface be blew off with air
pump, and the remaining dust is suggested to be removed by the software after the flat field is taken.
We have very detailed instruction on our website:
https://astronomy-imaging-camera.com/manuals/

ASI6200 Manual
18
8. Mechanical drawing
ASI6200MM/MC Pro

ASI6200 Manual
19
9.Servicing
For software upgrades please refer to “Support-manual and software” on our official website.
https://astronomy-imaging-camera.com/
Repairs and servicing are available by emailing info@zwoptical.com
For customers who bought the camera from your local dealer, dealer is responsible for the customer
service.
10.Warranty
We provide 2-year warranty for our products. We offer repair service or replacement for free if the
camera doesn’t work within warranty period.
After the warranty period, we continue to provide repair support and service on a charged basis.
This warranty does not apply to damage that occurred as a result of abuse or misuse, or
caused by afall or any other transportation failures after purchase.
Customer must pay for shipping when shipping the camera back for repair or replacement.
This manual suits for next models
2
Table of contents
Other ZWO Digital Camera manuals