1 BY ONE 509US-0001 User manual
1byone Product Inc.
2313E, Philadelphia Street, Unit M, Ontario, CA 91761
WWW.1byone.com
Instruction Manual/ Bedienungsanleitung/ Manuel d'instructions/
Manual de instrucciones/ 取扱説明書/Manuale di istruzioni
Programmable
Gaming Mouse

EN
DE
FR
ES
JP
IT
EN
DE
FR
ES
JP
IT
01 02
Thank you for choosing 1byone Programmable Gaming Mouse,
please read the user manual carefully when you use this product.
Content
Mouse
User Manual
CD Driver
Functions
Connect the mouse with your computer by USB port, it can work
normally after detecting finished. Please install the driver
software by the setup instruction.
Get into the software interface of “Gaming Mouse” , you can
start to set up the mouse function.
Please make sure the mouse has already been connected to your
computer before and after installing the software.Please make
sure the mouse has already been connected to your computer
before and after installing the software.
Driver Installation Instruction
Tips
Driver Setting Instruction
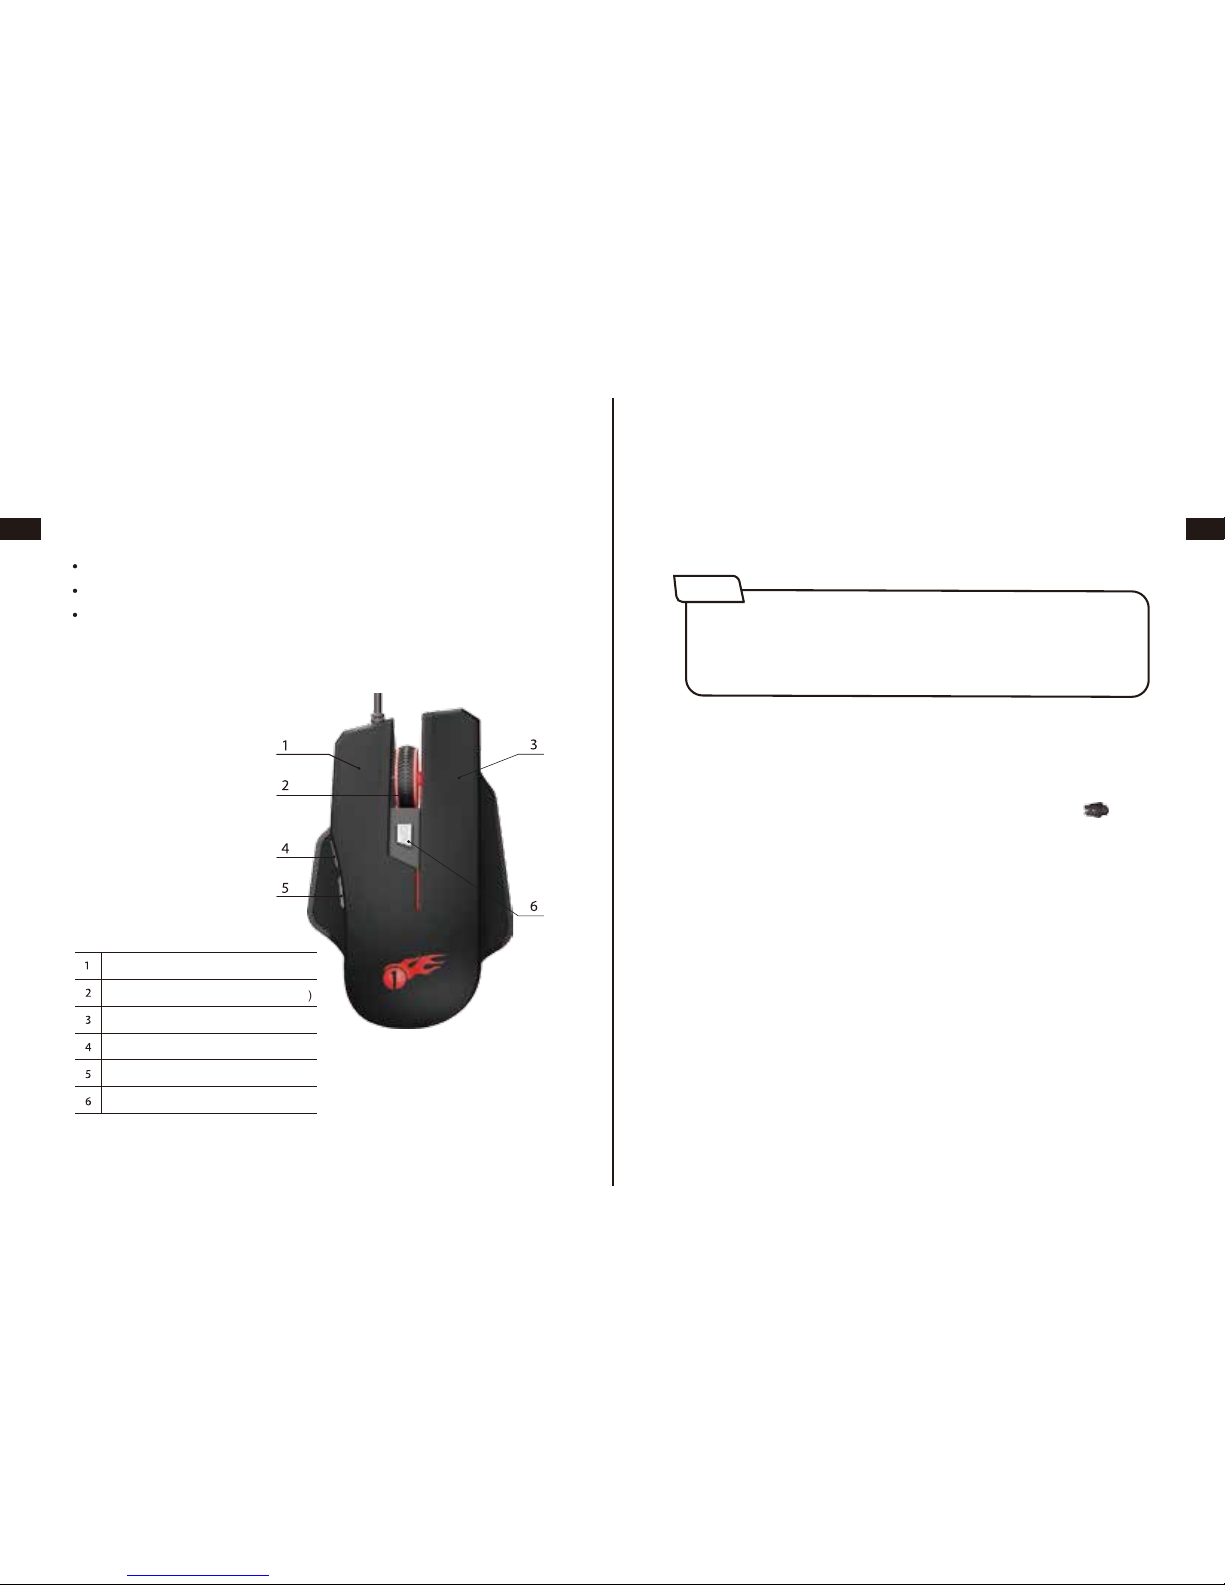
Left Button(Click)
Scroll wheel(Wheel Click)
Right Button(Menu)
Forward function(IE Forward)
Backward function(IE Backward)
DPI Button(DPI cycle)

EN
DE
FR
ES
JP
IT
EN
DE
FR
ES
JP
IT
03 04
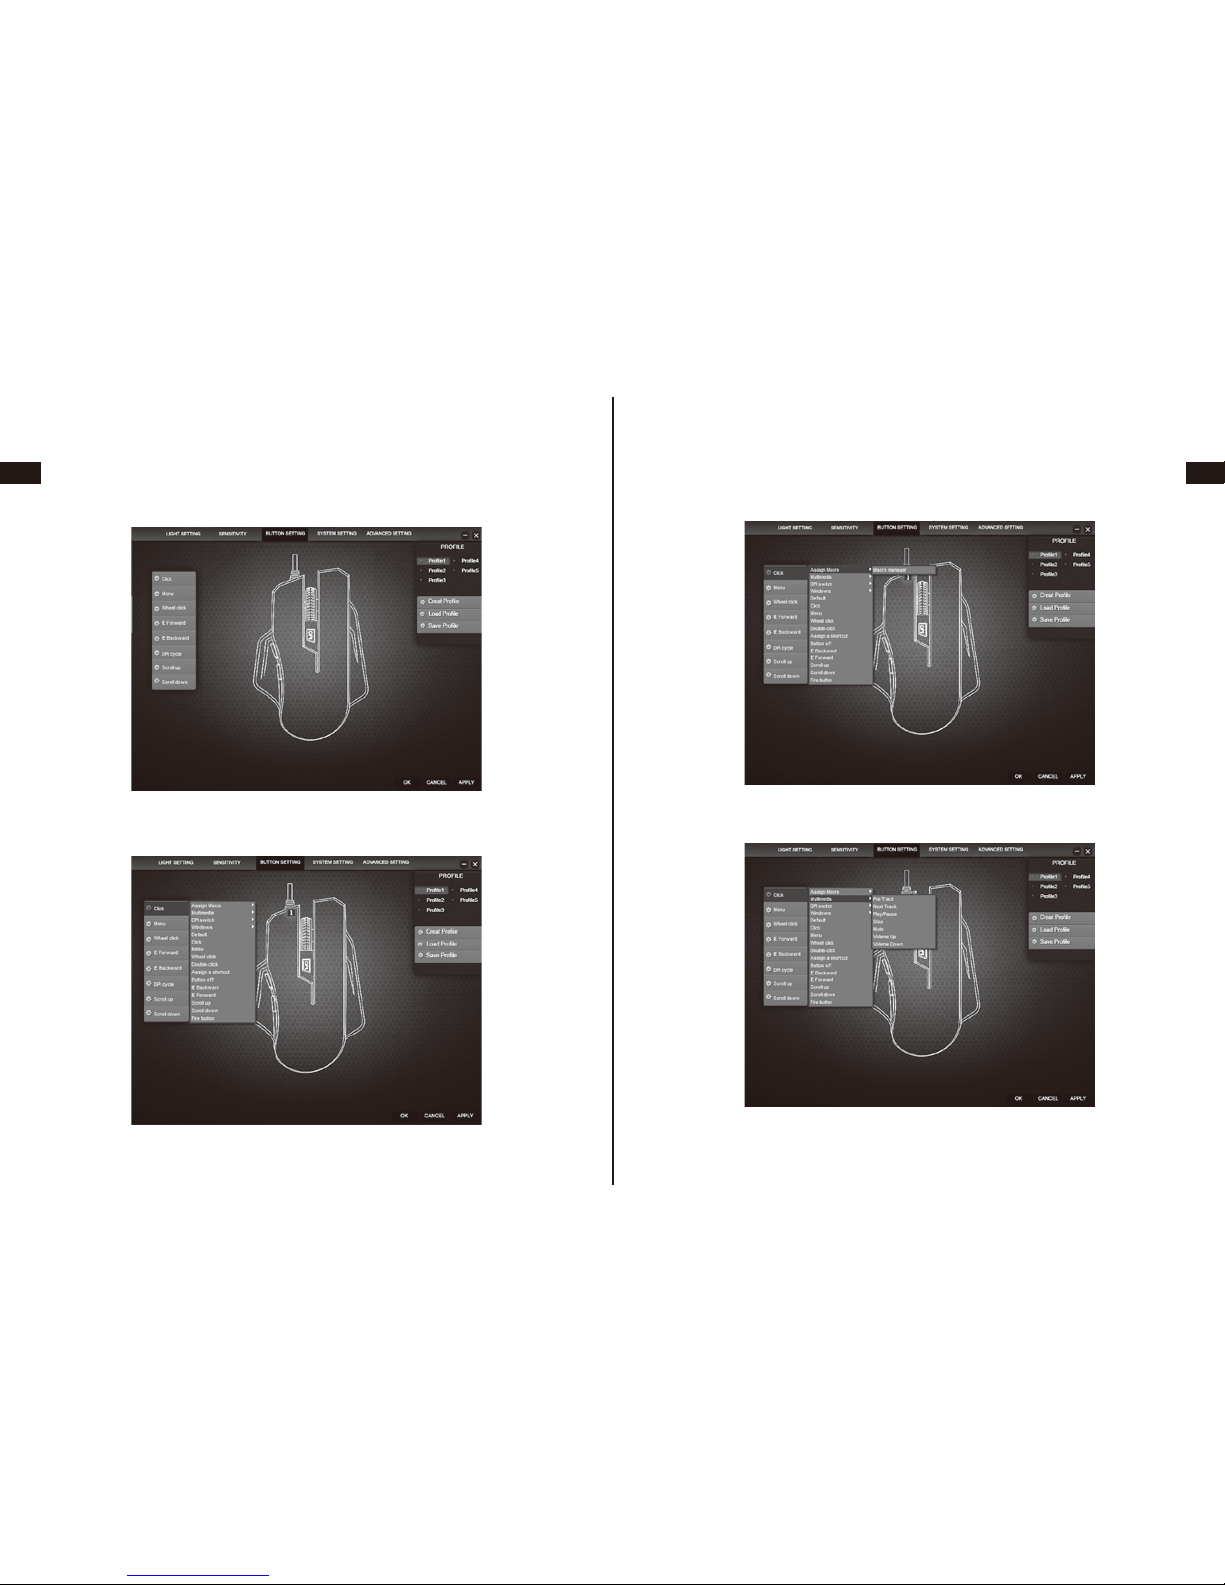
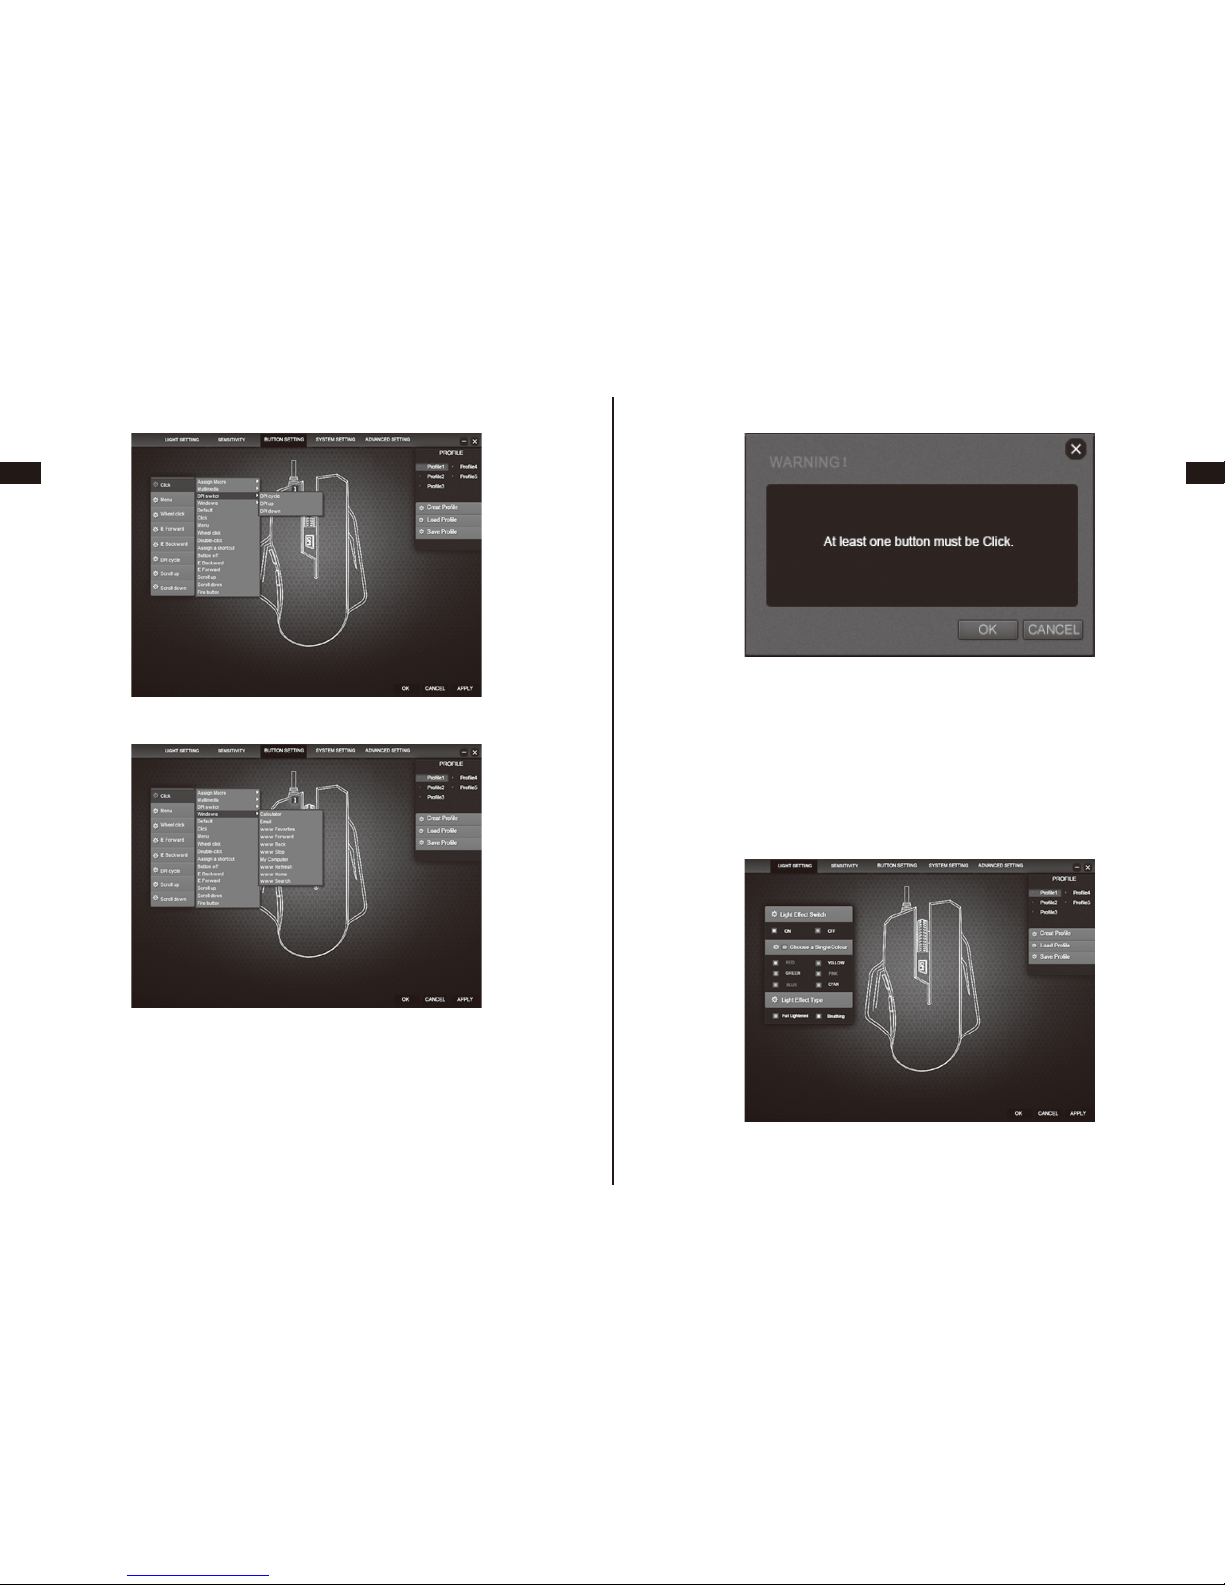
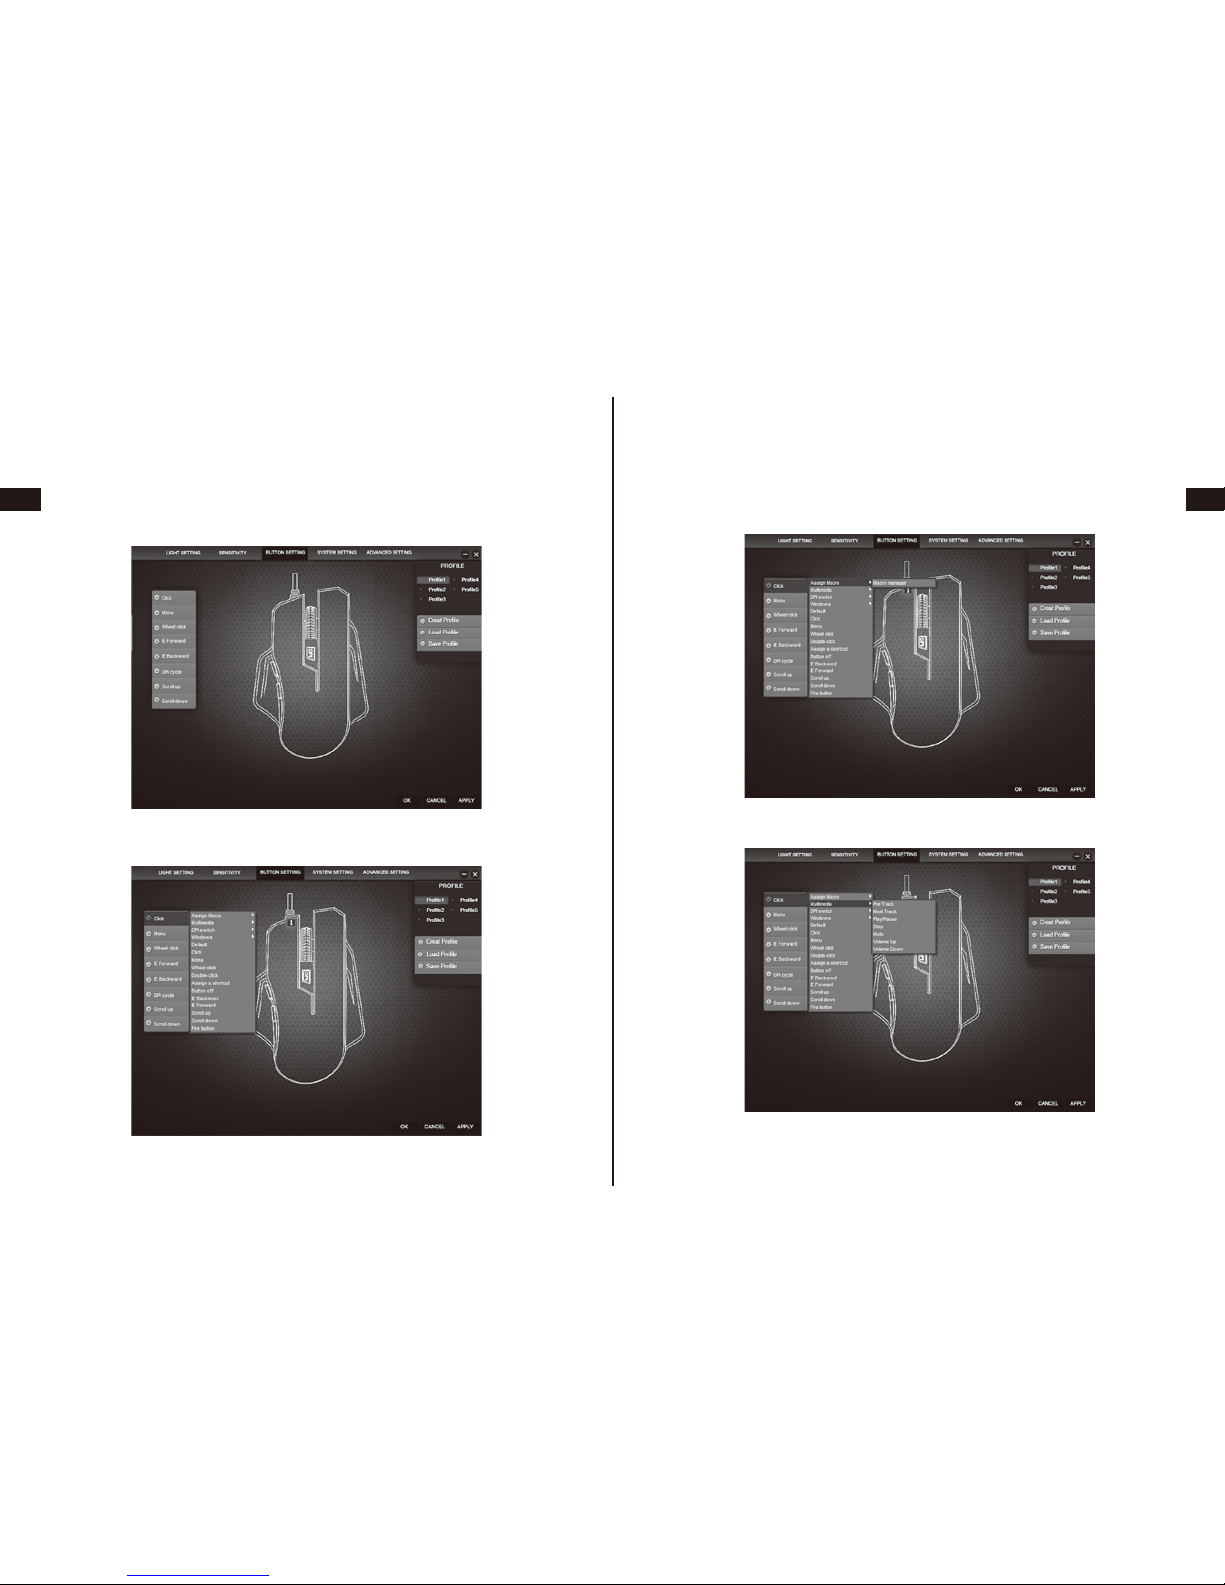
1.Button Setting
8 customized buttons can be set up. The scroll wheel can be set
as: Press the scroll wheel, Scroll up and Scroll down.
For the 8 buttons, total have 16 functions to be set for each
button. The user can set it as desired.
“Assign Macro”, “Multimedia”, “DPI switch” and “Windows” have
the submenu, more detailed functions can be set up, as below
Assign Macro
Multimedia

EN
DE
FR
ES
JP
IT
EN
DE
FR
ES
JP
IT
05 06
DPI switch
Windows
When you hover the cursor over one of the configuration boxes
of the buttons, the related position on the mouse will be
highlighted. Please note that at least one button must be set as
“Click” function firstly before other settings.
2.Light Setting
a) Light effect switch: The gaming mouse will light or not by
choosing “On” or “Off”.
b) Light effect type: The gaming mouse will light at the time by
choosing “Full lightened”, or will be breathing light by choosing
the other one.
c) The light color will be as chosen color. If not choose, the light
color will then change by DPI shift: red-blue-green-purple-yellow.
EN
DE
FR
ES
JP
IT
EN
DE
FR
ES
JP
IT
07 08
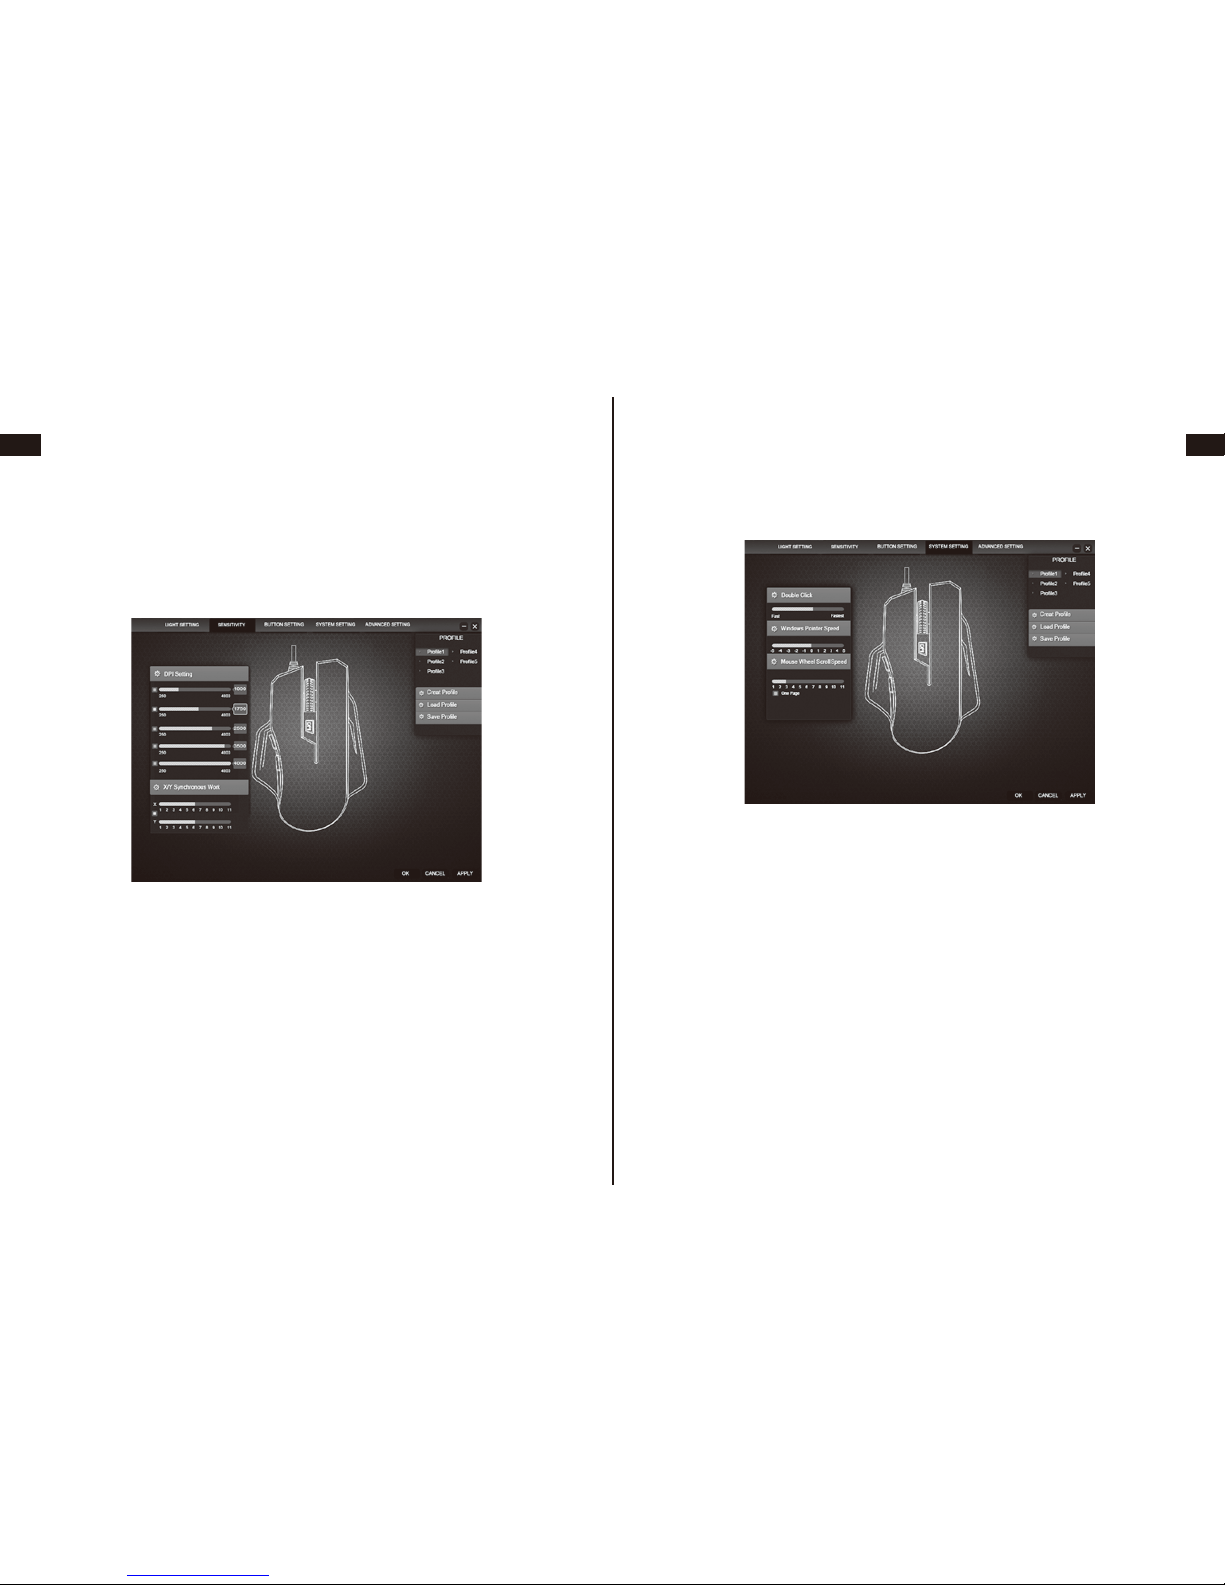
3.Sensitivity (DPI Setting)
As the pictures is showing, you can change between 5 different
DPI resolutions. Default setting: 1000 DPI, 1750 DPI, 2500 DPI,
3500 DPI and 4000 DPI. Each shift can adjust DPI value, 250
DPI by step. The regulation of DPI can also adjust X axis and Y
axis respectively. X/Y DPI can be set respectively by removing
X/Y synchronizing in the direction.
4.System Setting
You can adjust the parameter of operating system: Double click,
Windows pointer speed, Mouse wheel scroll speed.

EN
DE
FR
ES
JP
IT
EN
DE
FR
ES
JP
IT
09 10
5.Advanced Setting
Polling rate of the mouse can be set. Click “Reset”, you can
erase the all advanced settings and reset to factory default.
Click “Reset” and get into the below configuration window: click
“Ok” to rest the all customized settings to factory default. Click
“Cancel” to keep the current setting unchanged.
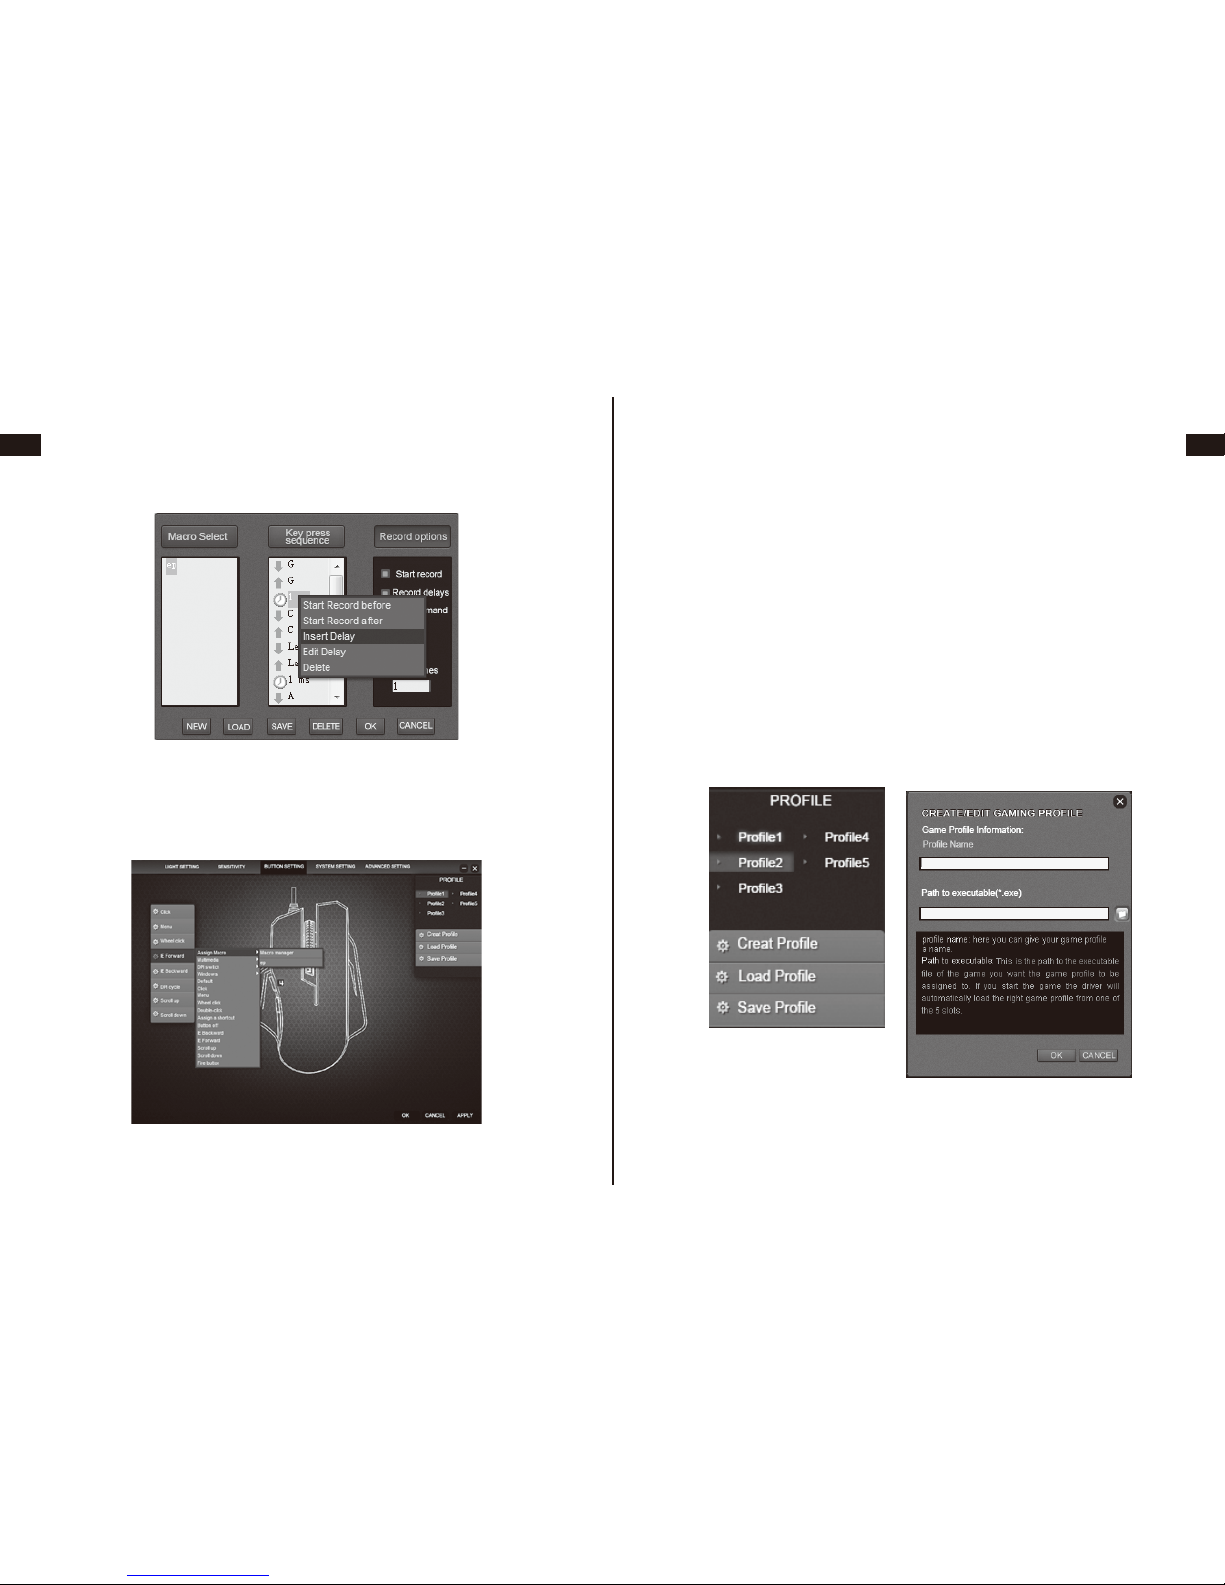
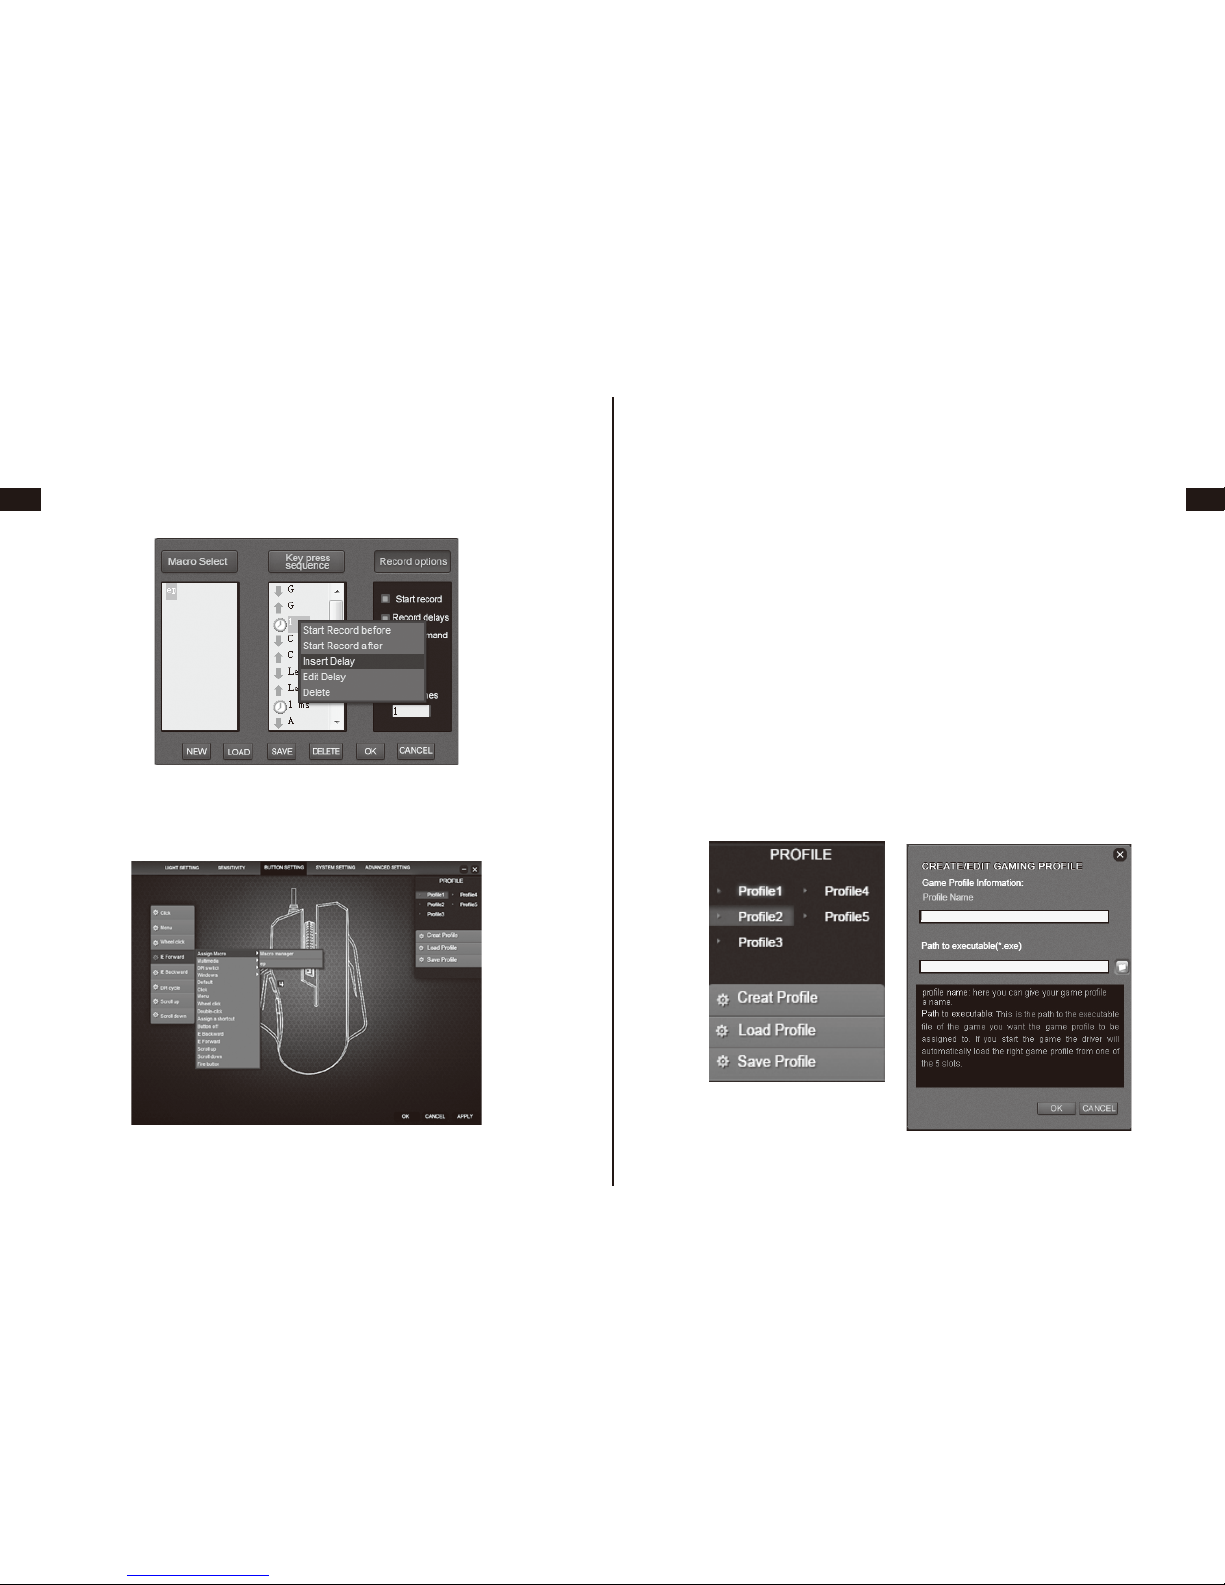
6.Macro Manager
Button Setting→Choose any button→Assign Macro→Macro
Manager. Click“New”to creat a new Marco function and name it,
for example:ep
Select the named Macro and click "Start record" to record
Macro, then input the key you want to set and will show in the
“Key press sequence” in the process of recording macro. And
after setting done, click "Stop record".If you want to record the
motion of keyboard, you can just click the relevant keys.
Currently it does not support the motion of the mouse.
EN
DE
FR
ES
JP
IT
EN
DE
FR
ES
JP
IT
11 12
If you want to insert the midst of macro command or modify the
delay, you need click “Stop record” firstly and then click “Insert
Delay”. For example, insert delay 1ms between “D” and “X”.
After setting the macro, you can assign the macro for buttons in
the below interface. Click “OK” to save the configuration setting.
7.Profile Setting
5 mode configuration settings are provided, easy to switch and
fit for different game environments.
Besides, the configuration of loading and saving are supported.
You can export the settings and save them in the hard drive. If
change computer or install new system, then you can just import
the saved setting to the computer, no need to repeat setting.
For example:
Choose Profile 1 →Create Profile→Path to executable (create a
new file and name it) → Click “OK”→ Save Profile →Save the
setting into the new created file and name →Choose Profile 3→
Load Profile →Find the saved setting and open it →Set OK.
Built in memory function is supported by this mouse. After
setting ok, the configuration parameter will be stored in the
mouse chipset synchronously. Even if change the computer, the
mouse with stored setting can still work.

EN
DE
FR
ES
JP
IT
EN
DE
FR
ES
JP
IT
13 14
Danke, dass Sie sich für die programmierbare Gaming Maus von
1byone entschieden haben. Bitte lesen Sie diese Betriebsanleitung
genau durch.
Inhalt
Maus
Betriebsanleitung
Treiber CD
Funktion
Verbinden Sie die Maus mit dem USB Anschluss. Nach kurzer
Überprüfung kann die Maus verwendet werden. Installieren Sie
nun die Treiber von der CD.
Starten Sie das Interface der „Gaming Mouse“ software.
Stellen Sie sicher, dass die Maus vor und nach der Installation der
Software weiterhin verbunden ist.
Treiberinstallation
Tipps
Treiber Einstellungen
Linke Maustaste
Scroll Wheel
Rechte Maustaste
Vorwärts (Browser)
Rückwärts (Browser)
DPI Knopf (Auswahl)
EN
DE
FR
ES
JP
IT
EN
DE
FR
ES
JP
IT
15 16
1.Tastenbelegung
Bis zu 8 Knöpfe können individuell konfiguriert werden. Das
Mausrad hat hierfür 3 Tasten: “Scroll Runter”, “Scroll Hoch” und
“Mausrad drücken”.
Für die 8 Knöpfe können sie jeweils eine der 16 verschiedenen
Funktionen auswählen.
“Assign Macro”, “Multimedia”, “DPI Switch” and “Windows”
haben unterkategorien in denen Sie weitere Einstellungen
vornehmen können:
Makro Einstellen
Multimedia
EN
DE
FR
ES
JP
IT
EN
DE
FR
ES
JP
IT
17 18
DPI Switch
Windows
Wenn Sie mit dem Mauszeiger über eine der Konfigurationsk-
nöpfe fahren, wird automatisch die Position des Knopfes auf
dem Bild angezeigt. Bitte setzen Sie mindestens einen der
Knöpfe als "Click".
2.Lichteffekte
a) Light effect switch: On oder Off für die automatische Beleuch-
tung der Maus.
b) Light effect type: Die Maus leuchtet die ganze Zeit bei „Full
lightened“ oder das Licht pulsiert leicht bei der anderen Auswahl.
c) Die ausgewählte Farbe ist die Farbe die angezeigt wird. Wenn
Sie nichts wählen, können Sie die Farbe auf der „DPI“ Taste
ändern.

EN
DE
FR
ES
JP
IT
EN
DE
FR
ES
JP
IT
19 20
3. Sensibilität
Wie auf dem Bild zu sehen können Sie 5 verschiedene DPI
Werte auswählen. Standardeinstellungen: 1000 DPI, 1750 DPI,
2500 DPI, 3500 DPI und 4000 DPI. Sie können die DPI Werte
mit 250er Schritten personalisiert anpassen. Die Vorschriften der
DPI messungen können mit X und Y Achse verändert werden.
X/Y DPI können ersetzt und verändert werden.
4. Systemeinstellungen
Sie können die Einstellungen Ihres Betriebssystems in der
Software vornehmen: Doppelklick, Mauszeiger Geschwindigkeit,
Mausrad Scrollgeschwindigkeit.

EN
DE
FR
ES
JP
IT
EN
DE
FR
ES
JP
IT
21 22
5.Erweiterte Einstellungen
Hier können Sie die Polling Rate der Maus einstellen (Achtung:
Kann den CPU belasten). Wenn Sie auf "RESET" drücken,
setzen sich alle Einstellung auf die Fabrikeinstellungen zurück.
Bestätigen Sie mit “OK” um alle Einstellungen zurückzusetzen
oder brechen Sie den Vorgang mit “CANCEL” ab.
6. Makro Manager
Clicken Sie auf “New” um ein neues Makro für die Maus
einzustellen. Button Setting→Choose any button→Assign Macro
→Macro Manager.
Wählen Sie das benannte Makro aus und drücken Sie auf “Start
record”. Die Software wird die Eingabe jedes Buttons registrie-
ren und in die "Key Press Sequence" speichern. Wenn Sie fertig
sind drücken Sie "Stop Record". Sie können auch Tatstaureing-
aben in dem Makro festhalten.

EN
DE
FR
ES
JP
IT
EN
DE
FR
ES
JP
IT
23 24
Wenn Sie einen Befehl oder eine Verzögerung hinzufügen
wollen clicken Sie "Stop Record" und Rechtsklicken Sie die Zeile
in der Sie eine Verzögerung einfügen wollen.
Nachdem Sie das Makro eingestellt haben, können Sie das
Makro einer Taste zuweisen. Klicken Sie "OK" um die Konfigura-
tion zu speichern.
7. Profileinstellungen
5 verschiedene Profileinstellungen können gespeichert werden,
so dass es einfach ist für jedes Spiel ein Profil anzulegen. Sie
können die Profile exportieren und auf der Festplatte für spätere
Nutzung speichern.
Beispiel:
Wählen Sie Profil 1 → Create Profile → Pfad zur Datei (erstellen
Sie eine neue Datei und benennen Sie sie → OK → Save Profile
→ Speichern Sie die Einstellungen in der neuen Datei →
Wählen Sie Profil 3 → Load Profile → Finden Sie die gespe-
icherten Einstellungen → Laden und OK
Die Maus hat einen eingebauten Speicherchip der nach
Bestätigung die Einstellungen in dem Chip speichert. Wenn Sie
die Maus an einem anderen PC anschließen, übernimmt der
neue PC das gespeicherte Profil

EN
DE
FR
ES
JP
IT
EN
DE
FR
ES
JP
IT
25 26
Merci d'avoir choisi 1byone Programmable Gaming Mouse, s'il
vous plaît lire attentivement le manuel lorsque vous utilisez ce
produit.
Contenu
Souris
Utilisateur Manuel
CD Driver
Les Fonctions
Connectez la souris avec votre ordinateur par le USB port, il peut
fonctionner normalement après la détection terminée. S'il vous
plaît installer le logiciel du pilote par l'instruction de configuration.
Entrez dans l'interface du logiciel de "Gaming Mouse" , vous
pouvez commencer à mettre en place la fonction de la souris.
S'il vous plaît faire que la souris a déjà été connecté à votre
ordinateur l'installation du logiciel avant et après.
Pilote d'installation Instruction
Conseils
Paramètre du pilote Instruction
Gauche Bouton (Cliquez)
Molette (Wheel Cliquez)
Droit Bouton (Menu)
Forward Fonction (IE Forward)
Fonction en arrière (IE arrière)
DPI Bouton (Cycle de DPI)
EN
DE
FR
ES
JP
IT
EN
DE
FR
ES
JP
IT
27 28
1. Bouton Réglage
8 boutons personnalisés peuvent être mis en place. La molette
de défilement peut être défini comme: Appuyez sur la molette
de défilement, Défiler vers le haut et défilement vers le bas.
Pour les 8 boutons, le total ont 16 fonctions à définir pour
chaque bouton. L'utilisateur peut définir comme défaut.
" Assign Macro ", " Multimedia ", " DPI switch " et "Windows" ont
le sous-menu, des fonctions plus détaillées peuvent être mis en
place, comme ci-dessous
Assign Macro
Multimedia

EN
DE
FR
ES
JP
IT
EN
DE
FR
ES
JP
IT
29 30
DPI switch
Windows
Lorsque déplacez le pointeur de la souris sur la boîte des
paramètres de bouton, et la position relative du bouton sera
allumé pour indiquer le bouton actuel. S'il vous plaît noter que
au moins un premier bouton est réglé sur "click" fonction pour
définir les autres boutons.
2. lumière installer
a) Lumière commutateur à effet: les lumières de la souris de jeu
peuvent être activés ou désactivés en sélectionnant le bouton
"Off" ou "On".
b)Type d'éclairage: souris de jeu aura la possibilité de " Full
lightened" ou sélectionnez un autre effet est que les feux
clignotants.
c) Couleurs claires souris à choisir. Si elle est désactivée, la
couleur de la lumière va changer avec le changement de DPI:
rouge - bleu - vert - violet - jaune.

EN
DE
FR
ES
JP
IT
EN
DE
FR
ES
JP
IT
31 32
3. sensibilité (DPI Réglage)
Comme image a montré, 5 résolutions de qualité adoptées. Par
défaut pour: 1000 DPI 1750 DPI, 2500 DPI, 3500 DPI et 4000
DPI. Chaque changement peut ajuster la valeur DPI, 250 DPI
par étape. La réglementation des DPI peut également régler
l'axe X et l'axe Y, respectivement. X / Y DPI peut être réglé
respectivement en enlevant X / Y synchronisation dans le sens.
4. Système Réglage
Vous pouvez régler le paramètre du système d'exploitation:
Double-cliquez, Windows vitesse du pointeur, la souris la
vitesse de défilement de la roue.

EN
DE
FR
ES
JP
IT
EN
DE
FR
ES
JP
IT
33 34
5. Paramètre avancé
Taux de la souris de vote peut être réglé. Cliquez sur "Reset",
vous pouvez effacer les paramètres avancés et tous réinitialiser
les paramètres d'usine.
Cliquez sur "Reset" et entrer dans la fenêtre de configuration
ci-dessous: cliquez sur "Ok" pour se reposer les réglages
personnalisés tous les paramètres d'usine. Cliquez sur "Cancel"
pour conserver le réglage actuel inchangé.
6. Gestionnaire de macros
Bouton Réglage → Choisissez l'un des boutons → Affecter une
macro → Gestionnaire de macros. Cliquez sur "New" pour créer
une nouvelle fonction Marco et nommez-le, par exemple: ep
Sélectionnez la macro nommée et cliquez sur " Start record"
pour enregistrer la macro, puis entrez la clé que vous souhaitez
définir et montrera dans la " Key press sequence" dans le
processus d'enregistrement de macro. Et après réglage terminé,
cliquez sur " Stop record "Si vous voulez enregistrer le mouve-
ment du clavier, vous pouvez juste cliquez sur les touches
correspondantes. Actuellement, il ne supporte pas le mouve-
ment de la souris.
EN
DE
FR
ES
JP
IT
EN
DE
FR
ES
JP
IT
35 36
Si vous souhaitez insérer le milieu de macro-commande ou de
modifier le délai, vous devez cliquer sur "Stop record" tout d'abord,
puis cliquez sur "Insert Delay". Par exemple, insérer retard 1ms
entre "D" et "X".
Après avoir réglé la macro, vous pouvez affecter la macro pour les
boutons dans l'interface ci-dessous. Cliquez sur "OK" pour
enregistrer les paramètres de configuration.
7. Profil Réglage
les paramètres de configuration du mode 5 sont fournies, facile
à changer et en forme pour différents environnements de jeu.
En outre, la configuration de chargement et la sauvegarde sont
pris en charge. Vous pouvez exporter les paramètres et les
enregistrer sur le disque dur. Si le changement ordinateur ou
installer nouveau système, alors vous pouvez simplement
importer le paramètre enregistré à l'ordinateur, pas besoin de
répéter paramètre.
Par exemple:
Choisissez Profil 1 → Créer un profil → Path to exécutable
(créer un nouveau fichier et nommez-le) → Cliquez sur "OK" →
Enregistrer le profil → Enregistrer le réglage dans le nouveau
fichier et le nom créé → Choisissez Profil 3 → Charger le profil
→ Trouver le paramètre enregistré et ouvrez → Définir OK.
Construit en fonction de mémoire est pris en charge par cette
souris. Après avoir réglé ok, la configuration paramètre sera
stocké dans le chipset de la souris synchroniquement. Même si
le changement ordinateur, la souris avec réglage mémorisé peut
encore fonctionner.
EN
DE
FR
ES
JP
IT
EN
DE
FR
ES
JP
IT
37 38
Gracias por elegir ratón programable del juego de 1byone , por
favor lea el manual del usuario cuando se utiliza este producto.
Contenido
Ratón
manual del usuario
CD Driver
Funciones
Conectan el ratón con el puerto USB del ordenador, se puede
trabajar normalmente después de terminar la inspección.Por
favor, instale el software del drive según la instrucción.
Entran en la interfaz de software de " Gaming Mouse ",
puede comenzar a configurar la función de ratón.
Por favor asegúrese de que el ratón ya se ha conectado a su
ordenador antes de instalar el software.
Instrucción de instalación del drive
Notas
Instrucciones de instalación de drive
Botón izquierdo (Clic)
Rueda de desplazamiento (rueda de clic)
Botón derecho (Clic)
Función hacia adelante (IE Adelante)
Función hacia atrás (IE atrás)
Botón de DPI (Ciclo de DPI)
Table of contents
Languages:
Other 1 BY ONE Mouse manuals


