2in1 BPtele User manual

www.2in1.si
CARDIAC DISEASE
& STROKE PREVENTION
DATA
TRANSFER
VIA
Please download and
install the free app
into your smartphone
USER’S MANUAL
BLOOD PRESSURE MONITOR

Warranty Card
This instrument is covered by a 5 year guarantee from the
date of purchase. The guarantee is valid only on presentation
of the warranty card completed or stamped by the seller/
dealer confirming date of purchase or the receipt. Batteries,
cu and accessories are not included. Opening or altering
the instrument invalidates the guarantee. The guarantee does
not cover damage, accidents or non-compliance with the
instruction manual. Please contact your local seller/dealer or
www.2in1.si.
Customer Name:
Address:
Address:
Telephone:
E-mail address:
Gender: Male Female Age:
Product Information
Date of purchase:
Store where purchased:
WARNING: The symbol on this product means that it’s an electronic product
and following the European directive 2012/19/EU the electronic products
have to be dispose on your local recycling centre for safe treatment.
- The Bluetooth® word mark and logos are registered trademarks owned by the Bluetooth SIG, Inc.
and any use of such marks by Rossmax International Ltd. is under
license. Other trademarks and trade names are those of their respective owners.
- The blood pressure monitor uses Bluetooth® (Bluetooth® low energy technology)
- Apple and the Apple logo are trademarks of Apple Inc., registered in the U.S. and other countries.
App Store is a service mark of Apple Inc.
- Google Play and the Google Play logo are trademarks of Google Inc.

3
Blood pressure measurements determined with 2in1. BP TELE
are equivalent to those obtained by a trained observer using
cu/stethoscope auscultation method, within the limits
prescribed by the American National Standard, Electronic
or Automated Sphygmomanometers. This unit is to be used
by adult consumers in a home environment. Do not use this
device on infants or neonates. 2in1. BP TELE is protected
against manufacturing defects by an established International
Warranty Program. For warranty information, you can contact
the manufacturer, Rossmax International Ltd.
Attention: Consult the accompanying documents. Please
read this manual care fully before use. For specific
information on your own blood pressure, contact your
physician. Please be sure to keep this manual.
Pulse Arrhythmia (PARR) technology specifically detects the
existence of pulse arrhythmia, including atrial fibrillation (AF,
AFib), Atrial and / of Ventricular Premature Contractions (PC).
Pulse Arrhythmia may be related to cardiac disorders, needs
medical attention and thus early diagnosis is of paramount
importance. The PARR technology detects arrhythmia during
regular blood pressure checks without any additional user skills,
user interaction and measurement prolongation. Beside the
blood pressure diagnosis a specific pulse arrhythmia diagnosis
is provided with PARR.
Note: The PARR detection of AFib and PC is provided with a
clinically proven high detection probability (1). However, the
sensitivity and specificity is limited, thus most, but not all
pulse arrhythmia will be detected and displayed. In certain
patients with uncommon clinical conditions the PARR
technology may not be able to detect pulse arrhythmia. This
partly comes from the fact that some arrhythmia can
only be found with an ECG diagnosis, but not with a pulse
INTRODUCTION
PARR (PULSE ARRHYTHMIA) TECHNOLOGY

4
diagnosis. Thus PARR is not meant to replace any medical
ECG diagnosis by your doctor. PARR provides an early
detection of certain pulse arrhythmia, which inevitably need
to be presented to your doctor in charge.
Remark: [1] Clinical Investigation of PARR - A new
Oscillometric Pulse Arrhythmia Type Discriminating
Detection Technology.
The upper chambers of the heart (the atria) do not contract,
but quiver and thus blood is driven irregularly and with lower
eciency into the ventricles. Subsequently irregular heartbeats
occurs, which mostly are associated with a fast, yet highly insta-
ble heart rate. This condition is associated with a higher risk for
the formation of cardiac blood clots.
Amongst others, they may elevate the risk of brain strokes.
Beside this atria fibrillation may contribute to the severity of a
chronic or acute heart failure condition and may be associated
with other heart-related complications. Age dependent, about
10% - 20% percent of patients suer from an ischemic stroke
also suer from atrial fibrillation. Atrial fibrillation most often
initially occurs with temporary periods of arrhythmia and may
progress to a permanent state of this disorder in the course of
time. No matter, whether you intent to safeguard yourself from
an undetected AFib state, or you measure during an ongoing
period of active atrial fibrillation, or you measure in between
periods of AFib, the PARR technology can be applied at any
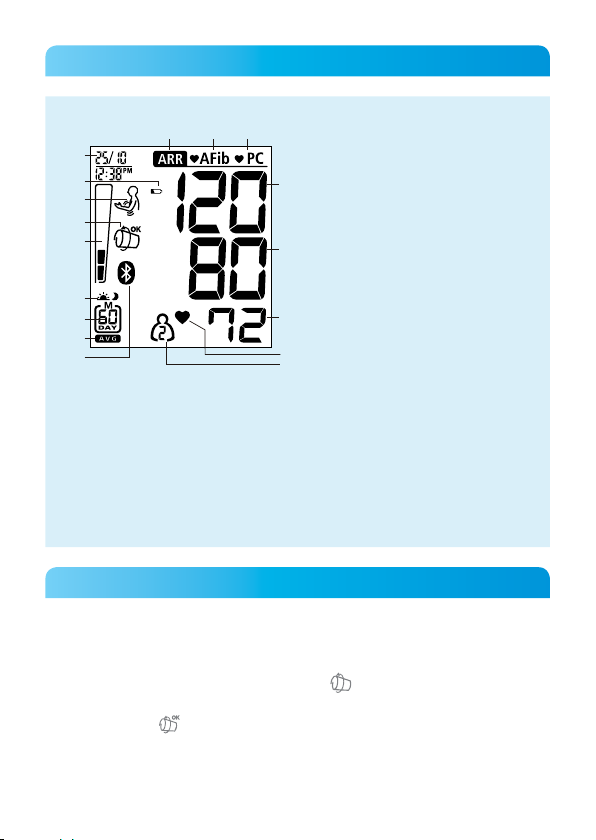
of these conditions. This unit is able to detect Atrial fibrillation
(AFib). The ARR and AFib icons ( ) are displayed right after
the measurement if Atrial Fibrillation was detected.
Note: It is strongly recommended, that you consult your phy-
sician, if either the AFib icon occurs newly for several times,
or, if your AFib is known to your doctor, but the incidence of
AFib readings changes over time. Your doctor will then be
able to provide all required medical test and possible thera-
peutic procedures.
ATRIAL FIBRILLATION DETECTION (AFIB)

5
Extra abnormal heartbeats generated in irregular excitation sites
of your heart, either in the atria (PAC), the ventricle (PVC) or the
cardiac conduction nodes (PNC). These extra beats may disrupt
your regular rhythm, they may come in early or cause a signifi-
cant pauses regarding your perceivable pulse. This is called pal-
pitations, which can be felt in your chest. They may occur as
isolated, single events, as a series of irregular pulses or can be
distributed all over your pulse beats. If they are not related to
mental stress, or acute demanding physical load, they may be a
marker for a multitude of cardiac disorders.
Some of these disorders go along with an elevated risk pro-
file for ischemic events, either in the heart (e,g, coronary heart
disease) or outside the heart, e.g. an elevated risk for a stroke.
Some PCs may indicate on valvular or myocardial disorders and
become very important if a myocarditis (infection of the heart
muscle) is suspected. This unit is able to detect premature con-
tractions ( ). The ARR and PC icons are displayed right after
the measurement if premature contractions have been detected.
Note: It is strongly recommended, that you consult your phy-
sician, if either the PC icon occurs newly for several times, or,
if your PC is known to your doctor, but the incidence of PC
readings changes over time. Your doctor will then be able to
provide all required medical test and possible therapeutic
procedures.
Note: The presence of a cardiac pacemaker may impair the
AFib detection by PARR.
PREMATURE CONTRACTION DETECTION (PC)

6
Once the occurrence of pulse arrhythmia has been detected in
the course of your blood pressure measurement, the icon ARR
is displayed. In the case, that the found pulse arrhythmia can be
specified by the PARR technology, the ARR icon is accompa-
nied by the specifically detected type of arrhythmia, e.g. PC or
AFib. Once the kind of found pulse arrhythmia cannot be safely
determined by PARR, the device is displaying ARR without any
additional pulse arrhythmia type icon.
Note: It is strongly recommended, that you consult your phy-
sician, if either the ARR icon occurs newly for several times,
or, if your ARR is known to your doctor, but the incidence
of ARR
readings changes over time. This is independent whether
the ARR icon is specified by another pulse arrhythmia icon
or not. Your doctor will then be able to provide all required
medical test and possible therapeutic procedures.
The PARR technology is able to detect and display combined
pulse arrhythmia findings.
Display Results
-Normal finding
ARR Pulse Arrhythmia without
type-specific detection
ARR PC Pulse Arrhythmia-Premature
ventricular, atrial or nodal
beat detection
ARR AFib Pulse Arrhythmia-Atrial fibril-
lation detection
ARR AFib PC Combined Pulse Arrhythmia:
Atrial fibrillation & Premature
beats detection
PULSE ARRHYTHMIA DETECTION (ARR)

7
This unit uses the oscillometric method to detect your blood
pressure. Before the cu starts inflating, the device will establish
a baseline cu pressure equivalent to the air pressure.
This unit will automatically determine the appropriate inflation
level based on pressure oscillations, followed by cu deflation.
During the deflation, the device will detect the amplitude and
slope of the pressure oscillations and thereby determine your
actual the systolic blood pressure, diastolic blood pressure, and
pulse rate.
This Blood Pressure Monitor complies with the European reg-
ulations and bears the CE mark “CE 0120”. The quality of the
device has been verified and conforms to the provisions of the
EC council directive 93/42/EEC (Medical Device Directive), An-
nex I essential requirements and applied harmonized standards.
EN 1060-1: 1995/A2: 2009 Non-invasive sphygmomanome-
ters - Part 1 - General requirements EN 1060-3: 1997/A2: 2009
Non -invasive sphygmomanometers - Part 3 - Supplementary
requirements for electro-mechanical blood pressure measuring
systems EN 1060-4: 2004 Non-invasive sphygmomanometers -
Part 4: Test Procedures to determine the overall system accura-
cy of automated non-invasive sphygmomanometers.
This blood pressure monitor was designed for long service pe-
riods. In order to ensure continued accuracy, it’s recommended
that all digital blood pressure monitors require re-calibration.
This monitor (under normal usage with approx. 3 measurements
a day) does not require re-calibration for 2 years. Once the
unit should be re-calibrated the device will display . The unit
should also be re-calibrated if the monitor sustains damage due
to blunt force (such as dropping) or exposure to fluids and / or
extreme hot or cold temperature / humidity changes. When
appears, simply return your device to your nearest dealer for
re-calibration service.
REAL FUZZY MEASURING TECHNOLOGY
PRELIMINARY REMARKS

8
Refer to the definitions of the World Health Organization, the
blood pressure ranges can be classified into 6 grades. (Ref. 1999
WHO-International Society of Hypertension Guidelines for the
management of Hypertension). This blood pressure classifica-
tion are based on statistical data, and may not be directly appli-
cable to any particular patient. It is important that you consult
with your physician regularly. Your physician will tell you your
normal blood pressure range as well as the point at which you
will be considered at risk. For reliable monitoring and reference
of your blood pressure, keeping long-term records is recom-
mended. Please download the blood pressure log at our website
www.rossmax.com.
Blood Pressure Standard
World Health Organization (WHO): 1999
Systolic
Pressure
(mmHg)
Diastolic
Pressure
(mmHg)
Optimal <120 and <80
Normal 120~129 or 80~84
High-normal 130~139 or 85~89
Grade 1 hypertension
(mild) 140~159 or 90~99
Grade 2 hypertension
(moderate) 160~179 or 100~109
Grade 3 hypertension ≥180 or ≥110
BLOOD PRESSURE STANDARD

9
NAME/FUNCTION OF EACH PART
1
5
4
2
37
6
1. Arm Cu
2. LCD Display
3. Air Tube and
Connector
4. Memory Key
5. ON/OFF/START key
6. User-Switching key
7. Battery Cover
8. Data Link Socket
9. AC Adaptor Jack
10.Cu Holder Design
8
9
10

10
If the cu was applied too loosely, it may cause unreliable mea-
surement results or measurements can fail to start. The “Loose
Cu Detection” can help to determine if the cu is wrapped
snugly enough. The specified icon appears once a “loosen
cu” has been detected during measurement. Otherwise the
specified icon appears if the cu is wrapped correctly during
measurement.
LOOSE CUFF DETECTION
1. Arrhythmia Detection
(ARR)
2. Atrial Fibrillation
Detection (AFib)
3. Premature Contraction
Detection (PC)
4. Date/Time Indication
5. Weak Battery Mark
6. Movement Mark
7. Loose Cu Detection
8. Hypertension Risk
Indication
9. Morning and Nighttime
Mark
10.Memory/Date Mark
11. Memory Average Mark
12. Bluetooth® Mark
13. Systolic Pressure
14. Diastolic Pressure
15. Pulse Rate
16. Pulse Mark
17. Memory Zone
5
13
1 2 3
14
15
4
9
8
6
7
10
11
12 16
17
NAME/FUNCTION OF EACH PART

11
This monitor has a non-stored single measurement function.
Press the User-Switching key to select the memory zone of
guest , and follow the Measurement Procedure to take a mea-
surement correctly. When the measurement is completed, the
measurement value will not be stored in memory zone.
The World Health Organization, classifying blood pressure rang-
es into 6 grades. This unit is equipped with an innovative blood
pressure risk indication, which visually indicates the assumed
risk level (optimal / normal / high-normal/ grade1 hypertension
/ grade 2 hypertension / grade 3 hypertension) of your result,
making the meaning of your findings comprehensive.
GUEST MODE
HYPERTENSION RISK INDICATION (HRI)
The “Movement Detection” helps reminding the user to remain
still and is indicating any adverse body movement during mea-
surement. The specified icon appears once a “body movement”
has been detected during and after such a measurement.
Note: It’s highly recommended that you measure again if the
icon appears.
MOVEMENT DETECTION

12
1. Connect the AC adaptor with the AC adaptor jack on the right
side of the unit.
2. Plug the AC adaptor into the socket. (AC adaptors with re-
quired voltage and current indicated near the AC adaptor
jack.)
Caution:
1. Please unload the batteries when operating with the AC
mode for a longer period of time. Leaving the batteries
in the compartment for a long time may cause leakage,
which may lead to damage of the unit.
2. No batteries are needed when operating with the AC
mode.
3. AC adaptors are optional. Please contact the distributor
USING THE AC ADAPTOR (OPTIONAL)
EE / Measurement Error: Make sure the L-plug is securely con-
nected to the air socket and calmly measure again. Wrap the
cu correctly around your arm and keep arm steady during
measurement. If the error keeps occurring, return the device to
your local distributor or service centre.
E1 / Air Circuit Abnormality: Make sure the L-Plug is securely
connected to the air socket on the side of the unit and calmly
measure again. If the errors still occur, return the device to your
local distributor or service centre for help.
E2 / Pressure Exceeding 300 mmHg: Switch the unit o and
measure again quietly. If the error keeps occurring, return the
device to your local distributor or service centre.
E3 / Data Error: Remove the batteries, wait for 60 seconds, and
reload. If the error keeps occurring, return the device to your
local distributor or service centre.
Er / Exceeding Measurement Range: Measure again quietly. If
the error keeps occurring, return the device to your local distrib-
utor or service centre.
ERROR CODES FOR YOUR REFERENCE

13
1. Press down and lift the battery cover in the direction of the
arrow to open the battery compartment.
2. Install or replace 4 “AAA” sized batteries in the battery com-
partment according to the indications inside the compart-
ment.
3. Replace the battery cover by clicking in the bottom hooks
first, then push in the top end of the battery cover.
4. Replace the batteries in pairs. Remove batteries when unit is
not in use for extended periods of time.
You need to replace the batteries when
1. low battery icon appears on display.
2. the ON/OFF/START key is pressed and nothing appears
on display.
Caution:
1. Batteries are hazardous waste. Do not dispose them to-
gether with the household garbage.
2. There are no user serviceable parts inside. Batteries or
damage from old batteries are not covered by warranty.
3. Use exclusively brand batteries. Always replace with
new batteries together. Use batteries of the same brand
and same type.
for the compatible AC adaptors.
4. Use only the authorized AC Adaptor with this blood
pressure monitor. Information forthe authorized AC adap-
tor, please refer to APPENDIX 1.
INSTALLING BATTERIES

14
1. Unwrap the arm cu, leaving the end of the cu through the
D-ring of the cu.
2. Put your left arm through the cu loop. The color strip indica-
tion should be positioned closer to you with the tube point-
ing in the direction of your arm (Fig. ). Turn your left palm
upward and place the edge of the arm cu at approximately
1.5 to 2.5 cm above the inner side of the elbow joint (Fig. ).
Tighten the cu by pulling the end of the cu.
3. Center the tube over the middle of the arm. Press the hook
and loop material together securely. Allow room for 2 fingers
to fit between the cu and your arm. Position the artery mark
(Ø) over the main artery (on the inside of your arm) (Fig. ,
). Note: Locate the main artery by pressing with 2 fingers
approximately 2 cm above the bend of your elbow on the in-
side of your left arm. Identify where the pulse can be felt the
strongest. This is your main artery.
4. Plug in the cu connecting tube into the unit (Fig. ).
5. Lay your arm on a table (palm upward) so the cu is at the
same height as your heart. Make sure the tube is not kinked
(Fig. ).
6. This cu is suitable for your use if the arrow falls within the
solid color line as shown on the right (Fig. ). If the arrow
falls outside the solid color line, you will need a cu with other
circumferences. Contact your local dealer for additional size
cus.
APPLYING THE CUFF

15
Here are a few helpful tips to help you obtain more accurate
readings:
• Blood pressure changes with every heartbeat and is in con-
stant fluctuation throughout the day.
• Blood pressure recording can be aected by the position of
the user, his or her physiological condition and other factors.
For greatest accuracy, wait one hour after exercising, bathing,
eating, drinking beverages with alcohol or caeine, or smok-
ing to measure blood pressure.
• Before measurement, it’s suggested that you sit quietly for at
least 5 minutes as measurement taken during a relaxed state
will have greater accuracy. You should not be physically tired
or exhausted while taking a measurement.
• Do not take measurements if you are under stress or tension.
• During measurement, do not talk or move your arm or hand
muscles.
• Take your blood pressure at normal body temperature. If you
MEASUREMENT PROCEDURES
Center tube over
middle of arm

16
are feeling cold or hot, wait a while before taking a measure-
ment.
• If the monitor is stored at very low temperature (near freez-
ing), have it placed at a warm location for at least one hour
before using it.
Wait 5 minutes before taking the next measurement.
1. Press the User-Switching key to select memory zone 1, mem-
ory zone 2 or guest mode. After a memory zone is selected,
press the ON/OFF/START key to reset the monitor so it can
start measurement in the chosen memory zone.
2. Press the ON/OFF/START key. All digits will light up, check-
ing the display functions. The checking procedure will be
completed in 2 seconds.
3. After all symbols appear, the display will show a blinking “0”.
The monitor is ready to measure and will automatically inflate
the cu slowly to start measurement.
4. Bluetooth® will automatically be activated on the device,
please see Data Transfer via Bluetooth®. You can also start
measurement directly by pressing the ON/OFF/START key
again, but the current measured reading (Systolic, Diastolic
and Pulse) will not automatically be transferred to the App.
5. When the measurement is completed, the cu will exhaust
the pressure inside. Systolic pressure, diastolic pressure and
pulse will be shown simultaneously on the LCD screen. The
measurement is then automatically stored into the pre-desig-
nated memory zone.
6. In order to enhance the probability of pulse arrhythmia de-
tection by the PARR technology, measurement repetitions
are recommended.
This monitor will re-inflate automatically to approximately 220
mmHg if the system detects that your body needs more pres-
sure to measure your blood pressure.
Note:
1. This monitor automatically switches o approximately 1 min-
ute after last key operation.
2. To interrupt the measurement, simply press the ON/OFF/
START key; the cu will deflate immediately.
3. During the measurement, do not talk or move your arm or
hand muscles.

17
1. The monitor has two memory zones (1 and 2). Each zone can
store up to 60 measurements.
2. To read memory values from a selected memory zone, use
the User-Switching key to select a memory zone (1 or 2) from
which you want to recall values. Press the Memory key. The
first reading displayed is the average of all morning readings
from the last 7 days.
3. Continue to press the Memory key to view the average of all
nighttime readings from the last 7 days.
4. Press the Memory key again to view the average of the last
3 measurements stored in memory, and the last previously
stored measurement. Every measurement comes with an as-
signed memory sequence number.
Note: The memory bank can store up to 60 readings per mem-
ory zone. When the number of readings exceeds 60, the oldest
data will be replaced with the new record.
Note: AM is defined as 4:00 AM – 11:59 AM
Note: PM is defined as 6:00 PM – 2:00 AM
RECALLING VALUES FROM MEMORY
1. Press the User-Switching key to select memory zone 1 or
memory zone 2.
2. Press and hold the Memory key for approximately 5 seconds,
then the data in the memory zone can be erased automati-
cally.
CLEARING VALUES FROM MEMORY

18
Pairing the Blood Pressure Monitor
with your Smartphone
To begin using Bluetooth® for the
first time, please visit the website
at www.2in1.si for the initial set-up
instructions.
1. Download and install the free
APP onto your smartphone.
2. To pair this device with your
smartphone, turn on the de-
vice, Bluetooth® and the App of
smartphone, and follow set-up
and pairing instructions.
DATA TRANSFER VIA BLUETOOTH®
1. To adjust the date/time/Bluetooth® in the monitor after in-
stalling or replacing batteries. The display will show a blinking
number showing the year.
2. Change the year by pressing the Memory key, each press will
increase the number. Press the ON/OFF/START key to con-
firm the entry and the screen will show a blinking number
representing the date.
3. Change the date, the hour and the minute as described in
Step 2 above, using the Memory key to change and the ON/
OFF/START key to confirm the entries.
4. After adjusting the date/time, the Bluetooth® symbol ( ) and
the blinking icon “ ” will be shown on the display simulta-
neously. Use the Memory key to choose whether automatic
Bluetooth® data transfer is activated (Bluetooth® symbol ( )+
) or deactivated (Bluetooth® symbol ( )+ ) and confirm
with the ON/OFF/START key.
5. Press the ON/OFF/START key again, “0” will reappear as the
Blood Pressure Monitor is ready for measurement.
TIME AND BLUETOOTH® ADJUSTMENT
APP
APP

19
3. The Bluetooth® symbol ( ) will flash on the display that indi-
cates the pairing is proceeding.
- If the pairing is successful, the Bluetooth® symbol ( ) will
stop flashing and appear on the display, the device will start
the measurement automatically. The current measured read-
ing (Systolic, Diastolic and Pulse) will automatically be trans-
ferred to the App.
- If the pairing has failed, the Bluetooth® symbol ( ) will con-
tinue flashing until the device shuts o automatically after 1
minute. Please re-pair this device with your smartphone.
Notes:
1. You can pair up to 2 destination devices with the monitor
2. Unpairing your device will not delete the information on the
phone App.
3. If you re-pair your smartphone with your blood pressure mon-
itor, all prior reading history stored on the phone App will be
retained.
4. Bluetooth® data transfer will reduce the battery capacity.
APP
APP
120mmHg
120mmHg

20
If any abnormality will arise during use, please check the follow-
ing points.
Symptoms Check Points Correction
No display when
the ON/OFF/
START key is
pressed
Have the batteries
run down?
Replace them with
four new batteries.
Have the batteries’
polarities been
positioned
incorrectly?
Re-insert the
batteries in the
correct positions.
EE mark shown
on display or the
blood pressure
value is displayed
excessively low
(high)
Is the cu placed
correctly?
Wrap the cu
properly so that
it is positioned
correctly.
Did you talk or
move during
measurement? Measure again.
Keep wrist
steady during
measurement.
Did you vigorously
shake the
cu during
measurement?
Note: If the unit still does not work, return it to your dealer. Un-
der no circumstance should you disassemble and repair the unit
by yourself.
TROUBLESHOOTING
Table of contents