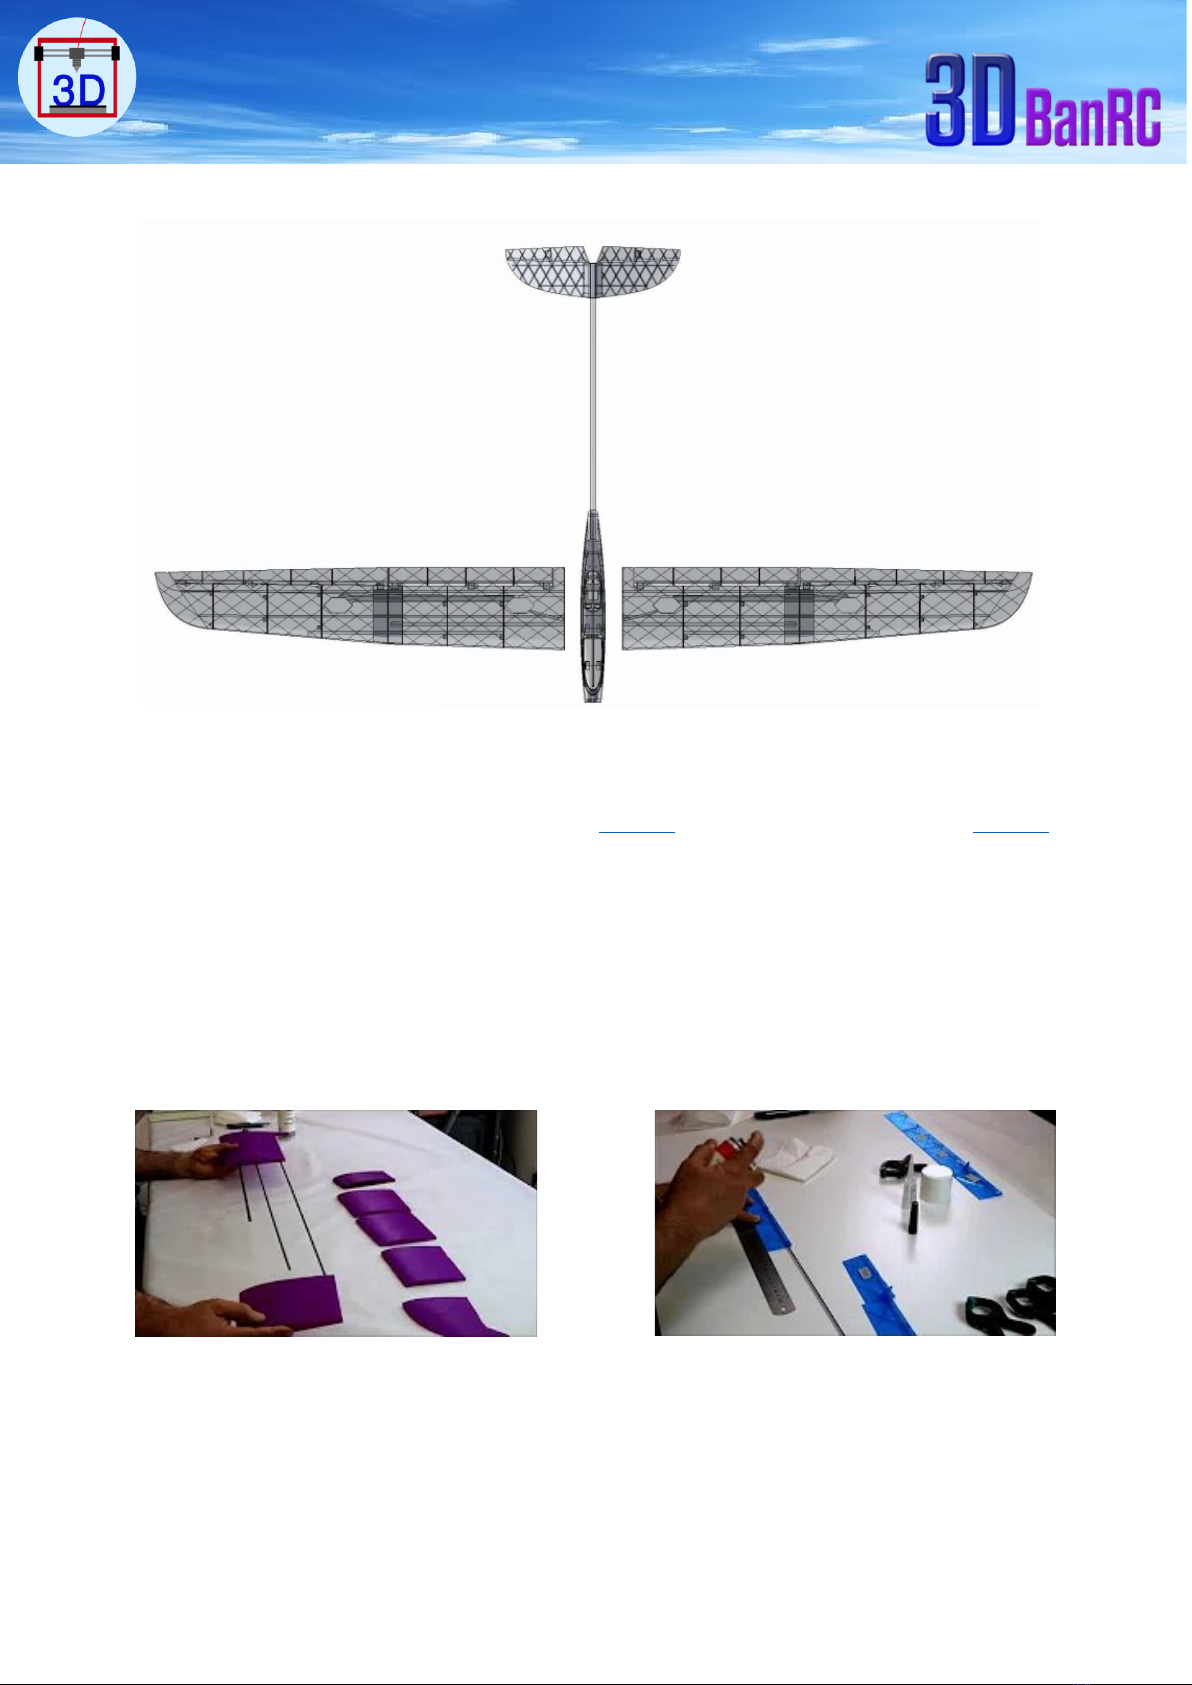
manuals.online logo
Brands
  1. Home
  2. •
  3. Brands
  4. •
  5. 3dBanRC
  6. •
  7. Toy
  8. •
  9. 3dBanRC BanRC2 User manual

3dBanRC BanRC2 User manual

1
3D BANRC
BanRC2 User Guide
Hi,
Thank you for your interest and welcome at BANRC 3D print gliders. BanRC2 it’s a very
dynamic 2 meters two parts wing glider, easy to print and assemble. This user guide will help
you on how to print and get your glider on sky.
Please do not share the STL files you bought. I trust your best and kindness on this matter.
2
Overview:
I started aero modalism on 2013 and 3D print on 2016. It takes me two years on design, print,
test & fly the 1st model. Sep 2017 first glider BanRC1 has born, 8 month later this BanRC2
glider was on sky.
The challenge was being to find the proper ratio between the rigidity and weight, easy design
to print and design can be printed with the most printers available in market.
Printer I’m using is Anet A8, with PLA filament 1.75mm, slicer Cura. Glass on bed with 3DLAC.
3
Technical data:
Wingspan:
2 meters
Length:
0.915m
Weight:
1,450kg on Fly
Wing area:
34,7dm2
Recommended
Motor:
XPower XC3514/14 or equivalent (screws hole distance
25mm). Ready to modify this distance according to your
motor.
ESC 40A - 45A:
Aliexpress OR Gearbest or equivalent.
Battery:
LiPo HOT LIPS 11,1V 2200mAh (3S), 195-200gm
Prop:
Folding propeller 11x8”
Spinner:
Folding Prop Spinner Ø38mm/Ø4mm
Radio & Receiver:
6 or 8 channels
Servo:
Ailerons: 2 servos
Elevator: 1 servo
Rudder: 1 servo
Flaps: 2 servos
Electronic installation in fuselage, refer to this video.
4
Accessories:
Super glue CA. CA glue spray Accelerator hinge 15 x 28.5 mm. Qty = 14
3mm claw nut. Qty = 4. Screw M3x20mm. Qty = 2 Screw M3x30mm. Qty = 2
1mm piano steel wire. Qty = 2 3mm pushrod 1 meter. Qty = 2 Plywood 2mm
Fuselage and wing screws support. Plywood 2mm. You can print these frames and sketch them on
the plywood for presice cut. They are remarked to easy know the location of each after printing.
Inside fuselage part 3
Inside fuselage part 4
Front Wing Support
Rear Wing Support
30x3mm
20x3mm
5
STL files:
Files are designed for an easy use with printers available in market and all type of slicers.
Important is to use the same setting shown in slicer tables.
You can print the STL files individually or in groups, individually is recommended.
G.Code files:
You can download them on your SD card for directly use them on your printer. Using these
files are on your own risk of your printer safety. OR you can generate your own G.Codes files
using the STL files for being sure that they will be applicable for your printer.
Option 1:
Download the G.Codes on SD card, insert the SD card in your printer. Heat end set to 200°C -
210°C and bed temperature set to 60°C. You can change the speed and temperature on printer
screen. Enjoy the printing.
Option 2:
Slice the STL file, save the G.Code on SD card, insert the SD card in printer. Enjoy the printing.
STL Files
G.Code
files
G.Code
file
Or another
slicer
Before you buy, you can test your printer on the biggest part wing part1 STL file.
Download Test STL file.
6
Assembling guide:
Materials and assembling videos.
Carbon tubes:
Tube epoxy resin
Item Part Dimension Qty Length
1 365mm
1 365mm
1 374mm
2 926mm
2 967mm
Ø6mm 2 513mm
3 Flap 2 396mm
4 Aileron 2 482mm
2156
2236
Ø3mm
Ø4mm
Ø2mm
1
Fuselage
2
Wing
Rudder
5
Item Part Dimension Qty Length
1
Wing
removable tube
Ø8mm 1 838mm
2
Fuselage tube
Boom Ø12mm 1
550mm
72mm in fuselage
Carbon Tubes
Tube Epoxy Resin
7
Assembling videos.
-Fuselage
-Wing
-Rudder Elevator
-Wing Servos.
Before you glue the parts, slid each carbon tube in each related part to be sure of easy
and smooth insertion and to check the parts match and alignment.
Step 1-2
Step 2-2
Step 1-4
Step 2-4
Step 3-4
Step 4-4
Step 1-3
Step 2-3
Step 3-3
Design modified, servos control horns upside of the wing. Covers screws
holders integrated in wing
8
CG:Glider should be in fly condition.
Do not glue the boom with fuselage till you check the balance of the model according to
weight “gm” of electronics you will use.
Steps:
1- Glue the Rudder Elevator with Boom.
2- Start with boom 700mm.
3- Insert the boom in fuselage.
4- Put the gilder on CG balance tool, if tail heavy, then shorten the boom by 100 “mm”
and check again, if tail still heavy, shorten boom by 50mm and check again. The
boom should be not less than 500mm
CG 75mm
Boom
9
Carbon Tubes: locations related to length.
Ø4mm
926mm
Ø4mm
967mm
Wing part 1
Ø6mm
513mm
Wing part 2
Ø8mm
838mm
Ø2mm
236mm
Ø2mm
156mm
Ø3mm
365mm
Ø3mm
374mm
10
Cockpit:
Two parts glue them. Steel wire Ø1-1,5mm 85mm length, slide it and glue it in part 1 hole.
Magnet Ø10mmx1.5mm.
Ø12mm
478mm
550mm
Boom
11
Slicer setting:
Important is to use the same setting values to get same weight.
Part Description Groups Part Description Groups
1 R Flap Part 1 A 26 L Aileron part 5 B
2 R Flap Part 2 A 27 L Aileron part 4 B
3 R Flap Part 3 B 28 L Aileron part 3 B
4 R Flap Part 4 B 29 L Aileron part 2 A
5 R Aileron part 1 A 30 L Aileron part 1 A
6 R Aileron part 2 A 31 L Flap Part 4 B
7 R Aileron part 3 B 32 L Flap Part 3 B
8 R Aileron part 4 B 33 L Flap Part 2 A
9 R Aileron part 5 B 34 L Flap Part 1 A
10 RWing part 8 D 35 Fuslage Part 1 E
11 RWing part 7 D 36 Fuslage Part 2 F
12 RWing part 6 D 37 Fuslage Part 3 F
13 RWing part 5 D 38 Fuslage Part 4 F
14 RWing part 4 D 39 Fuslage Part 5 G
15 RWing part 3 D 40 RRudder part 1 D
16 RWing part 2 D 41 RRudder part 2 D
17 RWing part 1 C 42 RElevator part 1 H
18 LWing part 1 C 43 RElevator part 2 B
19 LWing part 2 D 44 LElevator part 1 H
20 LWing part 3 D 45 LElevator part 2 B
21 LWing part 4 D 46 LRudder part 1 D
22 LWing part 5 D 47 LRudder part 2 D
23 LWing part 6 D 48 Rud Elev support I
24 LWing part 7 D 49 Fuslage cockpit P1&P2 J
25 LWing part 8 D 50 Servos covser 4 parts K
A B C D E F G H I J K
Wall thickness 0.4 0.4 0.4 0.4 0.4 0.4 0.4 0.4 0.8 0.4 0.4
Top thickness mm 1 1 1 1 1 1 1 1 1 1 1
Buttom thickness mm 2 1 2 1 8 1 1 3 1 1 1
Infill density % 0 0 0 0 10 10 30 0 5 10 100
Print speed mm/sec 30 30 50 50 50 50 50 30 50 30 100
Skirt NA NA NA NA NA NA NA NA NA NA √
Slicer
Groups
Common Slicer values
Layer height mm 0.3
Initial layer height mm 0.3
Nozzel diameter mm 0.4
Optimize wall printing order √
Outer before inner walls √
Print temprature °C 210
Bed temprature °C 60
Flow % 102
Retraction √
Slicing tolerance Exclusive
Support No
Cooling Fan No
Nozzel cooling fan √
Raft mm 5
12
Parts weight:
Try to get the same weight for each part as shown. Values shown are without Raft
WP1
58gm
WP2
42gm
WP3
32gm
WP4
44
WP5
34gm
WP6
28gm
WP7
25gm
WP8
17gm
WF1
5gm
WF2
6gm
WF3
4gm
WF4
4gm
WA1
7gm
WA2
4gm
WA3
4gm
WA4
4gm
WA5
2gm
Rudder elevator support
10gm
Rudder P1
12gm
Rudder P2
8gm
Elevator P1
4gm
Elevator P2
4gm
Fuselage P1
32gm
Fuselage P2
20gm
Fuselage P3
24gm
Fuselage P4
23gm
Fuselage P5
30gm
Cockpit
11gm
13
Printer:
All printers which have a basic printing dimensions of 200mmx200mmx180mm with heat bed
& Nozzle 0.4mm can print this Glider.
Tip: Before you buy the design, you can test your printer, download the Test STL Files. The
biggest and highest part Wing Part1 if your printer can print this part then it can print all the
parts of this model.
Printing:
Please keep these figures in mind:
-Print the parts individually, not in groups.
-Use raft for easy clean after print. All parts are flat, no need to apply support.
- In slicer be sure “Slicing Tolerance” is activated “Exclusive”. So, the printer can print the ribs.
- To avoid ribs appears on skin, in slicer be sure of “Outer Walls before inner walls” is activated.
-Cooling fan is OFF. For sure the fan for nozzle heat end its always ON.
- Glass on bed. 3DLAC spray for bed adhesive. OR as your own convenient material.
- 0.4mm nozzle head, Parts are designed on 0.4mm wall thickness.
- PLA filament.
- Follow slicer setting values to get the same weight “gm” shown in paragraph “Parts weight”
14
Parts in Slicer will appear as a solid part in “sold view” but using “layer view” will show the
inside details of the part which what the printer will print.
Solid view
Layer view
X-Ray view
15
Parts Lay on bed:
Important to lay the parts on bed as shown in photos to guaranty the printing quality. The
most important is to be sure that the part is lay FLAT on bed. STL files saved to lay the parts
flat on bed when they opened.
Part is not correctly Lay Flat on bed. Part is correctly Lay Flat on bed.
16
Tail tips should be at same distance “A” of wing tips
Check geometry, the vertical virtual line “B” connect V tail tips should be parallel to the
wing, adjust by turning the boom.
Wish you a nice adventure on printing, assembling and FLY
For further information you may need, don’t hesitate to contact me on “[email protected]”
3dBanRC
Regards
A
A
B
B

Popular Toy manuals by other brands

Eduard ZOOM Do 217J-1/2 manual

Eduard

Eduard ZOOM Do 217J-1/2 manual

Freewing F/A-18C Hornet manual

Freewing

Freewing F/A-18C Hornet manual

Mattel POLLY WHEELS polly pocket Cruise N Shop instructions

Mattel

Mattel POLLY WHEELS polly pocket Cruise N Shop instructions

LGB 65000 instructions

LGB

LGB 65000 instructions

Winfun Light-Up Smart Pad manual

Winfun

Winfun Light-Up Smart Pad manual

Mattel Barbie in the 12 Dancing Princesses Interactive Dance... quick start guide

Mattel

Mattel Barbie in the 12 Dancing Princesses Interactive Dance... quick start guide

Tumama Kids TM24 Series user manual

Tumama Kids

Tumama Kids TM24 Series user manual

Eduard Zoom Wildcat Mk.VI quick start guide

Eduard

Eduard Zoom Wildcat Mk.VI quick start guide

Canon Creative Park Chinese Phoenix Assembly instructions

Canon

Canon Creative Park Chinese Phoenix Assembly instructions

Power Wheels V3298 TOT ROD Toy Story 3 Owner's manual with assembly instructions

Power Wheels

Power Wheels V3298 TOT ROD Toy Story 3 Owner's manual with assembly instructions

Trix 21518 manual

Trix

Trix 21518 manual

Ebotics Code & Drive user manual

Ebotics

Ebotics Code & Drive user manual

Eduard Brassin Bf109F engine and fuselage guns quick start guide

Eduard

Eduard Brassin Bf109F engine and fuselage guns quick start guide

Reely EP Helicopter REX-X operating instructions

Reely

Reely EP Helicopter REX-X operating instructions

BLOTZ B06-CS-009 quick start guide

BLOTZ

BLOTZ B06-CS-009 quick start guide

Radica Games 74063 Tetris instruction manual

Radica Games

Radica Games 74063 Tetris instruction manual

Lionel Railroad Tugboat owner's manual

Lionel

Lionel Railroad Tugboat owner's manual

REVELL Junkers Ju 290 A-7 "Spy Version" Assembly manual

REVELL

REVELL Junkers Ju 290 A-7 "Spy Version" Assembly manual

manuals.online logo
manuals.online logoBrands
  • About & Mission
  • Contact us
  • Privacy Policy
  • Terms and Conditions

Copyright 2025 Manuals.Online. All Rights Reserved.