manuals.online logo
Brands
  1. Home
  2. •
  3. Brands
  4. •
  5. FUTABA
  6. •
  7. Toy
  8. •
  9. FUTABA GY470 User manual

FUTABA GY470 User manual

Features of GY470Features of GY470
Set ContentsSet Contents Connecting the GY470Connecting the GY470Connecting the GY470 (S.BUS)Connecting the GY470 (S.BUS)Mounting to FuselageMounting to FuselageRudder Servo Linkage CheckRudder Servo Linkage CheckThe following items are supplied with the GY470:
FunctionsFunctions
Mini screwdriver
Sensor tape
Extension Cord: (Black)
Extension Cord: (Red)
Wiring strap
GY470
Monitor LED display
State Color Move Reference
1. GY470 Power ON Orange 2 blinks
2. No servo pulse / Error Red Slow blink
3. Signal input from receiver Green Fast blink
4. Sensor initialization Red/Green ON AVCS (Red)
Normal (Green)
5. Turn Red/Green Fast blink Right (Green)
Left (Red)
6. Neutral offset Orange Slow blink Stick operation
7. Gain off -OFF
8. Switch operation Green One blink Each time of switch
operation
9. Low battery Red One flash Less than 3.8 V
●Remote gain function and mode switching functionYou can adjust gain from the transmitter by using the remote
gain function. Gain can also be adjusted with the trimmer on the
GY470. The mode switching function allows AVCS/NORMAL
gyro mode switching.
●Integrated, compact,and light weightCompact size(20.7x20.7x11mm)and light weight(3.7g)realized by high density mounting technology.
●Easy setupThe GY470 can be used immediately with minimum setup.
●Supporting the S.BUS/S.BUS2 connection Only one wire connection to the receiver can operate the GY470.
INSTRUCTION MANUAL
INSTRUCTION MANUAL
Rate Gyro for HelicoptersFor RC models●Trimmer
(Limit / Gain)●LED
●Servo Selection Switch ●Port1(Rudder input/S.BUS input)●Port2(Gain input)●Port3(Rudder output)●Gyro Direction
Switch
WARNING
Failure to follow these safety precautions may result in severe injury
to yourself and others.
Always check the transmitter and receiver battery voltage to ensure
they have enough remaining capacity to complete the flight.
The GY470 requires 3-5 seconds to initialize when the power is turned
on. Do not move the helicopter and do not move the rudder stick during
this initialization or the gyro may not initialize properly. Once the initializa-
tion process has been completed the rudder servo will move (a little) sev-
eral times indicating that the GY470 is now ready for flight.
Always ensure that there is some slack in the gyro cables to help
maximize performance. Always use the supplied gyro mounting pads to
attach the gyro to the helicopter mechanics. Do not use a strap that en-
compasses the GY470 sensor. This may affect the overall performance of
the gyro.
If you are switching between NORMAL mode and AVCS mode in flight,
please keep in mind that you must have the gyro re-learn the center posi-
tion after making a trim change within the transmitter. To memorize the
new center position simply flip the gain switch on the transmitter three
times between NORMAL mode and AVCS mode (NORMAL →AVCS →N
ORMAL →AVCS →NORMAL →AVCS) within one second. The servo will
center indicating that the new center position has been memorized.
Be sure to use a digital servo. Use only digital servos with the GY470.
Using the GY470 with an analog servo will damage the servo.
Always check the direction of operation of the servos. If you attempt to
fly the model when a servo operates in the wrong direction, the fuselage
will spin in a fixed direction and enter an extremely dangerous state.
Do not drop the GY470 onto a hard surface or subject the GY470 to a
strong shock as this may damage the sensor.
When using the GY470 in the AVCS mode, set revolution mixing to
OFF.
Do not place gyro near heating equipment (engine, motor, ESC, bat-
tery, servo, etc.). Always allow the gyro to adjust to the surrounding envi-
ronmental temperature before flight. A large temperature change during
use will cause drift and other operational issues. Rudder servo※Only digital servoGyro gain CH(Receiver)←connect→Port2(GY470)Remote gain effective. Trimmer(GY470) becomes LIMIT.Gyro gain CH(Receiver)←It does not connect→Port2(GY470)Remote gain is invalid. Trimmer(GY470) becomes GAIN.Extension Cord:(Black)Extension cord:(Red)GY470Port 3Port 1Rudder CHGyro gain CHPort 2ReceiverS.BUS ReceiverS.BUS CHRudder --- 4CHGyro gain --- 5CHGY470Port 2 is not connected.In S.BUS connection, the port 2 is not connected.
Remote gain is still effective.
S.BUS/S.BUS 2 portRudder servo※Only digital servoExtension cord:(Black)Port 3Port 1Main rotor shaft 90°Gyro mounted to the helicopterGY470Sensor tapeInstall the sensor so that the bottom of the
gyro is perpendicular to the main rotor shaft
axial direction. Offset of this axis will also re-
act in the roll and pitch directions.
As shown in a gure, the direc-
tion which sticks GY470 is free.
•Nopartofthismanualmaybereproducedinanyformwithoutpriorpermission.•Thecontentsofthismanualaresubjecttochangewithoutpriornotice.•Futabaisnotliableforanypotentialdamage(accidentaloroth-erwise)thatmayoccurafterinstallation.Before using your new gyro, please read this manual thoroughly
and use the gyro properly and safely. After reading this manual,
store it in a safe place.
Thank you for purchasing a GY470
gyro, a rate gyro for RC helicopters.
GY470 is a lightweight micro gyro
developed for RC helicopter rudder
(yaw axis) control. It can be used with
mininum setup and includes an S.BUS/
S.BUS2 port.
GY470 Ratings:(Integrated sensor type rate gyro)
• Gyro sensor: MEMS vibrating structure gyro
• Operating voltage: DC4.0 V to 8.4 V
• Current drain: 30 mA (excluding a servo)
• Operating temperature range: -10 ºC to +45 ºC
• Dimensions: 20.7 x 20.7 x 11.0 mm (except protrusion)
• Weight: 3.7 g
• Functions: Sensitivity trimmer. LED monitor. Servo selection (1520 uS,
760 uS). S.BUS/S.BUS2 connection.
*Oil on the sensor bottom and the part in-
stalled to the frame can be wiped off with
cleaner, etc.
GY470 installation precautions
· Always use the accessory sensor tape to install the GY470. Install the GY470 the center of the sensor tape.· Depending on the vibration from the heli-copter, the sponge may tear near the cor-ners of the sensor tape. If the helicopter is flown in this state, vibrations will not be su󱐰ciently absorbed and the sensor may fall o󱐯. Before ight, always check the sen-sor installation state. If the sponge is torn, replace it.Make the initial linkage connections in the NORMAL mode. In this case, make adjustments mechanically and make mini-mum trimmer adjustments at the transmitter.In the NORMAL mode, make the following linkage checks:·In the rudder neutral position, connect the linkage at the position at
which the servo horn and control wire are perpendicular.
Perpendicular
Control wire
Set the servo horn length based on
the helicopter manufacturer's instruc-
tions.
Move the rudder stick to the right and left and check the di-rection of operation of the tail rotor. If the tail rotor turns in the wrong direction, reverse the direction with the transmitter reverse function.1M23N38402
AdjustmentsAdjustments Flight AdjustmentsFlight Adjustments
AVCS / NORMAL ModeAVCS / NORMAL Mode
●A trimmer's operation*Since the trimmer is small and delicate, operate it by
gently using the provided mini screwdriver.
Setup before a ight [ Remote gain use ]
Adjusting gain with the transmitter.
When S.BUS connection or the gyro gain CH of the port 2 of a
gyro and a receiver is connected.
1. Settheservoselectionswitchtothesettingforyourtailrotorservo.Seechartbelow.2. Setupyourtransmitterbyfollowingthedirectionsinthegyrosettingmenumanual.Gyrogainissetupto50%byAVCS.Pleaserefertothegraph,AVCS,NORMALorwhenunclear.ItjudgesbytheLEDontheGY470.AVCS:RedNORMAL:Green3. ReceiverON→TheGY470requires3-5secondstoinitializewhenthepoweristurnedon.Donotmovethehelicopteranddonotmovetherudderstickduringthisinitializationorthegyromaynotinitializeproperly.Oncetheinitializationprocesshasbeencompletedtherudderservowillmove(alittle)severaltimesindicatingthattheGY470isnowreadyforight.Iftheneutralhasshifted,LEDwillblinkorange.Inthatcase,itreboots.4.Movetheruddersticktotheleftandrightandmakeadjustmentswiththelimittrimmer.Adjustformaximumtravel,makingsuretheservohorndoesn'thitthelinkage. [ Remote gain not use ]
Adjusting gain with the GY470 trimmer.
When not using an S.BUS connection and port 2 is not connected. In this case, a limit trimmer is automatically changed by the gyro
gain setting trimmer. A limit is xed by 50 degrees of right and
left. Adjustthetransmitterandgyrowhilerepeatedlytakingo󱐯andlandingandwiththeaircraftontheground.Transmitter adjustments must not be made while ying
because it is dangerous.
1. Setthesensitivitytothepositionatwhichhuntingdoesnotoccurduringhoveringandight.2. Adjustthehoveringandflightruddereffectusingthetransmitter'sD/RorAFRfunction.* Do not adjust with the End Point (ATV) function. If the End Point (ATV)
function is used, trimming may change.
AVCS 100%NORM 100%NORM 50%0%AVCS 50%<A gain trimmer's work >Operation in AVCS mode
If the rudder stick is operated or the helicopter is moved when the
helicopter was stopped during operation in the AVCS mode, the servo
will not return to the neutral position even if the rudder stick is re-
turned to the neutral position, and when the rudder stick is moved, the
rudder servo controls operation until the tail reaches the maximum
point. This is caused by addition of an integration function as an
AVCS mode operation and is not an abnormality. In actual ight, the
gyro constantly monitors movement of the tail and controls the servo
so that movement of the tail is stopped.
AVCS mode servo neutral position check method;
If the rudder stick or the helicopter was moved in the AVCS mode, the servo
will not return to its original neutral position. When the power is turned on,
the servo will return to the neutral position. The servo neutral position can
also be checked by the following method.
Neutral
position
Move the rudder stick 3 times to its full stroke to the left
and check method right at an internal of within 1 second
and immediately return the rudder stick to the neutral
position. The servo moves to the neutral position about 1
second later.
NORMAL mode sends control signals to the rudder servo only
when the tail of the helicopter moves. When the tail stops mov-
ing, the control signal from the gyro becomes zero. Conversely,
the AVCS mode continues to send control signals to the servo
even when the tail of the helicopter stops moving. The following
sequentially describes the NORMAL mode and the AVCS mode.
Operation of NORMAL mode
Basic operation is described by considering the case when the
helicopter is hovering under cross-wind conditions. With a nor-
mal mode, when the helicopter encounters a cross-wind, the
force of the cross-wind causes the tail of the helicopter to drift.
When the tail drifts, the gyro generates a control signal that stops
the drift. When the tail stops drifting, the control signal from the
gyro becomes zero. If the cross-wind continues to cause the tail
to drift in this state, the "stop" operation is repeated until the tail
faces into the winds. This is called the "weathervane" effect.
Operation of AVCS mode
Conversely, with an AVCS mode, when the helicopter encoun-
ters a cross-wind and the tail drifts, a control signal from the gyro
stops the drift. At the same time, the gyro computes the drift an-
gle and constantly outputs a control signal that resists the cross-
wind. Therefore, drifting of the tail can be stopped even if the
cross-wind continues to effect the helicopter. In other words, the
gyro itself automatically corrects(auto trim) changes in helicopter
tail trim by cross-wind. Considering operation of an AVCS mode,
when the tail of the helicopter rotates, the servo also rotates in
accordance with the angle of rotation of the tail. When the tail
stops rotating, the servo judges that it has stopped in that posi-
tion. This is the auto trim function. In AVCS operation modeIn NORMAL operation modeHovering in a cross wind. The tail will drift.AVCS is working properly during a cross wind.If it starts right driftIf it starts right driftA head turns to a direction of movement automatically.If no left rudder input is given, the machine will drift to the right. CrosswindCrosswind
HoveringHigh-speed flight
Please take a look at both the directions for the helicopter as well
as the transmitter.
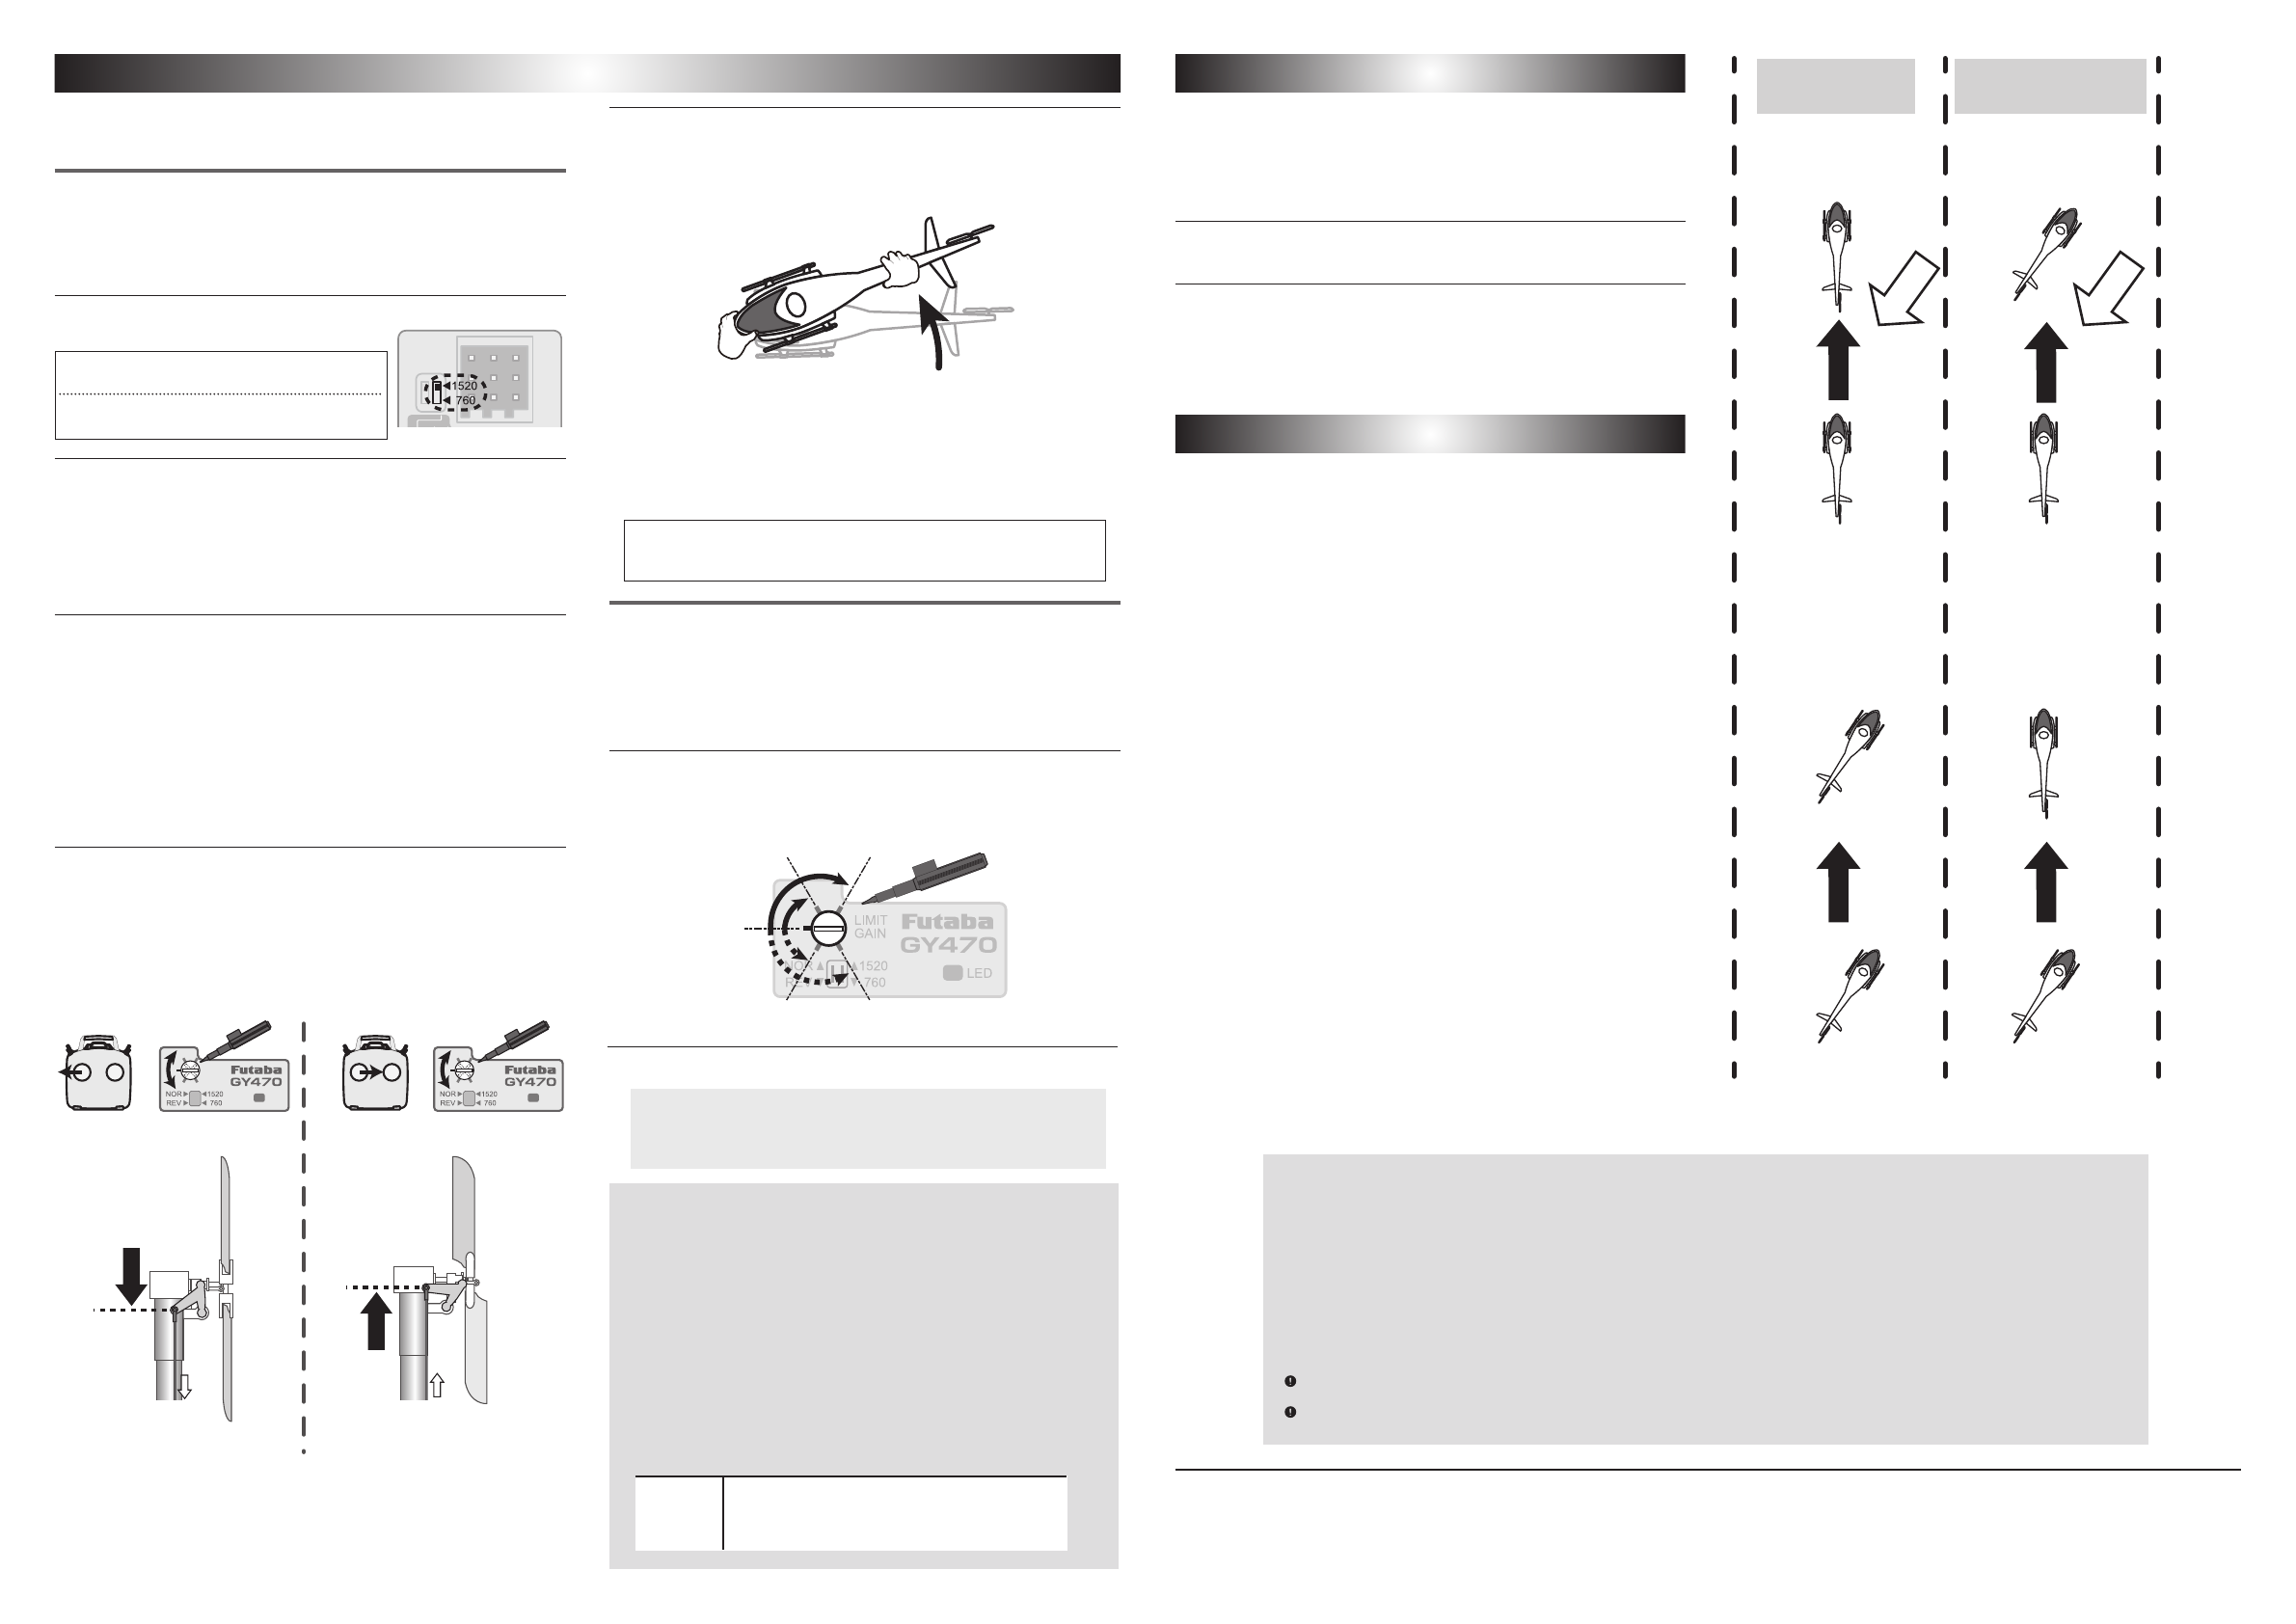
Hold the rudder stick full left.Adjust the left limit with the trim.Hold the rudder stick full right.Adjust the right limit with the trim.Adjust the linkage set up to get the maximum throw.Adjust the linkage set up to get the maximum throw.Bottom view of the tail section with the rudder stick full left.Bottom view of the tail section with the rudder stick full right.【Adjustment at the limit trimmer】
LIMIT
GAIN
LIMIT
GAIN
【Preflight check】Helicopter is turned to the Left ⇒Rudder operates on the
Right.
*This check is performed in the state where an engine (motor)
never starting.
5. IftherudderservomovestotheRightwhenthenoseofthehelicoptermovestotheLeft,thegyrodirectioniscorrect.IftherudderservomovestotheLeft,switchthedirectionusingtheGyro Direction Switch.If you try to fly the helicopter while the gyro direction is incorrect,
when the rotor rotates clockwise, the helicopter nose will yaw to the
Left and cause an extremely dangerous situation.
2.First,wesuggesttostartwithAVCSsetto50%.What is S.BUS?
Unlike conventional radio systems, the S.BUS system uses
data communication to transmit control signals from a
receiver to a servo, gyro, or other S.BUS compatible device.
This data includes commands such as “move the channel 3
servo to 15 degrees, move the channel 5 servo to 30 degrees”
to multiple devices. The S.BUS devices execute only those
commands for their own set channel. For this reason, it can
be used by connecting multiple servos to the same signal
line.
* Set the channel at the S.BUS servos by using an SBC-1 channel changer or a CIU-2 USB serial interface.
* Can also be used together with conventional servos. However, conventional servos cannot be used by the S.BUS output.
* When using servos with a remote battery pack, use S.BUS Hub with Cable (2-way/remote battery pack use).
Please refer to the instruction manual of S.BUS Hub with Cable (2-way/remote battery pack use) for the connection method.
Please turn on the power supply of the transmitter rst without fail, and, next, turn on the receiver if you use S.BUS. Moreover, please use it
after it conrms the operation without fail. Otherwise, the S.BUS communication cannot be judged and it is likely to malfunction.
The wiring for the S. BUS servo is replaced at power supply OFF. If you replace the wiring in power supply ON, S. BUS communications
cannot be judged, and it seems to malfunction.
1. Similarlytheprocedureof1. 3. 5 isfollowed.1520uS:BLS274SV,BLS254,BLS257,S9254,S9257,etc.760uS:BLS276SV,BLS256HV,BLS251,S9256,S9251FUTABA CORPORATION
Hobby Radio Control Business Center Sales & Marketing Department
1080 Yabutsuka, Chosei-mura, Chosei-gun, Chiba-ken, 299-4395, Japan
TEL: +81-475-32-6051, FAX: +81-475-32-2915
©FUTABA CORPORATION 2022, 5 (1)

Other FUTABA Toy manuals

FUTABA GV-1 User manual

FUTABA

FUTABA GV-1 User manual

FUTABA GY502 User manual

FUTABA

FUTABA GY502 User manual

FUTABA Sky Leaf Samba f User manual

FUTABA

FUTABA Sky Leaf Samba f User manual

FUTABA GY601 User manual

FUTABA

FUTABA GY601 User manual

FUTABA G501 User manual

FUTABA

FUTABA G501 User manual

FUTABA G190 User manual

FUTABA

FUTABA G190 User manual

FUTABA T16IZ Manual

FUTABA

FUTABA T16IZ Manual

FUTABA SkyLeaf BP User manual

FUTABA

FUTABA SkyLeaf BP User manual

FUTABA HV BLS274SV User manual

FUTABA

FUTABA HV BLS274SV User manual

FUTABA CGY750 User manual

FUTABA

FUTABA CGY750 User manual

FUTABA GY240 User manual

FUTABA

FUTABA GY240 User manual

FUTABA CGY750 User manual

FUTABA

FUTABA CGY750 User manual

FUTABA SkyLeaf Leader User manual

FUTABA

FUTABA SkyLeaf Leader User manual

FUTABA Big SkyLeaf User manual

FUTABA

FUTABA Big SkyLeaf User manual

FUTABA SkyLeaf-ST User manual

FUTABA

FUTABA SkyLeaf-ST User manual

FUTABA SkyLeaf-ST User manual

FUTABA

FUTABA SkyLeaf-ST User manual

FUTABA GY501 User manual

FUTABA

FUTABA GY501 User manual

FUTABA GY401 User manual

FUTABA

FUTABA GY401 User manual

FUTABA SkyLeaf Classic User manual

FUTABA

FUTABA SkyLeaf Classic User manual

FUTABA GY520 User manual

FUTABA

FUTABA GY520 User manual

FUTABA Groovy 90 3A User manual

FUTABA

FUTABA Groovy 90 3A User manual

Popular Toy manuals by other brands

Seagull Models RENO AIR CARE YAK-11 PERESTROIKA Assembly manual

Seagull Models

Seagull Models RENO AIR CARE YAK-11 PERESTROIKA Assembly manual

Eduard Tempest Mk.II landing flaps Assembly instructions

Eduard

Eduard Tempest Mk.II landing flaps Assembly instructions

LGB RhB offener Guterwagen mit Band manual

LGB

LGB RhB offener Guterwagen mit Band manual

Maserati GranTurismo MC Trofeo Assembly manual & user guide

Maserati

Maserati GranTurismo MC Trofeo Assembly manual & user guide

Carrera Digital 124 Wireless+ Assembly and instruction manual

Carrera

Carrera Digital 124 Wireless+ Assembly and instruction manual

PARKZONE PKZ1950 instruction manual

PARKZONE

PARKZONE PKZ1950 instruction manual

Fisher-Price BMH49 instruction sheet

Fisher-Price

Fisher-Price BMH49 instruction sheet

Faller 293028 quick start guide

Faller

Faller 293028 quick start guide

Carrera GO!!! Assembly and operating instructions

Carrera

Carrera GO!!! Assembly and operating instructions

Faller TRANSFORMER STATION instructions

Faller

Faller TRANSFORMER STATION instructions

Amewi 26069 instruction manual

Amewi

Amewi 26069 instruction manual

LGB 22852 instructions

LGB

LGB 22852 instructions

VTech Baby Green Means Go Baby Keys 5574 instruction manual

VTech Baby

VTech Baby Green Means Go Baby Keys 5574 instruction manual

Nerf N-STRIKE ELITE RHINO-FIRE BLASTER manual

Nerf

Nerf N-STRIKE ELITE RHINO-FIRE BLASTER manual

marklin 29200 user manual

marklin

marklin 29200 user manual

RC Lander T-33 Operational manual

RC Lander

RC Lander T-33 Operational manual

Xane F38 HORNET Assembly and operation instructions manual

Xane

Xane F38 HORNET Assembly and operation instructions manual

Mega Bloks BLOK TOWN Farm manual

Mega Bloks

Mega Bloks BLOK TOWN Farm manual

manuals.online logo
manuals.online logoBrands
  • About & Mission
  • Contact us
  • Privacy Policy
  • Terms and Conditions

Copyright 2025 Manuals.Online. All Rights Reserved.