3G STEPPERBIKE User manual

3G STEPPERBIKE OWNER’S MANUAL
CAUTION
This Owner’s manual is to be read prior to operating your 3G Stepperbike

This manual contains important safety, performance and maintenance information. Read the manual and all
warnings before taking your first ride on your new 3G Stepperbike, and keep the manual handy for future
reference.
Unsafe or improper use of the 3G Stepperbike by failing to read and comply with all safety, performance and
maintenance requirements and warnings could result in serious injury or death. It is also impossible to
predict every situation and condition which will occur while riding. 3G Stepperbike has made no
representation about the safe use of the Stepperbike under all conditions. There are risks associated with
the use of any Stepperbike which cannot be predicted or avoided and 3G Stepperbike recommends safe
cautions riding.
Warning
Assembly of your 3G Stepperbike by any party other than an authorized 3G Stepperbike dealer voids
your warranty. It is strongly recommended to have all post-sale assembly and service work on your
Stepperbike performed by a properly trained and equipped dealer.
When inspecting your 3G Stepperbike, be certain to tighten all nuts and bolts properly. Under
tightening can result in loosening, parts loss, and component damage. Over-tightened nuts and
bolts can break. Certain Stepperbike parts have metric hardwareAlways use the correct tools.

INTRODUCTION
CONGRATULATIONS on the purchase of your new 3G Stepperbike. This manual is designed to give you
the information you need for the safe operation and maintenance of your new Stepperbike. Please read it
thoroughly before riding your 3G Stepperbike and record the serial number in this manual in the event your
Stepperbike is lost or stolen. You may also want to register your serial number with your local police
department. Please retain your sales receipt as proof of purchase and keep with the information below.
MODEL NAME________________________________
SERIAL NUMBER______________________________
COLOR______________________________________
DATE OF PURCHASE__________________________
PLACE OF PURCHASE_________________________

Contents
1. About this Manual
2. What it’s called
3. What kind of 3G Stepperbike is it?
4. Fit and Safety
A.Fit
B. Safety Equipment
C. Mechanical Safety Check
5. Riding Safely and Responsibly

A. The Basics
B. Rules and the Road
C. Rules and the Trail
D. Wet Weather Riding
E. Night Riding
6. Service and Maintenance
7. About your Dealer

1. ABOUT THIS MANUAL
This manual was written to help you get the most performance, comfort, enjoyment and safety when riding your new
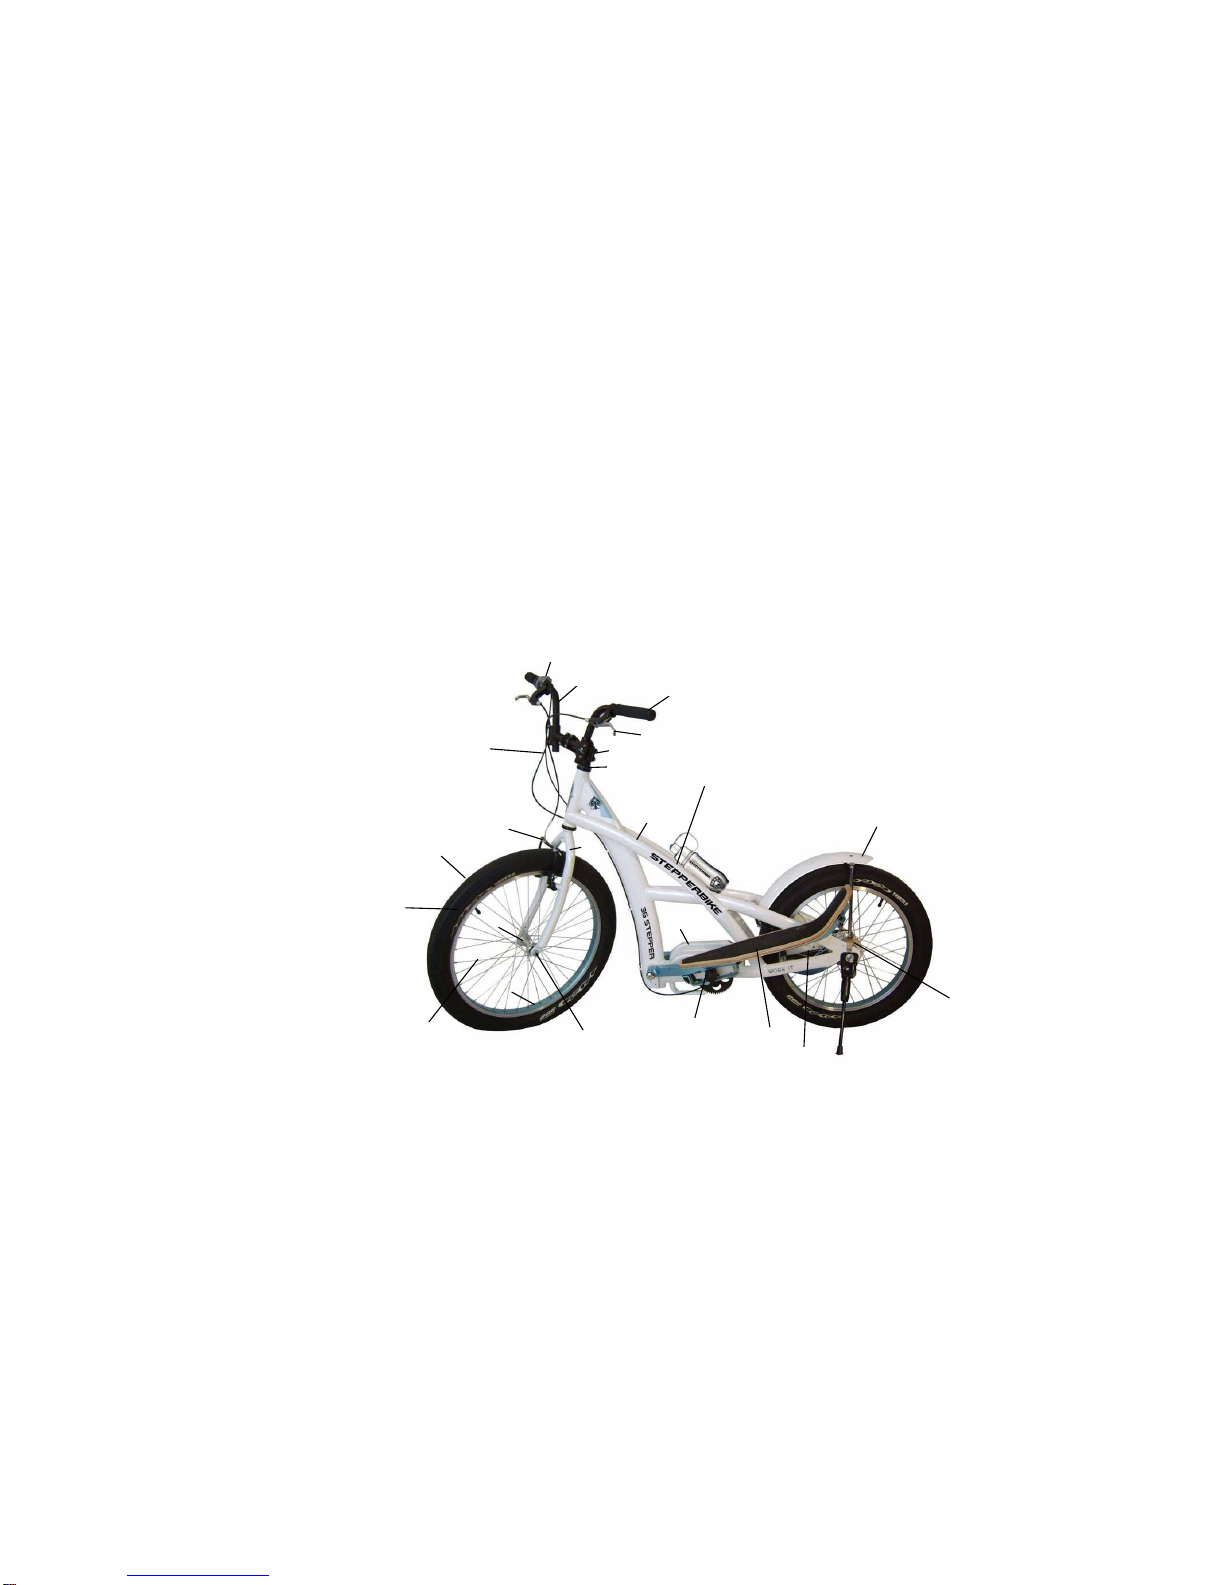
3G Stepperbike. It is important for you to understand your new Stepperbike. By reading this manual before you go out
on your first ride, you'll know how to get better performance, comfort, and enjoyment from your new Stepperbike. It is
also important that your first ride on your new Stepperbike is taken in a controlled environment, away from cars,
obstacles and other cyclists.
GENERAL WARNING
Riding Stepperbike can be a hazardous activity even under the best of circumstances. Proper maintenance of your
Stepperbike is your responsibility as it helps reduce the risk of injury. This manual contains many "Warnings" and
"Cautions" concerning the consequences of failure to maintain or inspect your 3G Stepperbike. Many of the warnings
and cautions say "you may lose control and fall". Because any fall can result in serious injury or even death, we do not
repeat the warning of possible injury or death whenever the risk of falling is mentioned.
SPECIAL NOTE FOR PARENTS
It is a tragic fact that many riding accidents involve children.As a parent or guardian, you bear the responsibility for the
activities and safety of your minor child. Among these responsibilities are to make sure that the 3G Stepperbike which
your child is riding is properly fitted to the child; That it is in good repair and safe operating condition; that you and your
child have learned, understand and
obey not only the applicable local motor vehicle, Stepperbike, bicycle and traffic laws, but also the common sense rules
of safe and responsible riding Stepperbike.As a parent you should read this manual before letting your child ride the
Stepperbike. Please make sure that your child always wears an approved helmet when riding.

2. What it’s
Called
1. frame
2. head parts
3. brake lever
4. shifter cable
5. shifter
6. grip
7. handle bar
8. bar stem
9. front fork
10. brake
11. tire
12. tube
13. hub
14. rim
15. spokes
16. chain guard
17. pedal
18. deck
19. chain
20. derailleur/Nexus hub
21. quick release
22. fender
23. waterbottle boss
(waterbottle not included)
5
7
3
8
2
4
10 9
1
6
11
12
13
14
15 17
16
18 19
20
22
21
23

Our 3G Stepperbike can be broadly categorized into three types,
according to the different sizes intended to use for different age:
Children’s Stepperbike, Teenage Stepperbike and Adult
Stepperbike. While there is a lot of use overlap in Stepperbike
design, each type of our Stepperbike is designed to provide
optimum performance, comfort and safety while on the correct size
and under specific use conditions. Which type is your 3G
Stepperbike?
Children’s Stepperbike only designed for those children who are
age from 8 to 13. This Stepperbike has painted different color intend
to the favor of boys and girls. The navy blue Stepperbike we called it
Spyder and another fresh yellow was painted is Junior. However, in
spite of what color it is, both of them are the same size, specification
and design. Their wheels have small outside diameter and the place
as well as height of handlebar and deck are suitable for children’s
height to get the comfort riding posture. The rear brake is
Drum-brake which is silent enough to help your riding more
enjoyable. It provides you casual, reliable brake performance.
3. What kind of
3G stepperbike
is it?

Teenage Stepperbike is the best choice of the youth from age 13
to 17.It upgrade from Children’s Stepperbike basis of function and
size. The internal Nexus 3 speed relaxes you to fit different road
conditions and provides the excellent shifter performance and
life-span. The step extent of deck suitable for most teenagers’
stature as well as drive power fit to the weight of theirs to make
riding more easily and funny.
Adult Stepperbike is designed to the people that ages are above
17. We categorize this type into Common Version and Senior
Version as they are different material for frame. Gentlemen are
fond of Senior Version which we called it “Hammer” and ladies are
prefer to “Work-it” .It is alloy frame with adjustable handlebar to
change the height and angle flexibly according to your like and
status of your body that help you to have a more broad and
enjoyable riding …. It is also assembled 8 speed rear derailleur to
fit almost every road condition; the shifter can rotate optionally to
adjust the speed when you are riding your Stepperbike.

A. Fit
Make sure the Stepperbike fits. A Stepperbike that’s too big
or too small for the rider is harder to control making it more
dangerous and can be uncomfortable.
Warning: If your 3G Stepperbike does not fit properly, you
may lose control and fall. If your new Stepperbike doesn’t
fit, ask your dealer to exchange it before you ride it.
The first check for correct size is standover height, Standover
height is the basic element of Stepperbike fit. To check for safe
standover height, straddle the Stepperbike while wearing the
kind of shoes in which you’ll be riding, both of your hands hold
on the grip of the handlebar and if your shoulder is below the
height of handlebar. That means the size is larger for you. To
ensure your sight-view is not keep off by the parts of handlebar
and have an enough seeing space, please chose smaller
Stepperbike compare your height.
4. Fit and
Safety

Adjusting of handlebar
Correct adjusting of handlebar is an important element for
you obtained the best performance and comfort, your dealer
is very experience to do this and they will tell you where
most comfortable position for most people is. Also, if
you feel the height and angle lead to uncomfortable for
you that you can adjust yourself.
While the handlebar of your 3G Stepperbike insert the head
tube through stem, your dealer can raise or lower your
handlebars a bit by adjusting stem height. In addition, if you
want a higher Stepperbike, the stem must be longer. Please
consult your dealer. Do not attempt to do this yourself,
as it requires special knowledge.
As for most of 3G Stepperbike, you can raise or lower your
handlebars a bit by adjusting stem height. Loosen the stem
binder bolt by Turing it counterclockwise three or four full
turns. If the bolt rises but the stem doesn’t, get a piece of

wood or a soft mallet and give the bolt a good whack to
release the wedge. Adjust the stem position as desired,
align stem with tire, and retighten the binder bolt tight
enough so that you cannot twist the stem and handlebars
out of alignment. Under no circumstances should the stem
be retighten-ended with its “Minimum Insertion” or
“Maximum Extension” mark visible. If you are uncertain
about the stem mark consult your dealer
If the connection between handlebar and front fork of 3G
Stepperbike is hitched stem by handlebar, your dealer can
through move the handlebar to realize change of the height
and angle of handlebar or you may adjust according to your
like.
CAUTION: the largest distance by the adjusting of
handlebar must reveal 10mm on the bottom-end of

handlebar and make sure the bolts on the steering tube
is tighten enough to insure that the steering tube can
sustain the whole weight of yourself.
Now check to make sure that the handlebars rotate freely in
both directions without the brake cables catching or binding
on anything.

CAUTION: On some Stepperbike, changing stem height
can affect the tension of the front brake cable, locking
the front brake or creating sufficient cable slack to
make the front brake inoperable. If the front brake
shoes move in towards the wheel rim or out away from
the wheel rim when you change stem height, take your
3G Stepperbike to your dealer for correct brake
adjustment before riding it .
WARNING: The minimum Inserting Mark of stem must
not be visible above the top of the headset. If the stem
is extended beyond the Minimum Inserting Mark, the
stem may damage the steering tube of fork or break,
which could cause you to lose control and fall.
You can change the angle of the handlebar or bar end
extensions by loosening their binder bolt, rotating the bar or
extension to the desired angle, re-centering it and
retightening the binder bolt tight enough so that the bars or
extensions can’t move in relation to each other and the
stem.

WARNING: Failure to properly tighten the stem binder
bolt, the handlebar binder bolt or the bar end extension
clamping bolts may compromise steering action, which
could cause you to lose control and fall. Place the front
wheel of the bicycle between your legs and attempt to
twist the handlebar/stem assembly. If you can twist the
stem in relation to the front wheel, turn the handlebars
in relation to the stem, or turn the bar end extensions
in relation to the handlebar, tighten the bolts.
Control position adjustments: The brake and shifting
controls on your bike are positioned where they work best
for most people. The angle of the controls and their position
on the handlebars can be changed. Ask your dealer to
show you how, or to make the adjustments for you.
Brake reach: Many 3G Stepperbike have brake levers
which can be adjusted for reach. If you have small hands
and find it difficult to squeeze the brake levers, your dealer
can either adjust the reach or fit shorter reach brake levers.

Assemblage of Cylinder pedals: you dealer will install the
cylinder pedals for you. The cylinder pedals are different on
left and right by their different screw direction of thread and
on the left hand the pedal (one side without chain)was
screwed tight in clock-wise direction as well as
The right pedal was screwed in counter clock-wise.
Do not attempt to disassemble the cylinder pedals
and frequent disassemble will damage thread of the
pedal to result in injury.

Assemblage of Deck: your dealer will assemble deck for
you. Do not attempt to disassemble deck, as it requires
special knowledge. If you find that the deck can not rotate
freely or have loose, consult your dealer, they will help you
to check where the problem is.
Installation of deck: your dealer will install deck for you. Do
not attempt to disassemble deck before you are familiar it.
When you deck has loosen or can not rotate smoothly,
please contact your dealer then they will examine where the
problem it is.
2.删除锁卡条图示

Cautions:
There is a railing as protecting device on the bottom of
deck. Do not think it is useless and disassemble it. When
you are in fast riding, the device can ensure the deck and
pedal are connected to keep the good driving
performance and reduce the accident.
On the surface of deck there is a cloth and its function is
increasing the frication between shoes’ bottom and
surface of deck. Still, we remind riders to wear softer
shoes with good friction while they are riding 3G
Stepperbike. Especially when they use Stepperbike in a
humid circumstance, it is important to prevent slip
otherwise they may result in serious injury or death.

B.Safety Equipment
WARNING: Many states require specific safety devices. It is
your responsibility to familiarize yourself with the laws of
the states where you ride and to comply with all applicable
laws, including properly equipping yourself and your
Stepperbike as the law requires.
Helmet: While not all States require bicyclists to wear approved
protective headgear, common sense dictates that you should
wear an ANSI or Snell approved helmet whether the law requires
it or not. Most serious Stepperbike injuries involve head injuries
which might have been avoided if the rider had worn a helmet.
Your dealer has a variety of attractive helmets, and can
recommend one to suit your needs. But the “right” helmet is not
just a fashion statement. It must fit correctly, be worn correctly
and be properly secured to do its real job.Ask your dealer to help
you with the fit and adjustment of your helmet.

WARNING: Always wear a helmet when riding your 3G
Stepperbike. Always keep the chin strap securely
buckled. Failure to wear an approved helmet may result
in serious injury or death.
Reflectors: Reflectors are important safety devices which are
designed as an integral part of your Stepperbike.
Federal regulations require every Stepperbike to be equipped
with front, rear, wheel and pedal reflectors. The size,
performance and location of each reflector are specified by the
U.S. Consumer Products Safety Commission. The reflectors are
designed to pick up and reflect street lights and car lights in a
way that helps you to be seen and recognized as a moving rider.
CAUTION: Check reflectors and their mounting brackets
regularly to make sure that they are clean, straight,
unbroken and securely mounted. Have your dealer replace
damaged reflectors and straighten or tighten any that are
bent or loose.
Table of contents
Other 3G Bicycle manuals
Popular Bicycle manuals by other brands

ITALMOTO
ITALMOTO Clodia owner's manual

Costway
Costway TY328026 user manual

Winora Group
Winora Group R5PRO Operation and maintenance manual

Trojan
Trojan PULSE 500 Care instructions and assembly manual

Canyon
Canyon SPECTRAL M120 X SYNTACE K.I.S. quick start guide

Mercedes-Benz
Mercedes-Benz n+ Championship Edition user manual