Tomcat Tiger User manual

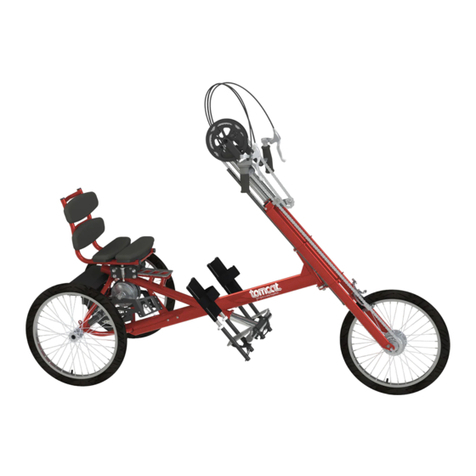
Tiger Tricycle from TOMCAT
Made in England
Dear Customer,
Thank you for choosing this innovative Tomcat product. We wish you many years of fun and
therapy from it.
Please read this handbook before using your Tiger Trike for the first time.
For more detailed advice visit www.tomcatuk.org
SECTIONS IN THIS MANUAL.
Safety Procedures Page 2
Set up and Adjustment Page 3 - 8
Posture Problems and Solutions Page 9-10
Maintenance Page 11
Tomcat Carer Control Instructions Page 12-13
Guarantee & Contact Details Page 14
THE QUEEN’S AWARDS
FOR ENTERPRISE:
INNOVATION
2013

Safety First!
Always wear a safety helmet and use the safety features supplied with your trike.
Do not use on steep inclines, heavy cambers, or sloping or uneven ground which may
cause the vehicle to tilt suddenly. Do not ride over curbs.
Discourage bad practice such as leaning, by stopping each time it occurs.
Do not exceed walking speed with “Carer Controlled Trikes” Slow down to turn and
steady the trike with the backrest.
Never leave the rider unattended. Use the “Park Brake” for mounting and dismount-
ing only.
Only one person may ride the trike. Do not allow others to take “piggy back “ rides.
To ensure good stability, keep the correct tyre pressure at all times. (20 psi)
WARNING. Always remove the control arm when using the trike independently.
Slight movement of the handlebars can cause rapid movement of the arm which may
cause serious eye or face injury to small children. Never allow small children to push
or steer the tricycle with the arm.
Excessive upward / downward force on the steering arm may cause mechanical dam-
age and steering mechanism failure. Use the arm for steering and light pushing only.
Never use the arm as a lever, (for example to lift the trike over a curb).
Follow the guidelines on assembly and adjustment. If your child might be at risk from
poor adjustment or overuse, seek your healthcare professional’s advice before first
use and at each subsequent adjustment.
Tomcat SNI Ltd, endeavour to make its products as safe as possible but ulti-
mately cannot control their usage. Ensure the product is used in accordance
with these recommendations, with due care, and in a safe manner.
Page 2
Notes

GUARANTEE
Tomcat SNI Ltd guarantee this product to be free of defects in material and
workmanship from the date of original purchase for a period of 2 years.
Tomcat additionally guarantee the frame excluding its attachments for a period
of 7 years.
Our obligation under this guarantee is limited to repair or replacement of the
faulty item or the entire unit at our option, providing it has been properly
maintained, has not been tampered with or repaired by unauthorised
individuals and in the case of custom built products, has not been used by
person(s) for whom it was not originally designed or intended. This guarantee
does not cover normal wear and tear, the cost of inconvenience, property
damage, abuse, misuse accident or similar incident.
Under these terms Tomcat SNI Ltd will bear the cost of replacement parts and
labour charges but not transportation costs unless by prior agreement. Call or
write before returning goods under this guarantee. Claims under this
guarantee will only be considered following inspection by us or our appointed
agent and before any remedial work is undertaken.
This guarantee applies to the original purchaser only and does not pass to any
third party through transfer of ownership or custody.
By offering this guarantee Tomcat Trikes Ltd in no way seeks to diminish a
consumers statuary rights.
Tomcat SNI Ltd
Unit 13/7The Gloucester Business Park
Hucclecote
Gloucester
GL3 4AA
Tel 01452 616900
Fax 01452 613300
Email i[email protected]
This Trike is the Property of
Supplied ………………………….Order No…………………………….
Safety First!
Setting up and using Carer Controlled Steering.
To release steering arm, press thumb tag down & push steering arm forward.
To re-attach, slot hole over front pin, lay flat on steering bowl top plate & pull buck until you hear it
click into place.
Pushing.
The Tomcat Carer Control arm is a steering device therefore pushing is not recommended except for
very light duty such as moving off or training a new user. If it is necessary to push hard, do so with the
backrest.
NEVER…
Push forward with the handle when on a tight turning circle. Push with the backrest in-
stead.
Lift the tricycle with the control handle.
Tilt the tricycle backwards or lift the front wheel off the ground with the control handle.
Drag the tricycle forward with the control handle.
Page 3

Braking.
To brake the Tiger, pull back on the brake handle.
Speed Control.
To control the speed, hold the handle at the top with fingers wrapped about the crook of the
handle and walk normally. When the trike accelerates away, don't brake or try to keep up. Let
the trike pull the brake lever on, against the resistance of your fingers. It will slow down to your
walking speed because of the articulated brake design. When you are both at the same speed
again the brake will release.
Park Brake.
Apply the park brake by pulling back on the strap brake lever then pushing the park brake button
down. To release the park brake simply pull back on the strap lever again and the park brake will
release.
Always check the brake is free before moving off. Only use the park brake to prevent motion
during mounting and dismounting.
Page 4
General Considerations
Ensure the park brake is applied, when a rider is getting on or off.
A Carer Controlled trike assumes the Carer is the primary and only decision
maker. It assumes that the rider may not be aware of the Carers intentions or
what is safe or dangerous and may unexpectedly attempt an inappropriate
action, therefore:
A Carer Controlled trike must ALWAYS be controlled by a carer,
who must ALWAYS maintain a grip on the control handle.
A Carer Controlled trike must NEVER be used at greater than
walking speed as safe control is not possible on the run.
A Tomcat is a light, fast trike, intended to get the very best from the human
body by seating the rider in the best possible geometrical position, however
this may require extra supervisory care therefore Carers should constantly
assess the road ahead and take the following appropriate action.
Be in control at all times. Train the rider that you make the
choices, by stopping the trike at each inappropriate influence.
Avoid potholes, soft, rutted or uneven surfaces.
Avoid heavy cambers, particularly adverse cambers. Avoid sud-
den acute cambers such as pavement drop kerbs. Avoid roads
with high crowns.
Discourage leaning by the rider, adjust support if necessary.
If avoidance is impossible, slow right down through the obstacle,
and whilst steering with one hand, use the other hand to steady
the trike by holding the backrest. Be prepared to stop the trike if
necessary.
Page 13

Tomcat Carer Control –Instructions for safe and proper use by new
Carers.
In conjunction with the General Safety advice on page 2 of the manual, please be
guided by the following.
Before each use, check tyre pressure. This should be between 40 and 45 psi
for a Tomcat and 18 to 20psi for a Tiger. Do not use if pressure is out-
side these limits. Do not use if the tyres show cracks or fissures.
Fully familiarise yourself with Carer Control before putting a rider on the
tricycle. In particular, familiarise yourself with braking and negotiating
corners. There are three main functions, Steering, Braking and Speed
Control.
Steering
Move the control arm left and right to steer. The action may appear to be
counter intuitive at first, but is essential for progressive control and
limiting over-steer and will quickly become natural and comfortable to
use. Progress to using the trike with a rider on board only when you are
comfortable with this function.
New riders and new carers should familiarise themselves with the vehicle on
flat level ground before progressing to uneven ground.
Braking
Hold the handle by the crook at all times. Pull back gently to brake.
Speed Control
Practice applying the brake and using the brake as a speed control device on hills
or when the rider is pedalling too fast. (To do this, hold the handle steadily by the
crook and simply walk at your preferred speed. The trike will adjust to that speed
automatically by applying greater braking force as the trike attempts to go faster
than your walking speed.)
Page 12
ADJUSTING YOUR TIGER
To Raise or lower the saddle (and backrest)
Slacken the clamp with a 5mm Allen Key
Re-adjust the saddle height and re-clamp (Firmly)
To Adjust the handle bars
For Height:
1. Turn the clamp screw on the top of the stem “anticlockwise”
Tap the screw head to release the clamp.
Reset the height then re-tighten the screw.
(13mm Spanner)
For “Close” - “Far” Position
2. Slacken the screw on the sides of the stem, Re-adjust position and re-tighten.
(13mm Spanner)
To Adjust the footshoe position
Turn the footshoe upside down and slacken both screws on the underside of the footshoe
with a 10mm spanner and move as required, then re-tighten.
Note that footshoes can move; forwards and backwards, sideways
and rotate, (when viewed from above) After adjustment check the pedals
turn freely without the footshoe clips or straps
fouling the crank arms.
Page 5

To Fit the footshoe straps
Fit the locking buckle to the strap. Pass the strap through the metal buckle then back through
the locking buckle as shown. (Photo 1) . Pass the strap, through the
inner metal buckle (Photo 2) , then through the back matal buckle (photo 3).
1 2
3 4
To adjust the strap
The strap passes over the instep of the foot with the locking buckle over the shoe laces.
It then passes behind the heel of the shoe and through the back metal buckle. When
correctly adjusted the back buckle will be in the area “between” the hook and loop
pads. (Photo 4) If this is not the case, adjust the strap length accordingly by adjusting
the locking buckle position. When correctly adjusted, you need only release the hook
and loop closure when taking the child on and off the trike.
To adjust the backrest depth (All Types)
Slacken the backrest bracket and slide
forwards and backwards as necessary.
Re-tighten after adjustment.
(5mm Allen Key)
Page 6
CARING FOR YOUR TIGER
1. Keep away from extremes of heat, dampness or prolonged sunlight. Wipe dry
when wet and store in a well ventilated room.
2. Maintain the correct tyre pressure at all times (20psi). Check tyre condition regu-
larly.
3. Clean paintwork, padded and plastic parts with a damp cloth or mild household
detergent.
4. Clean chrome and metal parts with a non abrasive polish.
5. Regularly check and adjust the brakes. (Maintain a 1 to 3mm total gap between
brake shoes and wheel rim)
Page 11

1
2
3
Page 10
Riding problems and their solutions.
The rider is sliding forward on the saddle.
There are many reasons for this including:
Saddle height too high or low.
Handlebars too far away.
Back support too far forward - or too low!
Pommel of saddle too low.
Poor muscle tone or other physical condition considerations.
Check the above adjustments and if necessary raise the saddle pommel to
discourage the practice. If the problem persists consult Tomcat.
The trike suddenly jerks or stops, as though something is catching.
New riders commonly experience this problem because they are excited. They
push down on the rising pedal before “top dead centre” thus causing the trike
to jerk or stop. Practice usually solves this problem but a little more speed can
help with co-ordination, until they settle down.
Sitting skewed or lop-sided on the saddle.
This problem can be difficult to identify, but is usually caused by the Rider
compensating for discomfort in another part of the body.
Examples include unequal arm reach due to wrist or elbow problems, forced
straightening of a twisted joint for example an ankle or knee, or forced over
extension of a joint with restricted range.
Consider the riders physical disabilities as this will usually guide you to the cause
of the problem but if you cannot resolve it by simple adjustment consult your
Physio or Tomcat or visit FAQ’s at www.tomcatuk.org before continuing.
Note: Tomcat can usually identify the problem by video.
The trike pulls to one side or is difficult to steer.
The rider is fighting you for steering control and winning. Usually it is
excitement and they will settle down, but if the problem persists, contact
Tomcat.
To adjust the backrest height (All Types)
Slacken the clamp screw on the “Tee” Bracket
and adjust for height.
Retighten after adjustment.
(13mm spanner and 5mm Allen Key)
To adjust The Backrest “Tilt”
(Upholstered Backrests Only)
Slacken the middle clamp and tilt to the required angle
(13mm spanner 5mm Allen Key).
To Remove backrest Arms (All Types)
Slacken the lock screw and remove the
arm from the backrest “Tee”.
To Adjust the backrest arms “gap”
Slacken the lock screw and move the arm in or out as re-
quired. Note that at least 4cm of arm must be inserted into
the backrest “Tee” Bar. See also instructions on adjusting
the waist strap
To Adjust the Backrest “Lateral Pad” height:
(Backrests with Laterals Only)
Slacken the rocking Arm screws and raise or
lower as required Re-tighten the screws after adjustment.
(13mm spanner 5mm Allen Key).
To Open and Close the Waist Strap Buckle (All Types)
Press the two side bars Pull the buckle apart.
To Close the buckle push the two parts together again.
Page 7

To Fit the waistcoat (If Supplied)
1. With the child on the tricycle and the waist
strap loose, place the harness over the chest
with the long legs over the shoulders.
2. Attach the straps by pressing together the
small buckles. (Photo 1)
3. Repeat this process for the lower legs of the
harness.
4. Tighten straps if necessary by pulling on the
loop at the end of each strap. (Photo 2)
5. To Loosen the straps, remove the harness
and work the strap back through each buckle
in turn. Alternatively, adjust the strap by
releasing the Cam Lock Buckles on the back
of the Backrest (Photo 3)and adjusting the
strap as required.
6. When adjustment is correct, close the waist
strap buckle. Check all straps and buckles
are secure and child is breathing easily.
To Tighten or Loosen the Waist Strap (All Types)
1. Pull the loose ends of the webbing strap through the locking buckle
2. Adjust the Side Release Buckles position on the strap as
required then pass the loose end back through the locking buckle once more. Check
the “Side Release Buckle” is secure.
Calipers (When Specified)
Callipers, where specified, clip in on the plate at the
back of the footshoes. To remove press button
located at the back underneath the plate and tilt
calliper backwards.
1
2
3
Page 8
To adjust the “reach” of the brake lever (Handlebars)
1. Screw the small screw near the brake cable in or out as required Adjust the brake block
clearance accordingly.
To adjust the brake
1. Slacken the lock nut with an 8mm spanner.
2. Turn the adjuster until the correct clearance is achieved. (1 to 3mm total gap between
brake blocks and wheel rim)
WRONG!
Toes point down.
Move the footshoe
backwards
CORRECT!
Square ankle similar to
a standing person
WRONG!
Heel Points down.
Move the footshoe
forwards.
WRONG!
Saddle too high.
CORRECT. WRONG!
Saddle too low.
For an able child, a trike is a toy for fun and
adventure.
For a disabled child a trike is the best exercise,
learning and social therapy tool, ever invented.
An able child can often adapt to a trike that
isn't quite right, but a disabled child may need
the trike carefully adjusted to their own special
needs and difficulties.
Getting it right is skilled work, particularly
when the child has severe physical disability, so
you should always seek professional advice
from a physiotherapist or skilled technician
before making adjustments.
However for your guidance; best posture will
usually be achieved when:
1. The child’s back is straight and upright.
2. Forearms are horizontal when holding
the handlebars.
3. Thighs are generally parallel when
pedalling.
4. Ankles are square (Most of the time).
5. Legs are slightly crooked at the lowest
pedal position.
More information is available at
www.tomcatuk.org in the (FAQ) frequently
asked questions section.
HINTS AND TIPS ON CLINICAL ADJUSTMENT
Page 9
Table of contents
Other Tomcat Bicycle manuals

