manuals.online logo
Brands
  1. Home
  2. •
  3. Brands
  4. •
  5. Winora Group
  6. •
  7. Bicycle
  8. •
  9. Winora Group R5PRO User manual

Winora Group R5PRO User manual

R5PRO
OPERATION AND MAINTENANCE
·MODLE R5PRO
USER MANUAL
ELECTRIC BICYCLE
· Please carefully check whether all parts are in good condition before. If there is any
problem, please contact the dealer in time.
· Abide by the city traffic laws and regulations when using.
· Slow down when encountering rain, snow and passing through slippery roads, increase
braking distance when braking, and avoid traveling as much as possible to ensure safety.
· Do not disassemble parts without authorization. If you need to replace them, please
purchase standard parts from distributors.
· Wading is prohibited during riding or when riding in rainy days. When accumulated water
floods the lowest position of motor hub, it will cause line failure.
· Do not contact the metal point of the battery, otherwise it will produce a large short-circuit
current and cause an accident and fire, please pay attention!
· Wear a helmet when riding an electric bicycle, and carry articles according to the law.
· Do not park electric bicycles in the foyer, stairs, walkways and safety exits of buildings.
· Due to the continuous improvement of products in technology, there may be different
things between the physical objects and the instructions. Please take the physical objects
as the standard.
Do not park electric bicycles in the foyer, stairs, walkways and safety exits of buildings.
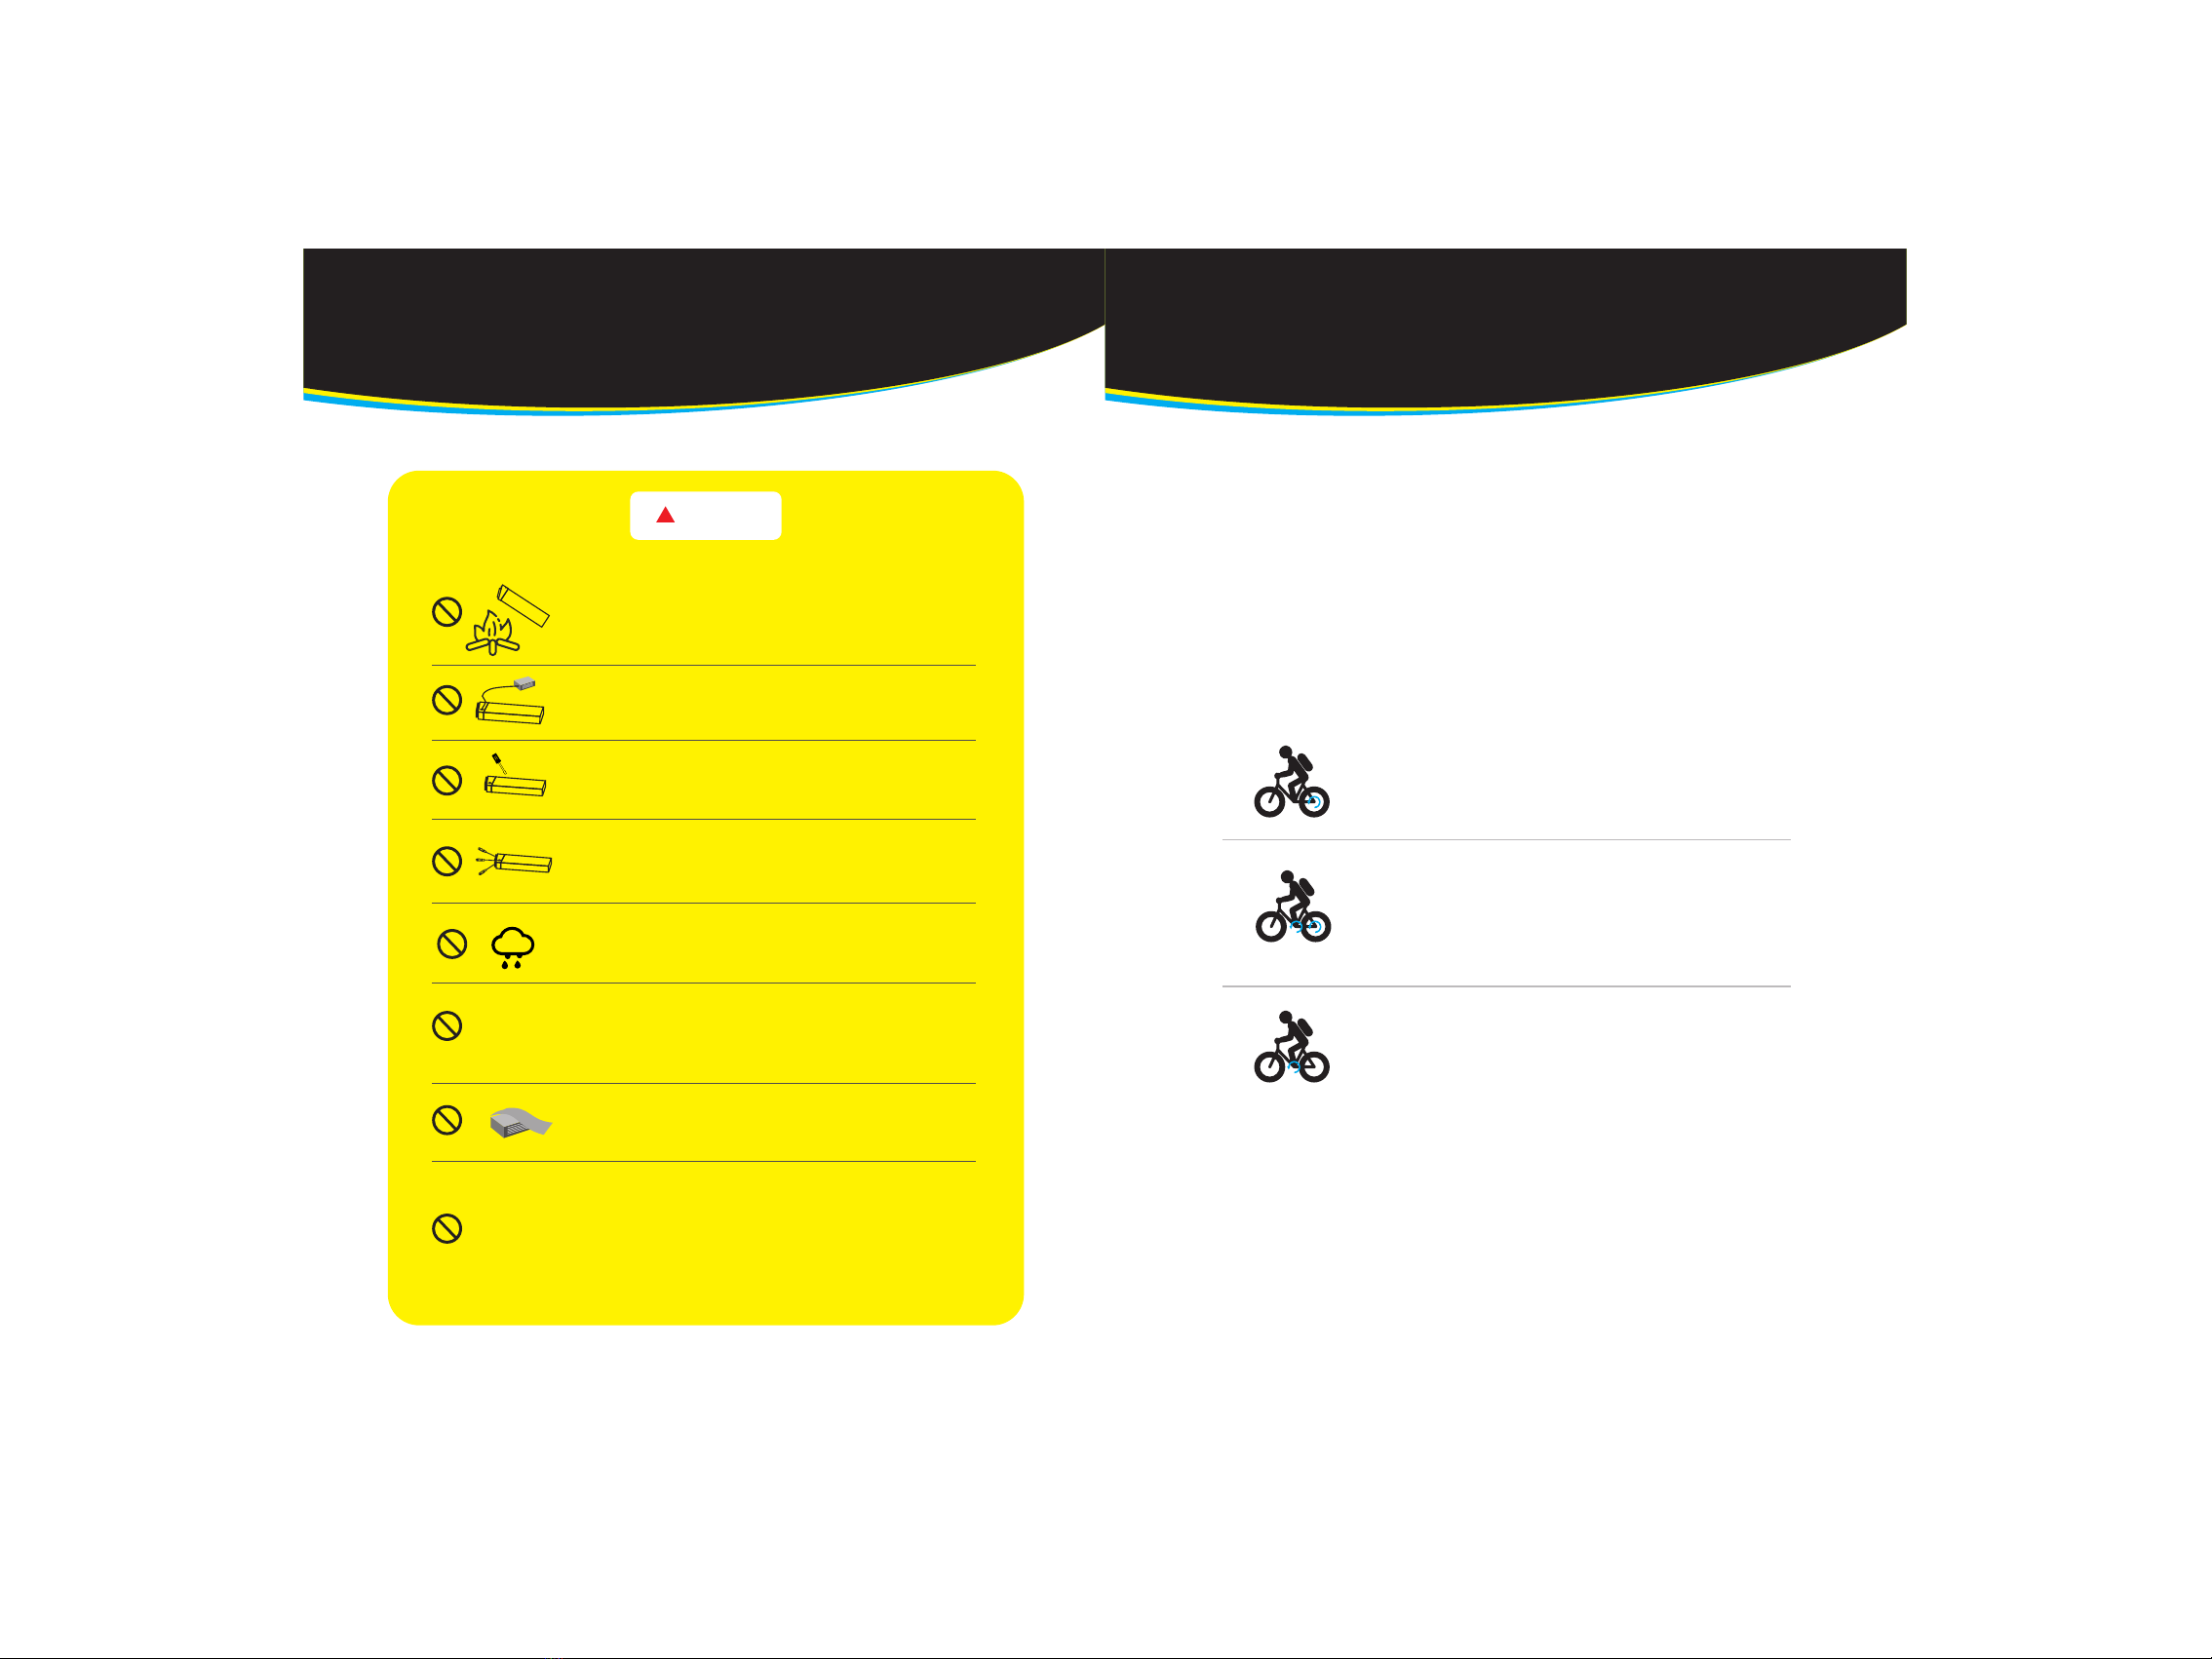
Electric bicycles should not be charged and parked in residential buildings. When charging,
they should stay away from combustibles and flammable materials and avoid charging for
a long time. Waste batteries cannot be disassembled without authorization.
X X X
Attention
Special Tips:
Riding Precautions
· Accelerate slowly when starting, and help with pedals when climbing, which can prolong
the service life of batteries and motors.
· The bicycle controller is equipped with overload protection function, which will automati-
cally
cut off the power supply when overload occurs, and when it returns to normal, the power
supply of the electric bicycle will be automatically turned on.
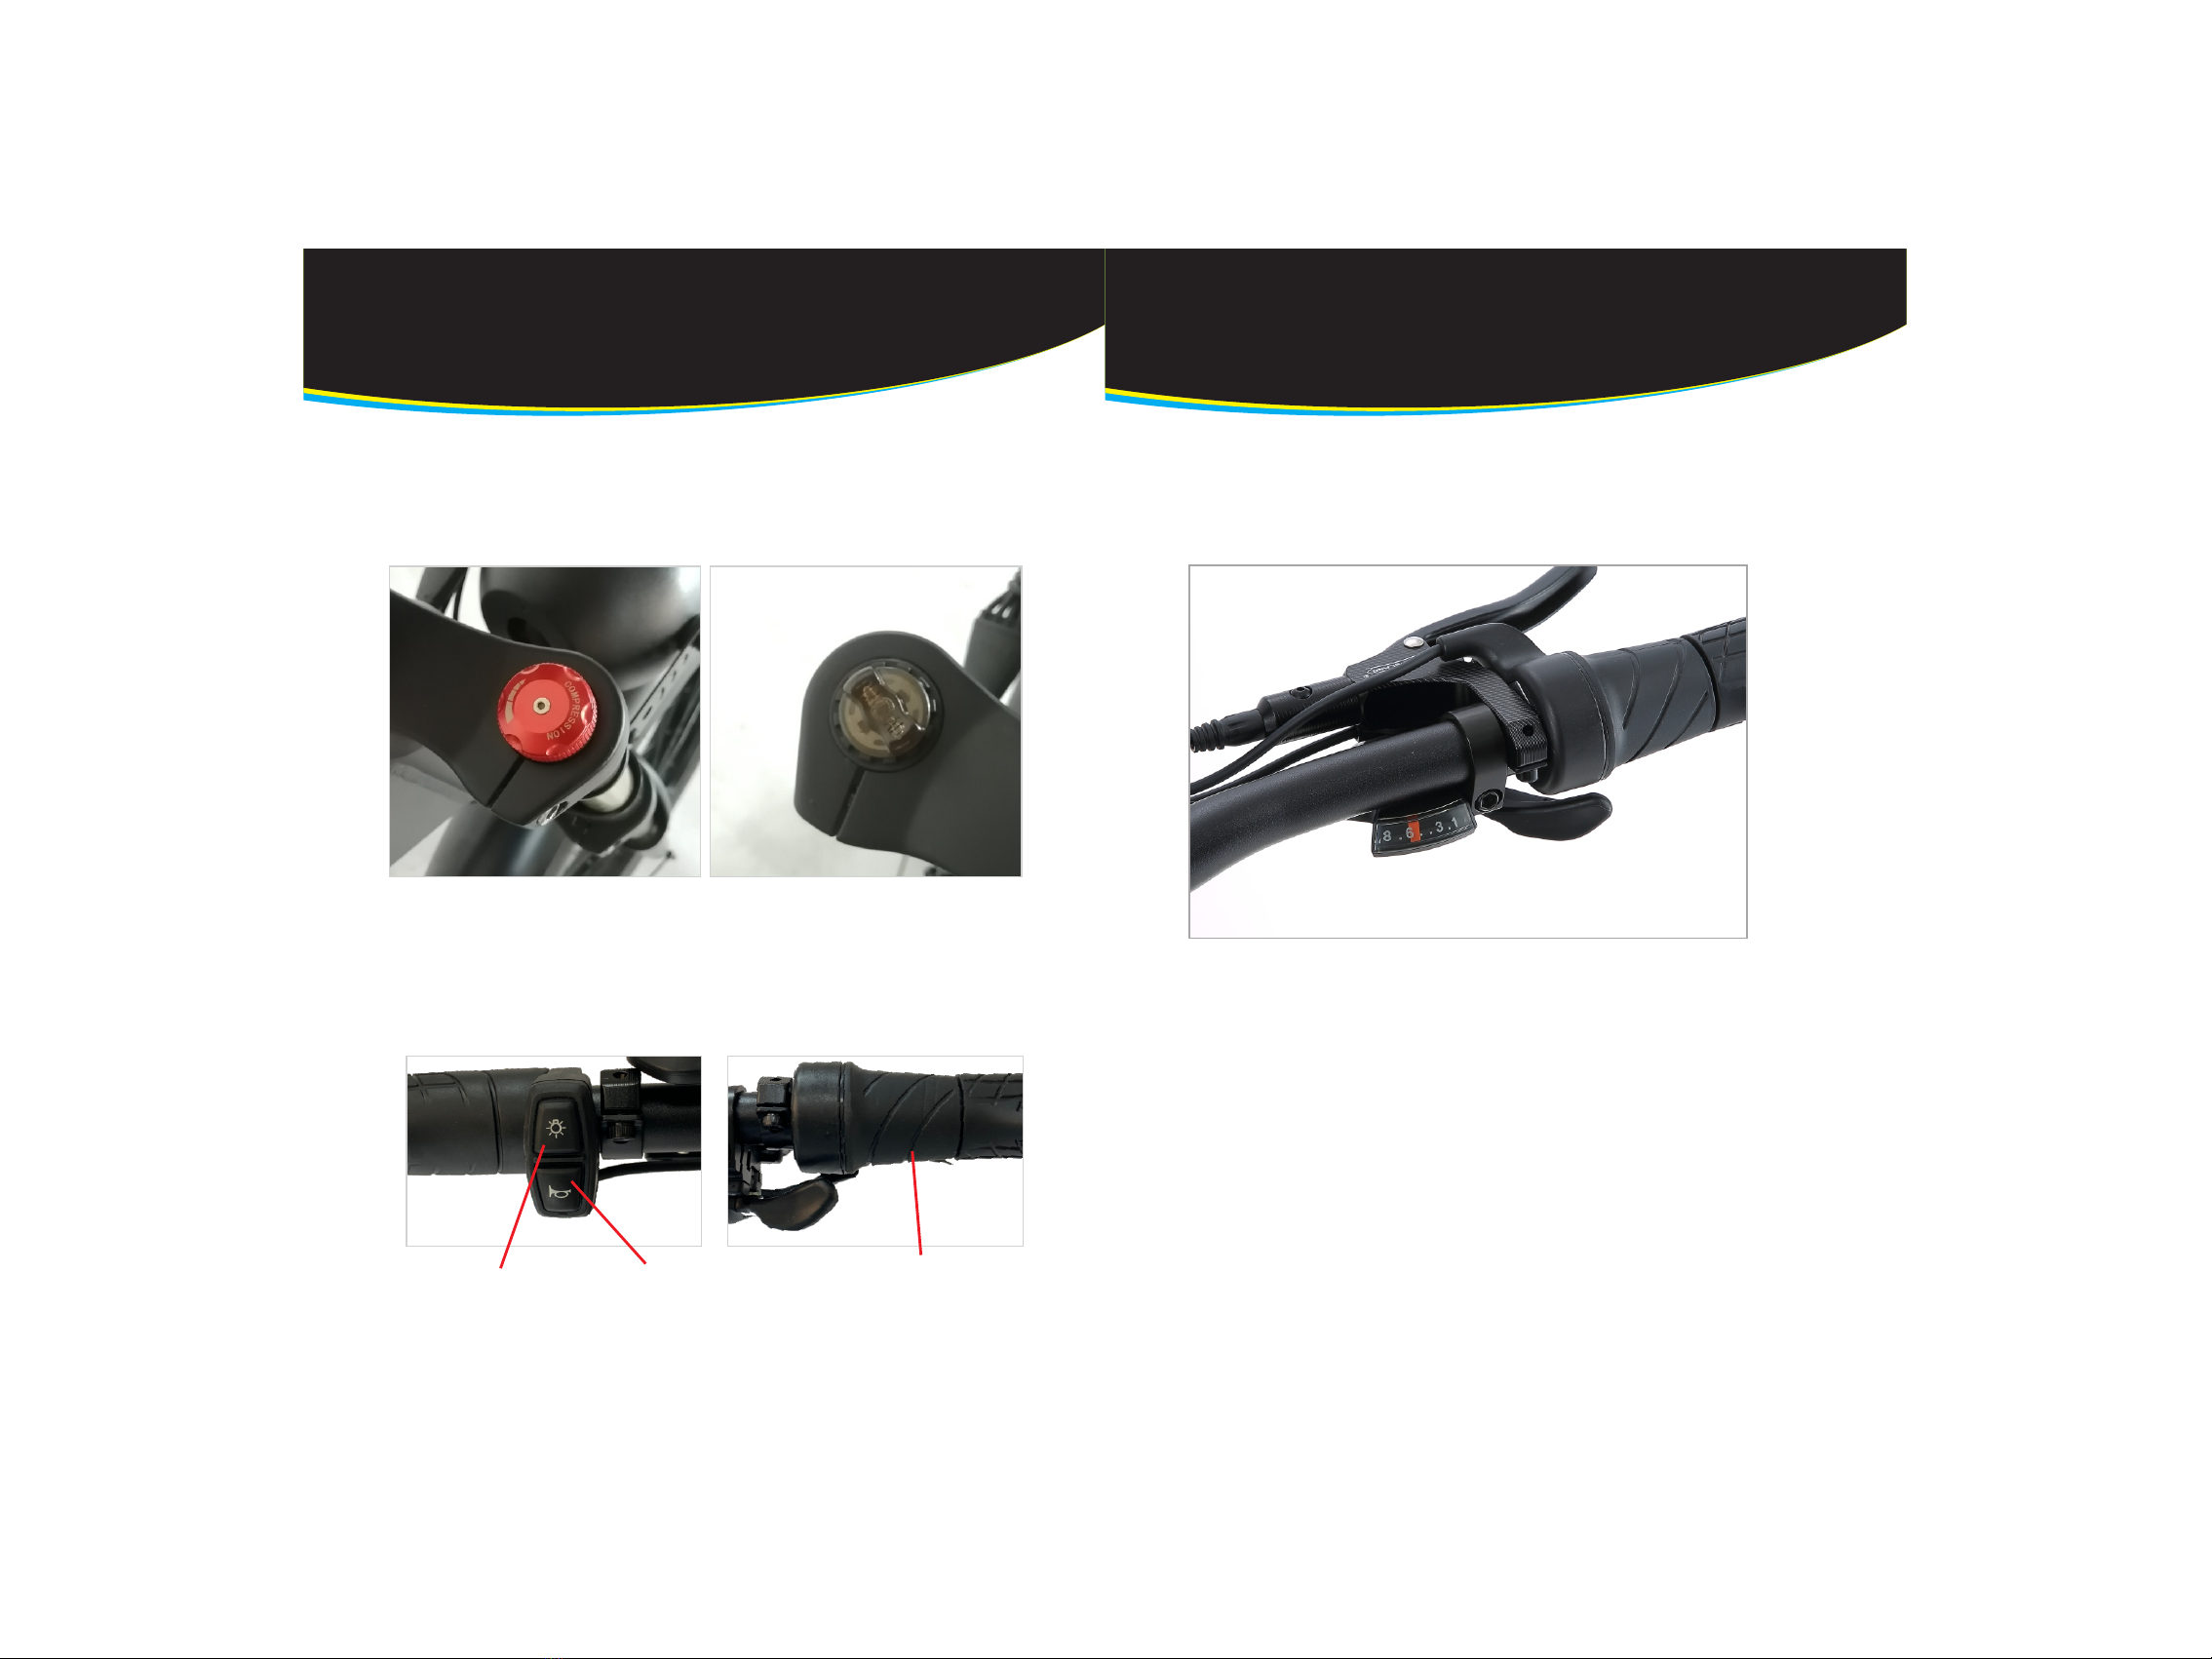
· The maximum load capacity of this bicycle is 180kg (including the weight of riders). Do not
overload driving. When driving on complex roads, try to ride and turn on the shock abso-
rption function.
Parking Precautions
· When implementing, the power switch should be turned off to prevent accidents caused
by sudden start of the bicycle due to unintentional rotation of the speed regulating handle.
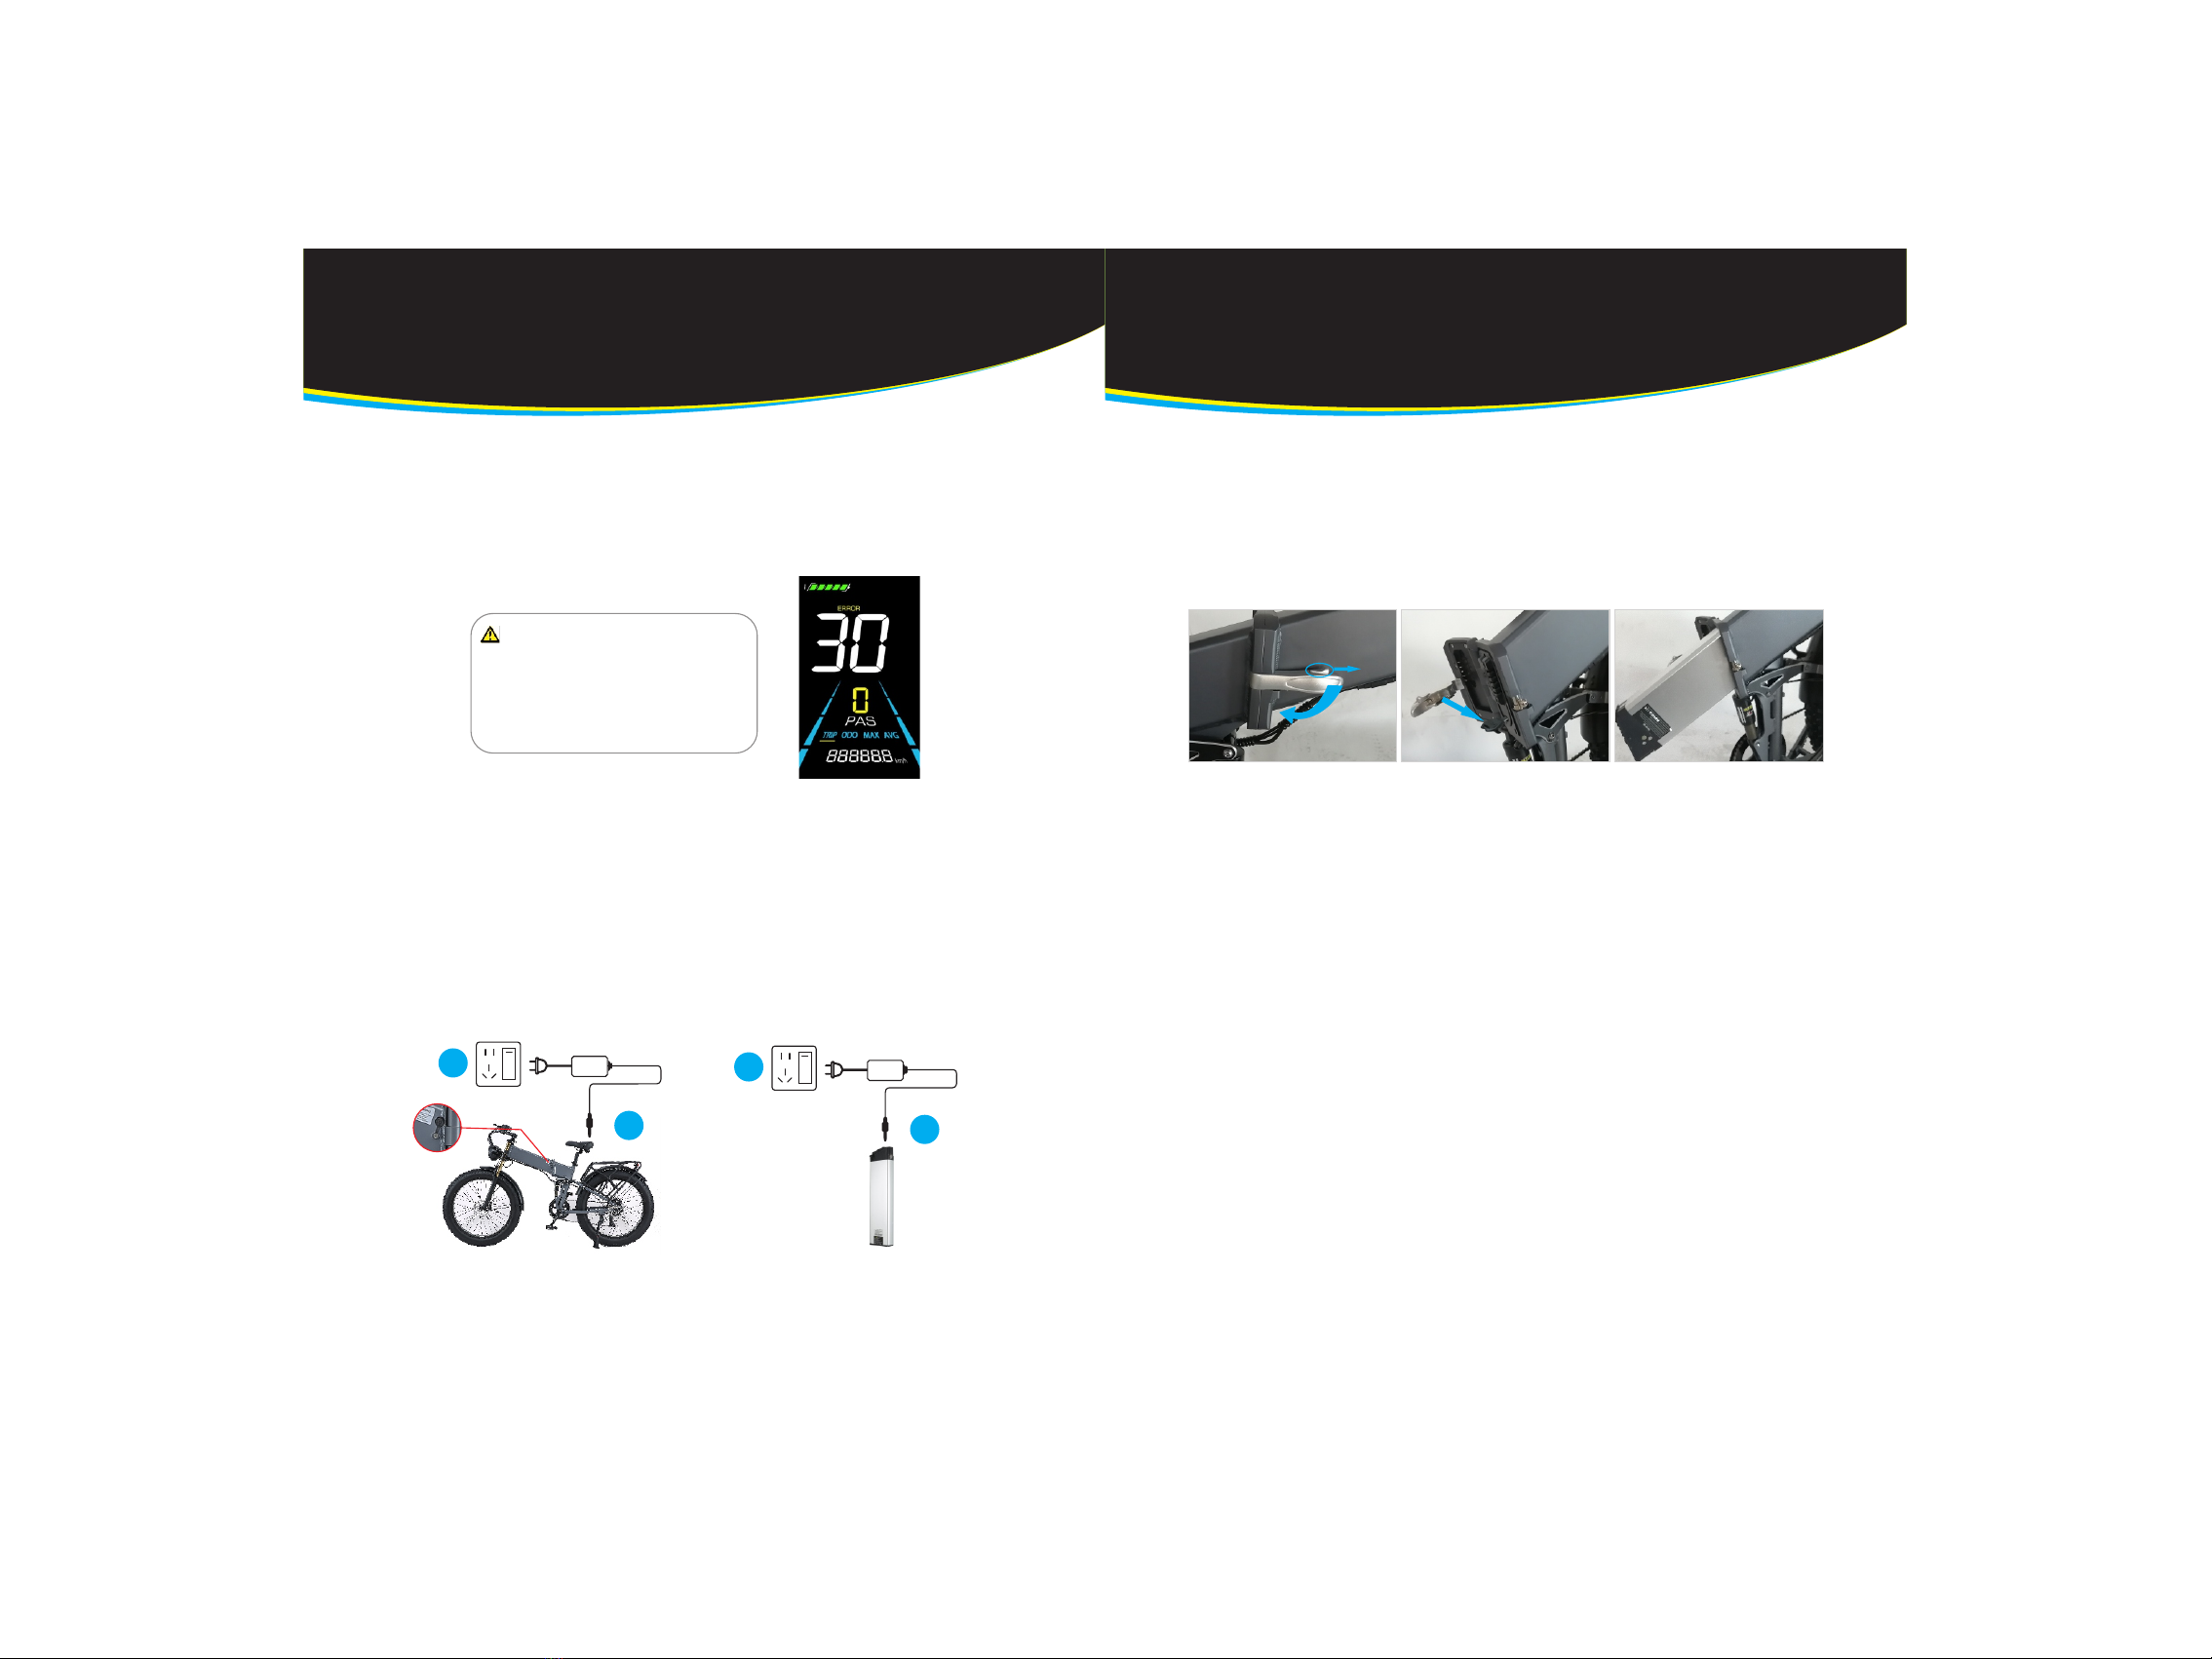
When parking, turn off the power supply, lock the battery and remove the key.
· For the sake of your driving safety and keeping your bike in the best condition, please
maintain it regularly.
Battery Storage
· Please store the battery at the ambient temperature of 20 ~ 25℃, and do not store the
battery in an environment higher than 50℃, otherwise it will lead to irreversible capacity
attenuation of the battery.
· If the bicycle is not used for a long time (such as winter, summer or other special
circumstances), the battery must be taken out and stored separately, maintained and
charged regularly, otherwise the battery may run out and cause irreversible damage.
· The most suitable storage capacity of the battery is 50%, and long-term storage of less
than 10% or more than 90% will lead to irreversible capacity attenuation of the battery.
·MOD LE R5P RO
USER MANUAL
·MOD LE R5P RO
USER MANUAL
E L E C T R I C
B I C Y C L E
E L E C T R I C
B I C Y C L E
1
MODLE R5PRO
Contents
Product configuration table
Bicycle installation
Component description
Charger usage
Precautions for battery use
Motor description
After-sales service
1
2-3
4-5
6-7
8
9
10
12
12-13
Battery disassembly and assembly 9
Instrument description
Warning matters
Frame
Battery weight
Variable speed
Instrument
Controller
Tire size
Body weight
Aluminum alloy
4KG
shimano 8 speed
Intelligent instrument
Vector controller
26 inches
34KG
Brake
Central axis
Load
Hub
Charging time
Climbing ability
Hydraulic brake
Sealed central shaft
About 180Kg
One-piece wheel/spoke wheel
4-6 hours
Approximately 30 °
Drive model 11
* Please note that due to the upgrade of the product, the bicycle you own may be different
from the picture and configuration.
* Product configuration is subject to physical objects.
·MOD LE R5P RO
USER MANUAL
·MOD LE R5P RO
USER MANUAL
E L E C T R I C
B I C Y C L E
E L E C T R I C
B I C Y C L E
E-bike APP 14-19
32
2. Adjust the position of the riser.
4. Stick the front fork on the quick
release
6. Tighten the left and right nuts as
shown
5. Adjust the center position of the
tire so that the positions on both
sides are the same.
Keyhole
Instrument
Safety folding buckle
Headlights
Front fork
Brake
Pedal
Power sensor
Motor
Tyres
Seat
Battery
Transmission
Bicycle Installation Renderings
Bicycle Installation
1. As shown in the figure, the front
wheels of the bicycle you receive
are separated from the bicycle
body.
3. Install handlebar riser
Since 95% of the bicycles have been installed, the rest can be installed directly after receiving.
7. Install the fenders and tighten the
screws
8. install lights
1
2
345 6
9. Insert the No. 1 fixing piece into
the slot of the No. 2 fixing piece
5
6
11. Install the No. 5 washer and No. 6
screw as shown in the figure
13. Install the left and right pedals
separately
10. as the picture shows
left
right
12. Link the light line, pay attention
to the arrow corresponding to
the direction of the arrow at the
other end
·MOD LE R5P RO
USER MANUAL
·MOD LE R5P RO
USER MANUAL
E L E C T R I C
B I C Y C L E
E L E C T R I C
B I C Y C L E
54
Description Of Variable Speed Finger Dial
· Please use the speed-changing finger dial when pedaling. (Note: Do not use it when it is
still)
· When changing speed, it needs to be adjusted step by step (note: do not directly adjust
from level 1 to level 8)
Eight-level speed change finger dial
Switch damping Adjust softness and hardness
Fork Description
Turn the switch on the left side to switch the front fork damping system, and adjust the
damping softness and hardness on the right side.
·MOD LE R5P RO
USER MANUAL
·MOD LE R5P RO
USER MANUAL
E L E C T R I C
B I C Y C L E
E L E C T R I C
B I C Y C L E
Handlebar control unit description
Lamp horn switch handle
6 7
·MOD LE R5P RO
USER MANUAL
·MOD LE R5P RO
USER MANUAL
E L E C T R I C
B I C Y C L E
E L E C T R I C
B I C Y C L E
Instrument Description
Battery level
Error code
Current speed
PAS level
Value and unit
Walk boost
Low brightness
display
Speed unit
KM/H
MPH
Trip odometer
Odometer
Max speed
Average speed
Cruise Power on/off
Plus Minus
Low brightness display
Toggle
Power on/off
Long press to power on/off the display. When the display is off, it will not use the battery
power and the leakage current is less than 1uA.
Display interface switching
When the display is powered on, it will show the Current Speed (km/h) and Trip Odometer (km)
by default. Short press to switch between Trip Odometer(km), Odometer (km), Maximum
Speed (km/h), and Average Speed (km/h)
Trip Odometer Odometer Average SpeedMaximum Speed
The display will automatically shut off if it is not used for more than 10 minutes.
Walk boost mode
Long Press and hold , the electric bicycle enters the walk
boost mode. The electric bicycle will walk at a fixed speed
of 6 km per hour and the display shows . Release to
stop the power output immediately and restore to the state
before walk boost.
The walk boost mode can only be used when pushing
the electric bicycle, please do not use it while riding.
PAS level selection
Press / to switch PAS level of
electric bicycle, thus changing the motor
output power
Battery level display
The Battery level is shown as 5 bars. When the battery is full charged, all of the 5 bars lighten
up. When the battery is fully depleted, the bar will begin to flash, warning the user to charge
the battery as soon as possible
Full power Four bars power Three bars power Two bars power One bar power
Empty power flashing
Boot password: 1212
1
2
Charger
1
2
Charger
8 9
1. Open the safety buckle first,
and then open the folding
buckle.
2. Insert the key and turn clockwise to lock
the battery. Turn counterclockwise to
remove the battery.
3. Take out the key and take out the
battery
Correct Use Of Charger
· Electric bicycles are equipped with special batteries, which must be charged by the special
charger provided by our company. Before charging, the electric bicycle must turn off the
power supply. When charging, the output end of the charger is linked to the electric bicycle,
and then the other end of the charger is linked to the power supply for charging. The red
ndicator of the charger lights up, indicating that charging is underway.
· It takes about 6 hours to charge the battery. When the indicator turns green, it indicates
that it is fully charged. Turn off the power connected to the charger first, remove the
charger, and try to avoid charging for a long time (avoid more than 12 hours)
· When charging, the charger and battery should not be covered with anything to avoid dan-
ger caused by overheating. It is recommended to start charging when the battery charge is
less than 20%. When parking for a long time, it should be stored at 50% of the power, and
must be charged once every other month.
· If you smell peculiar smell during charging, please stop charging immediately and send it to
the maintenance office for maintenance.
· When charging, do not touch the battery or charger, and children are strictly forbidden to
touch the charger.
· Keep the charger or battery away from flammable materials. Do not charge near babies and
children. Do not charge in an unattended state for a long time. For the safety of you and
your family, it is recommended not to charge in the early morning.
· Please do not use other brands of charger charging, charger is high-voltage circuit, do not
disassemble without authorization.
Precautions For Battery Use
Battery disassembly and assembly: The electric bicycle has built-in hidden battery and hidden
lock. When taking out the battery, fold the electric bicycle and open the lock with the key to
take it out.
Battery Disassembly And Assembly
·MOD LE R5P RO
USER MANUAL
·MOD LE R5P RO
USER MANUAL
E L E C T R I C
B I C Y C L E
E L E C T R I C
B I C Y C L E
Charging port
Error code display
If there is a fault occurs in the electronic system of the electric bicycle, the display will
automatically show an error code, see Schedule 1 for a detailed definition of the error code.
When the error code appears on
the display, please troubleshoot
the problem in time, the electric
bicycle will not be able to drive
normally after the problem occurs.
10 11
Do not put the battery into the fire Do not overheat
the battery.
Do not use other brand chargers to charge the battery.
Use the specified charger.
Do not disassemble or modify the battery.
Do not connect positive and negative electrodes or
touch terminals with metal objects.
Do not subject the charger to shocks, such as dropping.
Keep the charger away from water.
Do not let your skin touch the charger for a long time
during charging.
May cause skin burns because the temperature of the charger may
become 40C~60C (104F~140F) during external charging.
Do not cover the charger with objects or place objects
on the charger to avoid overheating and fire.
Please do not turn the pedal when the battery is installed
on the bicycle for charging. Avoid winding the power cord
on the pedal or crank, which may cause plug damage,
electric shock or fire.
Warning
!* The battery should be fully charged before long-distance travel. Rugged road conditions
and hilly terrain will consume more energy.
* Carrying more weight on an electric bicycle will consume more energy.
* When an electric bicycle runs at low temperature, its cruising range will be reduced.
* When the battery is turned off, your electric bike will be used as an ordinary bike.
Energy Consumption Description
Pattern Description
The key is turned on, and the instrument is turned
on. At this time, the electric auxiliary mode will be
started, which is driven by manpower and electric
power.
Riding an electric bicycle, the electric bicycle is
driven by manpower.
· In pedal assist mode, assist is triggered when the pedal is pressed forward, and is stopped
when the pedal is stopped. When you brake, the power assist system will automatically
stop, allowing the e-bike to slow down and stop. When the e-bike reaches the maximum
speed of the gear you have selected, the power assist will turn itself off.
The key is opened, the instrument is opened, and
the switch is twisted. The electric bicycle is driven
by electricity.
·MOD LE R5P RO
USER MANUAL
·MOD LE R5P RO
USER MANUAL
E L E C T R I C
B I C Y C L E
E L E C T R I C
B I C Y C L E
12 13
After-Sales Service
Motor
Controller
Instrument
Charger
Frame
Front fork
12 months
12 months
12 months
180 days
12 months
180 days
Performance failure
The inspected capacity is less than 2/3
of the specified capacity or the inspected
quality problem
Desoldering, material fracture
Performance failure
Warranty name Service term Warranty coverage (except human factors)
Not Covered By Warranty
· The warranty period has expired.
· Commercial rental is not warranted.
· Gifts are not covered by the warranty.
· Damage caused by unauthorized modification, disassembly and replacement of accessories.
· No warranty for parts damage caused by improper use or crash, injury, water inflow or
overload use by users.
· Due to the change of the factory batch or upgraded parts of electric bicycles, there is no
prior notice.
12 months
Battery
When the electric bicycle starts, the input current of the drive motor is large, and the motor
will have a certain noise to overcome the resistance to reach the speed. It is the friction
sound of the current torque and the magnetic force, which is a normal phenomenon. If the
starting current of the electric bicycle is increased, all noises will be more obvious. This is a
normal phenomenon and will not affect the use of the electric bicycle. (Note: When the
electric bicycle starts, it can be accelerated slowly when accelerating. At this time, the
starting current will not be too large, and the noise of the driving wheel will be relatively
small. At the same time, it will be beneficial to the battery life).
Motor Description
·MOD LE R5P RO
USER MANUAL
·MOD LE R5P RO
USER MANUAL
E L E C T R I C
B I C Y C L E
E L E C T R I C
B I C Y C L E
·MOD LE R5P RO
USER MANUAL
·MOD LE R5P RO
USER MANUAL
E L E C T R I C
B I C Y C L E
E L E C T R I C
B I C Y C L E
E-bike APP
First, scan the QR code of the picture below 1.1 to download the “E-bike” APP, or open the
mobile browser and enter the URL: https://www.pgyer.com/92m4 Download “E-bike”APP.
1.Download and install
Figure 1.1 “E-bike” download QR code
*The first time you open the APP,y ou will be prompted to obtain
permissions and allow all the permissions requested by the
APP. Otherwise,s ome functions may not be available.
Android phone
Apple Phone
Please search yolinebike in the App Store to find the
"yolinebike" APP and install it.
2. Registration and login
2.1 Registered account
Open the APP and click “Create an account”.
Figure 2.1 Login interface Figure 2.2 Registration
interfacel
Figure 2.3 Registration
interface2
If you only want to experience APP,you can directly click “No account
number” to directly enter the experience account.
2.2 Main interface description
Bluetooth
connectivity
Model picture
Current gear
Speed indication
Lock screen
switch
Trip odometer
Setup Menu
Lamp control
switch
Odometer
Current battery
voltage
Average speed
Gear adjustment
button
Figure 2.4 Main interface description
14 15
·MOD LE R5P RO
USER MANUAL
·MOD LE R5P RO
USER MANUAL
E L E C T R I C
B I C Y C L E
E L E C T R I C
B I C Y C L E
2.3 Bind display
1. Click the Bluetooth icon.
2. Click to search Bluetooth.
3. Click the Bluetooth name broadcast by the display to connect with Bluetooth. After the
connection is successful, the display will to also indicate the Bluetooth connection icon .
①
②
③
2.4 Basic operation
1.Toggle light
Users can operate the light control
button to switch the electric bicycle
headlights
2.Increase or decrease the boost gear
The user can operate the plus/minus
button to switch the assist gear
3.Display lock screen sleep
The user can operate the lock screen
button to lock and wake up the display
2.5 Setup Menu
1. Vehicle information
Bluetooth name, MAC address, speed
limit, current limit, wheel diameter,
software version and other information
are involved
2.Display unit setting
User can quickly modify the default unit
of the display
3.Startup mode setting
User can quickly modify the zero start
mode / non-zero start mode(note: this
function is only supported by some
protocols)
4.Speed limit setting
The user can quickly modify the
maximum speed limit of the vehicle
5.Clear Trip
The user can clear the trip mileage of
the display
6.Restore factory settings
The user can quickly restore the factory
settings of the display
7. Advanced parameter setting
Some more settings can be set.
Advanced parameters need to be
entered with a password. Generally
not open.
8 Bind display button
Users can use this button to bind and
unbind the display. After binding the
display, this display can only be
connected to this account
9 Historical faults
The user can query the
historical fault of the display
16 17
·MOD LE R5P RO
USER MANUAL
·MOD LE R5P RO
USER MANUAL
E L E C T R I C
B I C Y C L E
E L E C T R I C
B I C Y C L E
2.6 Map interface
At present, the Map interface can only display the current position, current battery voltage, riding
mileage and current speed information. In the future. We will develop cycling records and other
functions.
2.7 SMS message function
This APP has the function of SMS message, and end users can communicate with suppliers in
short text. It is convenient for users and customers to communicate well and seek services.
1 Open the “Me”interface and select “Service Provider Information”;
2 Enter the text you want to leave in “Message”. Click “OK” to level a message. The message
will be received in the administrator account;
3 Administrators can reply to customer message.
18 19
2.8 APP version upgrade
When the user finds the words “Find New version is: Vx.x” in the “Me” interface, it means that
there is a new version of the APP. You can click to download and install the new version of the
APP.

Other Winora Group Bicycle manuals

Winora Group R8 User manual

Winora Group

Winora Group R8 User manual

Winora Group Bicycle User manual

Winora Group

Winora Group Bicycle User manual

Winora Group RX20 User manual

Winora Group

Winora Group RX20 User manual

Winora Group RX50 User manual

Winora Group

Winora Group RX50 User manual

Winora Group LOAD Urban Owner's manual

Winora Group

Winora Group LOAD Urban Owner's manual

Winora Group Haibike User manual

Winora Group

Winora Group Haibike User manual

Popular Bicycle manuals by other brands

Insportline IN 3578 user manual

Insportline

Insportline IN 3578 user manual

DAHON P user manual

DAHON

DAHON P user manual

Kettler BOSCH B-750 FS1 operating instructions

Kettler

Kettler BOSCH B-750 FS1 operating instructions

Leisure E-bike LEB-400 user guide

Leisure

Leisure E-bike LEB-400 user guide

Dynacraft TALKING THOMAS TRIKE manual

Dynacraft

Dynacraft TALKING THOMAS TRIKE manual

REI Novara manual

REI

REI Novara manual

DI BLASI R21 Operation and maintenance

DI BLASI

DI BLASI R21 Operation and maintenance

Cycling Sports Group Bicycle owner's manual

Cycling Sports Group

Cycling Sports Group Bicycle owner's manual

Scott SPARK owner's manual

Scott

Scott SPARK owner's manual

Denver E Quick Rider X7 Instructions for use and maintenance

Denver

Denver E Quick Rider X7 Instructions for use and maintenance

Coccolle spectra Plus manual

Coccolle

Coccolle spectra Plus manual

SJOEF BIS256 instruction manual

SJOEF

SJOEF BIS256 instruction manual

TRIOBIKE Taxi user manual

TRIOBIKE

TRIOBIKE Taxi user manual

lovelec KOMO quick start guide

lovelec

lovelec KOMO quick start guide

Pepita R-Sport AMY-806 user manual

Pepita

Pepita R-Sport AMY-806 user manual

SONGZO MX03 user manual

SONGZO

SONGZO MX03 user manual

MORES PETITPIERRE owner's manual

MORES

MORES PETITPIERRE owner's manual

Vamoose RANGER ST owner's manual

Vamoose

Vamoose RANGER ST owner's manual

manuals.online logo
manuals.online logoBrands
  • About & Mission
  • Contact us
  • Privacy Policy
  • Terms and Conditions

Copyright 2025 Manuals.Online. All Rights Reserved.