3TO podofix User manual

Instructions
for the podofix nail correction brace

2

3
CONTENTS
Introduction 4
podofix active glue-on brace 5
How to avoid problems when using 6
Attaching the podofix brace
Preparations
Gluing the brace on 8
Activating the brace 9
Covering the wire connection 10
Removing the podofix brace 10
Product pointers 11
Safety pointers 11

4
INTRODUCTION
Application range
The podofix active glue-on brace can be used for practically all
kinds of
deformed, painfully ingrown and curled-
up nails. In addition, use of the podofix
brace is recommended for treatment of hypergranulation and corns in the nail
fold. The podofix brace is also suitable for cosmetic correction of misshaped
nails.
As
preparatory treatment for application of the 3TO brace or other wire braces
a podofix brace can initially be used if the nail fold is still too narrow for
insertion of the wire hooks.
Duration of treatment
Depending on the conditions, the podofix active glue-
on brace remains on the
nail for a period of from two weeks to about two months and can then be
replaced by new braces until the desired therapy effect is achieved.
Placing the brace
The podofix active glue-on brace is attached in or just behind t
he area of the
nail from which pain emanates. The size of the brace should be selected in such
a way that the brace can be placed as close as possible to the nail rim on the
side with the pain but in no case protruding beyond it. If the suction effect of a
brace does not suffice then two podofix braces can be attached behind each
other on a nail.
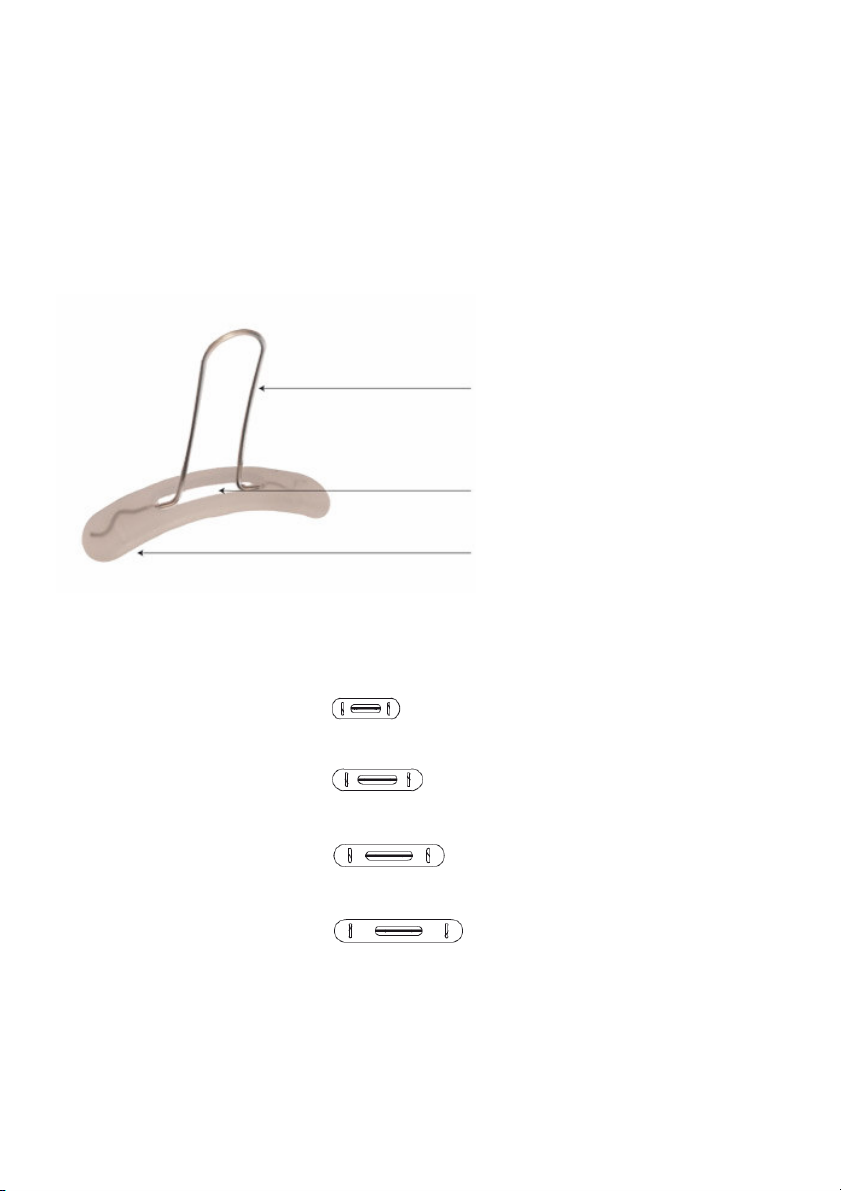
5
Size mini: 12 mm
Size S: 16 mm
Size M: 19 mm
Size L: 22 mm
activation wire
indentation
flexible, elastic plastic pad
THE PODO IX ACTIVE GLUE-ON BRACE
The podofix active glue-
on brace consists of an elastic plastic pad that sticks to
the nail and of an activation wire that tig
htens the brace after it is glued on.
After attaching it the wire lies in the indentation of the plastic pad and can be
sealed smooth.
The podofix active glue-on brace comes in four different widths:
The size should be selected in such a way tha
t the brace can at least be stuck
on the ingrown side of the nail as far as possible towards the rim but wi
thout
pressing in the nail fold.

6
HOW TO AVOID PROBLEMS WHEN USING
In order to avoid mistakes please note the following tips before
initially using the brace.
Softened nail
Please note that the nail may not be softened up before the brace is
applied. Foot baths and application of disinfectants or corn softeners to
the nail should be avoided prior to application.
Too much glue
If too much glue is used the brace will not stick to the nail. Please heed
the dosage instructions on page 8 in these Instructions.
Glue flask
Hold the rim and the threads of the bottle free from glue - otherwise, the
cap can paste up! If required, clean with a swab.
Durability
Store the glue upright at room temperature. Once opened expend within
3 months!
Working with Latex gloves
Work with Latex gloves to avoid having your fingers stick tight to the
brace and to avoid getting any residues of grease on the surface to be
glued. We recommend carrying out the entire treatment with Latex
gloves.

The brace is generally positioned on the side that is more heavily ingrown.
In order for the brace to lie co
mpletely flat on the body of the nail it must be
bent with the fingers to accord with the curvature of the nail.
! The size should be selected in such a way that the
brace can be stuck as far as possible towards the rum
on the ingrown side of the nail.
Clean the brace
The brace must likewise be degreased with an alcohol swab and must then be
allowed to dry (about 15 seconds).
! Bend the brace a little more than the body of the nail is curved and it will
then better fit onto the nail. This is particularly important on the ends of the
brace.
Clean the nail
Before gluing on the brace the nail must
be thoroughly
cleaned and degreased. For this purpose an alcohol
swab or, alternatively, a swab drenched with isopropyl
alcohol can be used.
After cleaning the nail should
be allowed to dry (about 15 seconds).
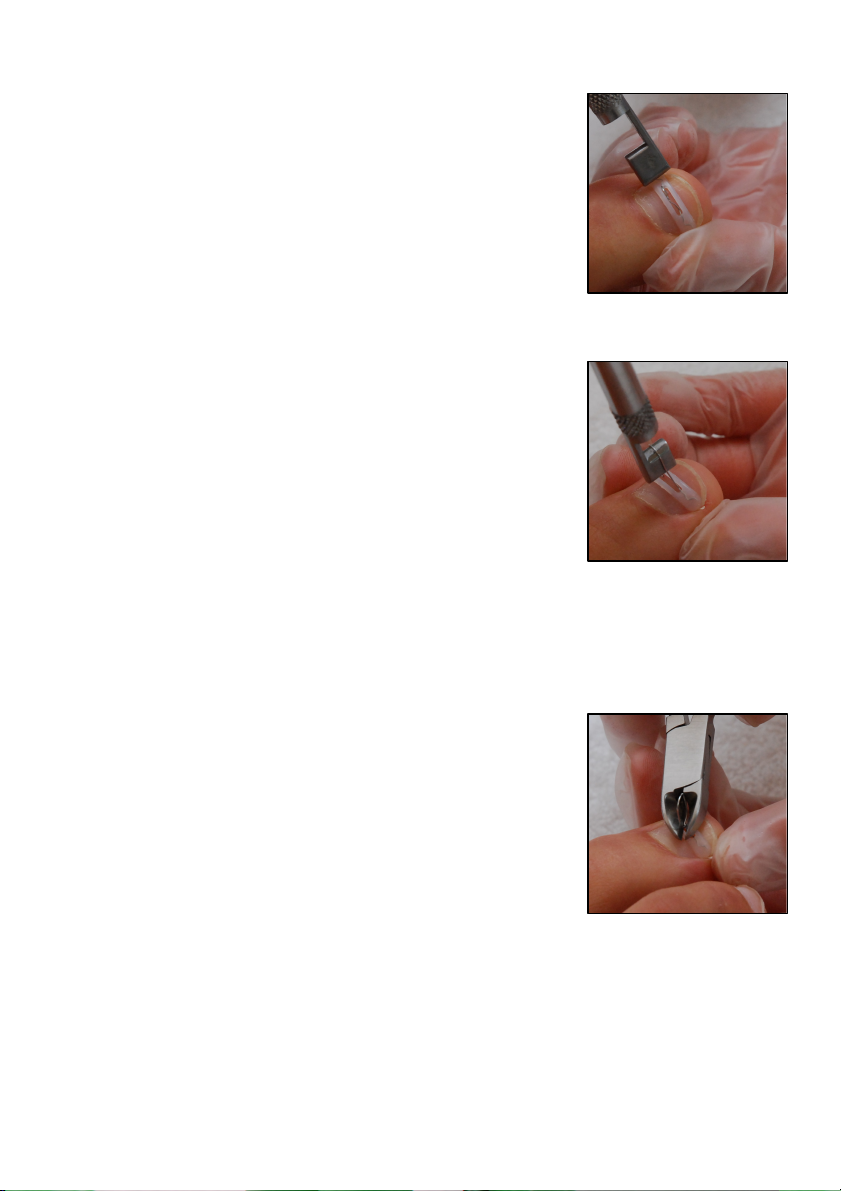
1. Preparation
Polish the nail
For gluing on t
he brace the nail must have as even and smooth a surface as
possible. If needed, it can be smoothed or slightly roughened with a cutter or a
soft nail file. Loose parts of the nail must be removed.
Adjust the brace
Select the proper size.
ATTACHING THE PODO IX BRACE

8
! Take care that the brace is not moved after it has once been applied.
Press the gluing surfaces of the brace on the nail for
about 15 seconds with your fingers. In doing so, push
the brace with its edges as far as possible down in the
direction of the nail fold
so that the midsection of the
brace attaches to the nail. Then press especially on the
edge areas of the brace.
Apply the brace
Position the brace on the side of the nail that is more
heavily ingrown.
Hold t
he brace by the wire handle and place it gently
on the nail.
2. Gluing on the brace
Apply the glue
! The glue is only applied to the brace and never to the
nail.
! If too much glue i
s applied the brace will not stick to
the nail.
Wipe off both sides of the brush on the bottle rim.
Apply a fine coat of the glue on the whole
undersurface of the brace.
9
Cut off the remainder of the wire
Cut the wire loop off with the cutting pliers. To do
this, place the cutting pliers flat on the brace and cut
off the wire loop with a cut perpendicular to the wire
loop.
Smooth out the ends of the wire with a nail file.
! If the activation wire is tightened by more than two rotations there is a
danger that it will rip off and the brace will be unusable..
3. Activate the brace
Turn the loop
Insert the tension tool into the wire loop.
Turn the tension tool at least one and at most two
complete rotations un
til the desired tension is attained.
While turning pull the tension tool slightly upwards.
Remove the tension tool.
Then the brace can be pressed down with the tension
tool especially in the areas of the edges.
!
Wait two minutes before activating so that the glue
hardens.
Remove the residue dust from the brace by blowing on it by using a soft
brush.

10
! If any wire remainder still sticks out of the sealing you can cover them up
with an additional coat of PediGel.
To remove it, the brace is loosened from the edges
with the cutting pliers.
With a file or a cutter glue residues can be removed.
4. Cover up the wire connection
To seal the podofix brace use the spatula to apply a
drop of PediGel sealant and mould it into the
indentation of the podofix brace.
Turn the UV microlamp on by turning the front of the
torch clockwise and harden the PediGel by beaming the
UV lamp on it for 20 seconds. Hold the microlamp at
the smallest possible distance (maximum 5 mm) away
from the sealing point.
Wipe the brac
e off after the PediGel hardens with the
alcohol swab.
REMOVING THE PODO IX BRACE

11
General safety pointers
The podofix nail correction brace is intended to be used only once.
Read these Instructions carefully before using it for the first time and
comply with all its suggestions.
PRODUCT POINTERS
Information on the glue
Store the glue as dry as possible. The glue’s shelf life with proper storage is
about 3 month from opening.
Information on the sealant
Do not leave the jar with the PediGel open for any longer period of time since
otherwise it could start to dry out due to daylight.
If the microlamp batteries are used up then replace them with four LR41 round
cells. The batters can be accessed by opening the rotating cap on the back.
SA ETY POINTERS
Safety pointers about the glue
CAUTION ! The glue can within seconds glue skin and eyelids tight.
The glue contains cyano-
acrylate and can irritate eyes, skin and
respiratory organs. Avoid contact with eyes and skin. In case of any
contact with the eyes or internal organs consult a doctor immediately.
Do not inhale its vapours.
It may also not come into contact with wounds, cover up any wounds
prior to using it with a coating of oil or grease.
Do not remove any eventual skin gluing with force but soften it up by
placing it in warm soap lather for a longer peri
od of time and then
carefully detaching it with acetone.
Keep out of the reach of children.

12
3TO GmbH Birkenstraße 8 D-82041 Deisenhofen 0049/89/20353444
Fax 0049/89/20353445 info@3to-gmbh.de www.podofix.de
3TO GmbH 2010
Table of contents
Other 3TO Personal Care Product manuals


