3TO COMBIped Setup guide

SET OF INSTRUCTIONS - COMBIped

2

3
TABLE OF CONTENT
INTRODUCTION 4
COMBIPED BRACE AND ACCESSORIES 5
INSTALLING THE COMBIPED BRACE 6
1. Prep r tions 6
2. Adjusting the br ce 7
3. Cle ning n il nd br ce 10
4. Adhering the COMBIped br ce 11
5. Cutting off the locking pin nd smoothing 13
REMOVING THE COMBIPED BRACE 14
PRODUCT INFORMATION 15
SAFETY INSTRUCTIONS 15

4
INTRODUCTION
Scope of applications
Our COMBIped
br ce c n be used s remedy g inst deformed,
ingrown nd rolled-
in n ils th t c use p in. The br ce will help to use
wire br ce, even if one side of the n il edge is ccessible only.
Depending on the type of pplic tion, the br ce c n be fixed to pply
tension on either both sides of the n il or one side only.
> If you need to pply tension on both sides
,
the br ce should be s long s possible nd
should stretch ccross the entire width of the
n il. You m y lso set two COMBIped
br ces
one
fter the other ( lso with different wire
sizes).
> If the effect is required on one side
only,
the br ce will be m de shorter nd the
dhesive p d ffixed in the middle. The effect
will then be focused on the wire side.
> In order to cure he vily rolled-
in n il, the
COMBIped
br ce should be inserted s f r to
the re r s possible.
> In n cute p in scen rio, ple se pl ce the
COMBIped br ce pprox. 2 mm
behind the
p in re .
5
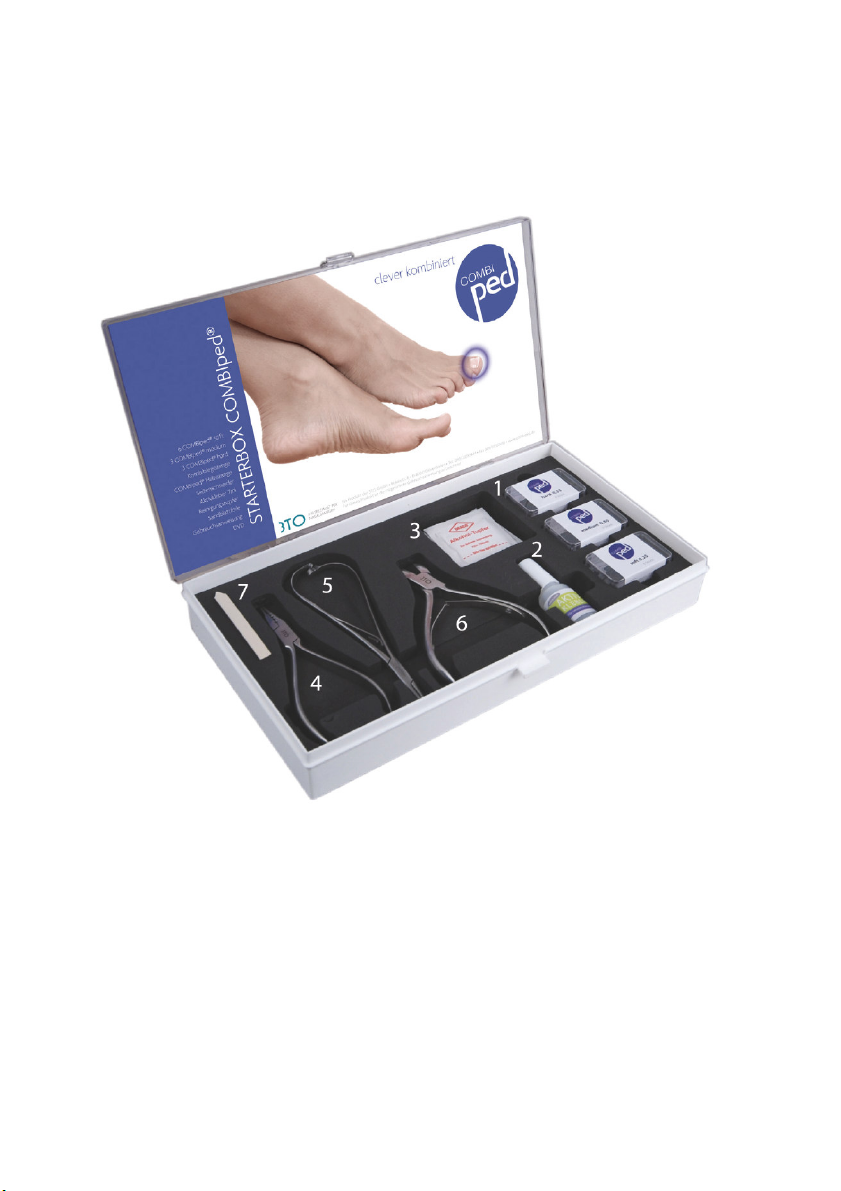
COMBIped
BRACE AND ACCESSORIES
Your st rter set comes with ll the products nd instruments you
need in order to use the COMBIped br ce:
1 COMBIped br ces in three different sizes
2 Adhesive with brush
3 Alcohol sw b for cle ning n il nd br ce
4 3TO combin tion pliers
5 COMBIped fix tion pliers
6 Side-cutting nippers
7 S ndp per file

6
INSTALLING T E COMBIped
BRACE
> The brace thickness “hard“ should be used for very thick and
rigid nails only, therefore, please use “soft“ and “medium“ for
most of the applications!
CAUTION: There is d nger of the n il
to come off when using br ce
with too much tension. Th t is why moder te tension should be pplied
only. If the p tient feels too much tension, remove the br ce nd repl ce
it by the next lower tension level.
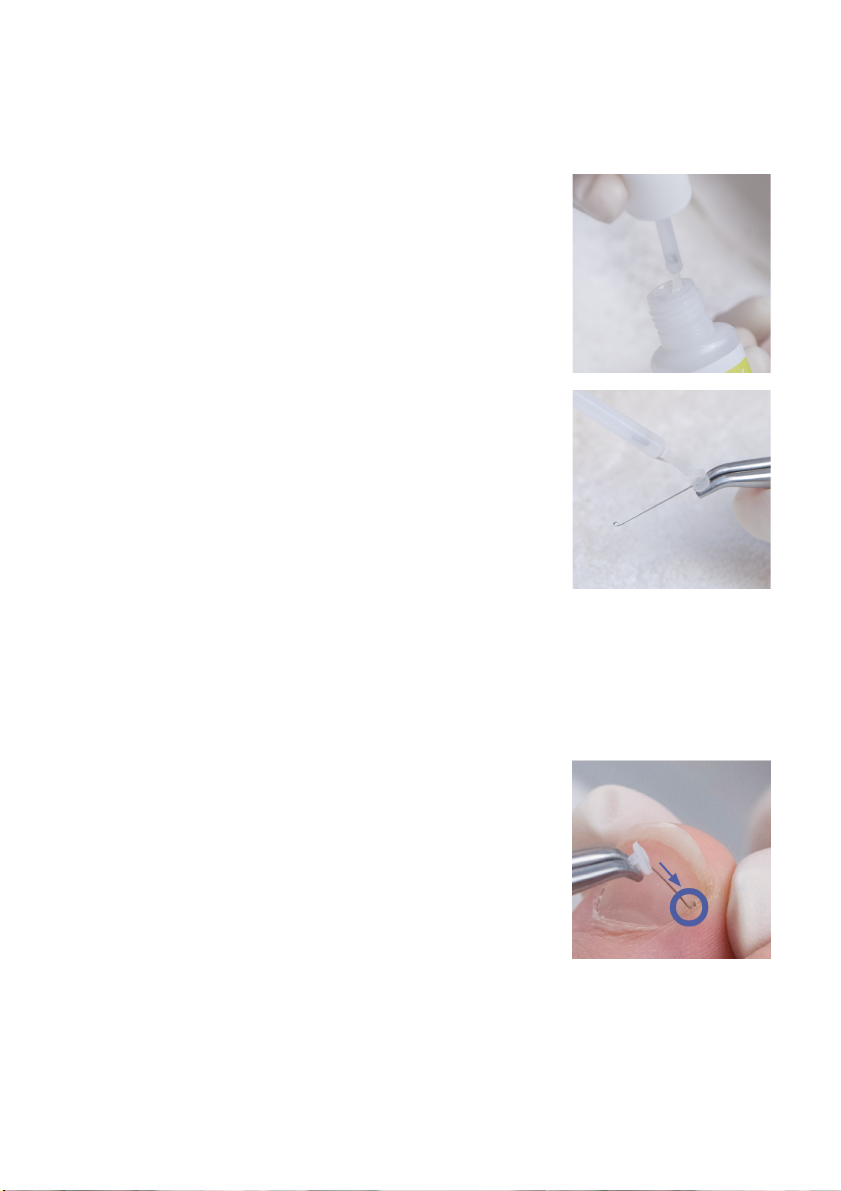
1. Preparations
Preparing the nails and cleaning the nail fold
Remove ny non-
dhesive p rts from the n il
surf ce. Smoothen extremely rough n ils or slightly
roughen extremely smooth n ils.
Cle n the n il fold nd prep re the re such s to
en ble the hook to be fixed under the n il edge
before inst lling the COMBIped br ces.
Disinfecting the brace
Disinfect the wire of the COMBIped
br ce before
bending the hook nd lso e
ch time before you
inst ll it by wiping with the lcohol sw b.
Selecting the right brace
Ple se choose the right br ce size depending on the
n il thickness (force needed).
soft:
Wire thickness of 0.25 mm – for soft nd norm l
n ils
medium:
Wire thickness of 0.30 mm – for norm l nd thick
n ils
hard:
Wire thickness of 0.35 mm – for extremely rigid nd
thick n ils
7
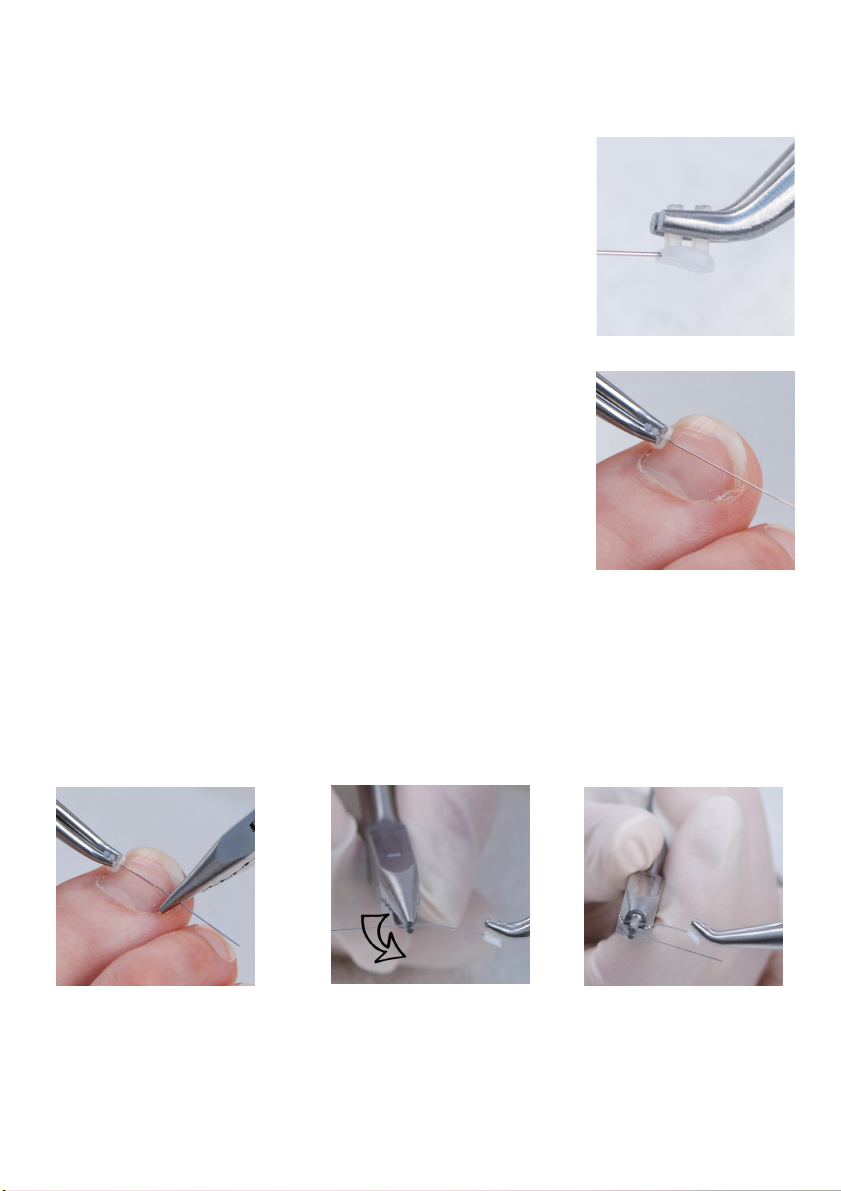
Bending the hooks
Use the combin tion pliers nd bend rough hook t the defined spot.
> Alw ys bend round the round m ndrel of the combin tion pliers!
2. Adjusting the brace
Grab the brace
Fix the br ce on both pins using the COMBIped
fix tion pliers (see photo)
> A cle r nce between the p d nd the COMBIped
fix tion plie rs will keep the br ce flexible.
Defining the brace length
Define the br ce length ccording to the n il width.
The br ce should be s long s possible.
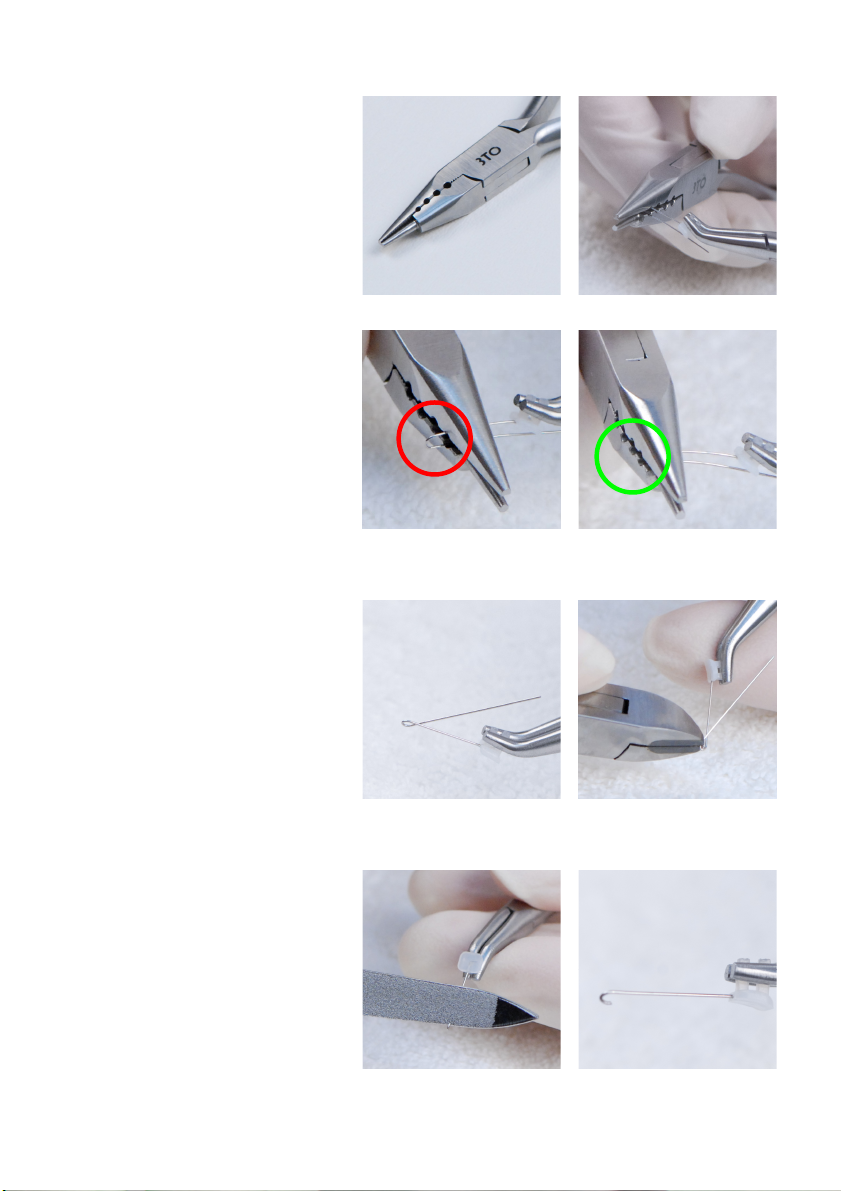
8
Use one of the four bores
depending on the desired
hook size. The bores –
i.e.
the hooks –
will become
sm ller tow rds the pe k of
the pliers.
Pl ce the pre-
bent hook in
the bore of the combin tion
pliers in n upright position
nd then press the pliers
together completely.
> The hook should not
protrude on the other side
of the pliers.
Cut off the hook short with
the side-
cutting nippers.
The fl t side of the nippers
will show tow rds the
rem ining hook!
> Ple se protect both your
eyes nd those of your
p tients by we ring
protective spect cles!
Deburr the hook using
n il
file. While doing so, support
the wire with your finger.
wrong right

9
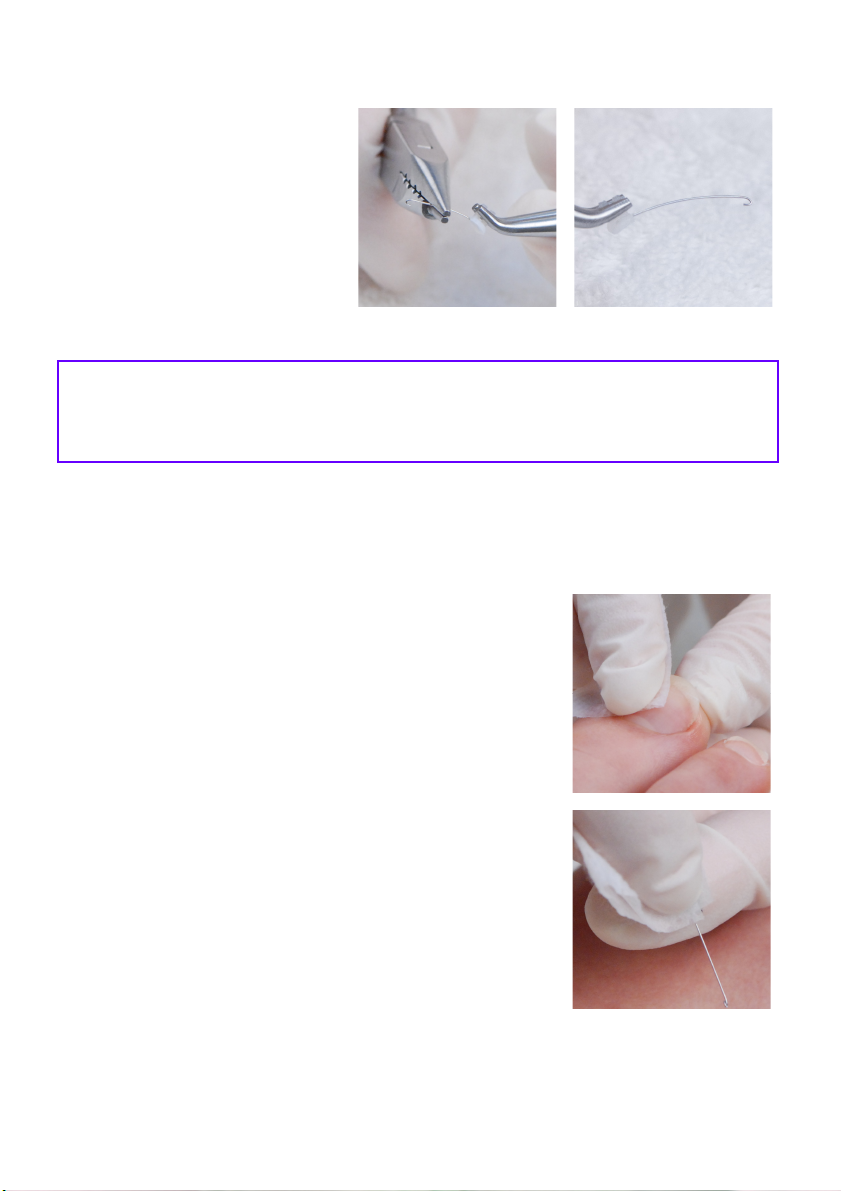
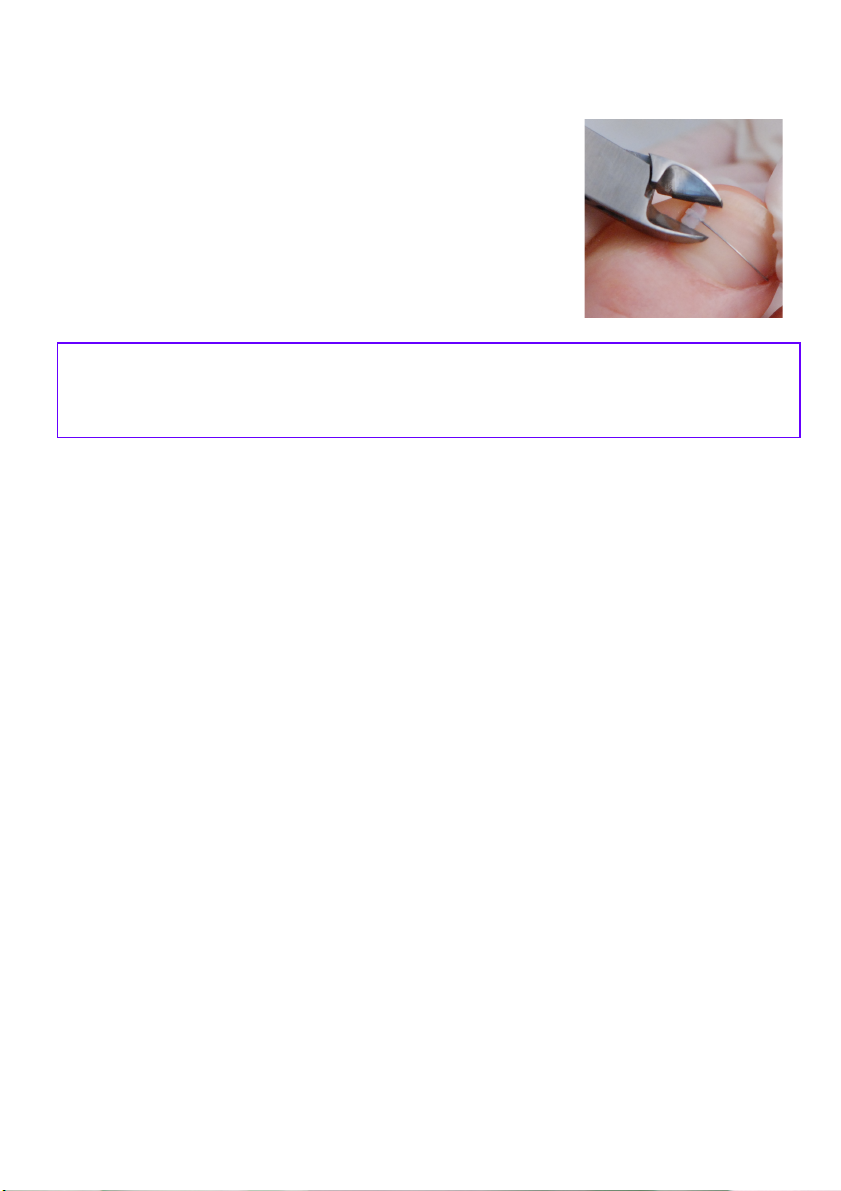
For inst llin
g the br ce,
ple se st rt by inserting
the hook into the n il fold,
turn the hook under the
n il edge nd then press
the p d with the fix tion
pliers onto the n il.
Slightly pull the pliers to
void the hook to jump off.
> If the tension is too
strong,
the wire m y be
pulled out of the p d
thereby destroying the
br ce
Check brace tension and optimse
Do not bend the wire of the COMBIped br ce, le ve it str ight first.
Ple se gree the level of tension with your p tient.
> Your p tient should not feel ny unple s nt tension!
RIG T ANGLE
Only this w y c n the
hook be turned under
the n il fold properly
WRONG ANGLE
The hook c nnot be
turned under the n il edge
nd will c use injury of
the n il fold
10
3.
Cleaning the nail and brace
Cleaning the nail
Cle n the n il with the lcohol sw b.
Cleaning the brace
Cle n the dhesive surf ce of the br ce p d with
the lcohol sw b.
> Allow n il nd br ce to dry off well fter
cle ning to ensure th t the dhesive will hold.
It is recommended to always use a lower brace tension,
rather than bending the brace.
Ple se pre-
bend the br ce
with your fingers or using
the 3TO combin tion pliers
ccording to the n il
sh pe,
only if your p tient feels too
much tension.
11
Inst ll the br ce under the n il edge.
> Do not use too much dhesive. The br ce will not hold on the n il, if
too much dhesive is used.
> Keep the edge nd the thre d of the bottle cle n. Cle n with the
sw b, if needed.
Slightly wipe off the brush on both sides.
Apply thin l yer of dhesive onto the dhesive
surf ce of the p d.
4. Adhering the COMBIped brace

12
WRONG
RI
G T
> Ple se ensure to hold the
COMBIped
pliers in the
right position when pressing
the p d.
If the pliers show too much
upw rds, the dhesive
surf ce will h ve no cont ct
with the n il nd the br ce
will not hold.
Very slightly pull the pliers to void the hook to
jump off nd then use the COMBIped
pliers nd
press the p d onto the n il.
Press with your finger slightly on the COMBIped
fix tion pliers for pprox. 1 minute.
13
Cut off the locking pins from
the dhesive p d using the
side-
cutting nippers s short
s possible one fter the
other (one pin fter the
other – 2 cuts).
Smoothen the p d with one
of the s ndp per files.
5. Cutting off the locking pin and smoothing
CAUTION! If the patient feels too much tension, remove
the brace!
14
The COMBIped
brace can be installed newly every 4-8 weeks as
needed until the treatment has been completed successfully.
Use the side-
cutting nippers to remove the
COMBIped br ce from the n il.
Remove ny rem ining dhesive nd smoothen
the n il.
REMOVING T E COMBIped
BRACE
15
Reizend
PRODUCT POINTERS
Information on the glue
Store the glue s dry s possible. The glue’s shelf life with proper
stor ge is bout 3 month from opening.
SAFETY POINTERS
Safety pointers about the glue
CAUTION ! The glue c n within seconds glue skin nd eyelids tight.
The glue cont ins cy no- cryl te nd c n irrit te eyes, skin nd respir tory
org ns. Avoid cont ct with eyes nd skin. In c se of ny cont ct with the eyes
or intern l org ns consult doctor immedi tely. Do not inh le its v pours.
It m y lso not come into cont ct with wounds, cover up ny wounds prior to
using it with co ting of oil or gre se.
Do not remove ny eventu l skin gluing with force but soften it up by pl cing
it in w rm so p l ther for longer period of time nd then c refully det ching
it with cetone.
Keep out of the re ch of children.
General safety pointers
The COMBIped n il correction br ce is intended to be used only
once.
Read these Instructions carefully before using it for the first
time and comply with all its suggestions.

16
3TO Gmb Birkenstr ße 8 D-82041 Deisenhofen +49-89-20353444
F x +49-89-20353445 info@3to-gmbh.de www.3to-gmbh.de
© 3TO GmbH M rch 2010
Table of contents
Other 3TO Personal Care Product manuals


