A-EON HighQ Check Special User manual

Thank you for purchasing the HighQ Check®Blood Glucose Monitoring System. This manual
provides important information to help you to use the system properly. Before using this
product, please read the following contents thoroughly and carefully.
Regular monitoring of your blood glucose levels can help you and your doctor gain better
control of your diabetes. Due to its compact size and easy operation, you can use the HighQ
Check®Blood Glucose Monitoring System to easily monitor your blood glucose levels by
yourself anywhere, any time. If you have other questions regarding this product, please contact
the local customer service or place of purchase.
Dear HighQ Check®System Owner :
01

INTENDED USE
IMPORTANT SAFETY PRECAUTIONS
CONTENTS OF SYSTEM
METER OVERVIEW
DISPLAY SCREEN
CHANGING THE BATTERY
TEST STRIP
CHANGING SETTINGS
CODING YOUR METER
BEFORE TESTING
PERFORMING A CONTROL SOLUTION TEST
CONTENT
02
......................................................................................................04
....................................................................05
........................................................................................06
..................................................................................................08
....................................................................................................10
.....................................................................................11
..............................................................................................................12
...........................................................................................13
..........................................................................................16
...................................................................................................17
.......................................................18

APPLY CONTROL SOLUTION
TESTING BLOOD GLUCOSE
BLOOD SAMPLING
TESTING YOUR BLOOD GLUCOSE
REVIEWING BLOOD GLUCOSE DAY AVERAGE RESULTS AND MEMORY
DOWNLOADING RESULTS ONTO A COMPUTER
MAINTENANCE
TROUBLESHOOTING
SYMBOL DESCRIPTION
SPECIFICATIONS
LOG BOOK .....
03
.................................................................................20
..................................................................................22
.................................................................................................24
.......................................................................25
...........27
.................................................28
......................................................................................................30
.............................................................................................32
..........................................................................................38
....................................................................................................39
.............................................................................................................40

The HighQ Check®blood glucose meter
The HighQ Check®blood glucose meter is intended to be used for quantitative blood glucose
tests in fresh capillary blood. The meter can only be used together with HighQ Check®test
strips. The blood glucose monitoring system comprises the meter and test strips and is
suitable for self‑testing and for professional use. People with diabetes can use this system to
self‑test their blood glucose. The system must not be used to diagnose or rule out diabetes.
The system is only suitable for use outside the body(in vitro diagnostic use). It should not be
used for the diagnosis of diabetes, or testing on newborns. The meter must only be used for
its intended purpose; if used otherwise preventive measures could be ineffective.
04
INTENDED USE

READ BEFORE USE
1. Use this device ONLY for the intended use described in this manual.
2. This device does NOT serve as a cure for any symptoms or diseases. The data measured
is for reference only. Always consult your doctor to have the results interpreted.
3. Keep the device and testing equipment away from young children. Small items such as
the battery cover, batteries, test strips, lancets and vial caps are choking hazards.
4. Do NOT under any circumstances use the device on newborns or infants.
5. Before using this device to test blood glucose, read all instructions thoroughly and prac
tice the test. Carry out all the quality control checks as directed.
6. Do NOT use the device if it is not working properly or if it is damaged.
7. Do NOT use accessories which are not specied by the manufacturer.
8. All parts of the kit are considered biohazardous and can potentially transmit infectious
diseases, even after you have performed cleaning and disinfection.
IMPORTANT SAFETY PRECAUTIONS
05
KEEP THESE INSTRUCTIONS IN A SAFE PLACE
06
CONTENTS OF SYSTEM
Your new HighQ Check®system kit includes :
Blood glucose meter
User’s manual
Carrying bag
Quick start user guide
Warranty card (last page of the user’s manual)
2 x 1.5V AAA Battery
①
②
③
④
⑤
⑥①
①
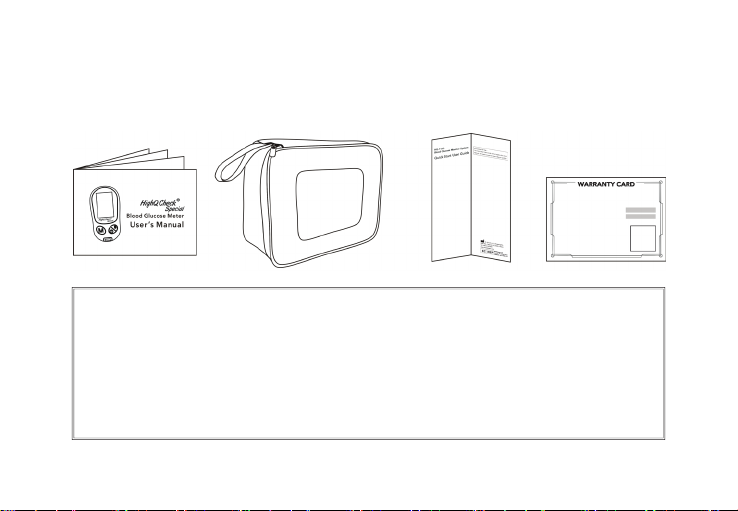
NOTE
A lancing device is not included in this kit. You must purchase your own lancing device.
Either multiple‑use auto‑disabling lancing devices or single‑use, disposable lancing devices
can be used with this system.
If any items are missing from your kit or opened, prior to use, please contact local customer
services or place of purchase for assistance.
② ③ ④ ⑤
07

08
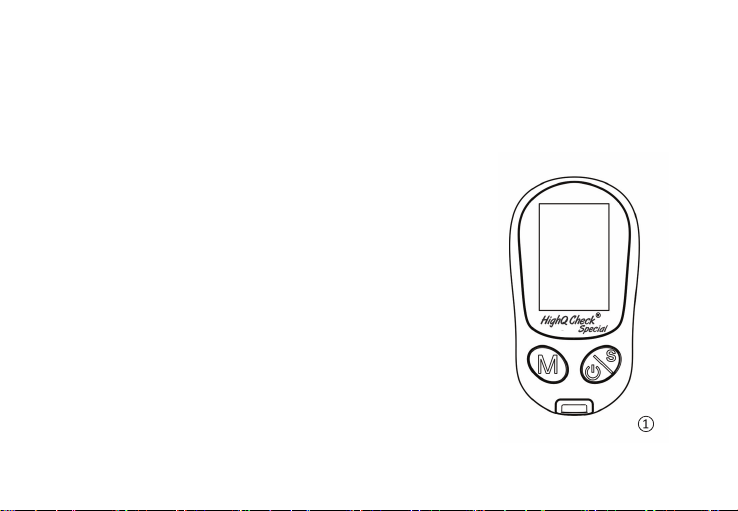
METER OVERVIEW
①
③②⑤
④
⑦
⑧
⑥

①
②
③
④
⑤
⑥
⑦
⑧
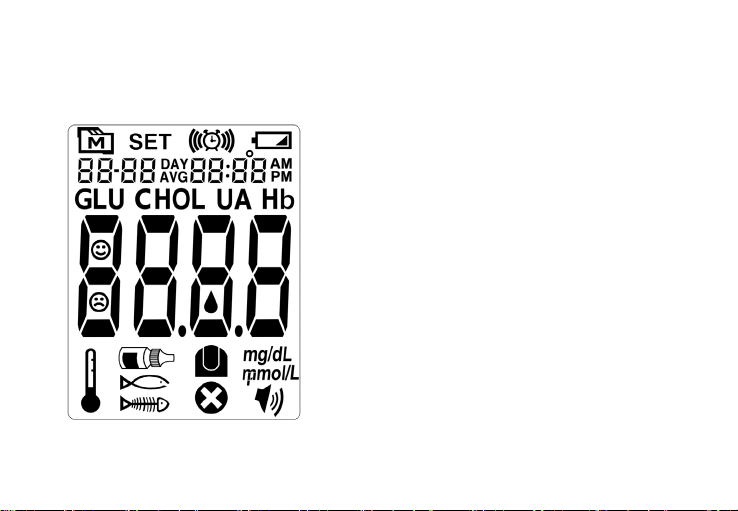
Display Screen
ON&OFF / S Button Enter and conrm the meter settings
M Button Enter the meter memory and Alarm Settings
Test Slot Insert test strip here to turn the meter on for testing.
S Button Enter and conrm the meter settings and Switch AC/PC
Data Port Download test results with a cable connection
Speaker
Label of the meter (serial number)
09
10
● Blood Drop Symbol
● Test Strip Symbol
● Test Result
● Date
● Time
● Day Average
● Battery Symbol
● Memory Symbol
● Control Solution Mode
● Measurement Unit
● Testing Type
● Setting Mode
● Measuring Mode
DISPLAY SCREEN
● AC‑before meal / PC‑after meal
● Thermometer
● Alarm Symbol
● Voice Symbol
● Error Message
● Face Symbol

When the battery symbol appears on the display for the rst time, the battery is almost empty.
Change the battery as soon as possible. The battery has already lost a lot of power and chan‑
geable conditions (e.g. a cold environment) can affect its performance even further.
You need 2 batteries of the type 1.5V AAA Battery.
With a new battery, you can perform approx. 500 tests or test for approx. 1 year. When you
change the battery, your saved test results always remain saved. Remove the used battery right
before inserting the new battery into the meter so that the time and date settings are not lost.
CHANGING THE BATTERY
CAUTION
✓ Do not use rechargeable or poor batteries.
✓ Do not remove the batteries during the testing.
✓ Do not mix the batteries or use the old and new batteries at the same time.
✓ Please follow the local regular when discarding used batteries.
11
12
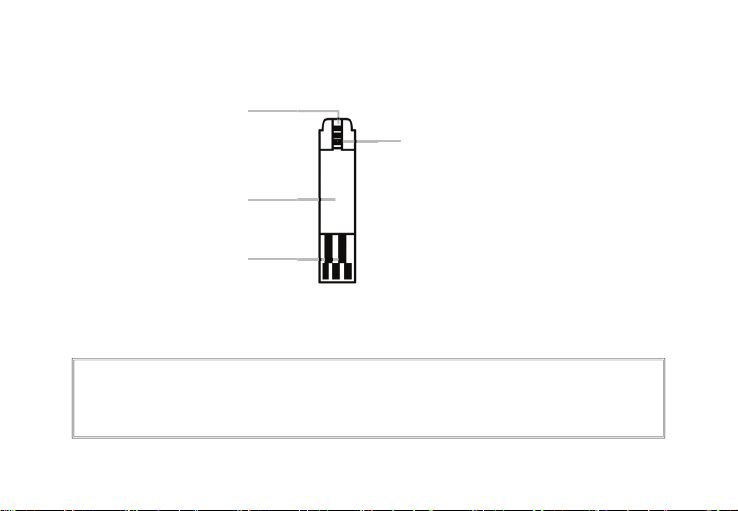
Absorbent Hole
Con rmation Window
Test Strip Handle
Control Bars
TEST STRIP
NOTE
The HighQ Check®meter should only be used with HighQ Check®Test Strips. Using other
test strips with this meter will produce inaccurate results.
ATTENTION : The front side of test strip should face up when inserting test strip. Test results
will be wrong if the contact bar is not fully inserted into the test slot.
①
②
③
④
①
③
②
④

Before using your meter for the rst time or if you change the meter battery, you should check
and update these settings.
Entering the Setting Mode
Start with the meter off (no test strip inserted). Press ON&OFF / S Button for 3 seconds.
1. Setting the date
The sequence of the date
setting is:
YEAR → MONTH → DAY
CHANGING SETTINGS
With the YEAR / MONTH / DAY ashing in sequence, press S until the correct year/month/day
appears. Press M.
13

14
2. Setting the time format
Press M to select the desired
time format ‑‑‑ 12h or 24h. Press S.
3. Setting the time
With the HOUR / MINUTE ashing
in sequence, press S until the correct
hour/ minute appears. Press M.

4. Setting the reminder alarm
Your meter has four reminder alarms. Press M after 3 secs into Alarm setting mode.
With the hour/minute ashing in sequence, press M to select the correct hour/ minute. Press M
and go to the next alarm setting.
With the HOUR / MINUTE ashing in sequence, press
M until the following sequence appear “OFF”, the
setting will be saved and the meter will shut down
automatically.
NOTE
These parameters can ONLY be changed in the setting mode.
If the meter is idle for 3 minutes during the setting mode, it will switch off automatically.
With the HOUR / MINUTE ashing in sequence, press M until the following sequence appear
“OFF”, the setting will be saved and the meter will shut down automatically.
15

A new code card is inside each new box of test strips. Code your meter every time when you
open a new box of test strips.
1. Insert the code
card into the slot.
The display will
show:
CODING YOUR METER
16
2. The code number will be show on the
display. Make sure the code number on the
display matches the
code number on the
test strip bottle.
WARNING
Do not discard the code card until you use all test strips in the same bottle.

17
BEFORE TESTING
Checking your test results
CG‑001 Control Solution contains a known amount of glucose that reacts with test strips and is
used to ensure your meter and test strips are working together correctly.
Test strips, control solutions, lancing device or sterile lancets may not be included in the kit
(please check the contents on your product box). They can be purchased separately. Please
make sure you have those items needed for a blood glucose test beforehand.
Do a control solution test when :
● you rst receive the meter, at least once a week to routinely check the meter and test
strips, you begin using a new vial of test strips.
● you suspect the meter or test strips are not working properly.
● your blood glucose test results are not consistent with how you feel, or if you think the
results are not accurate.
● practicing the testing process, or you have dropped or think you may have damaged the meter.

To perform a control solution test, you will need : HighQ Check®meter, HighQ Check®test
strip, CG‑001 control solution.
1. Insert the test strip to turn on the meter Insert the test strip into the meter. Wait for the
meter to display the “ “ and “ ”.
PERFORMING A CONTROL SOLUTION TEST
Drop blood Strip
18

19
2. Press S around 3 seconds until mark this test as a control
solution test mode. With “ ” displayed, the
meter will not store your test result in memory under
“ ”. If you press S again, the “ ” will
disappear and this test is no longer a control solution
test.
WARNING
When doing the control solution test, you must mark it so that the test result will NOT be
stored in the memory. Failure to do so will mix up the blood glucose test results with the
control solution test results in memory.
20
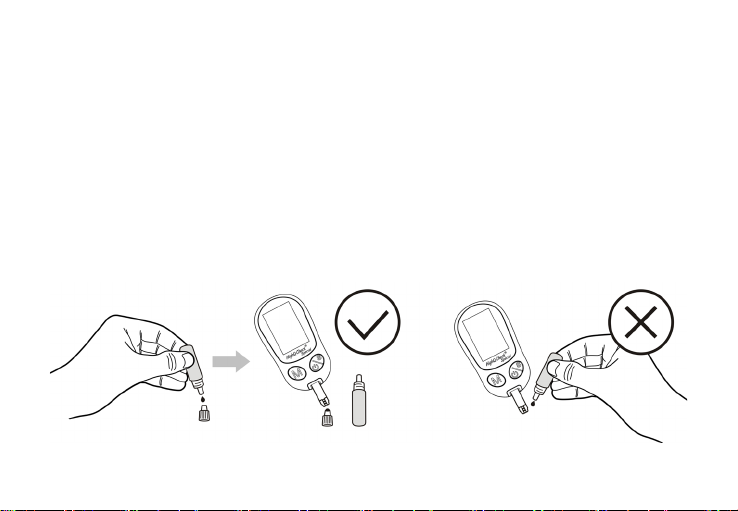
APPLY CONTROL SOLUTION
1. Shake the control solution vial thoroughly before use. Squeeze out a drop and wipe it off,
then squeeze out another drop and place it on the tip of the vial cap.
2. Hold the meter to move the absorbent hole of the test strip to touch the drop. Once the
conrmation window lls completely, the meter will begin counting down.
3. To avoid contaminating the control solution, do not directly apply control solution onto a
strip.
Table of contents


