Aalberts industries Apollo PEX 69PTKH00143 User manual

INSTRUCTION SHEET
PEX
Crimp Tools
PEX
69PTKH00143 - 1/2"
69PTKH00144 - 3/4"
69PTKH0014C - 1/2" & 3/4"
69PTKH0015K - 3/8"-1"
1
To remove and replace crimp heads: For 69PTKH0015K only (Heads cannot be replaced on all other Apollo® crimp tools)
1. Cut tubing end squarely. Check for and
remove any burrs.
2. Slide crimp ring over end of tubing.
Insert fitting into end of tubing until it
stops. Position the crimp ring 1/8" to
1/4" from the end of the tubing and
over the ribs of the fitting.
3. Place the crimping end of tool around
the crimp ring and press the handles
together.
4. Check for proper crimp with the
Go/ No-Go gauge.
1. With the handles. fully
open, press side release
spring upward until the
hook is above the jaw pin.
3. With the side release
spring pressed upward,
slide new jaw into place
and release the spring.
2. Slide jaw out of position
and remove.
2 3
If you have a 69PTKH0015K that does not have spring
loaded jaws, but jaws that are secured with screws, sim-
ply loosen the screws located at the center of the jaws.
Remove the jaws and slide the jaws you need into place.
Replace the screws at the center of the jaws and tighten.
Apollo® PEX Crimp Rings
APXCR3810PK 3/8" 10 Pack
APXCR1210PK 1/2" 10 Pack
APXCR1225PK 1/2" 25 Pack
APXCR1250PK 1/2" 50 Pack
APXCR12100PK 1/2" 100 Pack
APXCR3410PK 3/4" 10 Pack
APXCR3425PK 3/4" 25 Pack
APXCR34100PK 3/4" 100 Pack
APXCR15PK 1" 5 Pack
APXCR125PK 1" 25 Pack
Apollo® PEX PRO Crimp Rings
APXCR12LT 1/2" 10 Pack
APXCR34LT 3/4" 10 Pack
Conbraco Industries, Inc.
Matthews, NC 28105
1.888.229.2874
www.apolloflow.com
is-69PTKH_06/09/17
INSTRUCTION SHEET
PEX Crimp Tool
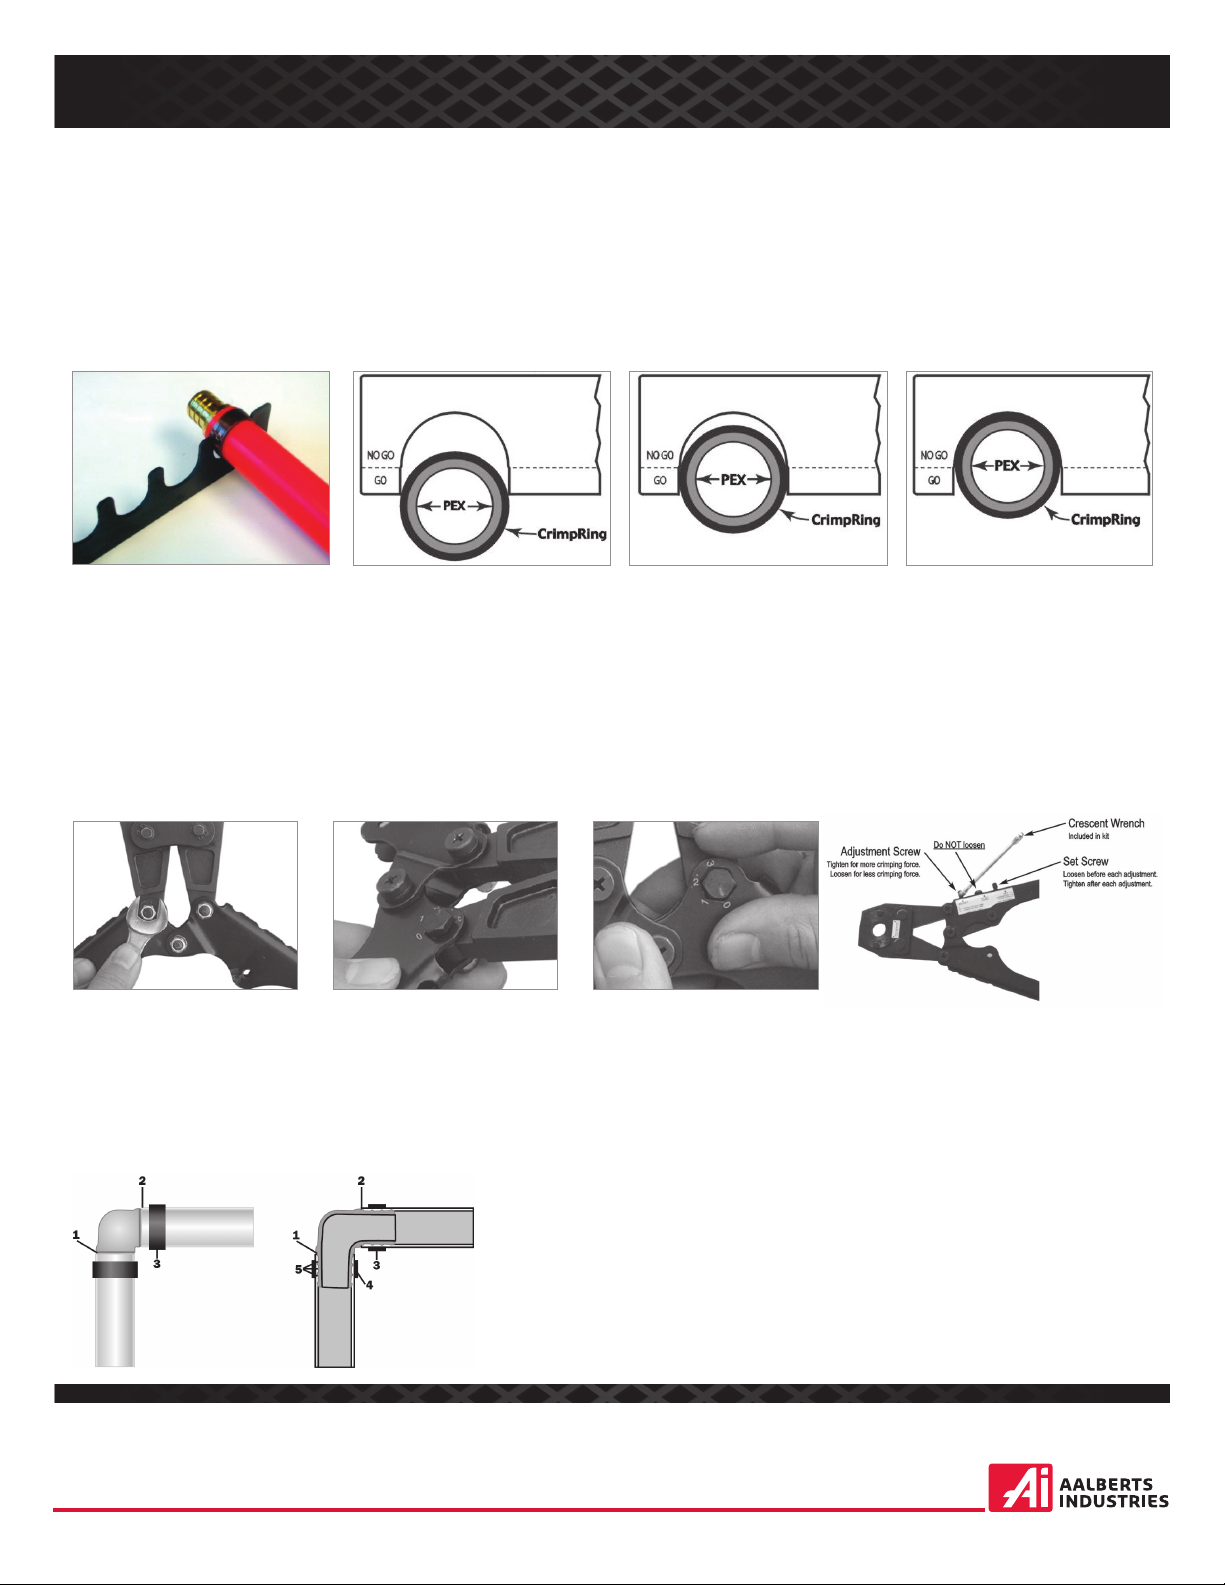
Go/No-Go Gauge
PEX
1. Slide the correct slot on the
gauge around the crimped ring.
2. If the ring does not fit into
the slot at all, then the crimp
is a“No-Go”. Adjust the
crimping force on the tool and
re-crimp the ring.
3. If the ring slides into the slot
and stops in the“Go”range at
least at one point, then the
crimp is good.The ring will
not fit the go range all the way
around it.
4. If the ring slides all the way
into the slot, then the crimp
ring is compressed too small
and is a“No-Go”. Remove the
ring and adjust the crimping
force on the tool.
1. Open the handle, then
loosen the nut on the screw
with the numbers
surrounding it.
2. Push and rotate the screw.
Increase the number for
more crimp force. Decrease
the number for less crimp
force.
3. Push the screw back into
place and tighten the nut.
How to adjust the crimp force:
If your crimp tool has screws on the side, to
adjust the crimp force first loosen the set
screw. Next, tighten the adjustment screw
for more force or loosen the screw for less
force. Finally, tighten the set screw after
any adjustments.
Illustration of a good connection:
1. Fitting shoulder location.
2. Pipe is cut square and stops at fitting sholder.
3. Position the CrimpRing 1/8" - 1/4" from the end of the pipe, directly over two end ribs of the fitting.
4. The CrimpRing is evenly compressed over the pipe and shows no evidence of uneven distortion.
5. The PEX material is uniformly compressed between the ribs, resulting in a leak-free, quality joint.
This manual suits for next models
3
Popular Crimping Tools manuals by other brands


Tyco Electronics
Tyco Electronics 90035-3 instruction sheet

Emerson
Emerson Klauke ES 20RMCCFB manual

Continental Refrigerator
Continental Refrigerator PC150HD quick start guide

TE Connectivity
TE Connectivity ERGOCRIMP 1-1579001-3 instruction sheet

Tyco Electronics
Tyco Electronics CERTI-CRIMP 90418-1 instruction sheet

Emerson
Emerson Klauke ES 105CFB manual