A&D UM-101 User manual

Instruction Manual
Manuel d’instructions
Manual de instrucciones
Manuale di Istruzioni
Bedienungsanleitung
使用手册
WM+PD4001301

English 1
UM-101
Digital Sphygmomanometer
Instruction Manual
Contents
1. Dear Customers ................................................................................2
2. Preliminary Remarks .........................................................................3
3. Notes for Proper Use.........................................................................4
4. Parts Identification.............................................................................6
5. Symbols.............................................................................................7
6. Using the Monitor ..............................................................................8
7. Measurements...................................................................................9
8. Useful Features ...............................................................................10
9. Troubleshooting...............................................................................11
10. Maintenance.................................................................................... 11
11. Technical Data.................................................................................12

English 2
1. Dear Customers
Congratulations on purchasing a state-of-the-art A&D sphygmomanometer,
one of the most advanced monitors available on the market today.
Designed for ease of use and accuracy, this monitor will facilitate your daily
blood pressure regimen. We recommend that you read through this
manual carefully before using this device for the first time.
Applicable Patient: This sphygmomanometer is designed for use on
adults only.
Environment for use: The device is for indoor use.
Features
Measurement
This sphygmomanometer is designed to monitor and display the cuff
pressure during cuff inflation and deflation while the healthcare provider
determines the patient’s blood pressure level by listening for Korotkoff
sounds with a stethoscope.
Easy to Use
This sphygmomanometer measures the pulse rate of a patient while the
cuff is deflating during blood pressure measurement, and indicates the
pulse rate on the LCD display.
Safety
This sphygmomanometer was designed to measure a patient’s blood
pressure without the use of mercury, therefore protecting your local
environment.
An automatic quick exhaust valve is installed in the device to prevent over
pressurization of 320mmHg or higher, therefore protecting the patient.

English 3
2. Preliminary Remarks
Compliance
Compliance with European Directive 93/42 EEC for Medical Products
The device conforms to the following requirements: European Directive 93/42
EEC for Medical Products; Medical Products Act; European Standards for
Electrical Medical Equipment EN 6060-1 (General Safety Provisions), EN
60601-2-30 (Particular Requirements for the Safety of Automatic Cycling
Indirect Blood Pressure Monitoring Equipment), EN 60601-1-2 and EN 55011
(Electromagnetic Compatibility); European Standards pertaining to Non
Invasive Blood Pressure Instruments EN 1060-1(General Requirements),
prEN 1060-3(Supplementary Requirements for Electrome-chanical Blood
Pressure Measuring Systems). The above is evidenced by the mark
of conformity accompanied by the reference number to the involved notified
body. This device is designed for adults only.
Definitions
SYS Systolic Blood Pressure
DIA Diastolic Blood Pressure
PUL Pulse
Exhaust This means “releasing the cuff air as soon as possible”.
Constant exhaust This means, “releasing the cuff air at a constant
depressurization rate”.
Batteries
Use alkaline batteries (LR6 type, AA type, Mignon) or equivalent batteries.
Do not mix new and used batteries.
Remove the batteries if the device will not be in use for a prolonged period of
time as the batteries may leak and cause a device malfunction.
A Defective Sphygmomanometer
Stop the examination immediately if the device does not work properly. Please
attach a note with the following "Do not use this sphygmomanometer " to
prevent any further use. This defective device should be stored in a safe place
to avoid any misuse until it has been sent for repair.

English 4
Training
The healthcare provider should stop the examination if there is an abnormality,
such as a patient feeling excessive arm pain, and remove the cuff to protect
the patient.
Repair
Do not attempt to open the device. Contact your nearest A&D authorized
representative and they will repair or replace the device.
Blood Pressure Measurement
This device is designed for use with adults.
Do not use the device on patients using heart-lung support equipment.
Do not use the device on patients in a critical condition or on ICU (intensive
care unit) patients.
3. Notes for Proper Use
Storage
Do not store the sphygmomanometer in the following places.
Where the device could be splashed with water or other liquids. If the device is
immersed by accident, it may require servicing. (DO NOT use the device
before it has endured a full service.)
Do not leave the device in a high temperature or high humidity environment, or
in direct sunlight.
Do not leave the device where it could be influenced by vibration or shock.
Do not leave the device in a dusty, salty or sulfuric environment.
Do not leave the device where medicines are stored, or where medicines are
evaporating.
Before Use
Make sure that the sphygmomanometer works correctly and that
measurement values are accurate.
Make sure that the cuff and air tubes are properly connected.
Check and maintain the cleanliness of the parts in direct contact with the patient.
Consider using a cuff cover for sanitary measurements.
Avoid placing the device near a strong magnetic field or static electricity.
Avoid placing the device near high frequency surgical equipment.

English 5
During Use
This device should be used by trained professionals.
Stop the examination immediately, if the patient feels pain during a
measurement or if the device does not work properly.
Stop using the device if you notice any abnormalities (for example; liquid
inside the device) and request a full service.
After Use
Clean the device, cuff and accessories before any subsequent uses. Do not
pull or kink the tubes. Do not use any organic solvent (for example; antiseptic
solution, etc.) to clean the device.
Press the ON/OFF button after a measurement.
You are advised to keep the original box for further transportation after
purchasing the device.
Periodic Maintenance
This device is a precision instrument and contains electronic circuitry.
Please check all functions periodically. Contact your nearest A&D
authorized representative for official calibration/check-up, according to
your local regulations.

English 6
4. Parts Identification
Main Body and Accessories
Function
ON/OFF
Button Turns on or off the device.
MARKER
button
During measurement...........
.
After turned off .....................
.
Puts a marker at a pressure value
Indicates a lifetime counter
Numerical
display
During measurement...........
.
After exhausted air ..............
.
Indicates pressure value
Indicates pulse rate
Display
Numerical displa
y
Rubber bulb
Exhaust valve
ON/OFF button
MARKER button
Pressure bar displa
y
Cuff
1.5V Batteries
(LR6 or AA) Band for attaching a
stethoscope on the arm Instruction manual
Cuff connector
Unit of pressure
Pressure value
Battery indicator
Pulse rate
Unit of pulse
High digi
t
s of the lifetime counter
Low digi
t
s of the lifetime counter

English 7
5. Symbols
Symbols Function / Meaning Recommended Action
Standby and Turn the device on.
MARKER Pressure value holding and lifetime
counter.
Battery installation guide
SN Serial number
Date of manufacture
Type BF: Device, cuff and tubing are
designed to provide special protection
against electrical shocks.
Full Battery
The battery power indicator during
measurement.
Low Battery The battery is low when it blinks.
Replace all batteries
with new ones, when
the indicator blinks.
Pressure remains in Cuff.
Measurement overtime.
Exhaust it with the
exhaust valve.
Device is out of order. Send for service.
mmHg Unit of pressure
bpm Unit of pulse
EC directive medical device label
WEEE label

English 8
6. Using the Monitor
Installing / Changing the Batteries
1. Remove the battery cover.
2. Insert a new set of batteries into the battery
compartment as shown. Make sure the polarities
(+) and (-) are correct. Use only LR6, AA or
equivalent batteries.
3. Close the battery cover.
CAUTION
Insert the batteries in the battery compartment.
If not, the device will not work.
When (LOW BATTERY mark) blinks in the LCD display, replace all
batteries with new ones. Do not mix old and new batteries. It may shorten the
battery life, or cause the device to malfunction.
Battery life varies with the ambient temperature and may be shorter at low
temperatures.
Use the specified batteries only. The batteries provided with the device are for
testing monitor performance and may have a limited life.
Remove the batteries if the device will not be in use for a prolonged period of
time as the batteries may leak and cause a device malfunction.
Connecting the Air Tube
Insert the air tube into the cuff connector firmly.
Selecting the Proper Cuff
Using the correct cuff size is important for accurate readings. If the cuff is not
the proper size, the reading may yield an incorrect blood pressure value.
The INDEX and RANGE marking on the cuff will indicate that you are using
the proper cuff or not. (Refer to "Attaching the Arm Cuff" in next section)
Arm Size Recommended Cuff Size Order No.
33 cm to 45 cm Large cuff AX-UM-101-03
23 cm to 33 cm Medium cuff AX-UM-101-01
17 cm to 25 cm Small cuff AX-UM-101-02
Arm size: The circumference at the biceps

English 9
Attaching the Arm Cuff
1. Wrap the cuff around the upper arm, about
2 ~ 3 cm above the elbow as shown on
right. Place the cuff directly against the skin,
as clothing may cause a faint pulse and
could result in a measurement error.
2. Constriction of the upper arm, caused by
rolling up a shirtsleeve, may interfere with
accurate readings.
3. Make sure that the index points are within
the range.
4. Attach a stethoscope on the arm with
accessory band.
7. Measurements
1. Place the cuff on the arm (preferably the left arm).
Keep the patient still during measurement.
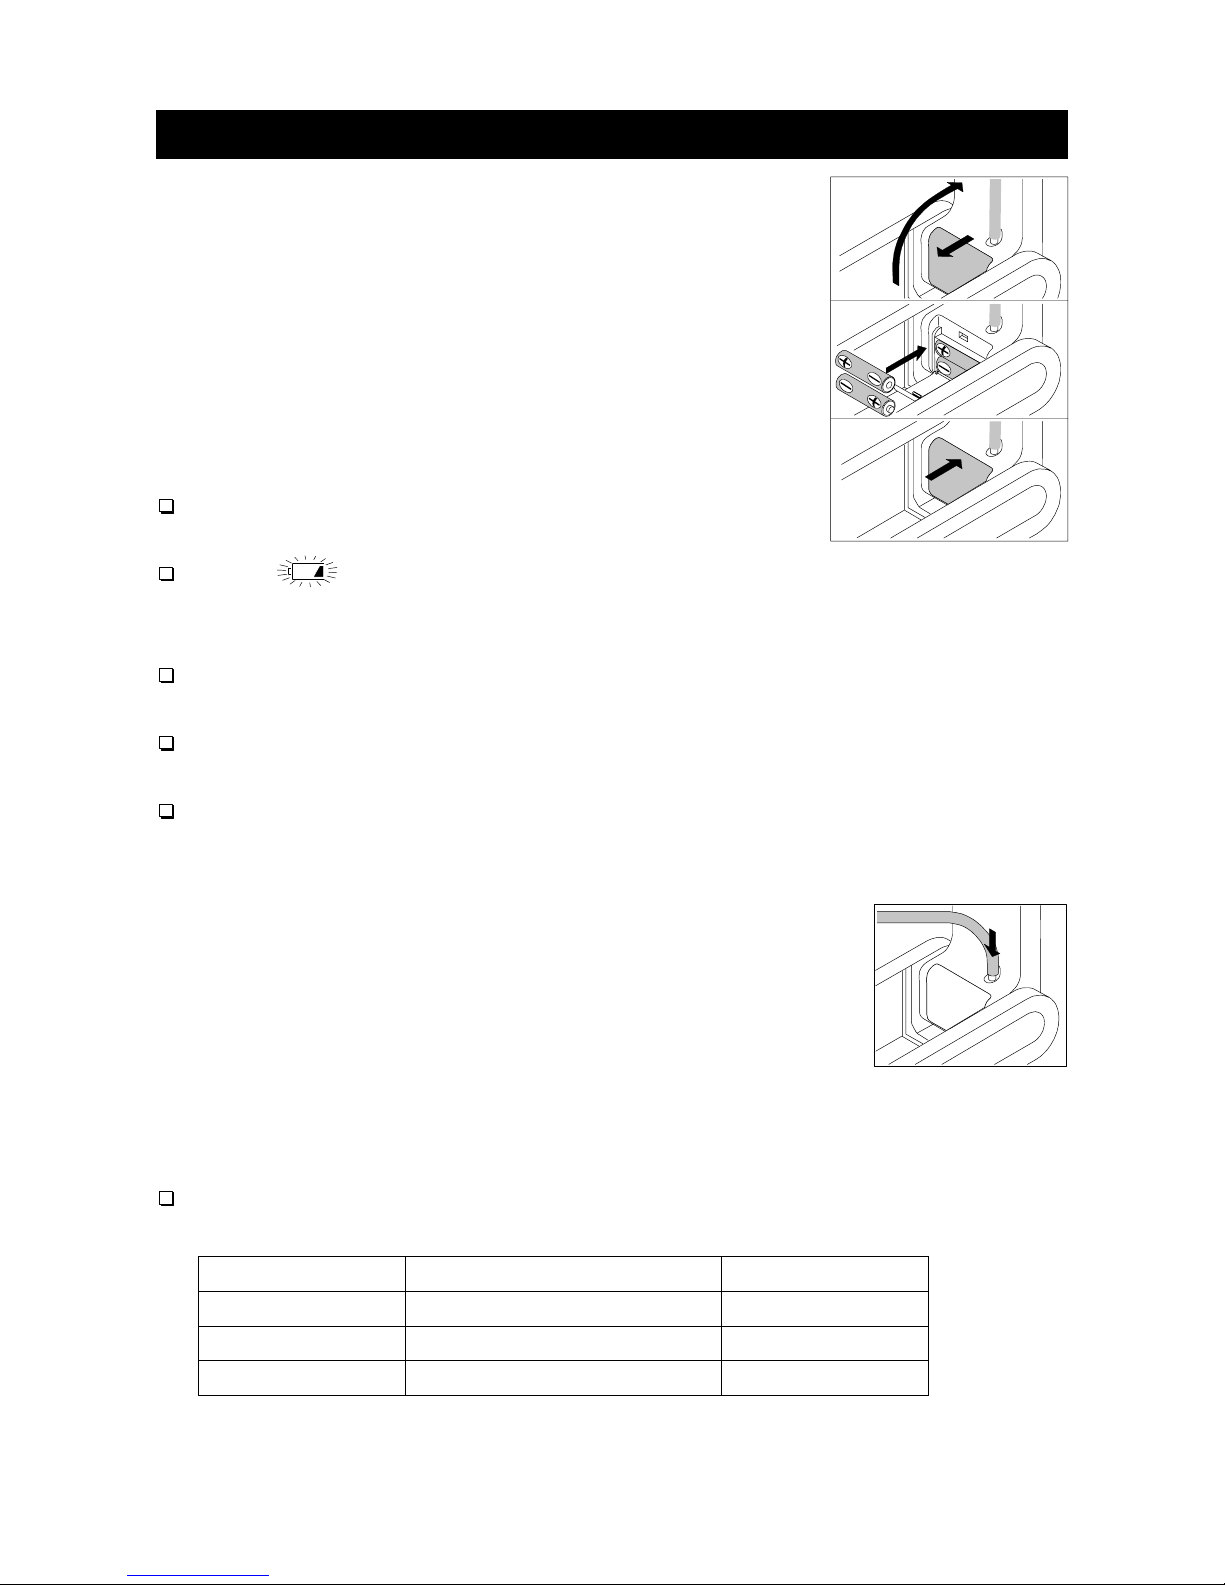
2. Press the ON/OFF button.
When the ON/OFF button is pressed, all of the
display symbols will appear for about one second.
When starts flashing, the device is ready for
measurement. If air is remaining in the cuff when the
ON/OFF button is pressed, the display will indicate an error code .
Switch off the device (press the ON/OFF button again) and turn the
exhaust valve counterclockwise once to expel all the air in the cuff. Then
press the ON/OFF button again to reactivate the device.
3. Place the stethoscope on the humerus artery and pressurize the cuff by
squeezing the rubber bulb. (Make sure the exhaust valve is completely
closed.)
While the cuff is inflating, the pressure bar will move and in turn the LCD
will display a number indicating the pressure.
Inflate the cuff to 30 to 40 mmHg higher than the patient’s expected
systolic value.
Note: If you wish to stop inflation at any time, press either the ON/OFF button
or turn the screw of the exhaust valve to release the air.
A
t heart level
RANGE
INDEX
2 ~ 3 cm
Cuf
f
Band
Stethoscope

English 10
4. When inflation is complete.
Turn the exhaust valve screw to release air slowly.
Measure the systolic pressure and the diastolic pressure by stethoscopy.
5. The pulse rate is shown on the numerical display when the measurement is
complete, and meets the following conditions.
When you pressurize 80mmHg or higher for the measurement.
When the pressure drops to 20mmHg or lower.
6. Turn the exhaust valve screw counterclockwise to
release all the air from the cuff.
If a measurement is taken with insufficient pressure,
the mark will be displayed. Re-pressurize the
cuff to a pressure that is about 30 to 40 mmHg higher
than the previous attempt.
An error message will be displayed if a
measurement is taken with insufficient pulses or in a
very noisy environment.
7. Press the ON/OFF button again to turn off the power.
Note: Model UM-101 has an automatic power-off function.
8. Useful Features
Measurement with MARKER Button
You can put a marker at a certain pressure value
when the MARKER button is pressed during the
measurement process. Up to 5 markings can be
shown over the range of 40mmHg.
Lifetime Counter
When the MARKER button is pressed while the device
is off, the lifetime counter is displayed.
This counter function indicates the hours the device was
in use and helps to determine when maintenance is
necessary. High digits and Low digits are alternatively
displayed. The example indicates that the device has
been in use for 1,278 hours.
Marker
Marker
High digi
t
Low digi
t
A
lternativel
y

English 11
9. Troubleshooting
Problem Possible Reason Recommended Action
Batteries are empty. Replace all batteries with new ones.Nothing
appears in the
display, even
when the power
is turned on.
Battery polarities
are not in the
correct position.
Reinstall the batteries with their
negative and positive ends matching
those indicated in the battery
compartment.
The cuff is not
fastened properly. Fasten the cuff correctly.
Patient moved thier
arm or body during
the measurement.
Make sure the patient remains very
still during the measurement.
The cuff position is
not correct.
Have the patient sit comfortably still.
Ensure that the cuff is at the same
level as the heart.
If the patient has a very weak or
irregular heart beat, the device may
have difficulty in determining thier
blood pressure.
The unit does
not take a
measurement.
Readings are
too high or too
low.
Remove the batteries. Reinstall them
properly and try the measurement
again.
Note: If the recommendations above do not solve the problem, contact
your nearest authorized A&D representative. Do not attempt to open
or repair this product by yourself, as any attempt to do so will render
your warranty invalid.
10. Maintenance
Do not attempt to open the device as the delicate electrical components and
intricate air unit inside could be damaged. If you cannot solve the problem
using our troubleshooting guide, request assistance from your authorized
dealer or from any A&D service group.
The device was designed and manufactured for a long service life. However it
is generally recommended to have the monitor inspected every 2 years, to
ensure proper functioning and accuracy. Please contact either your authorized
dealer or A&D for maintenance.

English 12
11. Technical Data
Model UM-101
Measurement method Stethoscopy with stethoscope
Measurement range
Numerical display Pressure: 0 ~ 300 mmHg
Pulse: 30 ~ 200 beats / minute
Pressure bar display Pressure: 20 ~ 280 mmHg
Measurement accuracy
Numerical display Pressure: ±3 mmHg
Pulse: ±5 %
Pressure bar display Pressure: ±4 mmHg
Power supply 2 x 1.5 V alkaline batteries (LR6 or AA)
Upper arm circumference 23 ~ 33 cm using the medium cuff
Classification Type BF
EMC IEC 60601-1-2: 2001
Operating condition +10°C to +40°C / 30%RH to 85 %RH
Storage condition -20°C to +60°C / 10%RH to 95 %RH
Dimensions Approx. 96 [W] x 322 [H] x 66[D] mm
Weight Approx. 940 g, excluding batteries
Note: Specifications are subject to change without prior notice.

A&D Co.,Ltd.
1-243 Asahi, Kitamoto-shi, Saitama 364-8585 JAPAN
Telephone: [81] (48) 593-1111 Fax: [81] (48) 593-1119
A&D INSTRUMENTS LTD.
<Authorized Representative Established in the European Community>
Unit 24/26 Blacklands Way, Abingdon Business Park,
Abingdon, Oxon OX14 1DY United Kingdom
Telephone: [44] (1235) 550420 Fax: [44] (1235) 550485
A&D MERCURY PTY. LTD.
32 Dew Street, Thebarton, South Australia 5031 AUSTRALIA
Telephone: [61] (8) 8301-8100 Fax: [61] (8) 8352-7409
Table of contents
Other A&D Medical Equipment manuals
Popular Medical Equipment manuals by other brands

Plymouth
Plymouth Nitronox Plus maintenance

Invivo
Invivo dS HiRes Hand/Wrist 16ch 1.5T Instructions for use

BeaconMedaes
BeaconMedaes Z MED Medical Air System Installation, operation and maintenance instructions

Arthrex
Arthrex Synergy Resection quick guide

KaVo
KaVo KaVo Primus 1058 Life TM Care Instructions

Infanor
Infanor CYBELEC CybTouch 6 G-W manual

Halyard
Halyard COOLIEF SINERGY Instructions for use

bloom
bloom COVID-19 test Instructions for use

Apex Medical
Apex Medical 9S-007301 instruction manual

Leckey
Leckey Advance Bath Chair user manual

Teeter
Teeter FitSpine Series Assembly & user instructions

Oridion
Oridion Smart OmniLine Guardian Directions for use