AAT Escalino 120 kg User guide

Translation of the original user's manual
Stair Climbing System escalino 120 kg
GB

CE-Declaration of conformity
The company AAT Alber Antriebstechnik GmbH herewith declares that the
products of the stair climbing system escalino were developed and manufac-
tured in concordance with the current regulations of the European Union,
EEC Guidelines 2007/47/EG and 2006/42/EG.
This declaration becomes void if the above mentioned devices have been al-
tered without the consent of AAT Alber Antriebstechnik GmbH.
Signature of the manufacturer:
Markus Alber
Managing shareholder
AAT Alber Antriebstechnik GmbH
The stair climbing system escalino has been
successfully tested and certified according to
the standard design for stair climbing vehi-
cles ISO 7176-23 and DIN EN 12182 at the
Technical University of Berlin, Berlin-Cert.
escalino
2
escalino_g1201_gb_03_2010
AAT Alber Antriebstechnik GmbH
Postfach 10 05 60 · D-72426 Albstadt
Tel. +49.74 31.12 95-0 · Fax +49.74 31.12 95-35

3
Table of contents
CE Declaration of conformity . . . . . . . . . . . . 2
Table of contents . . . . . . . . . . . . . . . . . 3
1 General information . . . . . . . . . . . . . . . . . . . . . 5
1.1 How to use this user's manual . . . . . . . . . . . 5
1.2 Instruction . . . . . . . . . . . . . . . . . . . . 5
1.3 Care and maintenance . . . . . . . . . . . . . . . 5
1.4 Warranty and liability. . . . . . . . . . . . . . . . 5
2 Description of the product . . . . . . . . . . . . . . . . . . 6
2.1 Adequate use . . . . . . . . . . . . . . . . . . . 6
2.2 Features of the escalino . . . . . . . . . . . . . . 7
2.3 Technical data . . . . . . . . . . . . . . . . . . . 8
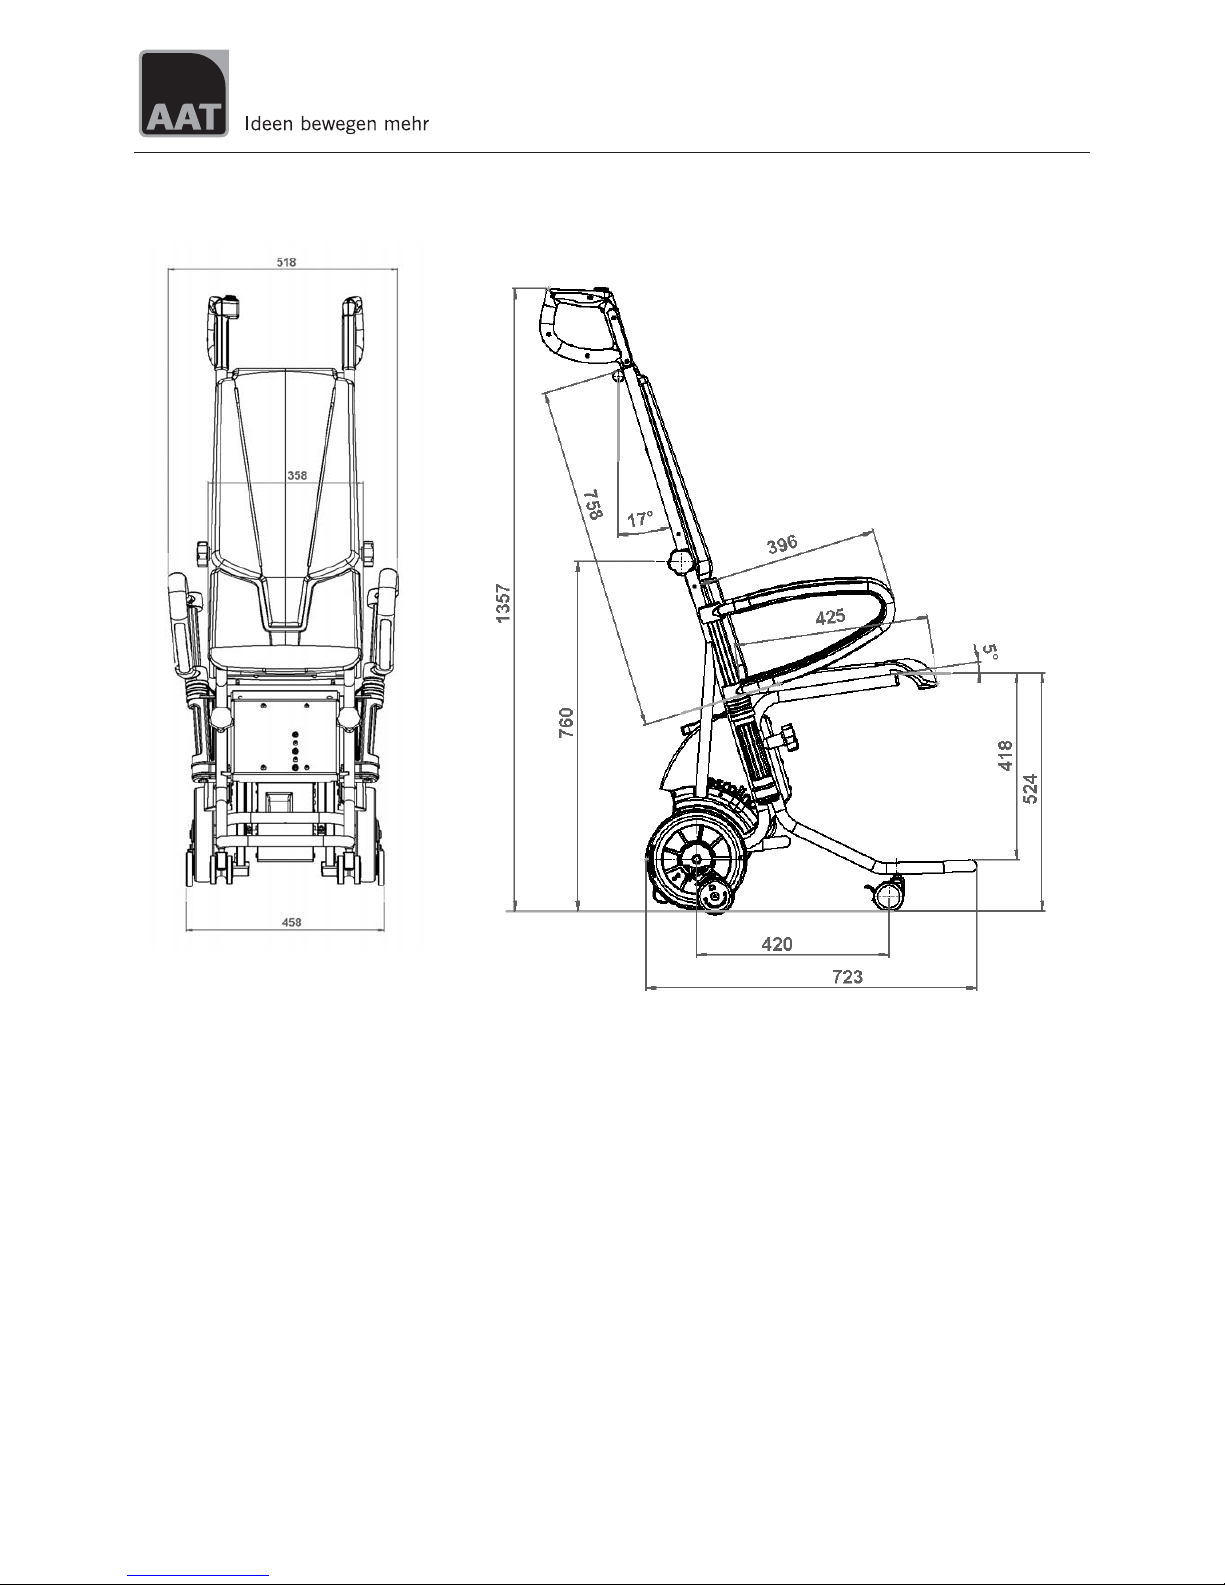
2.4 Dimensioned sketch . . . . . . . . . . . . . . . . 9
2.5 Standard scope of delivery . . . . . . . . . . . . . 10
2.6 Optional accessories . . . . . . . . . . . . . . . . 10
3 Assembly. . . . . . . . . . . . . . . . . . . . . . . . . . 11
3.1 Unfold the back part . . . . . . . . . . . . . . . . 11
3.2 Attach the C-part plus seat to the climbing unit . . . 11
3.3 Arm rests . . . . . . . . . . . . . . . . . . . . . 12
3.4 Functional check. . . . . . . . . . . . . . . . . . 12
4 Safety instructions . . . . . . . . . . . . . . . . . . . . . 13
4.1 Special information concerning the operation . . . . 13
4.2 Instruction . . . . . . . . . . . . . . . . . . . . 13
4.3 Safety brakes . . . . . . . . . . . . . . . . . . . 13
4.4 Lining of the climbing foot . . . . . . . . . . . . . 14
4.5 Lifting capacity . . . . . . . . . . . . . . . . . . 14
4.6 Care and maintenance . . . . . . . . . . . . . . . 14
4.7 Condition of paths, walkways etc . . . . . . . . . . 14
4.8 Charge of the batteries.. . . . . . . . . . . . . . . 14
4.9 Climbing mechanism . . . . . . . . . . . . . . . . 14
4.10 Transport . . . . . . . . . . . . . . . . . . . . . 14
5 Operation . . . . . . . . . . . . . . . . . . . . . . . . . 15
5.1 Maximum lifting capacity . . . . . . . . . . . . . 15
5.2 Membrane keypad . . . . . . . . . . . . . . . . . 15
5.3 Safety brakes . . . . . . . . . . . . . . . . . . . 15
5.4 Lining of the climbing foot . . . . . . . . . . . . . 15
6 Instructions for operation . . . . . . . . . . . . . . . . . . 16
6.1 Membrane keypad . . . . . . . . . . . . . . . . . 16
6.2 UP/DOWN switch . . . . . . . . . . . . . . . . . 16
6.3 Climbers . . . . . . . . . . . . . . . . . . . . . 17
6.4 Safety brakes . . . . . . . . . . . . . . . . . . . 18
6.5 Transportation of a person with the escalino . . . . . 19
6.6 Operation on level ground . . . . . . . . . . . . . 20
6.7 Tilting the stair climbing system . . . . . . . . . . 20
6.8 Operation on slopes . . . . . . . . . . . . . . . . 21
6.9 Climbing upstairs . . . . . . . . . . . . . . . . . 22
6.10 Climbing downstairs . . . . . . . . . . . . . . . . 25
6.11 Laying the escalino on the stairs ........... 27
6.12 Transport . . . . . . . . . . . . . . . . . . . . . 28
6.13 Trouble shooting . . . . . . . . . . . . . . . . . . 28
7 Accessories. . . . . . . . . . . . . . . . . . . . . . . . . 29
7.1 Voltage converter for your vehicle . . . . . . . . . . 29
escalino

8 Care, maintenance and recycling. . . . . . . . . . . . . . . 30
8.1 New user . . . . . . . . . . . . . . . . . . . . . 30
8.2 Charger . . . . . . . . . . . . . . . . . . . . . . 30
8.3 Sealed lead acid batteries . . . . . . . . . . . . . 31
8.4 Fuses . . . . . . . . . . . . . . . . . . . . . . . 33
8.5 Check brake lining . . . . . . . . . . . . . . . . . 34
8.6 Check the lining of the climbing foot . . . . . . . . 34
8.7 Cleaning. . . . . . . . . . . . . . . . . . . . . .. . . . . . . . . . . . . . . . . . . . . . . . . . 35
8.8 Recycling . . . . . . . . . . . . . . . . . . . . . 35
9 Warranty and liability . . . . . . . . . . . . . . . . . . . . 36
9.1 Warranty . . . . . . . . . . . . . . . . . . . . . 36
9.2 Liability . . . . . . . . . . . . . . . . . . . . . . 36
4
escalino

1 General information
Congratulations! With the acquisition of this stair climbing system you have
a device that will quickly become a reliable and indispensable partner in
transporting physically disabled people.
With the escalino you are able to transport one person safely and effortlessly
up- and downstairs; even winding stairs are no problem for the escalino. Dri-
ving on slopes is also possible. The safety brakes on both sides of the escali-
no ensure your safety.
Naturally the escalino is also suitable to drive on level ground. The device is
lightweight, flexible and does not take up much space.
The escalino is capable of climbing stairs up to a step height of 21 cm. The
minimum depth of step's surface must be 14 cm regardless of the type of
stairs (regular straight stairs or winding stairs).
The necessary step width concerning straight stairs is the width of the escali-
no an extra 10 cm for manoeuvring.
The minimum platform size of u-shaped stairs depends on factors such as
the attendant's height, etc. Your AAT representatives or your authorized dea-
ler are happy to advise you.
The sticker with the device's serial number is located on the left side of the
housing. Read the number here.
1.1 How to use this user's manual
The user’s manual is part of the delivery package and instruct you step by
step about the safe and adequate use of the escalino. Operating the escalino
takes a certain skill.
Please read this user’s manual carefully and particularly take note of the sa-
fety instructions before you use the escalino for the first time.
After reading, please store this user’s manual at an appropriate place for
further reference.
1.2 Instruction
In the interest of your safety the escalino may only be operated by trained
personnel.
Instruction on how to operate the device is part of the delivery package and
takes place with your authorized dealer or an AAT representative.
FPlease read this user’s manual carefully and particularly take note of
the safety instructions before you use the escalino for the first time.
1.3 Care and maintenance
One of the most important aspect concerning the maintenance of the escali-
no is charging the sealed lead acid batteries. They are integrated into the de-
vice and must be charged every time after using the device.
Other than that your escalino does not need much care and maintenance.
More extensive instructions you find in chapter 8.
1.4 Warranty and Liability
For damage that was caused by inadequate use disregarding this manual we
assume no liability whatsoever. (Please read chapter 9 for more detailed in-
formation concerning warranty and liability).
5
escalino

2 Description of the product
2.1 Adequate use
Please use the escalino exclusively for the transportation of physically disab-
led persons.
Said persons should be able to sit properly without help, otherwise you
should secure them with a safety belt. The latter is an accessory available at
AAT Alber Antriebstechnik GmbH.
In addition, the arms of the person to be transported should not protrude
over the arm rests during the transportation process.
FIn the interest of your safety you may not use the stair climbing devi-
ce escalino on escalators or moving belts!
FTransporting other kinds of loads is explicitly prohibited!
FOnly authorized operators may use the escalino. Therefore, never
leave the escalino unattended.
FPlease do not use the escalino in rain, slippery and wet conditions,
snow or ice due to the following potential safety hazards, e.g. danger
of slipping, restricted braking effect etc.
FDue to safety reasons the escalino may only be operated by trained
personnel who are physically and intellectually capable to handle the
device in all situations of operation.
6
escalino
Mastering stairs
Driving on level ground
Driving on slopes

2.2 Features of the escalino
1 = handle
2 = safety chip for the engine immobiliser
3 = up/down switch
4 = back rest (foldable)
5 = arm rest, swivelling
6 = C-part plus seat (removable)
7 = main wheel
8 = safety brake
9 = climber and climbing foot
10 = climbing unit
11 = membrane keypad
7
escalino

2.3 Technical data
8
escalino
measurements
height = 1357 mm
height (folded) = 760 mm
width without arm rests = 458 mm
width with arm rests attached = 518 mm
depth with the foot rest = 723 mm
weight climbing frame = 28.2 kg, c-part plus seat = 4.0 kg,
both arm rests = 1.5 kg, total weight = 33.7 kg
maximum lifting capacity 120 kg
batteries 2 x 12 V / 5 Ah (sealed)
direct current motor 24 V / 200 W
climbing speed approximately 12 steps / minute
capacity with one battery charge 8 - 12 levels (approximately 120 - 180 steps), depending on the load
maximum height of step 21 cm
storing/operating temperature, device 0° C up to + 60° C / - 30° C up to + 50° C
storing/operating temperature, batteries 0° C up to + 60° C / - 30° C up to + 50° C
degree of protectio IP 54 (protected against dust and splash water allover)
noise level the device's A weighted noise level lies typically below 70 dB (A)
vibrations the weighted RMS value of acceleration the upper body is exposed to
lies typically under 2.5m/s²

2.4 Dimensioned sketch
9
escalino

2.5 Standard scope of delivery
1 = charger including instructions
2 = arm rests
3 = climbing unit incl. back rest
4 = C-part
plus the user's manual
2.6 Optional accessories
1 = adjustable foot rest
2 = voltage converter
3 = hip belt
4 = seat belt system incl. hip belt
10
escalino

3 Assembly
With a few movements you can assemble the escalino by means of several
fixtures and tightening knobs. Disassembly is just as easy.
3.1 Unfold the back part
The back part can be unfolded and put in a vertical position by means of
toothed wheels. You need to lock it in that position with tightening screws .
FAlways make sure that the back part is securely fastened.
3.2 Attach the C-part plus seat to the climbing unit
Put the C-part plus seat onto the climbing frame; the locating bolts of the
C-part fit into the corresponding holes in the frame.
Fix the C-part tightly to the climbing frame with the two tightening knobs .
FAlways make sure that the C-part plus seat is securely fastened to
the climbing frame.
11
escalino

3.3 Arm rests
Insert the arm rests on both sides.
FPlease make sure that the arm rests are completely inserted into their
respective holding devices.
FDepending on the person's size the arm rests may be switched from
right to left and vice versa allowing for a wider or narrower seat.
3.4 Functional check
FPlease check the safety brakes each time before using the device
(see chapter 6.4 and 8.5)!
FPlease also check the safety brakes' braking effect as described in
chapter 6.4.1 and 6.4.1!
FPlease check the device's electronic functions each time before
using it (see chapter 6.9 and 6.10)!
FRegularly check whether the climbing feet's linings are still suffi-
cient (see chapter 8.6)
FMake sure that the seal lead acid batteries are charged before you
use the device!
12
escalino

4 Safety instructions
FFor a safe operation of the escalino it is important that you observe
and adhere to all warning signs and instructions in this user’s manual
as well as the warning signs and instructions on the device itself.
4.1 Special information concerning the operation: Due to safety rea-
sons the stair climber escalino may not be used on escalators and moving
walkways!
4.1.1 Environmental conditions, electro-magnetic compatibility: Elec-
tro-magnetic compatibility means that an electric device functions properly
in its electro-magnetic environment without influencing other devices in the
same environment.
FNevertheless, always check whether the device’s electronic functions
work properly before each use. This is particularly important if there
is an aerial mast nearby.
FPlease note that the escalino may interfere with other electronic
devices’ sensitive electro-magnetic fields (e.g. anti-theft systems in
department stores). This may also happen if you connect other devi-
ces.
FAlso make sure that the escalino is not operated in close proximity to
medical devices with a high potential for danger and/or life-suppor-
ting functions as well as diagnostic devices.
4.1.2 Climate: To ensure proper functioning it is not advisable to expose
the escalino to freezing conditions. Should this be unavoidable, always put
the device in a non-freezing environment for at least one hour before using it.
4.2 Instruction: The escalino may only be operated by trained person-
nel. In addition, the operator should be capable of lifting 1/3 of his or her
own weight. Minors are not allowed to use the escalino; exempt from the abo-
ve are adolescents over 16 years of age who have been trained under supervi-
sion to operate the escalino. While using the escalino you should always wear
good shoes that do not slip.
4.3 Safety brakes: Please check the safety brakes each time before
using the escalino (see chapter 6.4 and 8.5). The safety brakes, particularly
the knurled surface of the brake drums in the wheel rims, must be cleaned
weekly or after contamination with spirit to ensure the optimum braking ef-
fect.
FNever smoke during the cleaning of the device as well as keep it away
from ignition source.
FPlease consider the danger warning of the manufacturer previous
cleaning the device with spirit.
FNever use suds or greasy cleaners.
After cleaning the safety brakes must be checked as described in chapter
6.4.
13
escalino

4.4 Lining of the climbing foot: Please check regularly whether the li-
nings of each climbing foot is still sufficient (see chapter 8.6).
4.5 Lifting capacity: The stated maximum lifting capacity of 120 kg
may not be exceeded (see chapter 5.1).
You may under no circumstances use the escalino to transport goods.
4.6 Care and maintenance: Please make sure that you charge the devi-
ce after each use of the escalino.
If the escalino is not in operation, please turn off the device.
If the working elements of the device block, turn the escalino off immediate-
ly.
FRepairs may be done by authorized dealers or the manufacturer only.
Please exclusively use AAT Alber parts and accessories.
Please note the extensive care and maintenance instructions in chapter 8.
4.7 Condition of paths, walkways etc.: Please make sure that the paths
and walkways you use with the escalino are free of obstacles and not slippe-
ry. Avoid operation on damaged stair linings, snow, ice, etc.
FThe escalino may not be used in wet and rainy conditions.
4.8.1 Environmental conditions: Although the escalino has been tested
for its electro-magnetic compatibility, you should still check its electronic
functions before each use. This is particularly important if there is an aerial
mast nearby.
4.8 Charge of the batteries: You should only use the escalino with fully
charged batteries. You can check the batteries' capacity on the display of the
membrane keypad.
Should the batteries fall into the back-up range (red LED starts blinking) you
will hear a signal recurring every 12 seconds. It takes about 8 to 10 times of
charging and discharging the batteries before they reach their full capacity
again.
4.9 Climbing mechanism: The climbing unit and the climbers are for
the most part covered. Nevertheless, please pay attention that neither hands
nor feet get into the rotating area during the climbing process. Always keep a
safe distance.
4.10 Transport: Please transport the escalino as described in chapter
6.12.
FAlways turn off the escalino for transportation!
FWhen you transport the device in vehicles, please secure it according
to the relevant legal regulations in your country.
14
escalino

5 Operation
5.1 Maximum lifting capacity
Please make sure that the maximum lifting capacity of 120 kg is not excee-
ded.
5.2 Membrane keypad
With the membrane keypad you can turn the device on and off. Check the
batteries' capacity and turn the single step mode on or off.
5.3 Safety brakes
Before operating the escalino check the safety brakes every single time.
Extensive instructions you find in chapter 6.4 and 8.5.
5.4 Lining of the climbing foot
Please check regularly whether the lining on each climbing foot is still suf-
ficient.
Further instructions you find in chapter 8.6.
15
escalino

6 Instruction for operation
Before we get to the actual instructions for operation, we would like to intro-
duce the escalino's most important components to you.
6.1 Membrane keypad
6.1.1 ON/OFF key
The ON/OFF key on the membrane keypad is the power key to turn the
escalino on or off.
FThe escalino is equipped with a turn-off feature: if the device is on
and has not been used for 5 minutes, the turn off feature switches
the escalino off automatically. In such case you can only use the es-
calino again by pressing the ON/OFF key.
6.1.2 Capacity of the batteries
On the membrane keypad you can check the batteries' capacity . If the dis-
play highlights the green area, your batteries are fully charged. If the yellow
area is highlighted your batteries are running low. At this point you should
charge your batteries.
If the display highlights the red area (LED is blinking), you hear a signal that
recurs every 12 seconds.
FOnce you hear the first signal, the batteries' capacity is sufficient for
a maximum of 20 - 35, steps depending on the weight of the trans-
ported person.
6.2 UP/DOWN switch
This switch on the right handle activates the climbing mechanism up- or
downstairs.
FTurn on the device as described in chapter 6.1.1 before you activate
the UP/DOWN switch.
6.2.1 Safety chip for the engine immobiliser
The UP/DOWN switch only works if you put the safety chip for the engine im-
mobiliser into its slot. Please make sure that the chip is properly set to en-
sure safe and continuous operation.
If you do not put in the chip you can turn on the escalino, but you cannot dri-
ve with it. This feature makes sure that no unauthorized person uses the de-
vice.
16
escalino

6.2.2 Control light to indicate malfunction
Potential malfunction is indicated by a light diode.
In case of malfunction, turn the device first off and then on again. If there is
still an indication of malfunction, charge the batteries in case of low battery
charge. For all other cases of malfunction, please contact your authorized
dealer.
FPlease press the UP/DOWN switch only after you turn the device on.
Should you have neglected that the LED blinks 4 times. In such case,
please turn the device off and then on again.
6.2.3 Single step mode
Should you choose to turn off the single step mode manually you can do so
by pressing the key on the membrane keypad. The yellow LED above the
pictogram with the continuous arrow lights up as soon as you turn off the
single step mode.
FEvery time you turn on the escalino, the single step mode is automa-
tically activated.
If you activate the ON/OFF key in that mode, the device will climb only one
step at a time. The climbing system stops in the correct position.
The climbing mechanism cannot unintentionally be activated. You can take
your time to move the main wheels to the next step's edge.
To continue climbing you simply release the UP/DOWN switch and then
press it again.
6.3 Climbers
The climbers (see picture) must be pulled in to topmost position by means of
the UP/DOWN switch if you want to:
•drive on level ground and on slopes
•check the safety brakes
•begin climbing upstairs or downstairs
However, you need to fold out the climbers by activating the UP/DOWN
switch, direction up, whenever a person takes a seat in the escalino, so the
device is supported by the climbers (please also see chapter 6.5.1).
17
escalino
LED is blinking Identified malfunction
1 x socket is defective
2 x error, lifter plate (Fet)
3 x error, lifter (relay)
4 x UP/DOWN switch is defective
5 x malfunction in the motor

6.4 Safety brakes
There are safety brakes located on the climbing frame on both sides (see pic-
ture to the right).
FPlease check the safety brakes each time before you use the escali-
no.
You may check the brake effect either on top of the stairs or on level ground
as described in chapter 6.4.1 and 6.4.2.
6.4.1 Test the required brake effect
Pull in the climbers to their upmost position and tilt the escalino backwards
until the back rest is in an almost horizontal position. (See picture to the
right).
If the escalino cannot be pushed forward by the handles in said position, but
merely rolls backwards, then the required brake effect for the safe operation
of the escalino is granted (see picture).
FImportant: If the required brake effect is not guaranteed, you may,
under no circumstances, use the escalino any more. Please contact
your authorized AAT Alber dealer or the manufacturer immediately.
FShould the brake not kick in, you may under no circumstances use
the device. Please contact your authorized dealer or an AAT repre-
sentative immediately.
6.4.2 Test the required brake effect at the top edge of the stairs
FPlease make this test without a person sitting in the chair!
Pull in the climbers to their upmost position and tilt the device backwards
until the back rest is in an almost horizontal position. Drive forward to the
first step's edge (without person). If you cannot push the device over the
edge of the step, the required braking effect for a safe operation of the escali-
no is granted.
FImportant: If the required brake effect is not guaranteed, you may,
under no circumstances, use the escalino any more. Please contact
your authorized AAT Alber dealer or the manufacturer immediately.
FShould the brake not kick in, you may under no circumstances use
the device. Please contact your authorized dealer or an AAT repre-
sentative immediately.
18
escalino

6.5 Transportation of a person with the escalino
Please note that the escalino was developed to be operated by one person.
Always use both hands when using the device.
FOnly one person may be transported with the escalino!
FPlease practise driving with the escalino on level ground, slopes and
climbing up- and downstairs at first without a person sitting in the
chair. Also make sure that while you practise using the escalino no-
body is within close range of the potentially dangerous area underne-
ath the device.
We suggest that you practice climbing up- and downstairs with the single
step mode activated (see chapter 6.2.3).
FPlease do not exceed the maximum lifting capacity (see chapter 5).
FIn the interest of you safety please always operate the escalino from
behind, never sideways.
When a person takes a seat on the escalino, please follow these instructions:
6.5.1 Secure stand of the escalino
To avoid the escalino moving when a person takes a seat, you must fold out
the climbers in such a way that they rest on the ground.
Turn on the device and press the UP/DOWN switch direction UP until the
climbers touch the floor.
6.5.2 Swivel out or remove the arm rests
Sitting down can be facilitated by folding out the arm rests. If necessary you
can remove the arm rests altogether. After the person to be transported has
taken a seat you put the arm rests back into their original position.
19
escalino

6.6 Operation on level ground
After the person has been properly seated, you may transport him or her ef-
fortlessly on level ground (see picture). Make sure that the climbers are pul-
led in entirely.
FYou overcome a threshold by pulling the escalino backwards over it.
6.7 Tilting the stair climbing system
To drive on slopes or to climb stairs you must tilt the escalino, which can be
done easily by means of the climbers.
1. Turn on the escalino by pressing the ON/OFF key.
2. Press the UP/DOWN switch, direction DOWN until the climbers lift
the main wheels at least 1-2 cm off the floor (see picture).
3. Put your foot on the housing and tilt the escalino slightly toward you
until you feel that the escalino is balanced.
4. The escalino is balanced if you feel neither pull nor push in the hand-
les.
5. In order to drive on level ground, the climbers must be pulled in enti-
rely.
If you tilt the escalino further, or too much, the safety brakes engage and the
escalino can't be moved forward any more.
20
escalino
Table of contents