AAVARA PM4X4A User manual

PM4X4A
1080p HDMI Matrix 4X4
With 3D Video, 4 type Matrix mode & RS-232 control
Installation Guide
WWW.AAVARA.COM
AAVARA INNOVATION CORP.
ALL RIGHTS RESERVED
Rev 1.0

2
TABLE OF CONTENTS
Chapter 1 Introduction....................................... 3!
1.1 Features ......................................................... 3!
1.2 Technical Specifications................................. 4!
Chapter 2 Installation......................................... 5!
Chapter 3 Matrix Mode Dip Switch Setting ...... 6!
Chapter 4 RS-232 Command List...................... 9!
Chapter 5 Troubleshooting ............................. 10!

Chapter 1 Introduction
Aavara® PM4X4A 4x4 HDMIMatrix supports HDMI v1.4 3D Video Format, uncompressed resolution up to
1080p including multi-channel digital audio signal. Four inputs transmit high definition digital video and audio
signals to four displays in selection among. It is compliant with Blu-ray, DVD players, media players and
satellite set top boxes to any HDMI compatible display. Sources are accessible at all times to any display
when operating with the IR remote and RS-232 remote control. 4 type Matrix Mode Dip switch which can
adjust Matrix split rule to support all kind of installation configurations for both Commercial and Residential
application. PM4X4A matrix switching allows maximum versatility for integrated systems.
1.1 Features
•HDMI Specification 1.3b Compliant, with HDMI v1.4 3D Video Format support
•RS-232 control by PC or other RS-232 control panel for system integration
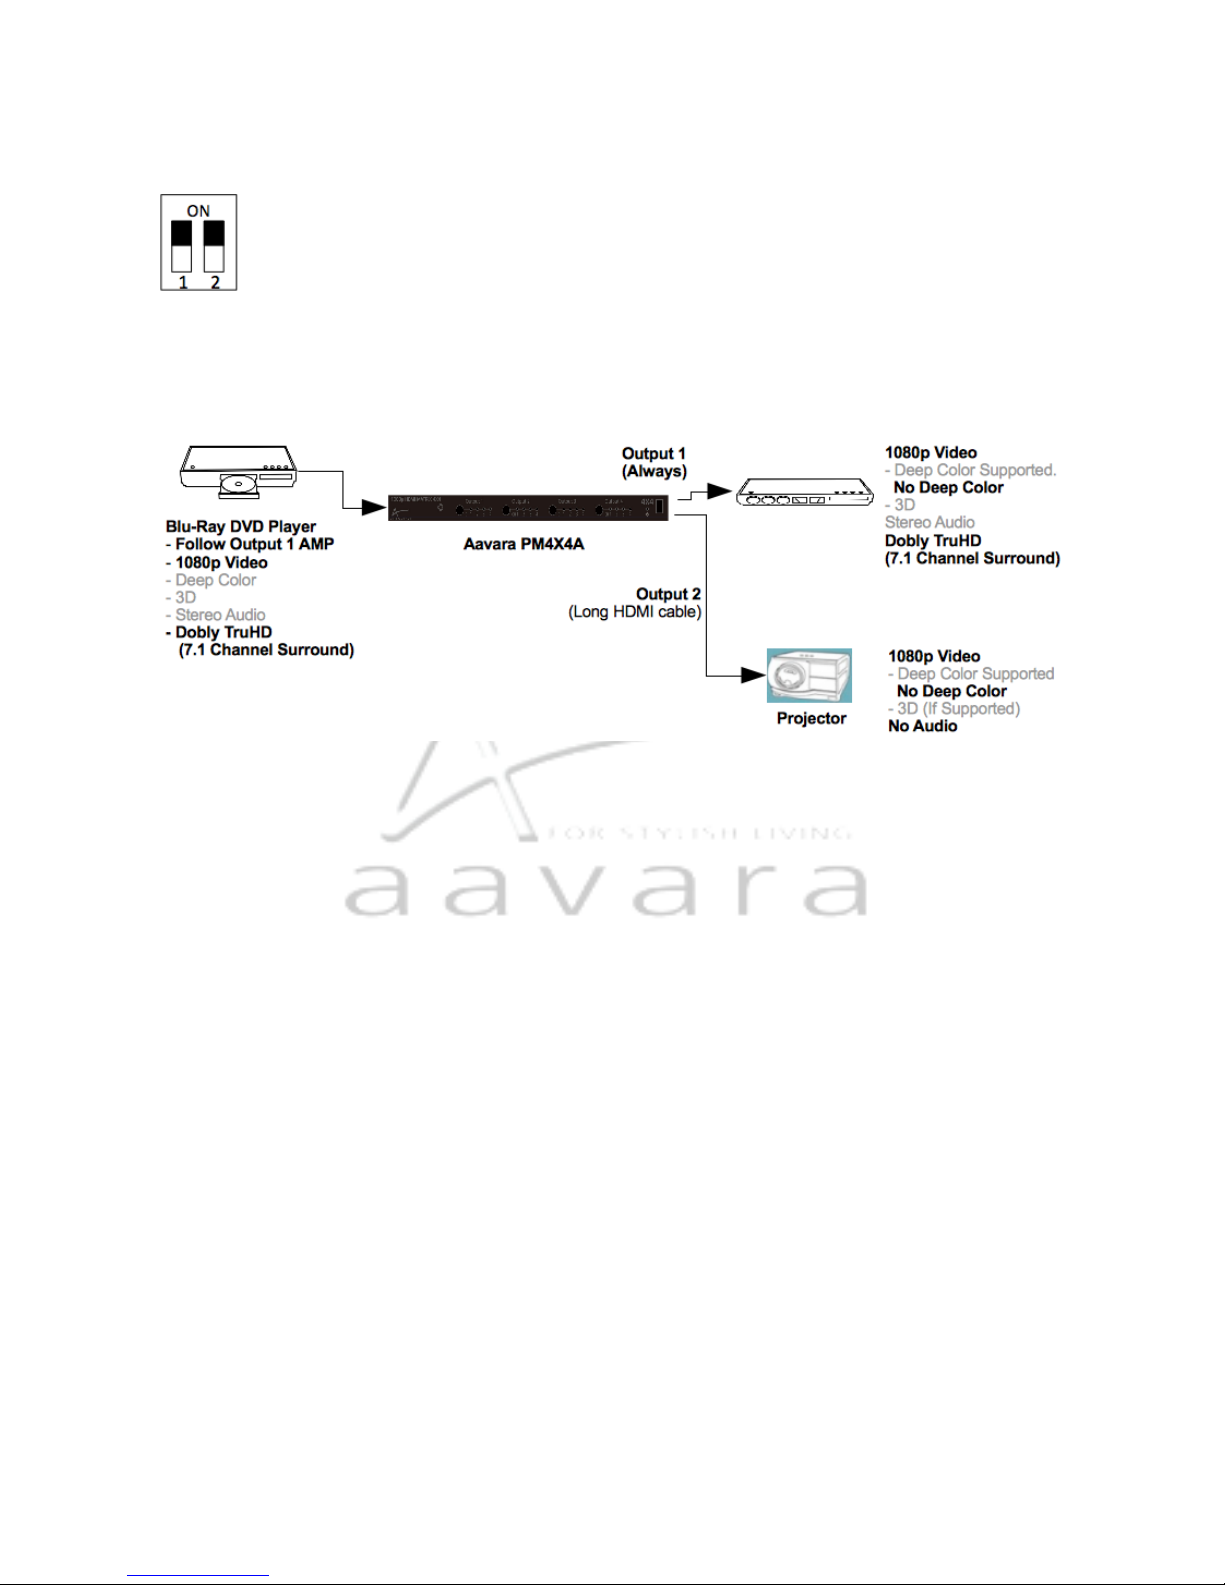
•Matrix Mode Dip switch can adjust Matrix split mode to following rule:
-Mode 1: Greatest Common Video Resolution & Audio Format made sure all displays will show video
correctly.
-Mode 2: Maximum Video and Audio output from Video source.
-Mode 3: Follow Output 1 Display, Video Source will handshake with Output 1 Display only and rest
display follow.
-Mode 4: Follow Output 1 Display, and Turn Off Deep Color. Video Source will handshake with Output 1
Display only and rest display follow. Which will reserve HDMI bandwidth for high quality multi-channel
Audio and improve long distance HDMI transmission stability.
•Support HDMI 36-bit Deep Color & x.v.Color wide color gamut
•Supports 480i, 480p, 576i, 576p, 720p, 1080i and 1080p resolution
•Freely to select one of four HDMI signal inputs by each Output displays/TV/projectors independently.
•Audio support Dolby® TrueHD & DTS-HD™ lossless 7.1 digital surround & Lip Sync
•DVI Specification 1.0 Compliant
•HDCP Rev1.2 specification Compliant
•Plug-and-play. Installs in seconds

4
1.2 Technical Specifications
Model No.
PM4X4A
HDMI Source Input
Port
HDMI Single Link, TMDS.
4
Display Device Output
Port
HDMI Single Link, TMDS.
4
Interface
Front Bezel:
-IR Receiver for IR Remote Control Matrix behavior
-4 Source Input Select Buttons & LED indicator for each HDMI Output
-Power LED Indicator
-Power Switch
Rear Bezel:
-DC Power Jack x 1
-USB port x 1 (for firmware upgrade only)
-HDMI Input Connector x 4
-HDMI Output Connector x 4
-Matrix Mode Dip Switch
-RS-232 x 1 (for Matrix control only)
Video Bandwidth
225 MHz
Single Link Range
480i, 480p, 576i, 576p, 1080i, 1080p
HDCP Function
HDCP Rev. 1.2 Compliant
Cable Length
5M (in and Out respectively)
Operation temperature
+5ºC to +35ºC
Storage temperature
-20ºC to +60ºC
Humidity Range
5% to 90% RH
Signal Rate
6.75Gbps
Power Adapter
5 VDC
Enclosure
Metal
Dimension (mm)
390(W) x 163(D) x 27(H) mm
Net Weight (g)
1.7 Kg / 3.75lbs

5
Chapter 2 Installation
1. Plug 5V wall-mounted power supply into the wall outlet.
2. Plug 5V power supply into the HDMI Matrix’s power DC jack.
3. Connect the HDMI cablesfrom the HDMI video source device to the Matrix HDMI Inputs.
4. Connect the HDMI cablesfrom your HDMI Output to all TV/Display/Projectors.
5. Select Matrix mode that fit your application/configuration and adjust Matrix mode dip switch.
Please refer Chapter 3 section for Matrix mode dip switch setting.
Made sure correct Matrix mode selected and correct dip switch setting.
6. Optional. Connect Rs-232 communication between PC/Control Panel and Matrix.
Please refer Chapter 4 section for RS-232 command list.
7. Power on the HDMI Matrix.
8. Power on your HDMI Displays.
9. Power on your HDMI Sources.

6
Chapter 3 Matrix Mode Dip Switch Setting
For multiple outputs selected same source input, PM4X4A provide 4 type Matrix mode
dip switch setting for fitting all kind of application/installation requirement.
Mode 1 (default,1Off,2Off)
Greatest Common Video resolution & Audio format made sure all displays
will show video correctly.
Matrix HDMI Input has connected to more than 1 HDMI Output to TV/Display/Projector,
Matrix will do EDID handshake between Video Source Device and all connected
TV/Display/Projectors.
Mode 2 (1On,2Off)
Maximum Video and Audio Output from Video Source Device.
Which support AV Receiver/Amplifier connected at one of Matrix HDMI output, to ensure
TV/Display/Projector got best Video output, and AV Receiver got maximum Audio output
(Multi-channel surround sound) without limitation of Stereo Audio capability of
TV/Display/Projector. Example:
* TV shall have no sound, since TV is not support 7.1 channel audio.
Suggest to turn TV Mute to prevent noise may happen.
** If Blu-Ray Player and TV are HDMI 3D video supported, but AV Receiver/AMP not 3D video compatible,
AV Receiver / AMP may have no sound output when Blu-Ray player and TV turn on 3D video. Please check
your AV Receiver / AMP vendor for further HDMI 3D video compatible info and further support required.

7
Mode 3 (1Off,2On)
Follow Output 1 Display, Video Source will handshake with Output 1
Display only and rest of Output displays follow.
By using Output 1 Display’s (which installer can sure EDID compatibility) Maximum Video
and Audio capability to drive Video Source Device handshaking and output format, for
ensuring the video resolution and audio format to all TV/displays/projectors/AV
Receiver/AMP at same source input as planned. The outcome will be the Greatest
Common Video resolution and Audio format between Output 1 Display and Video Source
Device.
Example: AV Receiver or AMP follow Output 1 TV for Stereo output.
Example: Follow Output 1 TV to ensure all displays got same 1080i resolution
*Notice, other HDMI Output Displays will show no video or no audio, if Output 1 Display has
higher resolution or audio format spec. supported.

8
Mode 4 (1 On, 2 On)
Follow Output 1 Display, and Turn Off Deep Color Output.
Which will reserve HDMI bandwidth for high quality multi-channel Audio and
improve long distance HDMI transmission stability. Also prevent noise may have when
Deep Color enable and low HDMI transmission quality may have (which cause long
distance HDMI cable, or HDMI extender applied in installation).

9
Chapter 4 RS-232 Command List
ASCII
Select
Output
Select
Source port
Binary
Memo
1
1
00110001
2
2
00110010
3
3
00110011
4
1
4
00110100
HDMI Output 1 switch to HDMI ? Input
5
1
00110101
6
2
00110110
7
3
00110111
8
2
4
00111000
HDMI Output 2 switch to HDMI ? Input
9
1
00111001
a
2
01100001
b
3
01100010
c
3
4
01100011
HDMI Output 3 switch to HDMI ? Input
d
1
01100100
e
2
01100101
f
3
01100110
g
4
4
01100111
HDMI Output 4 Switch to HDMI ? Input
h
1~4
1
01101000
All Output Switch to Input 1
i
1~4
2
01101001
All Output Switch to Input 2
j
1~4
3
01101010
All Output Switch to Input 3
k
1~4
4
01101011
All Output Switch to Input 4
I
01101100
Show Status:
Output 1 from input ?
Output 2 from Input ?
Output 3 from Input ?
Output 4 from Input ?
RS-232 Setting:
Boud rate: 19200 bps
Data bits: 8 bits
Partity: None
Stop bis: 1
Flow Control: None

10
Chapter 5 Troubleshooting
Problem
Solution
HDMI Matrix does not
work
1. Make sure the 5V power is plugged in Matrix DC in.
2. Check to see if the Power LED indicator is on.
No Signal or No Audio
output on one or several
of TV/display
1. Check and secure HDMI cable connection between display and Matrix.
2. Check Matrix mode dip switch setting. If Mode 2, 3 or 4 selected, be sure the display without
video or audio can accept the video resolution & audio format. To adjust Matrix mode or
video source output for ensure video & audio format compatible to display wanted.
RS-232 communication
not working
1. Double check on RS-232 port setting on Chapter 4, ensure all setting correct.
2. Made sure correct COM port used for communicate with Matrix.
3. Double check RS-232 cable used are good one.
4. If using USB to RS-232 covert cable/adapter, double check on driver installed properly.
IR Remote not work
1. Made sure IR Remote is toward to Matrix front bezel at left corner.
2. Check whether IR Remote working or not by using mobile phone camera or PC webcam,
see whether it blaze white/purple light when push IR Remote button.
-Change the battery of IR remote with new CR2025 (3V) LITHIUM battery.
-If Change the battery of IR remote still not working, the IR remote may already damage.
No Signal or poor picture
1. Make sure your video display is HDCP compliant.
2. Plug your HDMI cable to source and display directly, if there is no signal or poor picture,
please change another cable.
3. Make sure all HDMI connectors are tightly secured to all HDMI ports.
4. Turn off all equipments and restart all equipments.
※If the HDMI Matrix has HDCP compliant issue, please contact your video source device and display/projector seller for
HDCP compliant.
ALL RIGHTS RESERVED. 2011 AAVARA INNOVATION CORP.
Table of contents
Other AAVARA Switch manuals