Abbey Machinery Slurry Tanker Guide

Slurry Tanker

2
ABBEY TANKER PDI. CHART
This Dealer pre-delivery inspection chart is to be completed and signed by the dealer or their representative
before the machine is supplied to the customer.
Complete the Slurry Tanker PDI Chart
Model _____________________________ Date__________________ Serial No. _______________
Tick box below after item is checked
Check all hydraulic connections.
Check opening and closing of all gate valves:
Rod is fully opening vertically and not kicking left or right
Lollypop is not getting jammed in housing
No visible oil leak
50mm of tread visible above spring
Check hydraulic brakes by connecting the standard female brake fitting to the tractor and ensure they
operate properly.
Check all Gearbox Oil Levels in the pump.
Check pump control handle operation and its securing bolts.
Check wheel studs are torqued correctly, axle bolts hand brake.
Check play on wheel bearings by rocking the wheels and check tyre pressures.
Check bolt on hitch bolts where fitted (optional).
Check all hose clips.
Check all safety guarding and devices are fitted, and in good working order.
Check all lubrication points and grease sprung drawbar where fitted (optional).
Check all lighting is working correctly.
Check and ensure the right PTO shaft is cut to the correct length.
Check the oil lubrication drop rate while running the pump and the pressure setting on the tank
manometer gauge.
Check for air leaks in the tank when tank is pressurised.
Visually check the tandem under carriage (if fitted) and make sure all bolts are tight and all hydraulic
fittings are tight.
Check all U-bolts are tight on tandem axles (if fitted).
Check splash plate is adjusted correctly.
Check the machine overall visually and that a copy of the instruction manual is being supplied to the
customer with the machine.
P.D.I. For Additional Attachments if Fitted
Auto-filler
Check the Sequence valves are operating correctly and adjust if required.
Adjust arm to the right height for the pod when it is hitched up to customers tractor
Hydraulic Top Fill Hatch
Check function of Hydraulic top fill and clamp nut sealing the door

3
P.D.I. For Additional Attachments if Fitted (Con’d)
Boom Arm
Check hydraulic operation lifting/lowering and Swiveling
Check chain and sprocket are aligned correctly
Docking Station
Prime docking station by following the instructions in this manual
Set auto filler arm height to suit hopper
Centivac System with rain run fitted
Check gearbox oil level
Check function of the hydraulic motor
DCI Arm
Arm functions properly and clamps securely into pod
Turbo Pump
Check gearbox oil level
Function of hydraulic functions in sequence
In-Cab Electric Control Valves
Check each hydraulic function is working correctly
Check wiring and hose routing cannot be fouled
Mount control box in cab and explain functions to the customer
Air over Hydraulics
Test brakes on air only
Check that tractor is building up required pressure
Auto Weight Transfer System
Check function of additional feature
Sign below after working through the above check list, and log on to www.abbeymachinery.com dealer section
to register this machine.
N.B. Machine must be registered for warranty purposes.
Signature:_________________________________

4
Instruction Manual Contents
Section No.
Page No.
1.0
Function of the Tanks
5
2.0
Working With Slurry Safety Warning
6
3.0
Safety Warning
3.1 Slurry Tanker Noise Levels
8
3.2 Machine Safety Labels
9
4.0
Setting up for Use
4.1 Vacuum Tanks
11
4.2 Open Top Tanks
12
4.3 Extra components
12
5.0
Operating Instructions
5.1 Vacuum System
19
5.2 Centivac System
20
5.3 Open Top Tanks
23
5.4 Top Fill Hatches
23
5.5 Auto-Filler Unit
24
5.6 Steering Axle Tandem Tanks
29
6.0
Tanker Care and Maintenance
31
7.0
Vacuum Pump
7.1 Use
37
7.2 Maintenance
40
8.0
Replacement Parts
42
9.0
Trouble Shooting
68
10.0
Warranty & EC Declaration of Conf.
70
11.0
Terms and conditions
71
*** IMPORTANT NOTICE ***
1. Drawings in this manual are not to scale.
2. While every care is taken to ensure that all information in this manual is correct, the manufacturer
cannot be held responsible for any errors or emissions therein.
3. When ordering parts ensure you have the correct reference number and also the serial number of the
tank.

5
THE RANGE OF ABBEY TANKS INCLUDE
Vacuum Tanks, Centivac Tanks, Open Top Tanks, & Injection Tanks.
1.0 THE FUNCTION OF THE TANKS
The Abbey vacuum tank is a trailed machine which is capable of independently transporting liquid slurries from
one area to another. The tanks are designed solely for agricultural use, but may in certain circumstances be
used for transporting liquids for other purposes i.e. water, sewage sludge’s. It may be noted that the standard
Abbey tank has not been designed to travel at speeds over 40 km/h.
The principle of the standard Abbey vacuum tank is to suck slurry into the tank, transport it and then either
land spread it or dispose of it in a safe legal manner. The tank design was solely built for this function and
should be operated within the limits of the instruction manual.
The centivac tank is based on the same principle as the standard vacuum tank, and can be used for land
spreading of slurries. The Abbey centivac tank uses a second pump whereby the liquid can be land spread via a
raingun which is mounted on the side of the tank. This raingun should be used in line with the regulations of
the particular EC country in question.
The open top tank is a non-pressurised tank which is filled through a hopper shaped opening in the top of the
tank. The Abbey topfill slurry pump can be used for this purpose. The slurry can then be spread using a splash
plate which is mounted on the back of the tank.
The Abbey applicator tank works on the same principle of the standard vacuum tank. The slurry is
placed/injected into the ground with the use of a purpose built machine fitted to the back of the tanker
chassis.
The above descriptions of the functions of each tank, are provided to show how each tank can be used.
Further detail on the tanks and their variations can be found on the relevant sales leaflets.
* IMPORTANT
READ INSTRUCTIONS CAREFULLY BEFORE OPERATING THIS MACHINE
* The entire manual must be read and understood before operating this machine. If there is confusion about
the safe operation of any part of the machine, contact your dealer before operating it.

6
2.0 WORKING WITH SLURRY SAFTEY WARNING
Unless adequate precautions are taken Liquid Manure Storage can pose a threat to the safety of both people
and livestock. Slurry Tanks can contain gases which are produced by the decomposition of the slurry. These
gases have been known to kill persons entering Slurry Storage Tanks as well as animals on slats above tanks
which are being agitated.
To ensure the safety of persons working in and around Slurry Tanks, the following precautions should be taken
during mixing and emptying.
1. Don’t allow Slurry to rise to the level of the slats.
2. If silage effluent is added to Slurry this should be done slowly with the minimum of agitation.
Caution: Dangerous gases can be released when slurry is agitated.
3. Provide good ventilation when mixing slurry inside a slatted house.
4. Never enter a tank unless it has been thoroughly ventilated, slurry may give off poisonous gases.
5. If you must enter a tank then wear a safety harness with a lifeline held by two men.
6. Airline breathing equipment should be worn where continuous adequate ventilation is not possible.
7. Lift the minimum number of slats to permit access for the tanker pipe, pump or mixer. Where the
slats have been lifted erect temporary barriers to stop anyone falling into the tank.
8. Do not stand over openings when slurry is being agitated or loaded.
9. Secure the suction hose so that it cannot fall into the pit or tank.
10. One of the gases produced can be flammable so do not smoke or use naked flames, near slurry
equipment, when entering a slurry tank or near manholes of underground tanks.
11. Avoid driving heavy tractors and slurry tankers over slats which are only designed to carry livestock.
12. All livestock must be removed from slatted houses before slurry is agitated, and must remain out of
the house until all gases have dispersed from the ventilated house.
13. Never leave slurry tanks unsecured especially if young children are around.
14. Slurry can have the potential to cause intoxication asphyxiation, or explosions in badly ventilated
buildings.

7
1. Top Ball Valve
2. Manometer Gauge
3. Front Ball Valve
4. Pressure Relief Valve
5. Pump Control Handle
6. Oil Drip Feed Adjustment
7. Sight Glass
8. Ram & Spring Assembly
9. Inlet Valve
10. 2” High Pressure Hose Attachment
11. 6” Outlet

8
3.0 SAFETY WARNING
1) Ensure that the tractor PT0 shield and pump PTO guard are in place and the PT0 shaft guard is fitted
properly.
2) PTO guards should be kept well lubricated, refer to the accompanying leaflet for operating and
maintenance instructions on the shaft.
3) Do not operate the manual control on the rear valve or open the rear manhole while the tanker is
pressurised high pressure liquid could cause injury.
4) Operators should be trained and know how to use the tanker controls while standing as far away as
possible from the revolving shaft.
5) Suitable close-fitting clothing should be worn with no loose fabric to catch in the shaft.
6) Take care to match the tractor horsepower to tanker on soft sloping ground to prevent dangerous
uncontrollable situations from occurring.
7) If you have any doubts as to the safety operation of the Slurry Tanker advice should be sought from
your local dealer or direct from the Manufacturer.
8) Caution: Never enter a tanker to clean or inspect it unless it has been thoroughly ventilated. Any
gases that have remained in the tank after working it can be lethal.
9) When opening or inspecting the manual or hydraulic top fill point (if fitted), caution should be taken
to avoid falling from such a height.
10) If a ladder is fitted to the tank it must not be used while the tank is working or pressurised.
11) Do not operate the tank with excessively worn hitch eye. Replace it! The hitch eye should be checked
regularly particularly on tanks used for long periods during the season.
12) Damaged or worn hydraulic hoses should be replaced.
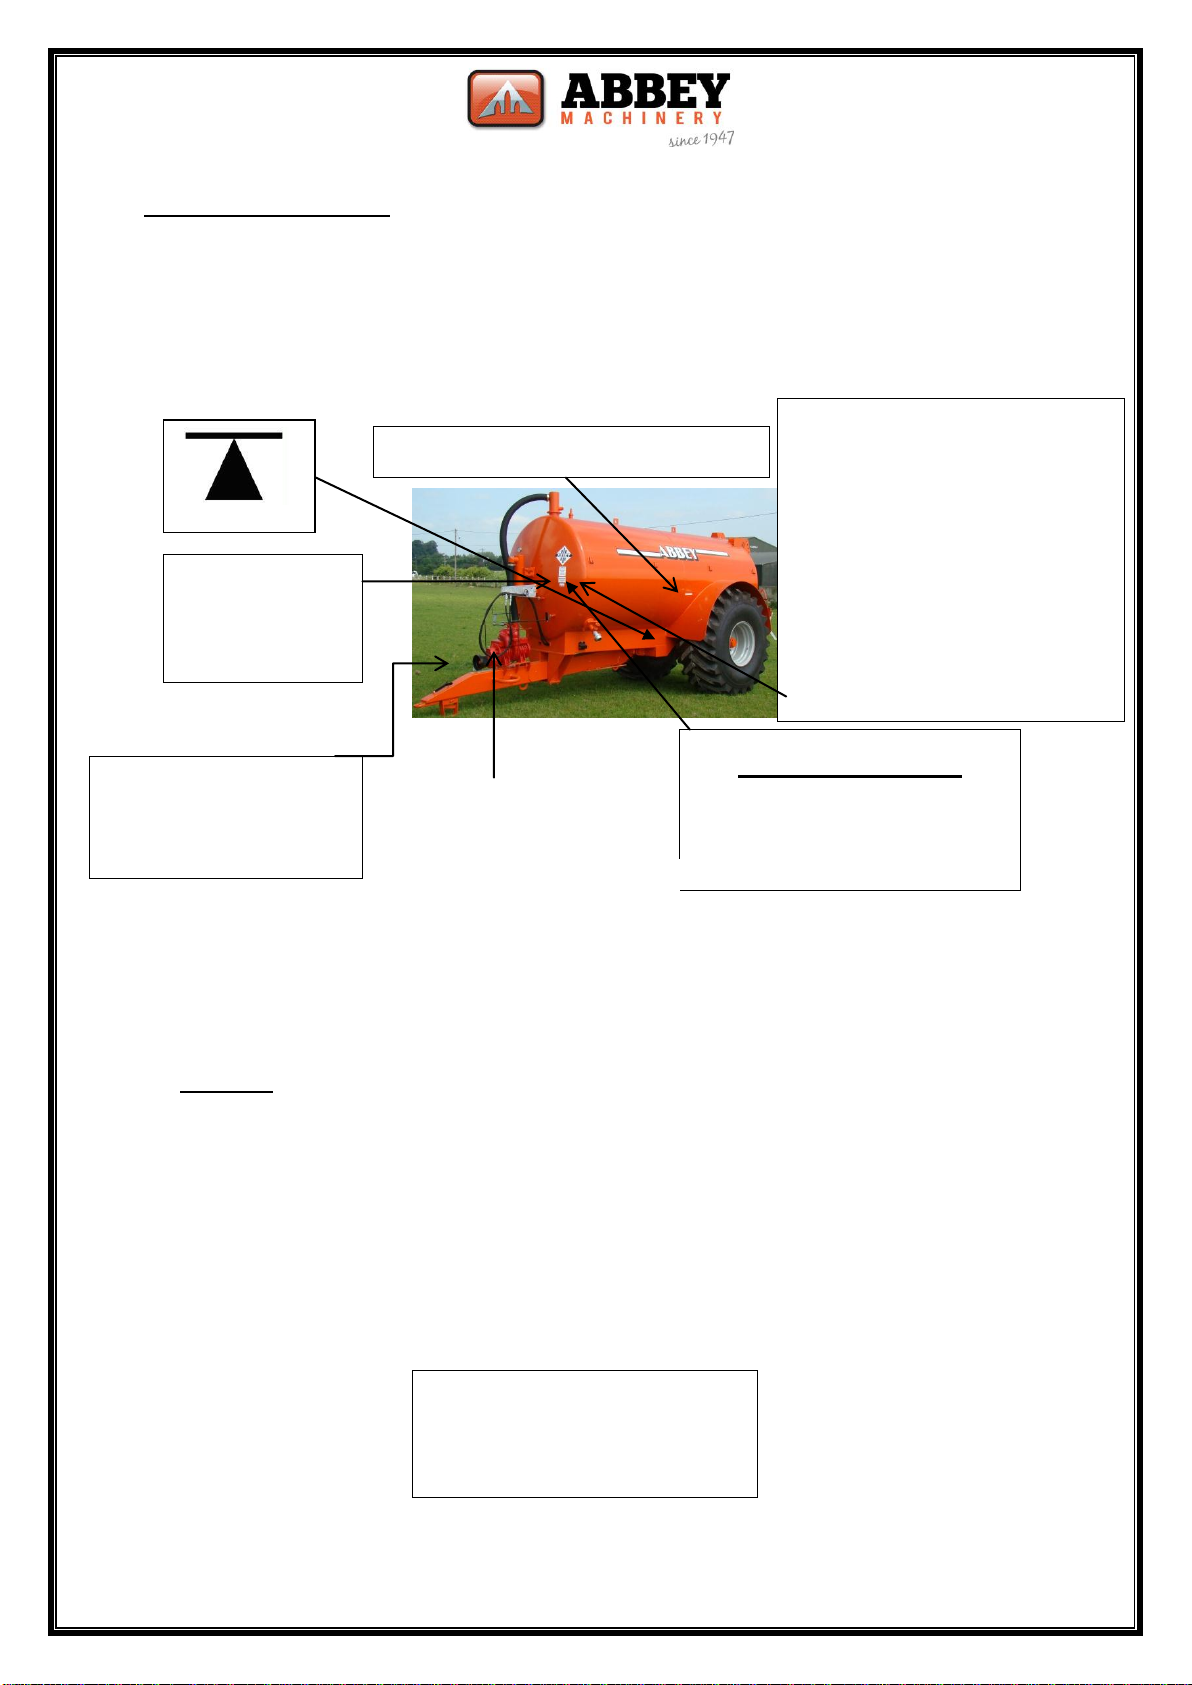
13) Both standard lifting points on the top of the barrel of the tank must be used if the tank is to be lifted
off the ground. Drawing A, page 8 shows the positions of the lifting points.
14) Never operate the tank in an unsafe manner.
15) Warning - Under no circumstances should the pump guard be used as a step.
16) Do not attempt to approach any part of the power shaft while it is working.
17) Caution: The Abbey tank has not been designed to travel at speeds over 40 km/hr and should be used
in line with the road regulations regarding trailed machines in your particular country. If you require
the tank to operate at speeds higher than this contact your Abbey dealer. Purpose built tankers will
be required.
18) The PT0 shaft is to be left on the stand provided, when the machine is not in use to prevent the shaft
guard from being damaged.
19) Caution: Before carrying out maintenance or adjustment on the Abbey tank, stop the tractor, apply
both the tractor and tank parking brakes, and disconnect the PTO shaft.
20) Caution: Always regularly check that the lights are working correctly when using the machine on the
road.
3.1 Slurry Tanker Noise Levels
Continuous A-weighted sound level at workstations. Noise levels exceed 70 db(a)
Peak C-weighted instantaneous sound pressure exceeds 63pa.
Caution: The necessary protective devices should be worn when operating the machine if required.

9
3.0 SAFETY WARNING (Con’d)
3.2 Machine Safety Labels
The machine safety labels shown in this section are placed in important areas on your machine to draw
attention to potential safety hazards.
Tank:
1. Keep wheel nut tight and check at regular intervals
2.
Max working pressure of this machine
Be aware that you are working with toxic fumes
When not using Tanker, leave pump handle in the neutral position
3. Important that you read and understand this instruction manual before operating this machine
4. Handle position indicator:
Handle in spread, Pump pressures tank
Handle in neutral, Free flow of air through pump
Handle in Fill, Pump creates a vacuum in tank
5. Max Tractor input PTO speed
6. Max Tanker speed
7. Lifting Point/Jacking point/Support Point
On 2500R and 3000R Tankers on Back dome:
Tanker should not be filled above the level of this sight glass when going on the public road
IMPORTANT
READ INSTRUCTIONS
CAREFULLY BEFORE
OPERATING THIS
MACHINE
MAX. WORKING
PRESSURE NOT TO
EXCEED 0.5 BAR
BEWARE OF TOXIC
FUMES WHEN WORKING
WITH SLURRY
WHEN NOT IN USE LEAVE
PUMP HANDLE IN CENTRE
POSITION
DO NOT
EXCEED40
K.P.H.
Keep Wheel Nuts Tight
MAX P.TO.
SPEED
540 R.P.M.
TANKER SHOULD NOT BE
FILLED ABOVE THIS
LEVEL WHEN USING ON
PUBLIC HIGHWAY
Spread
Neutral Fill
1.
2.
3.
4.
5.
6.
7.

10
3.0 SAFETY WARNING (Con’d)
Additional if Ladder or Rain Gun fitted:
Never use the hydraulic rain gun attached
When machine is moving orbeing to the tanker near overhead power lines
operated do not climb the ladder
Tandem Tankers:
Bolts on bogie to be kept tight and checked at regular intervals
PTO:
PTO Shaft Warning
Pump:
Vacuum Pump Safety Warnings
DO NOT
CLIMB
LADDER
WHILE
MACHINE IS
WORKING
DANGER!
NEVER USE RAINGUN
NEAR OVER HEAD
POWER LINES
Bogie ‘U’ bolts, undercarriage nuts
and wheel nuts to be kept tight

11
4.0 SETTING UP FOR USE
4.1 VACUUM TANKS
a) Connect Tanker to Tractor on pick-up Hitch or Draw bar. Measure P.T.O. Shaft leaving minimum 3” of
closure to allow turning circle and shaft closing. Ensure P.T.O. Guards are fitted. If connecting to a
tractor drawbar the necessary hitch eye reducer bush must be used.
b) Connect the following and check that they are working correctly. The tank hydraulic brakes and the
pump control (if fitted) to the external services of the tractor. The hydraulic rear valve to the external
services and connect the tank lights to the tractor.
c) Check that all valves and hoses are operational. Test run tanker with Control lever set in pressure
position to ensure that there are no leaks. Check rear inspection door. Should this door develop Air
Leak at any stage, the adjustable locking clamps can be tightened. If this does not resolve the problem
remove the door rubber seal and check that it is intact.
d) Check that wheel nuts are tight and hubs are greased. R = Remould N = New
Check Tyre Pressures:
16.5 x 22.5
R
43 P.SJ.
560/60 R 22.5
N
58 P.S.I.
1300 x 530/533
N
51 P.SJ.
600/55 R26.5
N
36 P.S.I.
400R 22.5
R
60 P.S.I.
650/55 R26.5
N
58 P.S.I.
15R x 22.5
R
60 P.S.I.
710/50 R26.5
N
58 P.S.I.
18.4 x 26
N
30 P.S.I.
425/65 R22.5
N
90 P.S.I.
22/ 70x20
(Mode 1100)
N
30 P.S.I.
21.3 x 24
N
36 P.S.I.
22/ 70x20
(Model 1600)
N
35 P.S.I.
23.1 x 26
N
36 P.S.I.
550/60-22.5
N
36 P.S.I.
28.1 x 26
N
36 P.S.I.
30.5 x 32
N
36 P.S.I.
e) Daily check wheel nuts on the tank after every load for the first week, tighten if necessary.
f) Important: On Tandem Tankers the suspension U Bolts and wheel nuts should be re-tightened after
first 5/10 miles and then checked weekly thereafter.
Suggested torque settings are shown below:
Tightening Torque (duNm=Kpm)
M14 x 1.4
13
M16 x 1.5
20
M18 x 1.5
27
M20 x 1.5
35
M22 x 1.5
45
M22 x 2
43
M24 x 1.5
55

12
4.0 SETTING UP FOR USE (con’d)
4.2 OPEN TOP TANKS
i. Connect the tanker to the tractor pick-up hitch. Measure the P.T.O. shaft as above and ensure all
guards are in place.
ii. Connect up the hydraulic brakes and the tank lights, and check both are working.
iii. Test run the tank before filling and check the wheels as per (d) on page 11.
4.3 EXTRA COMPONENTS (IF FITTED)
Top Fill Hatch
1. Ensure the hatch is clamped tightly and is sealed fully while pressurising the tank.
2. If the hatch is hydraulically operated connect the marked hoses to the tractor, and check to ensure it
is sealed. Adjustments can be made by increasing or reducing the top link length.
Centivac System - Danger! Never operate the rain gun near overhead power lines.
1. Running the Centrifugal pump dry for prolonged periods will cause over-heating.
2. Connect up the marked hydraulic hoses of the rain gun to the tractor (if fitted).
3. Rotate the rain gun through 360 Degree’s and check to see if it functions correctly
4. When working the pump ensure liquid is allowed to drip from the centrifugal pump shaft to lubricate
the graphite cord/packing, This is not necessary when the pump is fitted with a mechanical seal.
Hydraulic Break Away Brake
Before using the tanker fitted with the hydraulic break away system, the following check should be used to
ensure it operates correctly. Also the complete brake system needs to be checked at regular intervals and
parts replaced and maintained (i.e. leaking cylinders, worn brake shoes, incorrectly set brakes) for this system
to work properly.
Connect the brake connection to the tractor and ensure it is firmly plugged into the point on the tanker.
Connect the cable to the tractor. Adjust the cable to a suitable length allowing a minimum amount of slack.
Make sure the system is set to the normal braking position. Switch on the tractor and press the brake pedal in
the tractor fully for 10 seconds to charge the brake line and fail safe system.
If tractor disconnects from the tanker accidentally the cable will pull out and automatically apply the tanker
brakes.
Please note. Prior to disconnecting the brake hose from the tractor, relieve all pressure from the system by
operating the fail safe system a number of times.

13
4.0 SETTING UP FOR USE (con’d)
Docking Station
Double Valves open automatically
as the station is pushed down by
the self-fill arm.
Flexible suction hose feeding the
station
Priming the station
Slowly pressurise the system fully and
the valves will open.
Then dump the pressure and allow
the station lower to a pre-set height.
A typical setting is 700mm. Both gate
valves should close as it is lowered.
Close the ball valve to retain the
pressure and now the station is ready
for use.
When the arm lowers the tanker
side valve will open
automatically
Carefully read and understand fully the Abbey instructions prior to operating this machine.
Principles of the Station
Slowly forcing the self-filler arm into the docking station hopper and pushing down will cause the double gate
valves to open automatically and allow the tanker to be filled.
When the tanker is full, raising the self-fill arm will gradually allow the docking station shut off.
Caution Pressurised System.
No maintenance should be carried out, without relieving the systems of its working pressure.

14
4.0 SETTING UP FOR USE (con’d)
Docking Station (Con’d)
Aligning the Arm
Align the arm rubber boot with the hopper near edge.
Without the suction hose connected to the station, push the arm
into the hopper and ensure the double valves operate and the
docking station castors are free to manoeuvre to suit the arm.
Carefully read and understand fully the Abbey instructions prior to operating this machine.
Re Set the Docking Station as follows
For storage or transport it may be necessary to vent the pressure from the system.
To re set. Connect a hose to the hopper and an available tractor, open the hydraulic ball valve and slowly prime the
system. This will cause the docking station to raise and the 6” valves to open fully (a good time to flush out the pipe
work with water).
Now dump the system pressure which will allow the valves close and the hopper lower to a pre-set height. At this
height (typically 700 mm) shut off the ball valve to retain the pressure. The docking station is ready for use. Always
make a dry run to align the arm before connecting the suction hose.
Always wash down the unit after use to ensure proper operation.
Both Valves open as the arm pushes down.

15
4.0 SETTING UP FOR USE (con’d)
Electronic & Electric Controls
Rear mounted quick release
clip for quick transfer
between tractors.
The following functions are possible with this standard electric diverter
box ( standard on trailing shoe).
Please note with this unit, the tractor still controls the hydraulic service
and the box acts to divert the oil to a different function.
5 standard functions can be operated here,
Locking and unlocking electro hydraulic valves.
Trailing shoe work & fold diverter
C. filter (Rota cut) & rear spread valve diverter
A total of 4 hoses will run between tractor and tanker.
The following 8 functions can be operated on the tanker
version. Gate valves x2, hydraulic top fill, Trailing shoe
working and folding. Inlet turbo pump or rota cut filters.
Self-Filler units and tandem axle steering.
A feeder version is also available with other functions.
Hydraulic Valve Banks
Typically the Electronic control is linked to a hydraulic valve bank via a
junction box. See over leaf.
All logic is controlled by this unit and fault finding is simplified with the
internal lighted circuit.
Simple LED’s in the Hirschman plugs on solenoid valves also simplify
trouble shooting.
The Electric Control is linked to simple hydraulic diverters
All functions can be controlled individually by one cab
mounted wired unit. Which controls a valve bank on the
machine, via an electronic junction box.
A hydraulic feed and return hose are all that is required
between tractor and tanker
Continuous operation
of motor functions

16
4.0 SETTING UP FOR USE (con’d)
Components in the Electronic Control System
Automated Hydro Electric
Full electro hydraulic control of all tanker functions.
Full electronic control of application rates with the use of a flow meter, electric actuator and wheel sensor. This
allows the control of the exact application rate required and automatically maintains this rate independent of
forward speed changes.
Cab mounted controller
Controls all hydraulic functions with application rate data being recorded and
application rates controlled as the tanker is spreading.
Above are the electro hydraulic solenoids operated by the cab controller to work the hydraulic functions on the
tanker.
The cab mounted electronic unit, controls all the solenoids on an individual basis via the blue junction box on
the right side of this photo.
More complex systems like load sensing hydraulic valve banks for power beyond systems can be included if
required.
Small cetop 3 solenoids control
the minor functions while cetop
5 solenoids are preferred for
motor functions

17
4.0 SETTING UP FOR USE (con’d)
Forced Steering
Mounting clevis.
Horizontal distance of approx 240mm
from pin to pickup hook
Control rod
Adjustable in length to suit the
tractor
Control rod mounting
Preferably under the level of the pick up hook.
Allows good Clearance with chassis
Tractor Pickup hitch, new control rod
to be fabricated beside it.
Carefully read and understand fully the Abbey instructions prior to operating this machine.
Mounting the control rod position on the tractor for forced steering
The hitch position for the control rod will need to be fitted beside the tractor hitch.
A horizontal dimension of 240mm from the hook centre to the mounting pin of the control rod should be
maintained. It is preferable to mount the control Rod position lower than the pickup hook for max clearance
between the rod and any chassis parts it could collide with.
Caution Pressurised System.
No maintenance should be carried out with relieving the systems of its working pressure.
Fitting the control rod mounting

18
4.0 SETTING UP FOR USE (con’d)
Re Setting Forced Steering
Carefully read and understand fully the Abbey instructions prior to operating this machine.
Re Set the steering as follows
Release all hydraulic pressure from the system, and remove the steering locking bracket from the steering rams if
factory fitted for transport.
Drive the tractor and feeder forward on a level surface, in a straight line to align all axles ( with no pressure in the
system).
Now adjust the length of the control rod between the tractor and machine, until the control ram under the front of
the chassis has stroked half its length. Lock all positions tabs on the control rod to prevent it varying in length, when
the locking pin assembly is faced away from the chassis. Once adjusted to suit a particular tractor, no further
adjustment of the control rod is required. Use the locking pin in future to hitch the machine to the tractor.
Open the ball valves to prime the steering system. Keep pressurising the system until the pressure clocks read 80
bar. Close all taps and test the steering system by driving the tractor at low speeds to ensure it is working correctly,
both in forward and reverse directions.
Adjust the length of the control rod until the control ram is stroked half its
length.175mm for this ram
Remove steering locking bracket
First time setup. Remove locking bracket.
Release all pressure from the system.
Drive the tractor and feeder forward in a straight line for approx. 30m. To
make sure axles are in line with the tractor.

19
5.0 OPERATING INSTRUCTIONS
5.1 Vacuum System
VACUUM PUMP:It is recommended that the pump is run at maximum 250 R.P.M. for the first 3 hours of use.
This is important to ensure that all parts of the pump are well lubricated. It is also recommended that you
follow this procedure when the tanker has not been used for a long period of time.
1. Connect the suction hose to the inlet and ensure the other end is completely submerged in the slurry
Never allow the suction hose to touch the floor of the slurry tank.
2. Move the handle on the vacuum pump to the fill position so that it will create a vacuum in the tank.
3. Engage the P.T.O. and run at 400 R.PM.
4. After engaging the P.T.O. open the inlet valve.
5. Always ensure to set the screw on the pump oiler as per the vacuum pump use section 7.1.
6. When the tanker is full (i.e. slurry appears at the sight glass). The inlet gate valve should be closed and
the vacuum pump stopped (by disengaging the P.T.O). Safety ball valves protect the vacuum pump
from the slurry. but are not to be used to determine when the tank is full. If the tone of the pump
changes while it is working. Immediately close the inlet valve (the tank may be full).
7. Remove the suction hose, set up the spread plate and check all fill points are closed.
SPREADING
1. Move the handle on the pump to the central position for a few seconds until the vacuum is released.
Then set the pump handle into the spread position. This operation could be made at the end of the
filling sequence.
Note: Adjustment of the inverted spreader plate can be found on page 27.
2. To begin spreading engage the tractor P.T.O. at speed of 450 R.PM. Only use PT.O. to keep
Manometer at 0.6 Bar and Pressure Relief Valve open. lf revs, above this are used it will cause
excessive heat in the pump.
3. When Manometer gauge reads 0.5 BAR open outlet valve. Rate of application depends on forward
speed of the tractor and spreading plate setting.
When tank is empty close outlet valve and disengage P.T.O.
4. lf slurry is too thick to spread, agitate with an Abbey mixer or slurry pump .Water should also be
added to the slurry in the pit or lagoon to make it thinner while mixing.
5. CAUTION:
Disengage the PT.O. when turning.
Before opening the rear door or top-fill hatch, depressurise the tank by opening the rear valve.
(Never remove a sight glass while the tank is full or pressurised)

20
5.0 OPERATING INSTRUCTIONS (CONT.)
5.2 CENTIVAC SYSTEMS
To discharge tanker using rain gun.
1. Change handle on vacuum pump to central position, to release vacuum pressure.
2. Caution: Ensure P.T.O. shaft is disengaged.
3. Change handle on gearbox to centrifugal pump (i.e. rain gun).
4. Open delivery valve on discharge pipe and set 2” back pressure valve.
5. Engage PT.O. and commence spreading.
6. The rain gun can then be rotated 360° to the required position.
7. Empty the stone trap on the tank at regular intervals during the working day
8. When operating a Centivac tanker always engage the tractor P.T.O. at low rev’s when using the
Vacuum Pump to fill or spread. Revs can gradually be built up to the correct level after engaging the
P.T.O.
9. The same procedure for operating an D.C.I Arm.
Drawing A
Safety Warning
Standard Lifting Points
DCI POD
Centivac
Gearbox
DCI Arm
Table of contents
Popular Utility Vehicle manuals by other brands

Kubota
Kubota RTV 900 Operator's manual

Hammerhead
Hammerhead Twister UM250IIR owner's manual

Winget
Winget 2B1500 Operators Handbook & Parts

Husqvarna
Husqvarna HUV4421D owner's manual

Textron
Textron CUSHMAN ELECTRIC TUG E-Z-GO XI 340 Safety, operation & maintenance manual

Taylor-Dunn
Taylor-Dunn RE-380-36 Service and Replacement Parts Manual