manuals.online logo
Brands
  1. Home
  2. •
  3. Brands
  4. •
  5. Abble
  6. •
  7. Indoor Furnishing
  8. •
  9. Abble 300568 User manual

Abble 300568 User manual

ABBLE®

● Thank you for purchasing ABBLE® product.
● You are welcomed to visit www.abblestore.com for
more ABBLE® products.
● We are commi�ed to providing customers with quality
products and a good purchasing experience.
● Need any help regarding purchase or customer service,
please email us by [email protected]
(will be responded within 24 working hours) www.abblestore.com
SKU#300568
When using electrical products, basic precautions should always be followed including the
following:
1) To reduce the risk of fire, do not deliberately reposition either bulb or lampholder contact.
2) To reduce the risk of overheating, replace burned out lamps promptly. This is an electrical
product - not a toy! To avoid the risk of fire, burns, personal injury, and electric shock it should not
be played with or placed where small children can reach it.
3) Do not use seasonal products outdoors unless marked suitable for indoor and outdoor use.
When products are used in outdoor applications, connect the product to a Ground Fault Circuit
interrupting (GFCI) outlet. If one is not provided, contact a qualified electrician for proper installation.
4) This seasonal use product is not intended for permanent installation or use.
5) Do not mount or place near gas or electric heaters, fireplaces, candles or other similar sources of
heat.
6) Do not secure the wiring of the product with staples or nails, or place on sharp hooks or nails.
7) Do not let lamps rest on the supply cord or on any wire.
8) Unplug the product when leaving the house, when retiring for the night, or if left unattended.
9) Do not use this product for other than its intended use.
10) Do not hang ornaments or other objects from cord, wire, or light string.
11) Do not close doors or windows on the product or extension cord as this may damage the wire
insulation.
12) Do not cover the product with a cloth, paper or any material not part of the product when in use.
13) The product employs overload protection (fuse). A blown fuse indicates an overload or short
circuit situation. If the fuse blows, unplug the product from the outlet. Also unplug any additional
strings or products that may be attached to the product. Replace the fuse as per the user servicing
instructions (follow product marking for proper fuse rating) and check the product. If the replacement
fuse blows,a short circuit may be present and the product should be discarded.
Read and follow all instructions that are on the product or
provided with the product.
SAVE THESE INSTRUCTIONS
TROUBLESHOOTING:
If your tree does not light up, please check the following.
1. Check that all plugs are properly connected.
2. Check fuse in extension cord plug. If the fuse is burned out, please replace it with
spare fuse enclosed.
3. Check wall outlet for power.
4. Check for loose, missing, or broken bulbs.
STORAGE:
Unplug the product from the wall outlet and remove all ornaments and decorations.
(Except for decorations attached at manufacturer.)
Unplug each section of extension cord, keep each stack of lights connected together.
Gently lift off the top and middle sections, and remove the bottom section from the tree
stand. Carefully replece the tree in its box and tape it shut.
DO NOT STORE TREE IN A DAMP AREA OR IN AN AREA WHERE
THE TEMPERATURE EXCEEDS 100 F.
USER SERVICING INSTRUCTIONS:
BULB REPLACEMENT INSTRUCTIONS:
1. Make sure the light string is unplugged.
2. To unplug, grasp plug and remove from the receptacle or other outlet device.
Do not unplug by pulling the cord.
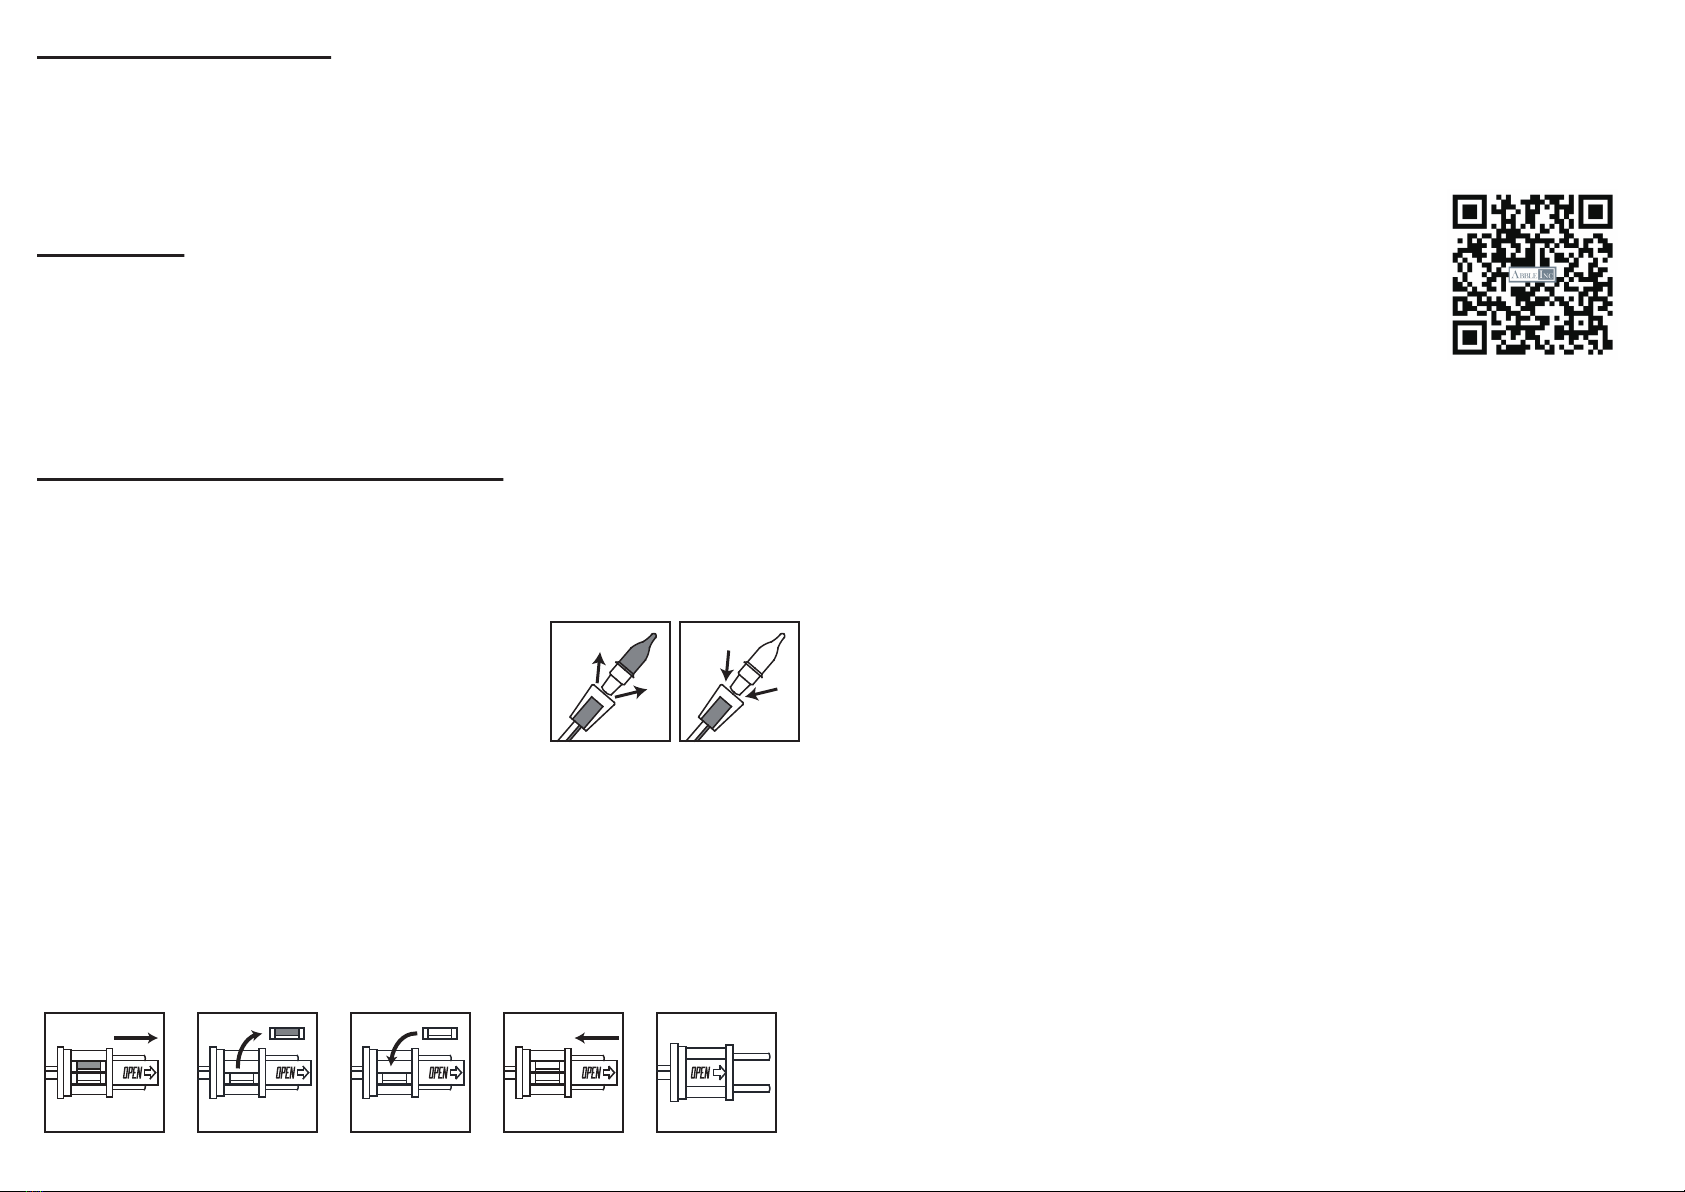
3. Allow bulb to cool. To remove bulb, pull bulb out of socket. (see below diagram)
CAUTION: To reduce the risk of overheating, replace
burned out lamps promptly.
Use 2.5volt, 0.425watt lamps only.
FUSE REPLACEMENT INSTRUCTIONS FOR EACH LIGHT STRING:
Risk of fire. Do not replace attachment plug. Contains a safety device (fuse) that should
not be removed. Discard product if the attachment plug is damaged.
1. Unplug product from the receptacle or other outlet device. Do not unplug by pulling
on cord.
2. Open fuse cover. Slide open fuse access cover on top of attachment plug toward
blades.
3. Remove fuse carefully.
4. Risk of fire. Replace fuse with 3 Amp, 125 Volt fuse (provided with this product.)
5. Close fuse cover: slide closed the fuse access cover on top of attachment plug.
Pull Bulb Out Replace Bulb
Burned Fuse New Fuse
1/44/4
IMPORTANT SAFETY INSTRUCTIONS FOR INDOOR USE ONLY
READ AND FOLLOW ALL SAFETY INSTRUCTIONS
3/42/4
1. Follow the stand assembly instructions to set up the tree stand.
a. Pull apart the legs of the stand so that they are X-shaped.
b. Screw the eye bolts through the hole of metal tabs. Turn screws so
they touch tree trunk. Stand tree up and straighten by adjusting
screws in or out then tighten screws.
2. Set section B to stand. Take all the hinged branches to unfold into
place. (See Fig. 1)
3. Shape the branches on the bottom section of your tree. Note that some
tree models have "side branches" attached to the main branch stem
that require additional shaping.
4. Insert tree top A into the hole (pole cap) on the top of the trunk of
section B.(See Fig.2) Take all the branches to be shaped.
Connect the plug (A1) on the light set on the tree top section into the
end-plug (B1) of the strings of section B. Shape the branches on the
tree top section.
5. After shaping the whole tree following the previous steps, step back
and take an overall look at the tree. Shift branches as necessary to fill
any gaps.
6. Now you can plug the B2 to a standard power outlet to perform the
tree for decoration.
PRE-LIT TREE ASSEMBLY INSTRUCTIONS:
USE AND CARE INSTRUCTIONS:
Before using or reusing, inspect product carefully. Discard any products that
have cut, damaged, or frayed wire insulation or cords, cracks in the lampholders,
loose connections, or exposed copper wire.
Before storing the product, carefully remove the product from wherever it is
placed to avoid any undue strain or stress on the product conductors,
connections, and wires.
When not in use, store neatly in a cool, dry location protected from sunlight.
A
B
B2
B1
A1
Fig. 1
Fig. 2
Fig. 3 Fig. 4 Fig. 5
side view
side branches
Eye Bolts
To Power Supply
1 2 Eye Bolts

Other Abble Indoor Furnishing manuals

Abble 300251 User manual

Abble

Abble 300251 User manual

Abble 300751 User manual

Abble

Abble 300751 User manual

Abble 300492 User manual

Abble

Abble 300492 User manual

Abble 300253-02 User manual

Abble

Abble 300253-02 User manual

Abble 300243 User manual

Abble

Abble 300243 User manual

Abble 300553 User manual

Abble

Abble 300553 User manual

Abble 300513-BLK User manual

Abble

Abble 300513-BLK User manual

Abble 300525 User manual

Abble

Abble 300525 User manual

Abble 300716 User manual

Abble

Abble 300716 User manual

Abble 300571 User manual

Abble

Abble 300571 User manual

Abble 300527 User manual

Abble

Abble 300527 User manual

Abble Tufted Round Cocktail Ottoman 300540 User manual

Abble

Abble Tufted Round Cocktail Ottoman 300540 User manual

Abble 300369 User manual

Abble

Abble 300369 User manual

Popular Indoor Furnishing manuals by other brands

Multimoveis baby 2323 Assembly instructions

Multimoveis

Multimoveis baby 2323 Assembly instructions

DURAVIT N1 4281 Mounting instructions

DURAVIT

DURAVIT N1 4281 Mounting instructions

Northbeam Adirondack Chair Kit With Pullout Ottoman Care Instructions

Northbeam

Northbeam Adirondack Chair Kit With Pullout Ottoman Care Instructions

Coaster 204691Q Assembly instruction

Coaster

Coaster 204691Q Assembly instruction

Dorel Asia Baby Relax DL8686 Instruction booklet

Dorel Asia

Dorel Asia Baby Relax DL8686 Instruction booklet

Comfort Products JNFF Assembly instructions

Comfort Products

Comfort Products JNFF Assembly instructions

CB2 Paradigm Assembly instructions

CB2

CB2 Paradigm Assembly instructions

HOME DECO FACTORY Havana HD65811 Assembly instructions

HOME DECO FACTORY

HOME DECO FACTORY Havana HD65811 Assembly instructions

RUSTA FLORENS manual

RUSTA

RUSTA FLORENS manual

Songmics VASAGLE LBC10V1 manual

Songmics

Songmics VASAGLE LBC10V1 manual

byLIVING MATTIS EB 110 L Assembly instructions

byLIVING

byLIVING MATTIS EB 110 L Assembly instructions

RSA Lighting Accurus ACT951 specification

RSA Lighting

RSA Lighting Accurus ACT951 specification

Kesseböhmer TopFlex Mounting instructions

Kesseböhmer

Kesseböhmer TopFlex Mounting instructions

modway EEI-2234 quick start guide

modway

modway EEI-2234 quick start guide

Pinnacle Design TV73003 parts list

Pinnacle Design

Pinnacle Design TV73003 parts list

boardprep RTA 300 WINE RACK Assembly instructions

boardprep

boardprep RTA 300 WINE RACK Assembly instructions

Furniture of America Perry Round Geometric Coffee Table YNJ-129-6 Assembly instructions

Furniture of America

Furniture of America Perry Round Geometric Coffee Table YNJ-129-6 Assembly instructions

IKEA BROR 503.000.15 manual

IKEA

IKEA BROR 503.000.15 manual

manuals.online logo
manuals.online logoBrands
  • About & Mission
  • Contact us
  • Privacy Policy
  • Terms and Conditions

Copyright 2025 Manuals.Online. All Rights Reserved.