abi JY-130B User manual

abi
A Brighter Image P/L
IMAGE
Document Camera
JY-130B
(1.3 Megapixel Camera output resolution)
&
JY-90B
(850,000 pixel Camera output resolution)
USER MANUAL
Please read this manual carefully before operating the visual presenter and keep it for reference.

NOTICES: PLEASE READ CAREFULLY BEFORE USE
Use the document camera under the rated electric conditions.
Do not place the document camera on any unstable surface. It may fall and cause injures or damages.
Do not place this device directly under sunlight or near heaters.
Do not place this device near water.
Keep the camera away from acid or alkali gas.
Do not place this document camera in humid, dusty, windy or vibrant locations.
The recommended operating environment is:
Temperature: 0ºC--45ºC(32ºF-113ºF)
Humidity: less than 75%
Always unplug BEFORE cleaning the device. Use a damp soft-cloth for cleaning. Do not use volatile solvent.
When this equipment functions abnormally, such as smoke, smell, noise, immediately unplug and call for
professional assistance.
Unplug the document camera or shut off the power when not in use.

CONTENTS
PART NAME AND FUNCTIONS: .......................................................3
1. Appearance:........................................................................................................................3
2. Rear Panel…………………………………………………………………………………4
3. Front control panel……………………………………………………………………… ..5
SPECIFICATIONS:………………………………………………………………………6
SETTING UP:……………………………………………………………………… ……. .7
OPERATION PROCEDURES…………………………………………8
TROUBLE-SHOOTING:.........................................................................9
SERVICE:
Contact: A Brighter Image Pty Ltd
Tel: 02.9938 6866
Fax: 02.9938 6899
Address: Unit H, 134-140 Old Pittwater Rd, BROOKVALE NSW 2100
Email: [email protected].au
Website: www.abimage.com.au
2
PART NAME AND FUNCTIONS:
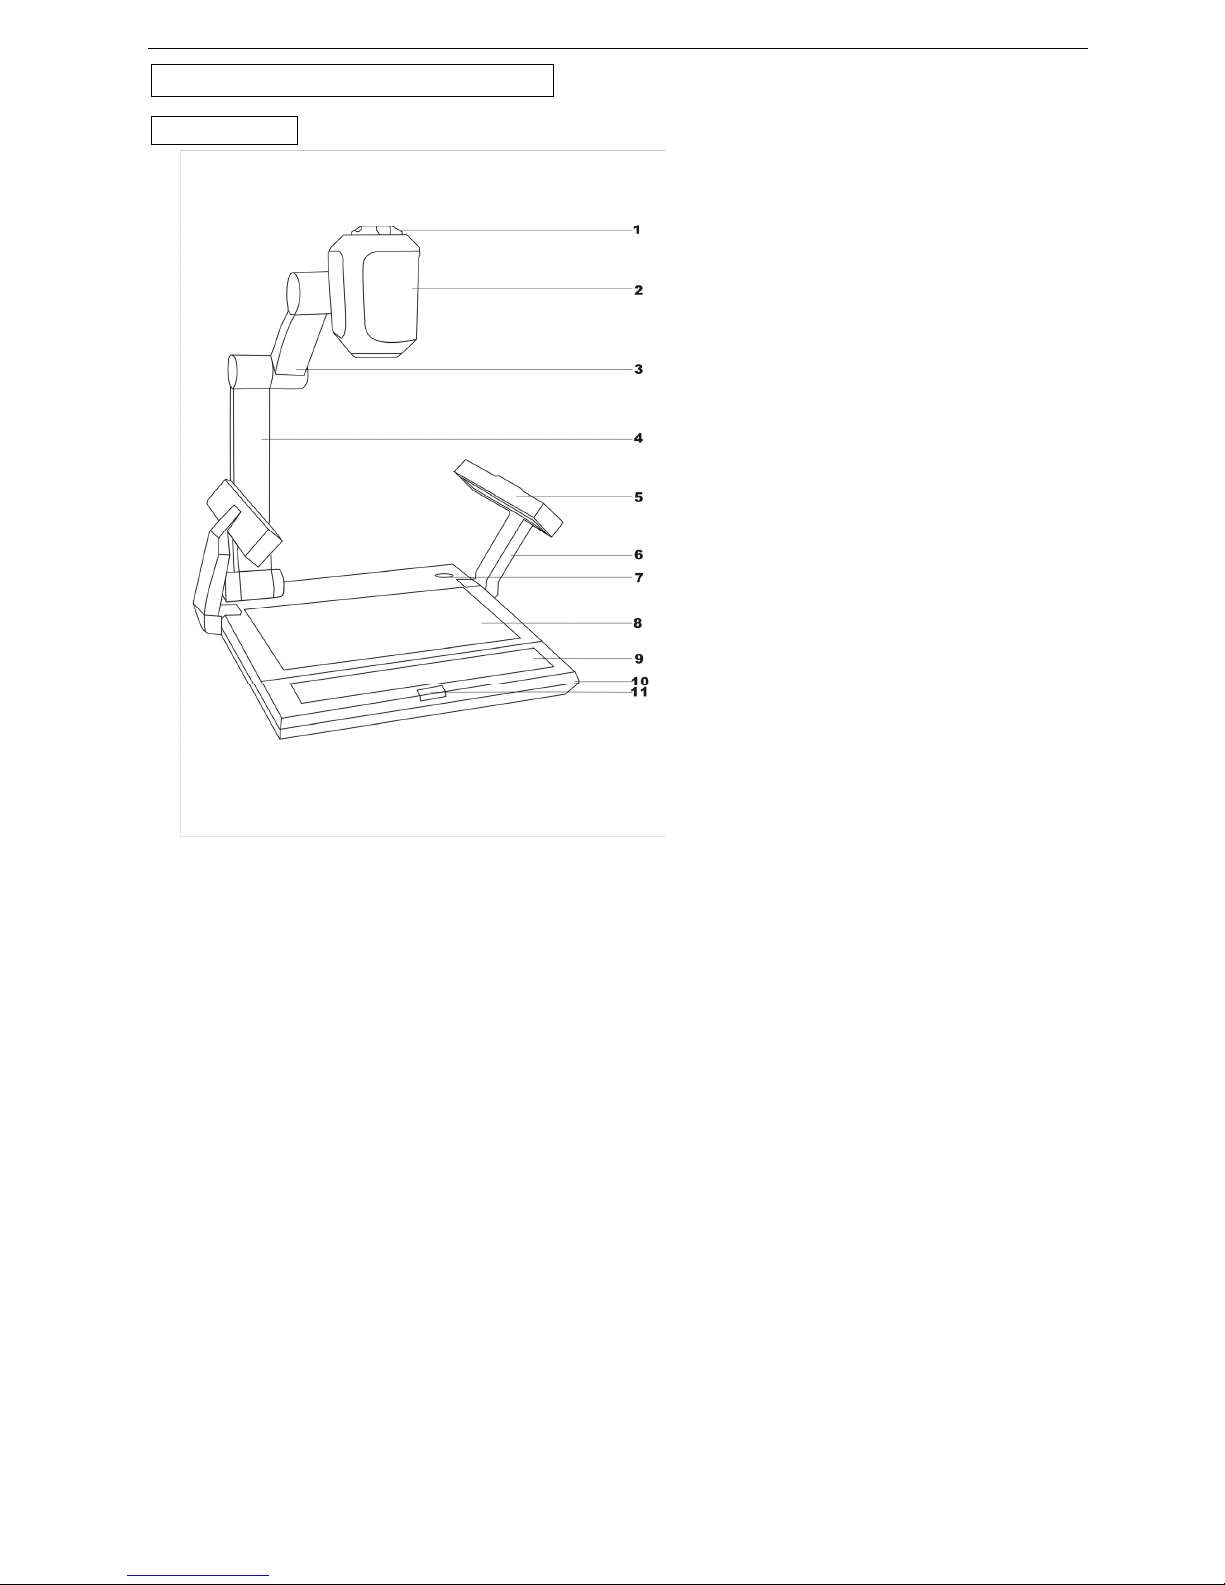
1. Appearance:
(1) camera control knob (2)sensor cover (3) upper mechanical arm
(4) main mechanical arm (5) side lamp (6)lightingarm
(7) power switch (8)base light (9) control panel
(10) base unit (11)
infrared receiver
- 3 -

2. Rear Panel
V1、L1、R1:Video & Audio Input
V2、L2、R2:Video & Audio Input
VIDEO:Composite Video Signal Output
S-VIDEO:S-video Output (YC synchronization sever )
MIC:Microphone Input
A1、A2:PC Audio Input
A OUT:Audio Output
VGA OUT1、VGA OUT2:VGA Output
VGA1、VGA2: VGA Input
RS-232:Serial Port (for ControlSystem)
USB:PC Signal Transmission (optional)
4.

3. Front Control Panel:
⑴.HOME:When the camera is in operating, press this button for 3 seconds, it will stop transmitting image
and go to standby, if press for another 3 seconds, the camera will get back to work again.
⑵.AV :Switch the input signal source ( video1 or video2).
⑶.PC:Switch between PC1 & PC2.
⑷.AC:Perform white balance automatically.
⑸.BRT+、BRT-:Image brightness control.
⑹.SHARPNESS+、SHARPNESS-:Image sharpness control.
⑺.P/N:Switch the image mode between positive and negative.
⑻.LAMP:Lamp control, switch the lighting mode as up lamp - down lamp- all turned off - up lamp, etc.
⑼.AF:Auto focus button.
⑽.ZOOM+/ ZOOM-:Image zoom in and zoom out control.
⑾.FOCUS+/FOCUS-:Adjust focus manually.
⑿.FRZ:Image control, switch between shoot and freeze.
⒀.FN: Function button,using with other buttons for special functions.
Control with FN button
⑴. FN+LAMP:Switch the image between text mode and dynamic mode. Text mode gives sharper and
better-colored images when showing printed material.
⑵. FN+BRT+、FN+BRT-:Image chroma control (red).
⑶. FN+SHARPNESS+、FN+SHARPNESS-:Image chroma control (blue).
⑷. FN+ZOOM+、FN+ZOOM-:MIC volume control.
⑸.FN+PC:Capture the image in the screen. (Available for models with image capture function).
⑹.FN+AV :Multi-image mode enabled;(Available for models with image capture function)
Press again to return to normal mode.
In multi-image mode:
ZOOM+:Display the first image.
FOCUS-: Display the second image.
ZOOM-: Display the third image.
FOCUS+: Display the fourth image.
FN+AF:Images page turning.
⑺.FN+FOCUS-:Output right-and-left mirror image.
⑻.FN+FOCUS+:Enable the function of side-by-side images comparison on same screen.
5.

SPECIFICATIONS:
Power supply 12V DC power adapter
Maximum power consumption 20 W
Temperature 0 —45℃
Operating condition
Humidity 5%——75%
Dimensions(packing case) 465mm×430mm×220mm (W×D×H)
Weight 5.5 kg
Light source LED
Compliance FCC,CE
Audio 2 x,<2.0 Vp -- p
Video 2 x,<1.0 Vp -- p/75Ω
Signal system PAL
Input
VGA(PC)2x
Audio 1 x,<2 Vp -- p
Video 1 x,<1.0Vp -- p/75Ω
Signal system PAL
Output
VGA(PC)2X
Video output RGBHV
Sensor CMOS image sensor
Total pixel 1,300,000
Focus Auto/manual
Zoom > 12X
Scan frequency 48 KHz(horizontal),60 Hz(vertical)
Images side-by-side comparison Manual
Brightness adjustment Manual
Text/dynamic mode switch Manual
Camera
Minimal surrounding illumination 4 Lux/ F 1.8 (maximum gain)
6

SETTING UP:
1. Unpack, put aside all packing
materials. Unfold the lighting
arms until reach the end position.
2. Raise the camera arm completely.
3. Rotate the camera head until the
lens face the center of the base unit.
4. Connect RGB interface: use the
provided RGB cable, connect the
output of the document camera
with the RGB input the display
(monitor, television or projector).
5. Connect the composite video-in
interface: use the provided RCA
pin cable.
6. Connect the S-video-in interface:
connect the S-video-out interface
(mini DIN 4P) with the S-video-in
interface of the display.
7. Plug the power cord into the power
cord receptacle of the document camera
and the AC outlet.
7.

OPERATION PROCEDURES:
1.General:
1). Turn on the Power switch.
2). Place the target object on the base unit surface.
3). Adjust the image size according to the object size by pressing the ZOOM+/ ZOOM-buttons on the control panel.
4). Press the “AF” button for automatic focus.
5). “Frz” button can be used to lock the image while changing displaying materials.
“FN” and “FRZ” button can be used to compare a previous captured image with the current image side by side.
Turn the knob on the camera head will changing the alignment of the showing image.
2. Showing printed material:
For sharper image and more vivid color, choose the Text mode by pressing “FN” and “P/N” button.
3. Showing the 3D objects:
Use the “FOCUS+/FOCUS-” buttons on the front panel to adjust the focus on any part of the 3D object.
4. Showing the transparent material such as an overhead transparent sheet:
Press the “Lamp” button until the built-in base light lights up.
8.

TROUBLE-SHOOTING:
Symptoms Possible causes/counter-measures
No image 1. Power cord is not properly connected.
2. Cables are not properly connected.
3. Power switch is not turned on.
4. The built-in fuse is broken: Change fuse.
Upper light not on 1. The filament is broken. Change the bulb.
2. the lamp is not fully plugged in its holder:
Out of focus or blurring
image
1. The object is too close to the lens.
2. Focus is on the max. point of “Tele” press “Wide”.
3. Auto-focus is not on: press AF again.
4. Fog on the lens in damp climate. It will disappear
gradually when the equipment warms up.
If the problem still remains after checking the above, consult your dealer or authorized service personnel.
PACKING LIST AND ACCESSORIES:
Item Quantity
Power cord 1
VGA Cable 1
USB Software CD 1
User Manual 1
Spare Fuse 1(installed in the power receptacle)
-9 -
This manual suits for next models
1
Table of contents


