abi Workman Use and care manual

NEED HELP? Visit us at ABIsupport.com or call 877.788.7253
Caution:
Read Safety Rules, Warnings & Assembly Instructions Carefully!
Owners Manual
&
asseMbly InstructIOns

2ABI® Workman Trailer Manual 877.788.7253 • ABIsupport.com
Sa f e t y R u l e S
Remember, any piece of equipment like an ATV trailer can cause injury if operated
improperly or if the user does not understand how to operate the equipment. Exer-
cise caution at all times when using your tow vehicle and tow trailer.
LOOK FOR THIS SYMBOL TO POINT OUT
IMPORTANT SAFETY PRECAUTIONS. IT
MEANS ATTENTION! BECOME ALERT!
YOUR SAFETY IS INVOLVED.
◆Read this owner’s manual before attempting to assemble or operate trailer.
◆Read the tow vehicle’s owner’s manual and know how to operate your tow vehicle before using
the trailer.
◆Do not transport people on or inside the trailer. The transport of people puts their lives at risk
and may be illegal as the trailer has not been designed to carry passengers.
◆Don’t allow adults to operate tow vehicle or trailer without proper instructions and experience.
◆Never allow children to operate the tow vehicle or the trailer.
◆Recommended tow vehicle engine size is 350 cc or larger with four-wheel drive in order to allow
safe operation when towing the trailer.
◆Use caution when towing the trailer over rough terrain and hillsides to prevent rolling over and
loss of control. Be careful towing the trailer in icy, wet, or snowy conditions which could impair
the braking ability of the trailer and the tow vehicle.
◆Tow Vehicle braking and stability may be affected when towing this trailer.
◆Using the trailer with a heavy load may inhibit the towing capacity of the tow vehicle. Do not
exceed the maximum towing capacity of your vehicle. Check the vehicle’s owner’s manual on
tow capacity limitations.
◆Before operating vehicle on any sloped surface or hill, refer to the safety rules in the vehicles
owner’s manual on proper operation on slopes. Use extreme caution on steep slopes.
◆Do not tow trailer on highways or on public thoroughfares. The trailer is designed for off road
use only.
Please exercise caution at ALL times when using the trailer on your tow vehicle:
CAUTION: VEHICLE BRAKING AND
STABILITY MAY BE AFFECTED WITH
THE ADDITION OF THIS TRAILER. BE
AWARE OF CHANGING CONDITIONS
ON SLOPES AT ALL TIMES.
CAUTION: AN IMPROPERLY COU-
PLED TRAILER CAN RESULT IN DEATH
OR SERIOUS INJURY. TIGHTEN THE
COUPLER ADJUSTMENT REGULARLY.
Driving too fast for conditions can result in loss of control and cause death or serious injury.
◆Decrease your speed as terrain, weather and lighting conditions deteriorate.
WaRNING

3877.788.7253 • ABIsupport.comABI® Workman Trailer Manual
Improper tire pressure can result in blowout and loss of control, which can lead to death or serious injury.
◆Be sure tires are inflated to pressure indicated on sidewall before towing trailer.
An improperly coupled trailer can result in death or serious injury.
Do NOT tow the trailer until:
◆The coupler is secured and locked to the hitch, use 2” ball hitch only;
◆The coupler is adjusted properly to fit the towing vehicle 2” ball;
◆Tires and wheels are checked;
◆The load is secured to the trailer; and
◆The trailer lights are connected and checked
Lug nuts are prone to loosen after initial installation, and if improperly tightened can lead to death or
serious injury.
◆Check lug nuts for tightness on a new trailer or when wheel(s) have been remounted after the
first 10, 25 and 50 miles of use. Tighten lug nuts before each use.
An overloaded trailer or improper distribution of load weight or shifting cargo can result in loss of con-
trol of the trailer, leading to death or serious injury.
◆Do not exceed the trailer Gross Vehicle Weight Rating (800 lbs. GVWR)
◆Tie down all loads with proper sized fasteners, ropes, straps, etc. (Not included)
◆Never disconnect trailer from tow vehicle while loaded.
◆Distribute the load front-to-rear and provide proper tongue weight.;
◆Distribute load evenly, right to left, and avoid tire overload; and
◆Keep the center of gravity low.
WaRNING
WaRNING
WaRNING
WaRNING
Improper electrical connection between the tow vehicle and the trailer will result in inoperable lights
and can lead to collision. Before each use:
◆Check tail/brake light for proper functioning
WaRNING
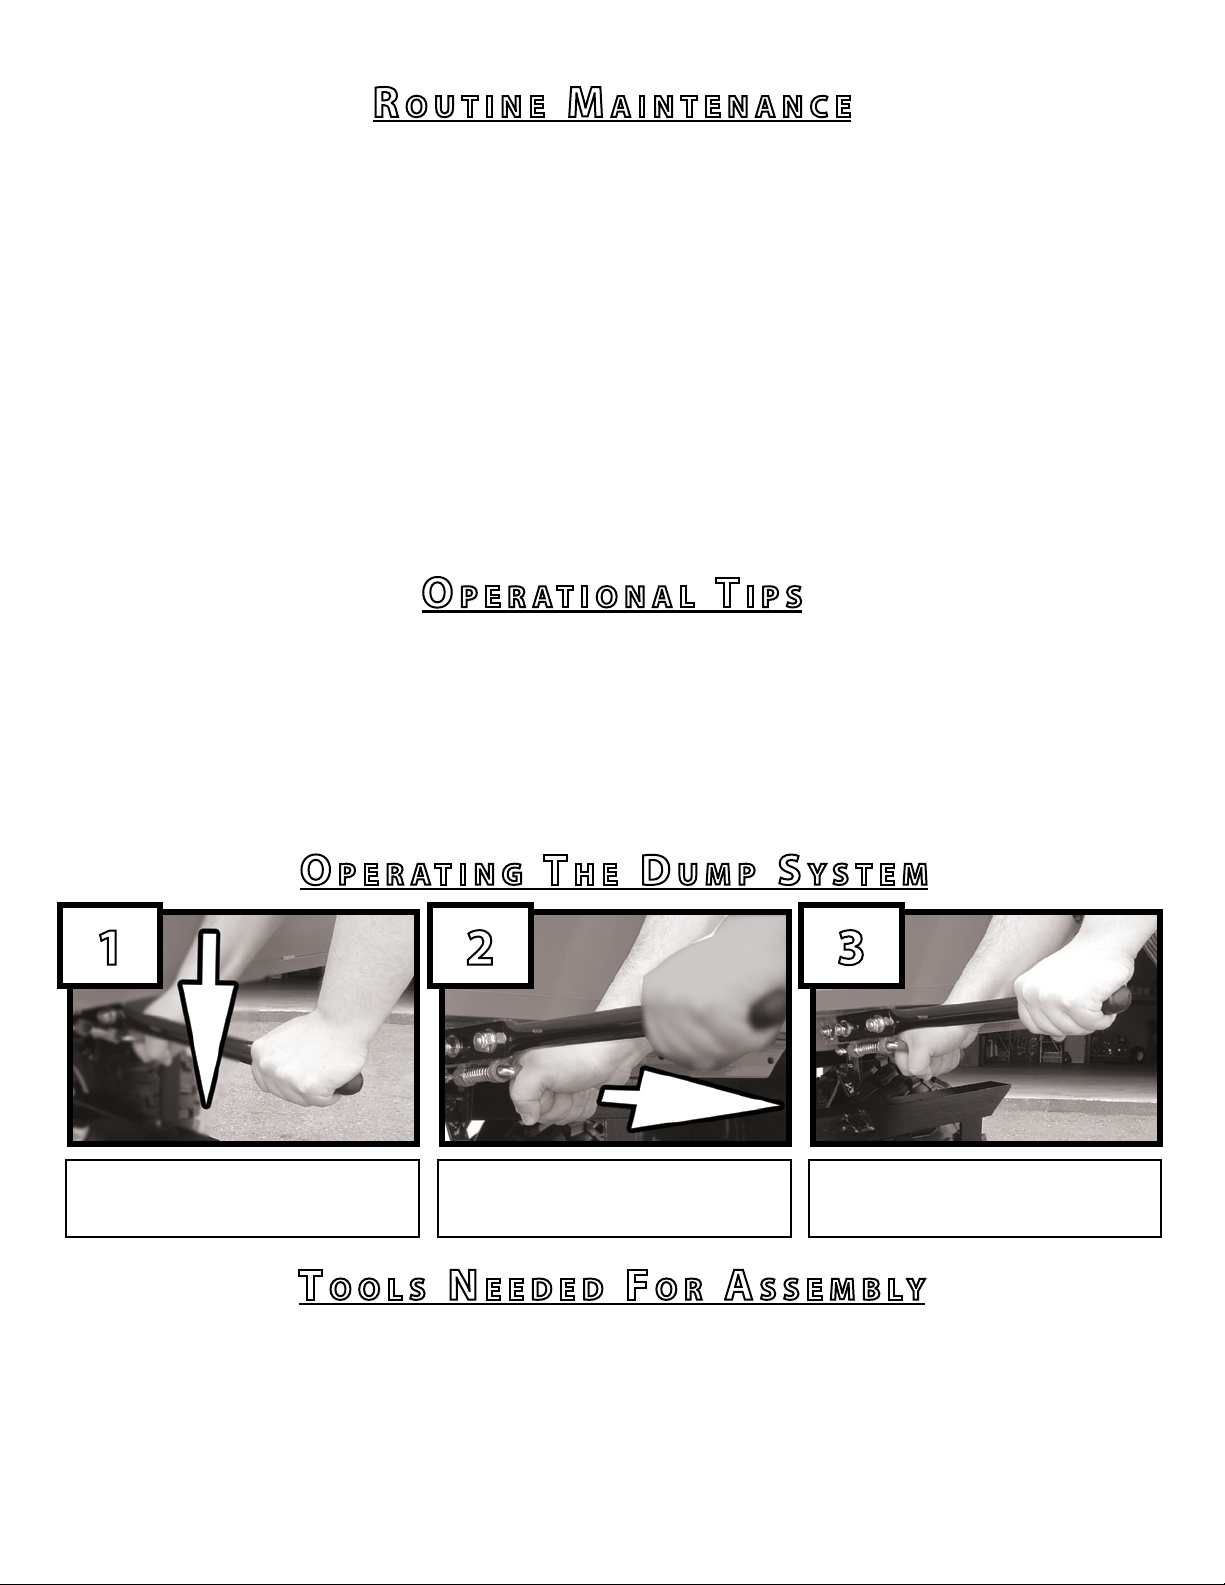
Stay clear of dump trailer when in use. Pinch points and material being dumped out of the trailer may
result in death or serious injury.
◆Never operate the dump system, up or down, without first visually and audibly ensuring peo-
ple, animals and other objects are clear of the trailer and the contents it is dumping.
◆Tailgate may be under pressure or helping to secure the contents of trailer bed, use caution
when opening and keep feet clear.
◆The trailer bed is under pressure. When pulling the bed latch pin, the bed will automatically
rise. Use dump arm to control, stand to one side of the arm and do not stand over the arm.
WaRNING

4ABI® Workman Trailer Manual 877.788.7253 • ABIsupport.com
Ro u t I N e M aINteNaNce
◆Wheel Hubs: Grease the hubs once a year, or before long periods of storage. There are grease
fittings located on the back of each hub for this purpose. If your hub does not have a grease fit-
ting, you will have to hand pack your bearings. When greasing or packing your bearings you will
want to use Hi-Temp Wheel Bearing grease only. If using a grease gun, we recommend a couple
pumps for this.
◆Trailer Bed Pivot Point: Grease the pivot points for the trailers bed once a month, or before long
periods of storage. To reach the grease fitting you will raise the bed, and use the grease fittings
located at the pivot point. We recommend multipurpose grease for the pivot points.
◆Trailer Bed Latch Mechanism: Use spray lithium grease as need.
◆Ball Hitch: Use spray lithium grease as needed.
Trailer Lubrication:
◆Use standard mild dish soap or automotive car wash and water for routine cleaning.
◆If using to haul manure clean after every use. Do NOT store manure in trailer bed.
Trailer Cleaning:
op e R a t I o N a l t IpS
◆Read and abide by the safety rules and warnings on pages 2 and 3.
◆The tailgate has 4 positions. 1) All 4 pins connected = Closed Tailgate. 2) All 4 pins removed =
Open Bed. 3) Top 2 pins connected and bottom two released = Dump Position. 4) Top 2 pins re-
leased and bottom two connected = Fold Down Tailgate (Like on a pickup truck.)
◆Before attempting to dump material, either remove the tailgate or release the two bottom pins
to allow material to flow.
◆Use wheel chocks, when trailer is not connected to a vehicle, to prevent it from rolling on inclines.
to o l S N eeded f o R a SSeMbly
◆Two strong individuals
◆13mm socket or box wrench
◆18mm socket or box wrench
◆10mm socket or box wrench
◆21mm deep well socket for tires
◆Standard set of pliers
◆9” adjustable wrench
◆Air Pump
◆Electrical tape & Lithium grease
◆Assembly Time is About 1 Hour
1
1) Stand clear! Then grasp handle
firmly and press down.
2
3) Control the dump motion using
the arm used in step 1.
3
2) With second hand, pull dump bed
latch pin towards you.
op e R a t I N G t h e d uMp S y S t e M

5877.788.7253 • ABIsupport.comABI® Workman Trailer Manual
aSSeMbly I NStRuctIoNS f o R a b I W oRkMaN
1) Unpack parts from inside trailer bed, saving the cardboard lid to be used in Step 18.
2) With the help of 2 people, turn trailer bed up-
side down for assembly. Use cardboard from pack-
aging to protect bed rails. Be careful not to dam-
age tailgate pins or D-rings on the side of trailer.
3) Remove the 4 wooden blocks used for shipping and dis-
card/recycle as shown in the photo left.
1
2
3

6ABI® Workman Trailer Manual 877.788.7253 • ABIsupport.com
4) Bolt subframe “Struts” with shortest sec-
tion of “Struts” closest to the handle, pho-
to left. Each “Strut” is either Right or Left.
Place each “Strut” on the inside portion,
flush with the bed, use bolts from package
labeled AX.
Leave bolts loose- do NOT tighten until
Step 8.
4
aX
5
5) Install “Bed Rest” to rectangular frame, as shown in the photo above, with the “Striker” pointing forward; use bolts from
package labeled B. Notice the direction of the “Pivot Point,” near the taillight, as it points up in the same direction as the
mounted “Bed Rest.”
BEFORE OPERATING YOUR WORKMAN TRAILER, read, understand
and follow the safety rules on page 2 and the warnings listed on
page 2 & 3 as well as the cautions listed throughout this manual.
b
Back
Front
Back
Front
Pivot
Point
Strut
Mounts
Bolt
Here
Bed
Rest
Strut
Strut

7877.788.7253 • ABIsupport.comABI® Workman Trailer Manual
6) With two people, take assembly portion from STEP 5 and turn it upsidedown. Hold it over the trailer bed and align the “V
shaped” struts with the strut mounts. Place on trailer bed with the taillight pointing toward the tailgate or back of the bed.
Use pivot bolts from package labeled D to secure the bed struts to the frame. Tighten these bolts only.
6
7) Install the “Cross Bar” to the struts with the direction of
the “angle iron” on the bottom as shown above, use bolts
from package labeled EX. Leave bolts loose- do NOT
tighten until Step 9.
7
8) Tighten bolts that join bed and sub
frame struts from Step 4.
8
eX
d
9) Tighten bolts on cross
bar from Step 7.
9
Bolt
Here
Bolt
Here
Cross
Bar

8ABI® Workman Trailer Manual 877.788.7253 • ABIsupport.com
10) Using hardware labeled I, on the front of the trailer, install the “Slam Latch Hook.” This is the latch the secures and
releases the trailer bed to and from the frame. There are three steps. 10a) Start by aligning the “Slam Latch Hook” to the
“Striker” on the bed. As shown in the first image. 10b) Next use the large bolt, washers and nut to mount the bottom hole
of the “Slam Latch Hook” in between the two mounting tabs welded to the frame. Use a washer on the outsides of the tabs.
10c) Using the small bolt, washers, spacer and nut, mount the small hole of the “Slam Latch Hook” to the spring loaded
“Latch Release” already mounted to the trailer bed. As shown in the second image above, insert the hardware in the follow-
ing order. 1) Slide a washer onto the small bolt, insert the bolt through the “Latch Release” hole, slide bolt through spacer,
then slide bolt through the small hole of the “Slam Latch Hook” and then use the washer and nut to secure assembly.
Do NOT over tighten the small bolt! Allow the hook and pin to move freely.
10
11) Install the “Handle” to the bed
as shown in the photo to the left.
Use hardware labeled J
12) Mount the “Idler Axle”
to the frame with the
swing arm pointing to the
rear or taillight, use bolts
from package labeled H.
Evenly & securely tighten.
Note: There are 2 pack-
ages of bolts labeled H
which are used in steps 12
and 15.
11
12 J
h
I
Bolt
Here
Striker
Hook Slam
Latch
Hook
Latch
Release

15) Bolt the tongue assembly to the frame. Tighten to
50-71 ft-Ibs (68-96nm). Ensure the open side of the ball
coupler is facing up. Be sure the wires DO NOT BECOME
PINCHED between the frame and the tongue. Use bolts
from package labeled H.
16) Place tongue
wires in hook on
coupler.
14) On the tongue assembly, connect the male electrical
connectors to the female electrical connectors, ensuring
that the colors of the wires match. Use electrical tape as
shown below. Push excess wiring back into the frame.
BE CAREFUL NOT TO DAMAGE WIRES.
14 15
h
To secure the trailer wiring, wrap the
connections with black electrical tape
and use ZIP-TIES in a loop to prevent
the wires from unplugging.
9877.788.7253 • ABIsupport.comABI® Workman Trailer Manual
13 13) Mount each wheel/tire assembly to the hubs with 4
tapered lug nuts each. The taper of the lug nuts must face
toward the wheel. Install with the valve stem, on the tire,
facing away from the frame. Tighten the nuts gradually,
alternating between nuts opposite each other, to assure
even seating of the wheel onto the axle.
Inflate tire to recommended pressure on sidewall of tire.
16

19) With the help
of 2 people, gently
turn the trailer on to
it’s side, on the card-
board. Then gen-
tly push it onto it’s
tires. Be careful not
to damage tailgate
pins or D-rings on
the side of the trail-
er.
19
10ABI® Workman Trailer Manual 877.788.7253 • ABIsupport.com
17a) First, using the trailer tongue, one person raise the
frame. Then a second person, bolt the thicker side of the
gas shock and cable to the connection point nearest the
tongue. 17b) Then raise or lower the tongue, to position
the mounting point of the other end of the gas shock, to
enable it to align to the frame cross bar. Finally, bolt the
gas shock and the other end of the cable to the frame. Se-
curely tighten bolts. 17c) Next press down on the tongue
to compress the gas shock until trailer bed latch catches
the frame. Ensure it is securely latched before letting go of
the tongue. Use hardware labeled K.
18) Place cardboard under each end of the trailer bed with about 12 inches
sticking out to one side. This is to provide protection for the trailer powder
coating during the next step.
17a
18
k
BEFORE OPERATING YOUR WORKMAN TRAILER, read, understand
and follow the safety rules on page 2 and the warnings listed on
page 2 & 3 as well as the cautions listed throughout this manual.
17b17c

11 877.788.7253 • ABIsupport.comABI® Workman Trailer Manual
The ATV wiring harness has a 4-pole connector at one end and bare end wires at the other end. This har-
ness connects to the ATV’s taillight and battery. Splice these wires, using the supplied connectors, into the
appropriate ATV wires, as shown below. For additional assistance, please refer to your ATV owner’s manual
or ATV wiring schematic. Seal all splices to insure that water does not corrode or short the electrical wiring.
Next route the connector-end of the wire to the rear of the ATV. Be sure to leave enough extra wire to ac-
commodate the turning requirements when pulling your ATV Trailer.
When you are ready to use the ATV trailer, plug the connector end into the 4-pole connector at the trailer
coupler.
Note: Some models may contain a 4-pole connector with an extra black wire. Please ignore the extra black wire.
to W V ehIcle W IRING I N S t a l l a t I o N
Connecting Wire Harness To Tow Vehicle
BROWN WIRE CONNECTS TO THE VEHICLE STOP WIRE USING “A”
YELLOW WIRE CONNECTS TO VEHICLE RUNNING LIGHT WIRE USING “A”
WHITE WIRE CONNECTS TO THE VEHICLE BATTERY (-) NEGATIVE TERMINAL USING “A”
CAUTION: AN IMPROPERLY COUPLED
TRAILER CAN RESULT IN DEATH OR SE-
RIOUS INJURY. TIGHTEN THE COUPLE
ADJUSTMENT REGULARLY.
Limited Warranty For Consumers: ABI warrants the goods to be new and free from material defect for one
(1) year from the date of ABI’s delivery of goods to Buyer. This warranty will be satisfied by ABI’s repairing
the goods or furnishing replacement goods or parts, at its option. To take advantage of this warranty, Buyer
must immediately notify ABI of the claimed defect. ABI shall have no obligation under this warranty for
(a) goods which have been repaired or altered by any party other than ABI, and or (b) defects which result
from misuse, accident, or improper connection of the goods to a tow vehicle, and or (c) commercial use of
the product. THIS IS BUYER’S EXCLUSIVE REMEDY UNDER THIS WARRANTY. ABI DISCLAIMS ALL OTHER WAR-
RANTIES, EXPRESS OR IMPLIED, INCLUDING BUT NOT LIMITED TO WARRANTIES OF MERCHANTABILITY, FIT-
NESS FOR A PARTICULAR PURPOSE, AND AGAINST INFRINGEMENT. THIS WARRANTY IS NOT TRANSFERABLE.
WARNING: The trailer bed is under pressure. When
you pull the bed latch pin, the bed will automatically
dump. Use extreme caution or an injury could occur.

WIRING SCHEMATIC FOR ABI® WORKMAN
ATV SIDE TRAILER SIDE
877.788.7253
ABIsupport.com
ABIequine.com
ABIattachments.com
Popular Utility Vehicle manuals by other brands

Cushman
Cushman turf truckster Parts & maintenance manual

Krone
Krone Profi Liner operating instructions

cascade corporation
cascade corporation 10A Bin user manual

Great Dane
Great Dane Champion CP Maintenance manual

Hisun
Hisun HS700UTV-4 Maintenance handbook

Cub Cadet
Cub Cadet Challenger 500 Operator's manual

Polaris
Polaris 2013 Ranger EV Owner's manual for maintenance and safety

Toro
Toro Workman GTX Series Operator's manual

Krone
Krone BOX LINER TU 70 operating instructions

Polaris
Polaris RANGER XP 900 Owner's manual for maintenance and safety

Husqvarna
Husqvarna HUV 4213-G 2008 owner's manual

Muck-Truck
Muck-Truck E Truck Owner & operator instruction manual