ACD GENie EC User manual

2024W.McMillanSt.
Tucson,Arizona85705USA
Telephone:(520)290-2855
Fax:(520)290-2860
TollFree:(800)737-0223
Email:acd@goACD.com
Web:www.goACD.com
Software Rev1.16
AdvancedCalibrationDesigns,Inc.
InstructionManual
SoftwareRev1.16
CalibrationGasGenerator
AdvancedCalibrationDesigns,Inc.
GENie EC GENieQC-1 GENieO3

CalibrationGasSystem
Instruction Manual for
GENie QC-1
GENie EC
GENie O3
Software Rev 1.16

Calibration Gas System
Instruction Manual for
GENie QC-1
GENie EC
GENie O3
Software Rev 1.16

TableofContents
Warning..................................................................................................................................1
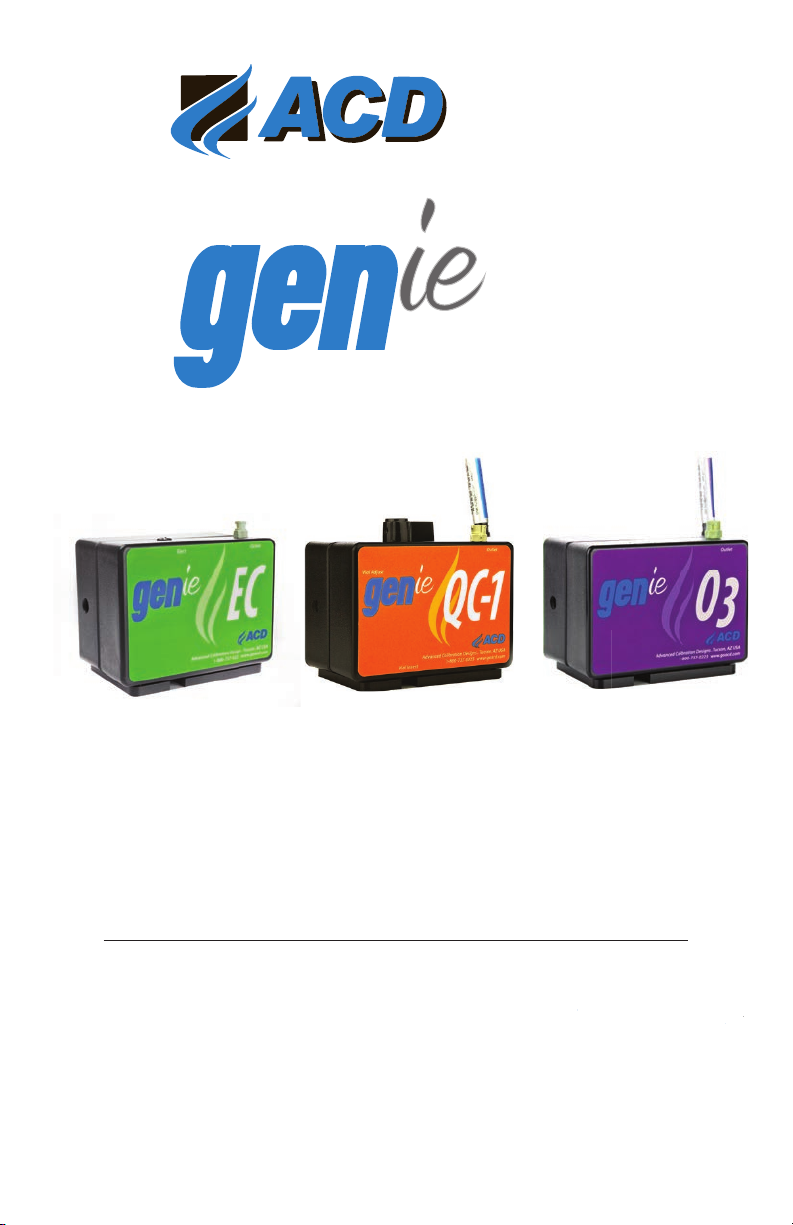
General Description...........................................................................................................2
GENie Base Unit...................................................................................................................2
Power Source....................................................................................................2
Microprocessor-Based Circuitry.................................................................3
Digital Display...................................................................................................3
POWER and SELECT........................................................................................3
Delivery Hose....................................................................................................3
External Charcoal Filter.............................................................................3
Mass Flow Sensor............................................................................................4
System Interface Bus......................................................................................4
Foreign Language Option............................................................................4
GENie QC-1 Module ...........................................................................................................6
Operation.....................................................................................................................6
Quick Check Vial (QCV)..................................................................................6
Menu Options: Foreign Language Option......................................................9
Gas Sources .................................................................................................................9
Accessories and Replacement Parts ................................................................10
Specifications............................................................................................................10
GENie EC Module ..............................................................................................................11
Internal Micro Pump.....................................................................................11
Operation...................................................................................................................11
Menu Options: Sample Draw Mode.................................................................15
Menu Options: Foreign Language Option....................................................16
Gas Sources ...............................................................................................................17
Accessories and Replacement Parts ................................................................18
Specifications............................................................................................................18
Generating Source Removal and Replacement ..........................................18
GENie O3 Module..............................................................................................................20
Internal Micro Pump.....................................................................................20
Ultraviolet LightSource..............................................................................20
Operation...................................................................................................................20
Accessories................................................................................................................23
Specifications............................................................................................................23
Maintenance.......................................................................................................................24
Battery Replacement.......................................................................................................24
Troubleshooting................................................................................................................26
Accessories..........................................................................................................................28
Replacement Parts............................................................................................................29
Standard Warranty ...........................................................................................................30

Page 1
Warning
This instrument generates calibration gas for toxic gas detectors. The
instruction manual should be read and understood before the
operation of the instrument. Failure to operate the instrument
correctly can lead to improper calibrations.
This instrument conforms to the protection requirements of the EC
DIRECTIVE 89/336/EEC on Electromagnetic Compatibility (EMC), in
accordance with the provisions of Statutory Instrument 2372.
The following standards have been applied:
EN 50081-1 Emissions Standard (Residential Commercial and Light
Industry)
EN 50082-1 Immunity Standard (Residential Commercial and Light
Industry)

Base Unit
Page 2
General Description
The GENie family of instruments consists of the GENie base unit (which
provides a microprocessor-based user interface and control system) and a
source module (that determines the gas to be generated).
GENie Base Unit and GENie (QC-1, EC or O3) Source Module (front and
rearview)
GENie Base Unit
Battery-powered microprocessor-based user interface and control system.
PowerSource
A set of four fully charged, heavy-duty alkaline AA batteries provides
approximately 6 hours of continuous operation at .5 LPM. Note:
Rechargeable or light duty batteries can be used, but they give
significantly less operating time.
An optional battery extender is available that utilizes eight AA type
batteries and provides extended hours of operation.

Base Unit
Page 3
Continuous operation power adapters are also available for benchtop
operation (note adapters are also available for international customers).
Microprocessor-BasedCircuitry
The GENie base unit has microprocessor-based circuitry that performs
several different operations and offers the user many different features.
The microprocessor tracks source and battery usage, monitors the airflow
rate, and controls the source and pump to give the selected ppm and flow
rate. In addition to English, every GENie QC-1 can provide menu displays
in French, German Spanish, and Portuguese. See section IV. Menu Options
for instructions on how to change the menu language.
DigitalDisplay
The GENie base unit has a liquid crystal display (LCD) located on the front
of the instrument. This display is protected by a thin, clear plastic cover
that is part of the front membrane panel and may be replaced if it
becomes scratched or unclear.
POWERandSELECT
The POWER and SELECT switches are momentary push button type
switches activated through the front membrane panel. They are physical
switches mounted directly on the circuit board.
DeliveryHose
The instrument comes standard with a five (5) foot long, ¼ inch diameter
Teflon lined hose for delivering the gas to the sensor or calibration
adaptor. The hose has a male quick connect adaptor for easy attachment
to the instrument.
ExternalCharcoalFilter
An external charcoal filter is provided to scrub contaminated air. This filter
should be replaced yearly at the time of calibration.

Base Unit
Page 4
MassFlowSensor
The GENie main module has a built-in mass flow sensor that measures the
flow rate of the instrument. This information is used in two ways. With the
pump engaged, it is used to control the pump to the desired flow rate
over a range of 0.2 to 1.0 LPM. With the pump disabled, it is used to
measure the airflow rate drawn through the GENie by an external pump
(for use with EC module only). This information is used to determine the
source generation rate to achieve the desired ppm. The flow meter should
be calibrated against a primary mass flow standard every 12 months.
SystemInterfaceBus
The center of the GENie system of products is the module expansion bus.
This proprietary interface bus is what allows the GENie base unit to
interface with an ever-expanding family of product modules. Each source
module provides the base unit with information about calibration, the life
of the unit, gas type, etc. These contacts must remain clean and
undamaged throughout the life of the instrument. If communication
ForeignLanguageOption
The menu options can be adjusted to read in German, French, or Spanish.
To change the language, start the unit as you normally would. When the
GENie screen appears,
GENie [Module Name]
press the SELECT button. This will bring up the following screen (note: the
Select button must be pressed quickly before the above screen
transitions):
English
Press the SELECT button to choose the preferred language. Each time the
select button is pressed the language will continue to scroll through the
four possible options. When the language is displayed, press the POWER
button to continue with the start-upsequence.

Base Unit
Page 5
Deutsch
Español
Portuguese
Francais

QC-1 Module
Page 6
GENie QC-1 Module
Operation
Quick Check Vial (QCV)
The GENie QC-1 utilizes the ACD Quick Check
Vials (QCVs) as a gas source. Before inserting a
new vial into the instrument, open the coarse
adjust knob approximately three
rotations to allow for easier insertion. To
begin operation, take one of the QC vials
and break the internal glass vial to
release the gas. Slide open the GENie
base unit and insert the vial into the unit
as shown below. The vial should snap
into place. Then return the base plate by
To start the instrument, press and hold the POWER switch, located in the
lower right of the front of the instrument, until the display reads GENie
QC-1, approximately five (5) seconds. Release the switch immediately
thereafter.
The instrument will sequence through several screens as follows:
GENie 1.2 QC-1
Copyright 2012
The instrument will display the serial number and source number,
followed by the manufactured date. The calibration date is the date the
instrument was last calibrated.
Serial# 0000001
Source# 000001
Manufactured
01 Jan 2012

QC-1 Module
Page 7
Calibration Date
01 Jan 2012
The display will change to simply display the concentration as shown
below.
100 PPM NH3
Select to change
If the instrument is unable to achieve the selected concentration due to
insufficient gas concentration, the following screen sequences will display
accompanied by an audible beep.
100 PPM NH3
Low PPM warning
100 PPM NH3
Stabilizing ….
100 PPM NH3
@ .20
If the instrument is unable to achieve the selected concentration due to
excessive gas concentration, the following screen sequences are displayed
accompanied by an audible double beep.
100 PPM NH3
High PPM warning
275 PPM NH3
Stabilizing ….
275 PPM NH3
@ 1.10
In the High PPM warning mode, the unit will display the actual
concentration rather than the set point so that the operator has an idea of
how much adjustment is needed to bring the unit into normal operation.

QC-1 Module
Page 8
When the coarse adjust in range the unit will return to displaying the set
point concentration.
If the Low PPM warning message is present open the vial adjust slightly by
rotating it counterclockwise to allow additional gas to enter the system. If
the High PPM warning message is
present close the vial adjust knob by
rotating it clockwise as shown in the
image to the right.
When the instrument has stabilized,
the display will change to read the
concentration of the gas being
generated and the flow rate as shown
below.
100 PPM NH3
@ .50
The position of the vial adjust is a rough adjustment depending on the
concentration you have selected. The instrument will adjust flow to obtain
the exact concentration. In general, a more open vial adjust will result in a
higher flow rate and a more closed vial adjust will result in a lower flow
rate. If at any time the unit is unable to produce the exact concentration
selected, you will be notified with the above menu accompanied by the
audible beep (single beep for low PPM. Double beep for high PPM.)
At any time during operation, pressing the select switch will result in the
following series of menus
100 PPM NH3
Select to change
Battery Status
100
pressing the select button will result in the following display.

QC-1 Module
Page 9
10 to 500 PPM
Set ... 100PPM
At this point pressing the up or down arrows will result in the output
changing accordingly. Pressing the down arrow will scroll the output
down from 500 PPM to 10 PPM. When the desired concentration is
and return to
normal operation displaying the source life and battery status before
returning to display the new concentration. You are ready to calibrate.
20 PPM NH3
Select to change
When your calibration is complete simply press and hold the power
button for approx. 5 seconds to turn the instrument off.
Remove vial
NH3
0035. PPM
Purging...
NH3
0035. PPM
The above screens will alternate until the PPM level purges below 10 PPM
or until 30 seconds have expired before powering down. The coarse adjust
should be fully closed at this time. It is recommended that the vial be
removed and discarded before turning the unit off at the end of the day.
Leaving the coarse adjust open with a vial in the unit will result in a gas
build up in the system that can potentially damage the instrument.
MenuOptions: ForeignLanguageOption
See page 4.
GasSources
QCV, Ammonia (NH3), 12 pack
525-0001-12

QC-1 Module
Page 10
QCV, Ammonia (NH3), 12 Pack HIGH PPM
525-0011-12
Accessories andReplacement Parts
Item Description
Part Number
EC Module for GENie System
750-0202-01
O3 Module for GENie System
750-0202-02
See page 28 for more Accessories and Replacement Parts.
Specifications
Airflow rate
Variable
Useful source life
8 hours/vial (12 pack included)
Warm-up time
< 30 seconds
L x W x H
5"W x 3.88"H x 3.13"D
Weight
2 lb. (907g)
Operating Temperature
0°C to 50°C
Relative Humidity
0 -100%
Accuracy
+/-10%
Repeat-ability
+/-5%
Battery Power
4 Alkaline AA
Battery Life
Approx. 5 hours

EC Module
Page 11
GENie EC Module
Fast warm-up time allows the instrument to be turned off between
remotely located sensors saving battery life and avoiding the generation
of unwanted gas. The GENie EC module uses the following components to
produce the calibration gas/air mixture:
InternalMicroPump
A small, rotary vane, micro air pump draws in ambient air to blend with
the generated gas.
Operation
To start the instrument, press and hold the POWER switch, located in the
lower right of the front of the instrument, until the display reads GENie EC,
approximately five (5) seconds. Release the switch immediately thereafter.
The instrument will sequence through several screens as follows:
GENie 1.20 EC
Copyright 2012
The instrument will display the serial number and source number,
followed by the manufactured date. The calibration date is the date the
instrument (main module) was last calibrated.
Serial# 0000001
Source# 000001
Manufactured
01 Jan 2012
Calibration Date
01 Jan 2012
Initializing …

EC Module
Page 12
Stabilizing …
The unit will then scroll through the flow rate, concentration and gas type,
source life, and battery status.
Flow 0.5 LPM
Select to change
1.00 PPM CL2
Source Life
Battery Status
Note that the gas type will be different depending on the source
used as will the source life and concentration ranges.
At this point, the unit will begin the stabilizing period. The unit will display
the following sequence until either the SELECT button is pressed to
change the flow or concentration, the POWER button is pressed and held
to turn the unit off, or the Standby time elapses.
Stabilizing ...
Standby:60 sec
Flow 0.5 LPM
1.00 PPM CL2
Standby:60 sec
When the Standby time elapses, the display will change to simply display
the concentration as shown below. At this point the calibration gas is
stable and you may proceed with calibration. A timer will run on the
bottom-line indication the time the unit has been running.

EC Module
Page 13
1.00 PPM CL2
At any time during operation, pressing the select switch will result in the
following series of menus.
Flow 0.5 LPM
Select to change
1.00 PPM CL2
Select to change
Source Life
Battery Status
When the flow is displayed wi
the select button will result in the following display.
0.2 to 1.0 LPM
At this point pressing the up or down arrows will result in the flow rate
changing accordingly. Pressing the down arrow will scroll the flow down
from the current setting to 0.2 LPM.
Holding the down arrow will also allow the unit to be set to 0.0 LPM.When
set to 0.0 LPM the unitwill turn off the internal pump. This is done to
provide a method for calibrating nts. In this
configuration,
regulator. It should be noted that by setting both the flow and the
concentration to zero the unit will operate as a real-time mass flow meter.
To le mple d
When the desired flow rate is displayed simply release the buttons. The

EC Module
Page 14
When the concentration is displa chang
pressing the select button will result in the following display. (note that
the range may differ depending on the source being used and the flow
rate.)
0.5 to 50 PPM
At this point pressing the up or down arrows changes the output
accordingly. Pressing the down arrow will scroll the output down from the
current setpoint to 0 .5 PPM. (note that the range may differ depending on
the source being used.)
When the desired concentration is displayed simply release the buttons.
The unit will
source life and battery status. If either the flow rate, concentration, or both,
are changed the unit will display a short 20-second stabilizing screen as
shown below.
Stabilizing ...
Standby: 20 sec
Flow 0.5 LPM
1.00 PPM CL2
Standby: 18 sec
When the stabilizing time is complete, the unit will return to display the
new concentration and flow rate. You are ready to calibrate.
1.0 PPM CL2
When your calibration is complete simply press and hold the power
button for approx. 5 seconds to turn the instrument off. The display will
The unit will display the following screen and count down
until the unit will power off. Note: At any time while purging the unit will
allow for changing flow and PPM. By changing these variables, the unit

EC Module
Page 15
will return to normal running mode and the purge cycle will be aborted.
The purge cycle is intended to allow the corrosive gases to be vented out
of the instrument before storage. If the generating source is removed
during the purge cycle, the unit will immediately power off. This allows for
quick change out from one gas source to the next, for customers
calibrating detection systems for multiple gases.
Purging …
Standby: 180 sec
MenuOptions: SampleDrawMode
When set to 0.0 LPM the unit will turn off the internal pump. This is done
truments. In this
configuration, the GENie EC operates similarly
regulator.
The display will change to the following.
Stabilize flow …
Flow 0.000 LPM
The unit can now be connected to a sample draw instrument. Do this by
connecting the hose from the sample draw instrument to the output of
the GENie EC. The GENie will display the flow being pulled through the
instrument and wait a short period to ensure the flow is stable. The display
will look something like this.
Stabilize flow …
Flow 0.65 LPM
With the flow stabilized, the unit will scroll to allow for setting the
concentration. Note that the concentration range will differ based on the
flow rate that the sample draw instrument pulls. At this point, the
concentration can be set as described earlier.
0.5 to 50 PPM

EC Module
Page 16
Stabilizing ...
Standby: 20 sec
Calibration gas will begin to flow immediately. The 20 second period is to
allow for stabilization of the source and the sensor etc. It should be noted
the
sample draw is removed. That is to say that several handheld instruments
can be calibrated in this way without any user required interaction of the
GENie EC instrument. (assuming all are being calibrated at the same
concentration)
To achieve this, simply calibrate the first unit then remove it from the
GENie EC. The unit will display the 0 flow and will wait patiently. When the
next sample draw instrument is connected the unit will display its flow
(they are often slightly different from unit to unit) and will immediately
begin producing the concentration set earlier. In this way, the GENie EC
calibration source can be used to calibrate several sample draw
instruments quickly and easily.
The operator can also configure the instrument as a real-time mass flow
meter by setting the concentration to zero. In this configuration, the
GENie can be used to test sampling pumps. The flow source can be
pushed through the input fitting (in place of the charcoal filter) or be
drawn out through the output fitting. While the concentration is set to
zero, the unit will simply display flow in real-time. To exit this mode simply
select to change either the flow or the concentration away from zero as
required.
MenuOptions:ForeignLanguageOption
See page 4.
This manual suits for next models
2
Table of contents
Other ACD Portable Generator manuals