GenConnex GXG LP-EU2200i-SA-EC User manual

Genconnex is a trademark of New England Gen-Connect LLC Honda is a registered trademark of Honda Motor Co., Ltd.70-00019r1.00
Engineered to the next level
GenconnexTM
Engineered to the next level
GenconnexTM
Supplement to Honda EU2200i OEM Owner’s ManualModel numbersGXG LP-EU2200i-SA-ECGXG LP-EU2200i-Comp-ECGXG LP-EU2200i-HX-ECGXG LP-EU2200i-Camo-ECPropane modified Honda EU2200iby GenConneXTM
1-800-341-0792Parts, Service and Support
GenconnexTM Generator Warranty
These products are warranted for 3 years or 1000hrs hours, whichever comes first, from defects in material and workmanship for its intended use. The Warranty starts from your shipment arrival date from us or one of our approved resellers, and is transferable to subsequent purchasers only in California. We reserve the right to deny warranty claims when, in our sole but reasonable determination conclude that the cause of the primary failure was due to misuse and neglect (including but not limited to flood, sand & debris filled, impact with vehicle or heavy object, etc). This warranty is applicable only to the items purchased.We disclaim any responsibility for loss of time or use of the product, transportation, commercial loss, or any other incidental or consequential damage. Any implied warranties are limited to the duration of this written limited warranty.
We will either repair or replace with like-kind unit, or issue a refund based on the pro-rata remaining term of the warranty period, within 30 days of receipt of the unit or goods. We will pay shipping costs within the continental 48 states to and back from our repair facility if you call first to get a pre-paid shipping label sent to you by us.
Factory and Warranty 35 Pond Park Road, Unit 11, Hingham, MA 02043 GenconnexTM and HomeconnexTM are trademarks of New England Gen-Connect LLC, Copyright 2018 All rights reserved.www.genconnex.net www.genconnexdirect.net
We
offer out-of-warranty repair service for any units we modify or manufacture at our main factory and at additional authorized dealers provided parts are still available from the original OEM. Please call for details or go to www.genconnexdirect.net to locate a service center near you.
Consumer Service Information
Engineered to the next level
GenconnexTM

5
Dear Customer, Thank you for purchasing a GenconnexTM modified Honda generator. We sincerely hope you are satisfied with your purchase for many years. Before operating your generator, please take a moment to read this entire manual along with the original Honda owner’s manual. This manual is intended to be a supplement to the original Honda Owner’s Manual with regard to operation on alternate fuels. Where different, this manual supersede
s
the Honda Owner’s Manual unless otherwise noted. Table of Contents
1) Safety Information …….………………….….….… 1 2) Quick Tips …………................................…...…..... 2 3) Use & Operating Instructions ..........….…..... 3 - 4Switching between fuelsInstalling the correct fuel orificeConnecting to propane & natural gasPriming before starting3) Troubleshooting Tips ......……...………...…........ 45) Technical …………….............................….…..….. 5Propane tank sizing & run timesUnderstanding pressure regulatorsSpecifications specific to Tri-Fuel conversionHigh altitude operation 6) Warranty & Service Information ......…..….......... 6GenconnexTM Dealer LocationsCustomer Service Information Technical Information
Specifications changes for Tri-Fuel conversion
Engine Oil Fully synthetic SAE 10W-30Fuel Options Propane, Natural Gas or GasolinePropane & Nat. Gas Pressure7-11” water column (approx. 1/2psi)Spark Plug
CR5HSB
(NGK) gap to 0.020-0.022”
Note spark gap can be set closer to .020 for better operation in cold weather for propane and natural gas, and closer to .031 for best operation in general with gasoline.Modification for High Altitude Operation
Please contact your authorized GenconnexTM servicing dealer for the correct high altitude fuel orifice kit for operation of your generator at altitudes above 5,000 feet (1,500 meters). This includes propane or natural gas When installed, this kit will enable your generator to meet emission standards throughout its useful life at the specified altitude. When not operating above 5,000 feet, please make sure to have your generator converted back to prevent overheating and serious engine damage.Propane Tank: (psi = pounds per square inch) (w.c. = inches Water Column)Red Regulator reduces to:Silver regulator reduces to: 60psi - 120psi+ (too high!)Pressure10-15 psi / 277-330”w.c. (too high!)1/2 psi / 7-11”w.c. (correct)Understanding pressure regulators
Engine Oil:SAE 10W-30 Fully Synthetic (approx. 2/5 qt)Spark Plug:NGK: CR5HSB gapped to .020-.022 inches
Quick Reference Information
Fuel Usage:
Based on lower heating value of Propane C3H8 is approx 85,000 Btu/gal @ 90% full tankNote that tank refill can varying from 75-100% depending on provider.RED means only can use tank/average load combination in weather above 32 deg F or tank won’ t vaporize propane fast enough to keep up with demand. Propane stops vaporizing at -44Deg F.
Propane Load
1.80 lbs/hr at 1800 Watts0.92 lbs/hr at 800 Watts0.70 lbs/hr at 400 Watts
EU2200i400W average load (eco on)800W average load (eco on)1200W average load1800W average load28hrs44hrs88hrs160hrs21hrs33hrs67hrs120hrs19hrs30hrs60hrs106hrs12hrs20hrs40hrs 76hrsHow long will a tank run my generator?
20lb/4.7gal30lb/7.0gal 2-30lb/14gal 100lb/25gal
(400,000Btu)(600,000Btu)(1,200,000Btu)(2,000,000Btu)

1
4
Use & Operating Instructions continued from previous pageTroubleshooting
Generator won’t start, wont stay running or runs very poorly
1..Make sure the generator’s run switch is set to on.2.Check that quick disconnect from hose to unit is fully seated and locked.3.Check that propane tank hose connection is fully screwed on and tight.4.Turn your propane tank off then back on slowly to check/reset tank internal valve.5.Check that your air cleaner element is not flooded with oil. This can happen if your generator tips over. If it is, squeeze filter between paper towels, then properly dispose of oily paper towels. (oily rags can spontaneously combust in garbage or in pile - hang until dry, then soak with water and detergent before discarding)6.Check that your tank isn’t empty, or near empty.7.If your propane tank tipped over, the tank valve may freeze up. Return tank to upright position and let it sit for a while without use to let valve thaw and/or drain.8.Listen for slight “hissing” sound before starting when pulling up on round ball on top of inlet (to let you know fuel is flowing through tank and regulator)9.Observe lights on front of generator panel to help diagnose problems.
1: Set your generator on a hard level surface outdoors such as a driveway or concrete patio at least 5’ from any opening in a dwelling (window, door vent etc) but preferably 10 feet.4: How to start your generator from propane
3: Attach the end of hose with the female quick-disconnect onto the generator’s male quick-disconnect found near the pull starter side of generator. To do this, fully pull back on the safety shroud of the female quick-disconnect to expose the ring of bearings, insert over male on generator, then release the shroud to seal. See “Safety Information” section of this supplement for more details.
2a: If using propane tank, place tank at least one foot away from generator making sure it is secured from tipping over and close enough for the propane hose with pressure reducing regulator to reach with a slight slack in the hose (not pulling on fittings). A milk crate is ideal for 20 and 30lb tanks, but taller tanks will need additional securing. Close the valve on the propane tank then attach the propane hose with pressure reducing regulator onto the tank. Connection should be hand tight.2b: If using propane from an outlet, make sure outdoor shutoff valve is in off position then attach straight hose to outdoor quick disconnect near shutoff valve.
Safety Information
NOTICE:This section is intended to augment safety information in the original Honda OEM manual and not
supersede
it.You must read the Honda Owner’s Manual
WARNING:Failure to follow instructions may result in explosion or fire causing property damage, serious injury or death. DO NOT attempt to use damaged (including but not limited to kinked, cut, chewed or plugged) equipment and hoses. See your local LP or Nat. Gas dealer for repairs.DO NOT attempt to make repairs yourselfDO NOT connect to non-approved tanks or systems
DO NOT use open flame to check for gas leaksDO NOT perform your own gas pipe installation or repair without a proper licenseDO NOT let fuel hose/regulator or tank come in direct contact with exhaust pipeDO NOT make any alterations or modifications to any natural gas or propane supply. You must use a licensed gas fitter/plumber and follow all state and local codes.
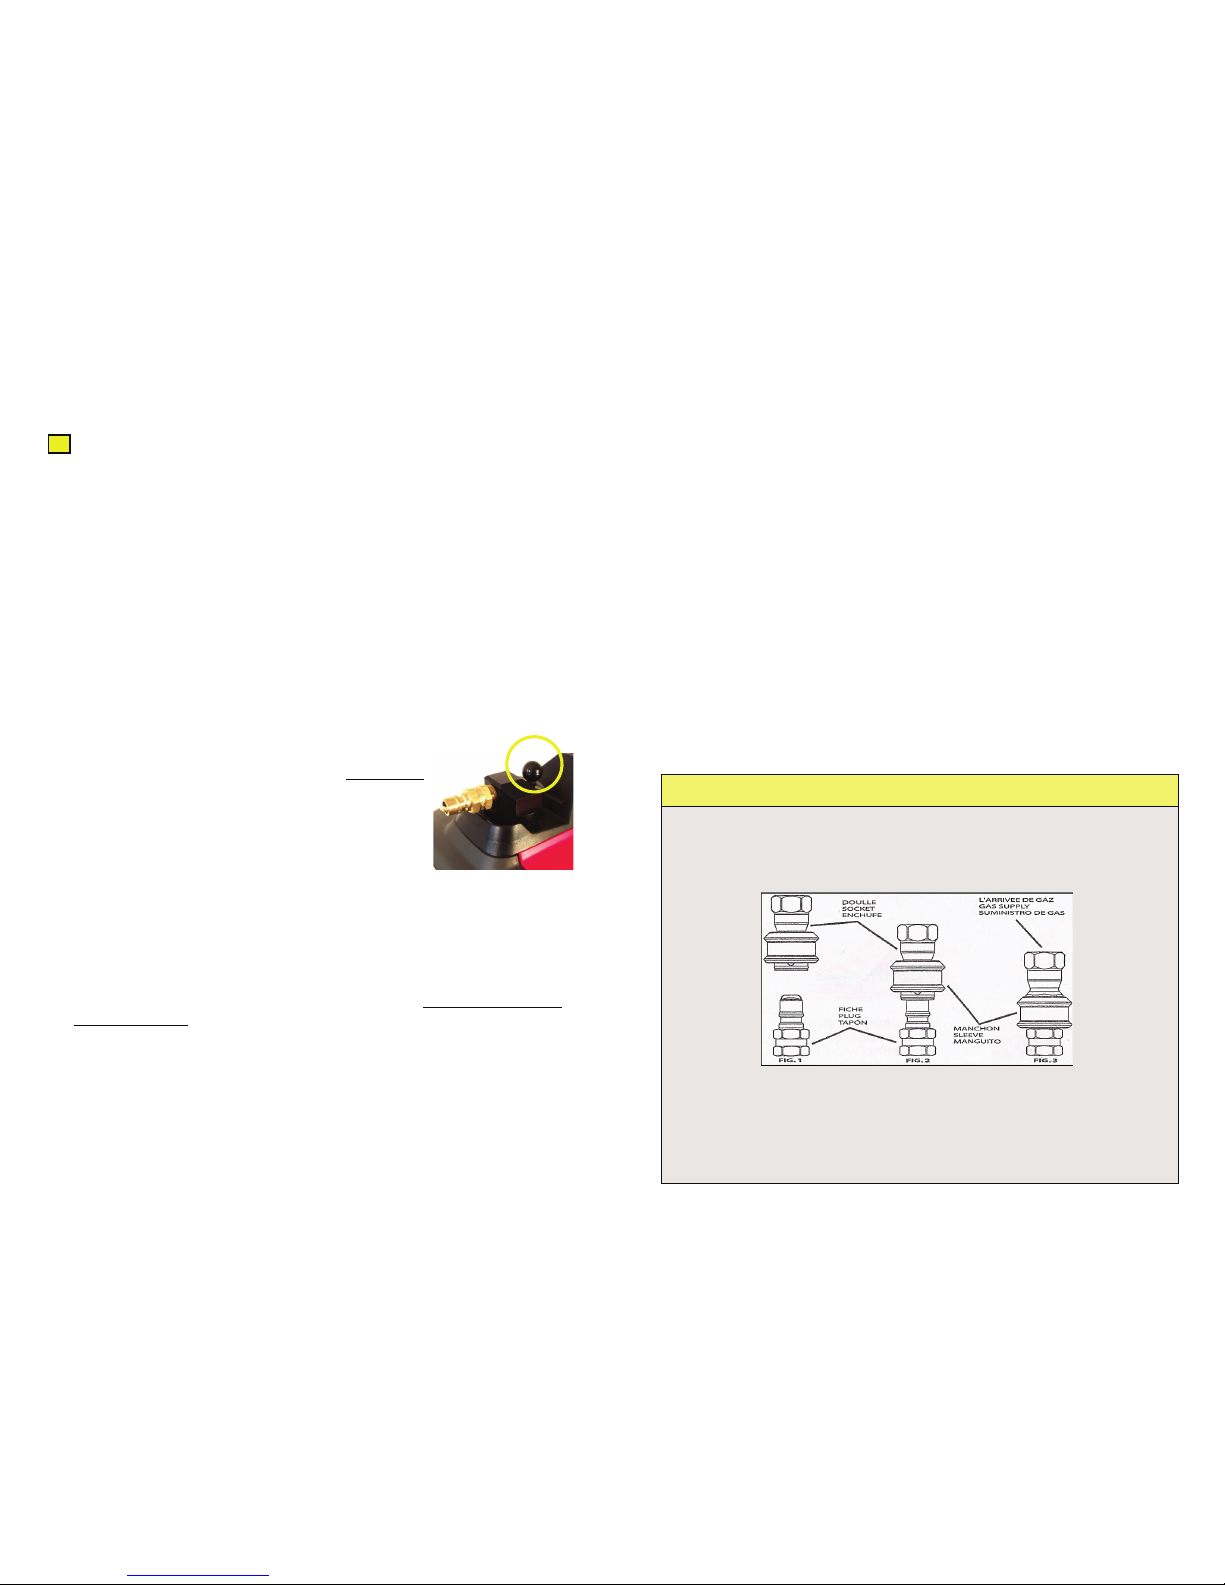
ANSI Z21.41 Quick-Disconnect Devices Installation & Operation Instructions1) Push back sleeve of socket (fig. 1), insert plug (fig. 2), and release sleeve.2) Push plug until sleeve snaps forward locking plug in socket (fig. 3) (This turns on the gas automatically if valve is is on and tank is connected3) Leak test with leak test solution
CAUTION Quick-disconnect devices are to be installed by a gas service technician only. Install according to local codes or NFPA 54 (ANSI Z223.1) National Fuel Gas Code.
PROPANE & NAT. GAS QUICK-DISCONNECT FITTINGS
4. Prime the generator by pulling up on primer ball for 3 seconds (see ball on top of generator at propane inlet), then pull starter cord to start. If generator mis-starts, prime again then pull again to start. Priming for too long will flood engine. If so, wait a minute then try again.

32
1.PRIME FOR ONLY 3 SECONDS (only for propane and natural gas) by gently pressing the button labeled ‘Primer’ on the demand regulator. Over-priming will flood the engine preventing starting. 2.TURN PROPANE TANK ON SLOWLY to prevent EXCESS FLOW VALVE from activating inside propane tank. To reset it, turn tank off, unscrew and re-connect regulator then turn tank on slower.3.The ‘Choke’ is not needed for propane or natural gas fuels.4.NEVER store propane tanks in your home or garage.5.We recommend that you always put the caps back over the quick-disconnects immediately after use to prevent contamination or water from entering the unit.6.We recommend ECO mode only if your load will not be fluctuating greatly. This prevents a brown-out and possible damage to your equipment as the generator tries to quickly increase RPM’s to handle the sudden change.7.DO NOT operate any generator inside your home, garage, or place of business to prevent death from Carbon Monoxide inhalation. It must be used outdoors at all times with all nearby doors and windows closed. 8.DO NOT operate any generator within 5 feet of any window, door or other opening per The National Fire Code, and it is highly recommend that it be at a minimum distance of 10 feet.9.To shut off your generator when running on propane or natural gas, we recommend that do so by turning off the propane tank or fuel supply valve to prevent accidents.
Quick Tips
Use & Operating Instructions
GENERAL TANK SIZING GUIDELINESper generator output rating(assuming 1/2-3/4 average rated load)> 10 Deg F2kW 20lb tank, 3kW 30lb tank, 7kW 60lb-100lb tank or dual 30lb10 to -10 Deg F2kW 30lb tank3lW 40lb tank7kW 100lb tank or dual 40lb tanks-10 to -20 Deg F2kW 40lb tank3lW 60lb tank7kW Dual 60 to100lb tanks
TO START YOUR GENERATOR, first connect the regulator hose supplied to the propane tank and generator. If you hear a “ting” sound as you turn on the valve then you may have actuated the tank’s excess flow valve. If this happens, either wait a moment for it to automatically reset or you will have to turn off tank valve and repeat this step slower. Next you may need to purge the air out of your just connected propane or natural gas hose and prime your fuel system for rapid start (if it hasn’t just been running) by pulling up on the black ball on top the generator’s fuel inlet for a full 3 seconds. you should hear a slight “hiss” sound meaning fuel is properly flowing. Your fuel system is now ready to operate. Refer now to your OEM manual for further detailed start instructions.TO STOP YOUR GENERATOR, we recommend that you disconnect the load first then turn off the gas supply then turn off the key. This is a best practice so your Propane or Natural gas line does not stay under pressure to minimize potential accidents. How to start your generator and STOP your generator
2: Change fuel orifice if operating above 5,000 ftTo change fuel orifices, first pull the fuel line down and off of the brass injector fitting. Using the supplied allen wrench, unscrew the fuel orifice installed in the end of the brass fitting and install the correct fuel orifice. This is also how and where to install the alternate ‘High-Altitude Orifice’ if needed for over 5000ft. Re-apply the fuel tube fully onto the brass injector.
This lever does not effect the propane flow but does allow the spark plug to fire when in the ON position.
Your generator has been pre-configured to run from propane but you may instead configure it to operate at a high altitude (above 5,000ft). To do so, you will need to change the fuel orifice located in the brass fitting attached to the fuel line shown circled below.DO NOT connect your generator directly to a propane tank without the proper regulator or to an intermediate 10-15psi regulator often found on large tanks. Your generator comes pre-set from the factory to run from low pressure propane at 7-11” w.c. equivalent to approx. 1/2psi standard household pressure. 3: Connect your generator using the correct hose
Propane hose with pressure reducing regulator for connecting to 20-100lb propane tankLow pressure propane straight-through hose for connecting to low pressure outletCAUTION: You MUST use a licensed plumber or gas fitter to add a shutoff and quick-disconnect gas outlet to your home’s propane tank!Propane inlet location. Remove protective cap for access
1: First turn the generator run switch to “ON”Note: switch in picture is in “OFF” position.TO OPERATE FROM: Propane
NOTE: The orifice with the smaller hole is for high altitude.
Typical hose options‘Primer’’ handle(pull up to prime)Quick-disconnect(remove blue cover)
NOTE: SEE HONDA MANUAL TO OPERATE FROM GASOLINE
This manual suits for next models
8
Table of contents
Other GenConnex Portable Generator manuals
Popular Portable Generator manuals by other brands

Chicago Electric
Chicago Electric 94191 Assembly and operation instructions

Gage Bilt
Gage Bilt GB808HVB instructions

Lukasiewicz
Lukasiewicz Sonic Blaster Plus operating manual

Shindaiwa
Shindaiwa DG50MKM-P Owner's and operator's manual

Tektronix
Tektronix AWG5200 Series Service manual

Westinghouse
Westinghouse WJS001 operating instructions