Acer al200 User manual

User’sManual

Specialnoteson LCDmonitors..............................................................................1
Introduction...........................................................................................................2
Features.................................................................................................................2
Unpacking..............................................................................................................3
Attaching/Removing the Base...............................................................................4
Screen position adjustment....................................................................................4
Connecting the power cord....................................................................................5
Safetyprecaution...................................................................................................5
Cleaning your monitor............................................................................................5
Presetmodes..........................................................................................................6
Power saving..........................................................................................................7
DDC.......................................................................................................................7
Installation.............................................................................................................8
Usercontrols..........................................................................................................9
Front panel controls...............................................................................................9
Basicsection of aOSD screen..............................................................................10
Standard OSDoperation.......................................................................................11
OSDfunction description.....................................................................................11
Troubleshooting..................................................................................................13
Specification.........................................................................................................15
Formore informationandhelpin recycling,please visitthe followingwebsites:
Worldwide:ht t p :/ / g lo b a l .a c e r. c o m/a b o u t/ s us t a i na b il i t y. h t m
TABLEOFCONTENTS

AL2002W
E-1
SPECIALNOTESON LCD MONITORS
The following symptomsare normal with LCD monitor and do not indicate a problem.
NOTES
·Dueto thenature ofthe fluorescentlight,thescreenmayflicker during initialuse.
Turn off thePowerSwitchandthenturnit on againtomakesuretheflicker disappears.
·You mayfind slightlyunevenbrightnesson the screen dependingon the desktop
patternyou use.
·TheLCDscreenhaseffectivepixels of 99.99% or more.Itmay includeblemishesof0.
01% or lesssuch as amissingpixel or apixel litall of thetime.
·Due to the natureof the LCD screen, an afterimage of theprevious screen may
remain after switching the image,when thesameimage is displayed for hours.In
thiscase, the screen isrecoveredslowly bychanging theimage or turning off the
Power Switch for hours.
JAPANESEMATERIALCONTENTDECLARATION
A Japanese regulatoryrequirement, definedbyspecification JIS0950, 2005.mandates
thatmanufactures provide Material Content Declarations for certaincategories of electronic
products offered for sale after July1, 2006.
ToviewtheJIS C0950 materialdeclaration for thisproduct. Visit
http://global.acer.com/about/sustainability.htm

AL2002W
E-2
INTRODUCTION
Congratulations for purchasingmodelAL2002W ,ahigh performance20-inch color TFT
LCDmonitor.TheAL2002Wmonitor provides flicker-freeand color imagesatoptional
resolutions. Through this user guide, we will introduce you step-by-step all the
features, functionsand technical specifications of theLCD monitor. Surely you will have
arefreshing experienceworkingwith themonitor.
FEATURES
The AL2002Wis a20-inch TFTLCD monitor that is intelligent,microprocessor-basedand
ergonomicallydesigneddisplay,compatible withmost analogRGB(Red, Green, Blue)and
Digitaldisplay standards, including PS/V, PS/2,optional forAppleMacintosh Centris,
Quadra, and Macintosh II family signals.The LCDmonitor is capable of displaying crisp
and vibrant color graphics with VGA,SVGA, XGA,SXGA(non-interlaced), SXGA,WSXGA
and most Macintosh compatible color video cards.
·Themonitorisableto properlyfunction evenin caseofupgrade video cardsor
software because of the wide auto-scanning compatibilityrangewithoutrequiring to
buyanewmonitor.
·Theinternal microprocessor digitallycontrolsauto-scanning.For horizontal scan
frequencies between 30 KHz and81 KHz,andvertical scan frequencies between 56 Hz
and 76 Hz.Ineachfrequencymode, the microprocessor-basedcircuitryallowsthe
monitor to function at the precision-of a fixed frequency.
·The residentmemoryallowsfor storing factorydefault settings and also additional
user adjustment parameters.
·Themaximumresolutionachievableis WSXGA(1680 x1050),best suitedforWindows
applications
·Thecompact and sleekcabinetdesign saves lot of your desk space and makes your
desk look neat andtidy.
·Themonitorcomplies with TCO99guidelines. In this scheme,noenvironmentalharmful
substances are used during the entiremanufacturing process.
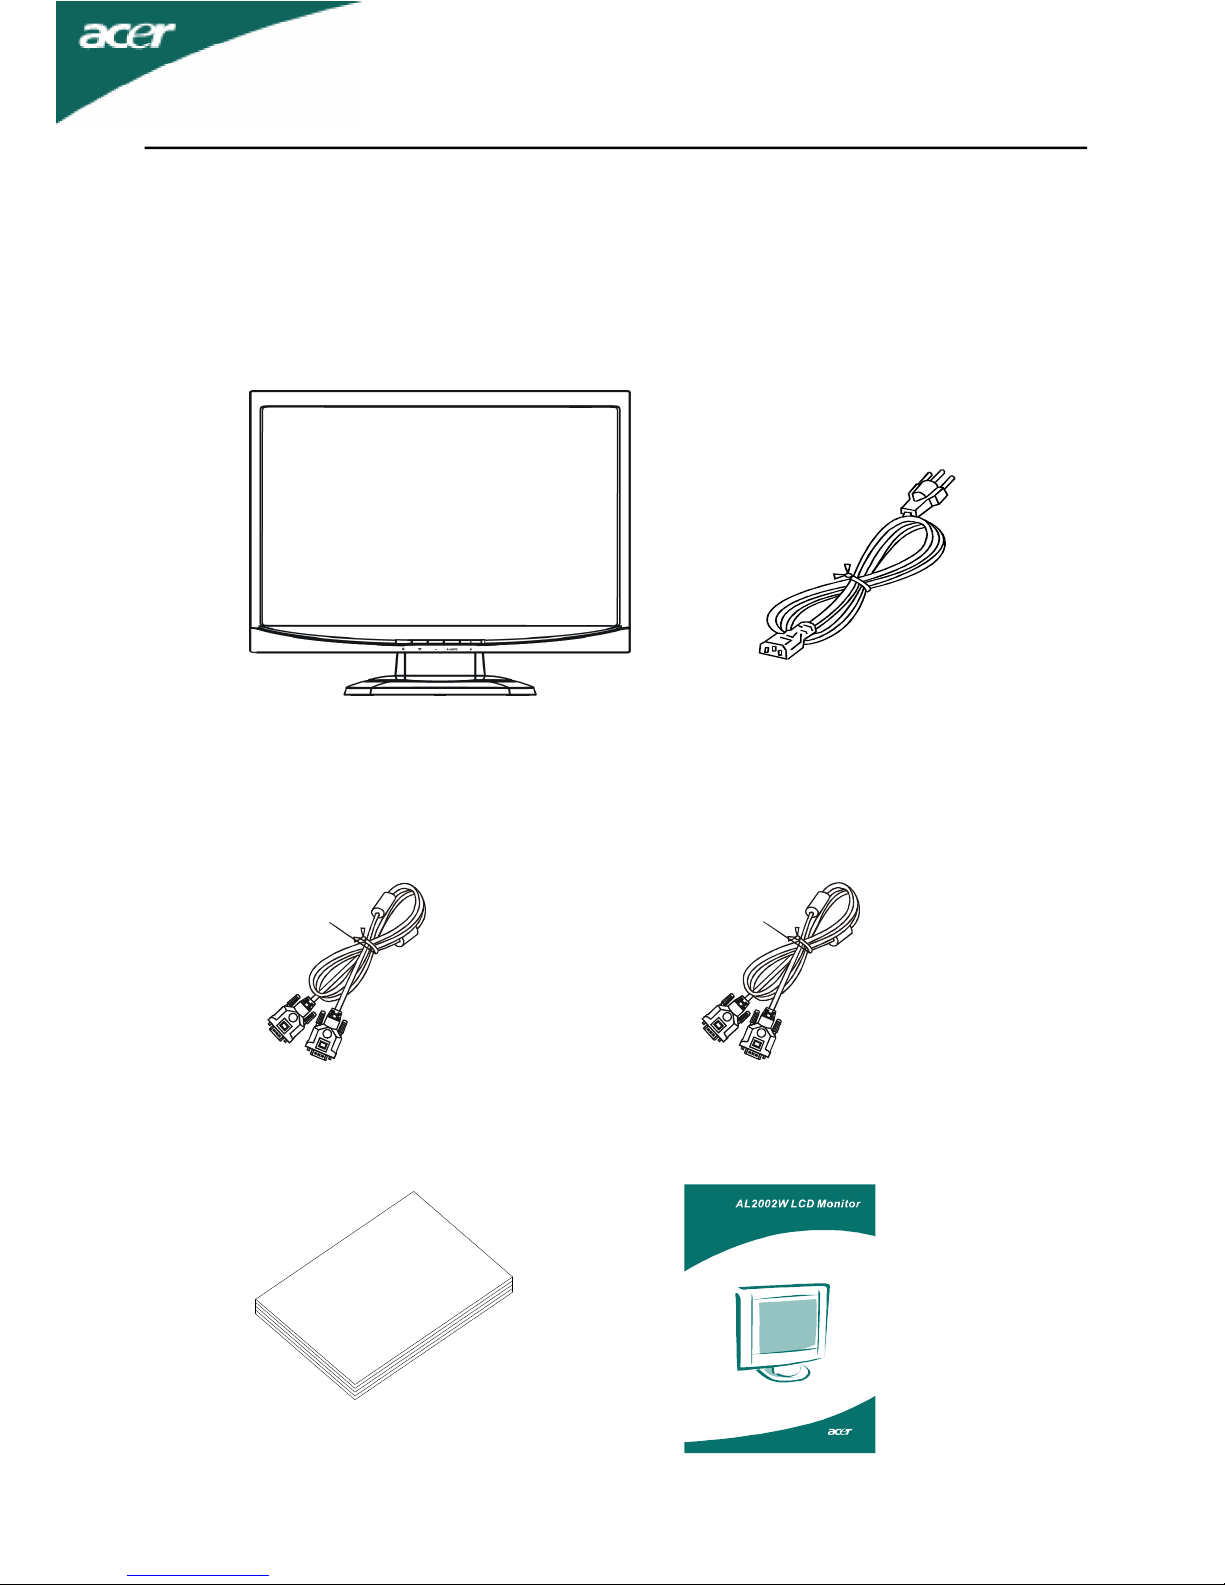
AL2002W
E-3
·LCD Monitor
UNPACKING
Pleasecheckthefollowing items arepresentwhenyouunpackthebox,and savethe
packing materials incaseyou will need to ship or transport the monitor in future.
·User Manual
·DSUBCable
·DVICable
(Only Dual-Input Model)
·ACPower
QuickStartGuide
·Quick StartGuide

AL2002W
E-4
SCREEN POSITION ADJUSTMENT
In oder to optimize the best viewing position, you canadjust the tilt ofthe monitor by
using both of your hands to holdthe edges ofthe monitor as shownin the figure below.
The monitor can be adjusted to 20 degrees up or 5 degrees down as indicated byarrow
below.
Attaching/RemovingtheBase
Install:
Align the four hooks on the bottom of
the monitor with the corresponding
slotson thebottomof the base.
20 0
50
Remove:
Depress the hook asindicated first
before removing the base and followthe
arrowdirection toremoveit.

AL2002W
E-5
CONNECTING THE POWER CORD
·Check first to make sure that the power cord you use is the correct type required for
your area.
·This monitor has a universal power supplythat allows operation in either 100/120V
ACor 220/240 VACvoltage area.No user-adjustment is required.
·Plugone endofthe powercord totheAC Inlet,pluganother endtoaproper AC outlet.
·For unit using at 120 V AC:
UseaULListedCord Set, TypeSVTwireand plug rated 10 A/125 V.
·For unit usingat220/240 VAC (outside of U.S.):
UseaCord Set consistingof H05VV-F cord and plugrated10 A, 250 V.Thecord set
should have the appropriate safetyapprovals for the countryin whichthe equipment
willbe installed.
SAFETY PRECAUTION
·Avoid placing themonitor, or any otherheavy object, on the power cord to prevent
it fromfire or electrical shock.
·Donotexpose themonitor torain,excessivemoisture,or dust toavoidfire or shock
hazard.
·Do notcoverthe slotsor openingsofthemonitor for properheat dissipation.
Always put the monitor in a place where there is adequate ventilation.
·Avoid placing the monitor against a bright background or where sunlight or other
lightsources may reflect on theface of the monitor. Placethe monitor just below
eye level.
·Handle with care when transporting the monitor.
·Refrain fromgiving shock or scratch to the screen, asscreen is fragile.
CLEANING YOUR MONITOR
Please carefully followthebelowguidelineswhen cleaning the monitor.
·Always unplug the monitor before cleaning.
·Use a soft cloth to wipe the screen and cabinet front and sides.

AL2002W
E-6
PRESETMODES
To reducetheneed for adjustmentfordifferentmodes, themonitorhasdefaultsetting
modes thatare most commonly usedas given inthetablebelow.For optimum adjustment,
the user is suggested to performthe Auto Setup under Windows “Full Screen” pattern or
usingthepatternin thefloppydiskprovided. Whennoneof themode is matched, theuser
can store their preferred modes in the usermodes. Themonitor is capableofstoring up to
9 usermodes. Theonlycondition to store as a user mode is the newdisplayinformation
musthave1 KHzdifferencefor horizontalfrequencyor 1Hzfor vertical frequency or the
sync signal polarities are differentfromthe default modes.
ModeResolution H.Freq.
(KHz)
BandWidth
(MHz)
Polarity
HV
1VGA720 x40070Hz31.4728.322-+
2VGA640x48060Hz31.4725.175--
3VESA640x48075Hz37.5031.5--
4VESA800x60060Hz37.8840++
5VESA800x60075Hz46.8849.5++
6VESA1024 x76860Hz48.3665--
7VESA1024 x76875Hz60.0278.75++
8MAC1152 x86475Hz67.5108++
9SXGA1280x102460Hz64108++
10SXGA1280x102475Hz79.976135++
11WSXGA1680x105060Hz65.3146.25-+

AL2002W
E-7
POWERSAVING
Themonitor will be driveninto “Power Saving”mode bythecontrol
s
ignalfromthe
displaycontroller, asindicated bythe amber-color power LED.
The power saving states will be kept until acontrol signal hasbeen detected or the
keyboard or mouseisactivated. The recovery timefromActive OFF state backtoONstate
isaround 5 seconds.
DDC
To make your installation easier, the monitor is able to Plug and Playwith your systemif
your systemalso supports DDC protocol. The DDC(DisplayDataChannel) is a
communication protocol through which themonitor automatically informsthehost system
about its capabilities, forexample, supported resolutions and corresponding timing. The
monitor supportsDDC2B standard.
State Power
Consumption LEDLight
ONNormalGreen
PowerSavingMode<2 WAmber

AL2002W
E-8
INSTALLATION
To install the monitor to your host system,please followthe steps as given below:
Steps
1.1-1Connect VideoCable
a. Make sure both the monitor and computer are powered-OFF.
b. Connect theVGAvideo cableto the computer.
1-2DigitalCable (OnlyDual-InputModel)
a. Make sure both the monitor and computer are powered-OFF.
b. ConnecttheDVI video cable tothecomputer.
2.Connect power cord
Connectthe power cord to the monitor, then to a properlygrounded ACoutlet.
3.Power-ONMonitor andComputer
Power-ON themonitor first, then power-ON thecomputer.
This sequence is veryimportant.
4.If themonitorstilldoesnotfunctionproperly,please referto the troubleshooting
section to diagnose the problem.
Pleasedon’t open
the cover

AL2002W
E-9
USERCONTROLS
Front Panel Controls
1.Power Switch:To turn ON or OFFthepower.
2.PowerLED: Lights up to indicate thepower is turned ON.
3.Select MENU:Toexit andenterOSD menu.
4.Select :Tomove downward inthe OSD Item.
ACtas Digital and Analogswitching hot keywhen OSDis not
displayed.(Only Dual-Input Model)
5.-:To decrease the value ofthe parameter in the OSD, whichhas been
selected for adjustment.
-:Choose thepreviousOSD MENUpage.
6.+:To increase the value of the parameterin the OSD,which has been selected
for adjustment.
+:Choosethe nextOSDMENU page.
AUTO:Act asAUTO adjustment hot keywhen OSD is not displayed.
12
3456

AL2002W
E-10
Basic Sections of aOSD Screen
i
i
i
1024x 768 60Hz
i
i
255
255
255
-
-
-
+
+
+
5000K 6500K7500K8200K9300K
Brightness
Contrast
AutoContrast
Red
Green
Blue
HorizontalSize
Fine
Left/Right
Down/Up
Auto Adjust
OSDLeft/Right
OSDDown/Up
Language
Factory Reset
OSD Timeout
Auto Adjusting
PleaseWait
NoVGASignal
CheckVGACable
VGA

AL2002W
E-11
Standard OSD Operation
1.Press MENU key toactivatetheOSD menu,whenOSD is notdisplayed.
2.Use Select keytomovedownthrough the menu cyclically.Theparameter willbe
highlighted when selected.
3.Then use +or -to increase or decrease the value of theparameter, or makeselection
between different options.
4.To quittheOSDscreen atany time during theoperation, press MENU key.If no keys
are pressed for atimeperiod, the OSDautomatically disappears.
5.When OSD is not displayed,press +keytostart Auto-Adjust.
6.When OSD isnotdisplayed, press keyto switchAnalog and Digitalmode.(Only
Dual-Input Model)
OSDFunction Description
-------------------------------------------------------------
·Brightness To increaseor decrease the brightness.
·Contrast Toincrease or decrease the contrast.
·Auto Contrast Press “+” key tostartauto analog contrast.
[Whenstayingat Digital mode, Auto Contrast will be
disabled](Only Dual-Input Model)
-------------------------------------------------------------
·ColorTemperature Press “-”or“+”toselect 5000,6500,7500,8200,9300
and USER. Only whenselecting USER, you can make
adjustments to the R/G/B content, otherwise not.
-------------------------------------------------------------
·HorizontalSize Toincreaseor decreasethesize ofimage.
·Fine To increase or decrease the snownoise of the image.
·Left / Right Tomove the screen toward left or right.
·Down / Up To move the screen upward or downward.
When stayingatDigital mode, thispage will be disabled.(Only Dual-Input Model)

AL2002W
E-12
·Auto Adjust Press “+” toturn on this function. The Auto-Adjust
will automatically adjustV-Position,H-Position,Clock,
and Clock-Phase, the whole process takes about 5
seconds.
------------------------------------------------------------
·Language Select amongEnglish, French, Italian,German,Spanish,
,and .
·Factory Reset To return the monitor to itsdefault settings.
·OSD TimeOut To adjusttheperiod ofOSD auto turn-off time.
·OSD Left / Right To move the OSD position horizontallyon the screen.
When the “+” keyis pressed, the OSD control menu
will moveto theright side ofthe screen. Likewise when
the “-” keyis pressed, theOSDcontrol menu will move
to the left side.
·OSD Down/ Up To move the OSDposition verticallyon the screen.
When the “+” keyis pressed, the OSD control menu
will move to the up side of the screen. Likewise when
the “-” keyis pressed, theOSDcontrol menu will move
to the lower side.
-------------------------------------------------------------
·Information Indicates the current resolution and
V-Frequency.
-------------------------------------------------------------

AL2002W
E-13
TROUBLESHOOTING
Before sending your LCD monitor for servicing, please checkthe troubleshooting list
belowto see if you can self-diagnose theproblem.
ProblemsCurrentStatusRemedy
No
Picture
LED ON ·UsingOSD,adjustbrightness andcontrastto
maximumorresettotheirdefaultsettings.
LED OFF ·Check thepowerswitch.
·Check if ACpowercordisproperlyconnected
tothemonitor.
LED displays
amber color
·Check if video signalcableisproperly
connected attheback ofmonitor.
·Check if thepowerofcomputersystemisON.
Abnormal
Picture
UnstablePicture ·Check if thespecificationofgraphicsadapter
andmonitorisincompliancewhichmaybe
causing theinputsignalfrequencymismatch.
Displayismissing,
center shift,ortoo
small or too large
indisplaysize
·UsingOSD,adjustRESOLUTION,CLOCK,
CLOCK-PHASE,H-POSITIONandV-
POSITIONwithnon-standardsignals.
·UsingOSD,incaseofmissing full-screenimage,
pleaseselectotherresolutionorother vertical
refreshtiming.
·Waitforafewsecondsafteradjustingthesizeof
theimagebeforechangingordisconnecting the
signalcableorpoweringOFF themonitor.
(VGAMode)

AL2002W
E-14
ProblemsCurrentStatusRemedy
No
Picture
LED ON ·UsingOSD,adjustbrightness andcontrastto
maximumorresettotheirdefaultsettings.
LED OFF ·Check thepowerswitch.
·Check if ACpowercordisproperlyconnected
tothemonitor.
LED displays
amber color
·Check if video signalcableisproperly
connected attheback ofmonitor.
·Check if thepowerofcomputersystemisON.
(DVIMode)

AL2002W
E-15
SPECIFICATION
LCDDisplay
DisplayType20"TFTLCD
DisplayArea (WxH)433.4x270.9 mm
ContrastRatio800:1(Typ.)
ViewingAngle160oH160oV(CR=10)
PowerInput
Voltage100-240Vac
Frequency50-60Hz
CurrentRating1.5A
OperationalFeatures
DisplayColors16.7M
ResolutionWSXGA(1680 x1050)at60Hzmaximum.
Brightness300 cd/m2(Typ.)
ResponseTime5ms(Typ.)
InterfaceAnalogRGB,Digital(OnlyDual-InputModel)
InputConnector 15-pinD-sub, DVI-DCable(OnlyDual-InputModel)
UsersControls
FrontPanelControlsPowerOn/Off,MENU,SelectDOWN(),Select
DOWN()toswitchAnalogandDigitalValue(+/-
)(OnlyDual-InputModel),+/AUTO,-.
OSDControls
(Note)
Brightness,Contrast,AutoContrast,Color
Temperature,HorizontalSize,Fine,Left/Right,
Down/Up,Auto-Adjust,Language,FactoryReset,
OSDTimeOut,OSDLeft/Right,OSDDown/Up,
Information
Note:forDVI mode, AutoContrast,Horizontal
size,Fine,Left/Right,Down/Up,AutoAdjust will
bedisabled.

AL2002W
E-16
*All specifications are subject to change withoutnotice.
PhysicalSpecification
Dimension(HxWxD)383 x479x188(mm)
NetWeight4.5 Kg
Power
PowerSavingYes
PowerConsumption40 W(OnlyAnalogInputmodel)
49 W(OnlyDualInputmodel)
Regulation
Safety&EMIUL,CUL,TUV-GS, TUV-Ergonomics,FCC-B,CE,
TCO99

This manual suits for next models
2
Table of contents
Other Acer Monitor manuals