Acer ENDURO Urban T1 User manual

ENDURO Urban T1
User’s Manual

2 -
© 2020 All Rights Reserved
ENDURO Urban T1 User’s Manual
Covers: EUT110-11A
Regulatory Model Number (RMN): A9001
This revision: November 2020
ENDURO Urban T1
Model number: _______________________________________________
Serial number: _______________________________________________
Date of purchase: ____________________________________________
Place of purchase: ___________________________________________
Comes with the Google™ app and Google Chrome™
Google, Android, Google Play, YouTube and other marks are trademarks of Google LLC.
Important
This manual contains proprietary information that is protected by
copyright laws. The information contained in this manual is subject to
change without notice. Images provided herein are for reference only
and may contain information or features that do not apply to your
computer. Acer Group shall not be liable for technical or editorial errors
or omissions contained in this manual.
Register your Acer product
Go to www.acer.com/register-product, and sign in or sign up your Acer ID
to register your product.
Once it is done, you can review it under “My Products” page.

Table of contents - 3
TABLE OF CONTENTS
Getting started with your tablet 4
Unpacking your tablet.............................. 4
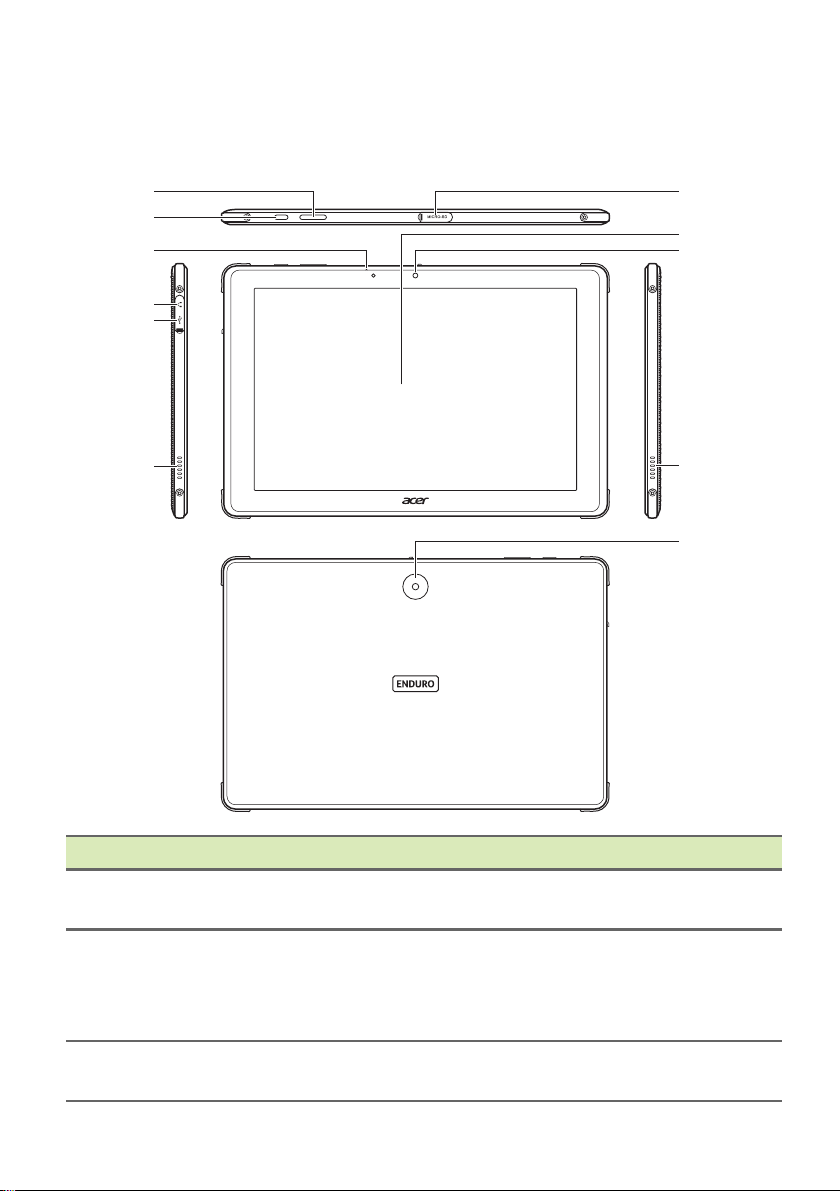
Getting to know your tablet...................... 5
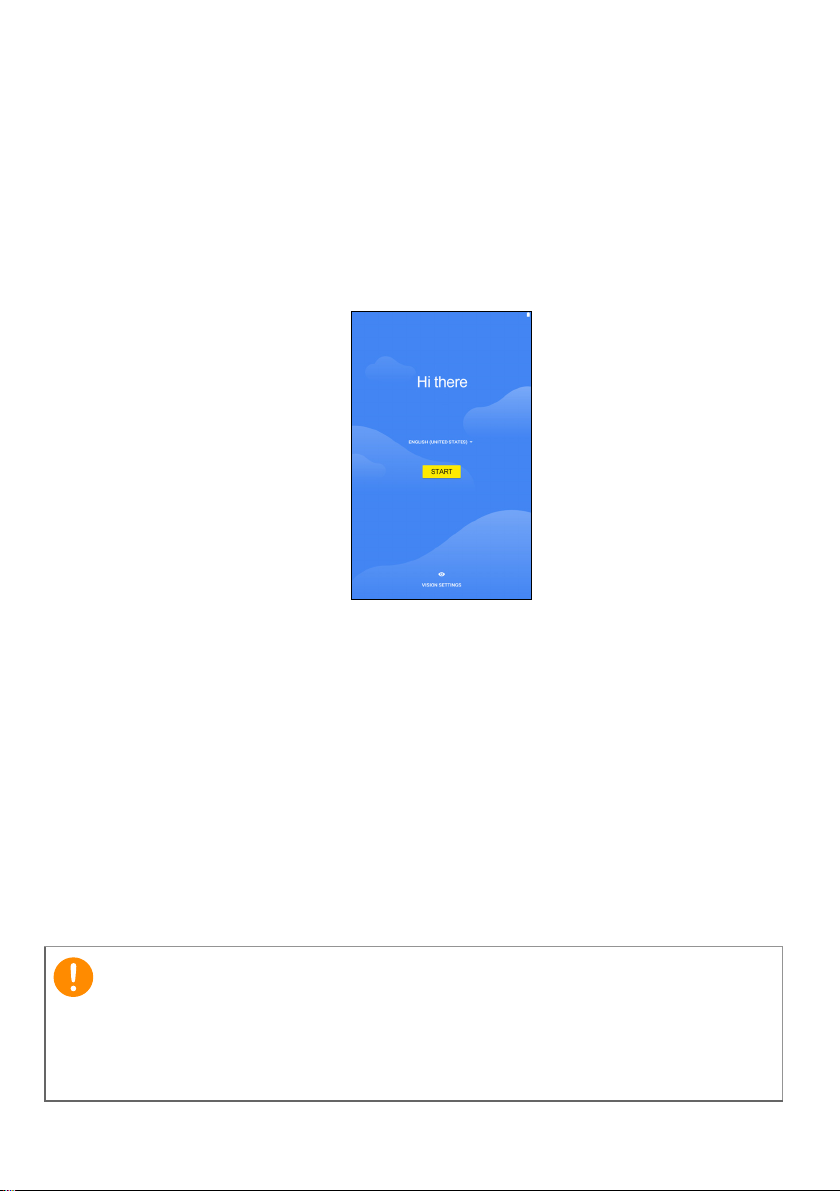
Turning on for the first time...................... 7
Charging your tablet 9
Assembling the power adapter ................ 9
Using your tablet 11
Using the touchscreen........................... 11
The Home screen .................................. 11
The virtual keyboard .............................. 23
Editing text............................................. 24
Setting an alarm .................................... 25
Waking your tablet................................. 25
Shutting down your tablet ...................... 26
Connecting devices to your tablet 27
Connecting to AC power........................ 27
Accessories ........................................... 27
Inserting a microSD card ....................... 27
Transferring files between your tablet
and a PC................................................ 27
Connecting a Bluetooth device.............. 28
Going online 30
Managing Wi-Fi connections ................. 30
Data saver (background data) ............... 30
Browsing the internet............................. 31
Google™ services ................................. 32
Using the camera and video recorder 35
Camera/video icons and indicators........ 35
Taking a photo ....................................... 36
Recording a video.................................. 36
Camera and video options..................... 37
Advanced settings 39
Network & internet ................................. 39
Connected devices ................................ 41
Apps & notifications ............................... 41
Display ................................................... 42
Sound .................................................... 43
Personal................................................. 43
System................................................... 44
Updating your tablet’s operating system 44
Resetting your tablet.............................. 45
FAQ and troubleshooting 46
Other sources of help ............................ 47
Specifications 48
Guidelines for safe battery usage 50
Battery information................................. 50
Replacing the battery............................. 51
End user license agreement 52

4 - Getting started with your tablet
GETTING STARTED WITH YOUR TABLET
Unpacking your tablet
Your new tablet comes packed in a protective box. Carefully unpack
the box and remove the contents. If any of the following items are
missing or damaged, contact your dealer immediately:
• ENDURO Urban T1 tablet
• Product setup and safety information
• Power cord
• USB cable
• AC adapter
• Warranty card
Note
Before using your tablet for the first time, you need to charge it for at least
four hours. After that you can recharge the battery as needed.
Note
If the battery has been depleted for a while, please charge the tablet for at
least 30 minutes using the adapter.

Getting started with your tablet - 5
Getting to know your tablet
1 7
9
8
2
3
4
5
6
10
6
Views
No. Item Description
1Volume control key Increases and decreases the tablet
volume.
2Power button
Long press to turn the tablet on, press
briefly to turn the screen on/off or enter
sleep mode; press and hold to turn the
tablet off.
3Microphone Receives audio for voice searches, video
chats and Internet calls.

6 - Getting started with your tablet
43.5 mm headphone jack Connects to stereo headphones.
Pull the lip down to open the port fully.
5Micro USB port
Connects to a computer via a USB cable.
Also serves as the charging port for the
AC adapter. For more information, see
Charging your tablet on page 9.
6Speakers Delivers stereo audio output.
7MicroSD card slot Insert a microSD card into the slot.
Pull the lip down to open the port fully.
8Touchscreen 10.1" LED-backlit LCD.
9Front-facing camera A 2 megapixel camera for video chats
and selfies.
10 Rear-facing camera A 5-megapixel camera for taking high-
resolution images.
No. Item Description

Getting started with your tablet - 7
Turning on for the first time
Before you start, rotate the tablet to Portrait mode. To turn on your
tablet, press and hold the power button until you see the Acer logo.
Wait a moment for your tablet to boot up. You will then be asked some
questions before you can use your tablet.
To start, tap to select your language then tap the arrow. Follow the
rest of the instructions as they are displayed.
If the tablet’s screen turns off, it has entered sleep mode. Briefly press
the power button to wake it up. For more information see Waking
your tablet on page 25.
Sign in to or create a Google account
If you have Internet access, your tablet allows you to synchronize
information with a Google account.
During the start-up process, you may create or sign in to an account,
which will be used to synchronize your contact list, email, calendar
and other information. If you do not yet have Internet access, or do not
want to use this feature, then tap Skip.
Important
You must sign in to a Google Account to use GmailTM, Hangouts,
Google Calendar, and other Google apps; to download apps from
Google Play; to back up your settings to Google servers; and to take
advantage of other Google services on your tablet.

8 - Getting started with your tablet
If you have multiple Google accounts, such as separate accounts for
personal and business contacts, you can access and synchonize
them from the Accounts settings section. See Multiple Google
accounts on page 43
Note
If Google Play Store is updating apps in the background, opening new apps
may consume memory and may affect the performance on your device.

Charging your tablet - 9
CHARGING YOUR TABLET
Assembling the power adapter
Your tablet is bundled with one of two types of USB power adapters: a
fixed-prong type or a removable-prong type. Both types are described
in this manual.
Fixed-prong type
The prongs and power adapter body form a complete piece, no
assembly required. Simply slide the large end of the USB cable into
the power adapter body (it will fit in only one direction). You cannot
remove or switch the prongs with this type of adapter.
Removable-prong type
Align arrows on the power adapter head and body. Insert the head
onto the power adapter body and turn the head towards "CLOSE"
printed on the head until it clicks into place. Simply slide the large end
of the USB cable into the power adapter body (it will fit in only one
direction).
CLOSE
OPEN
1
C
OPEN
2

10 - Charging your tablet
Connecting power
Connect the power connector to your tablet and plug the AC adapter
into any AC outlet.
Warning
Only use an Acer-approved adapter to charge your device.
Note
It is normal for the tablet surface to become warm during charging or long
periods of use.

Using your tablet - 11
USING YOUR TABLET
Using the touchscreen
Your tablet uses a touchscreen for selecting items and entering
information. Use your finger to tap the screen.
Tap: Touch the screen once to open items and select options.
Swipe: Quickly swipe your finger across the screen to switch screens
or open lists of options or information.
Drag: Hold your finger on the screen and drag across the screen to
select text and images.
Tap and hold: Tap and hold an item to see a menu of actions for that
item.
Scroll: To scroll up or down the screen, simply drag your finger up or
down the screen in the direction that you want to scroll.
The Home screen
When you start your tablet, or wake it from power saving, it will display
the Home screen. This screen gives you quick access to apps
("applications"), widgets, and folders. See Personalizing Home
screens on page 19.
Folders are groups of apps that occupy one space on a Home screen.
See Adding folders to a Home screen on page 21.
Widgets provide special functions, quick shortcuts to special app
features, or serve as small apps that display constantly-updated
information (like the time and weather). Many apps provide widgets,
while some apps provide only a widget, and must be added and used
from a Home screen. See Adding widgets to a Home screen on
page 21.
Note
When you first see the Home screen, and your tablet is connected to the
Internet, it will download a selection of recommended, optional apps. These
may be deleted, as with any other downloaded app.

12 - Using your tablet
Using the Home screens
The Home screen provides controls and information.
Swipe the Home screen up to see most apps installed on your tablet.
If you need more space, you can extend the Home screen to give you
more screens to add app icons or widgets. To add additional screens,
tap, hold, and then drag an icon to the right edge of the screen. See
Moving an app or folder on page 19 and Adding widgets to a
Home screen on page 21.
Search
Status and
notification bar
Navigation
Note
Bundled apps differ depending on region and configuration.
Note
Removing or moving all apps and widgets from a Home screen will
automatically remove that Home screen as well.
Application
dock

Using your tablet - 13
Navigation
To navigate through menus and options,
three (or more) icons are shown at the
bottom of the screen.
Back
Tap this icon to go to the previous page, or to go up one level
in a menu. This icon may be replaced with the hide icon in
certain cases (e.g. when the keyboard is displayed. In this
case, tapping the icon minimizes the keyboard.
Home
Tap this icon to go directly to the Home screen. Tap and hold to open
Google search.
Overview / Recent
Tap this icon to see recently opened apps in your tablet’s Overview
screen. Tap an app to open it. Tap anywhere on the screen to return
to the Home screen.
Previous app
Double tap the Overview icon to switch directly to the previously used
app.
Split-screen mode
If you are using a compatible app, tap and hold the Overview
icon to enter split-screen mode. See Split-screen mode on
page 17.
Favorites bar
The Favorites bar is visible on any Home screen and holds apps you
frequently use. To remove an app from the bar, simply tap and hold
the app and drag it away. To fill the gap with an app of your choice,
see Moving an app or folder on page 19.
Back Home Overview
Hide

14 - Using your tablet
Home settings
Open Layout settings for your tablet.
Widgets
Add a widget to the screen. See Adding widgets to a Home screen
on page 21.
Wallpapers
Change the image for the screen background. See Changing the
wallpaper on page 22.
Access requests
When you first open some apps, or use certain
functions, your tablet will ask for permission to
access some features or information.
To allow the app to fully function tap Allow or OK, but if you do not
want to share some information you can choose to Cancel or Deny
access; however this may cause some apps to function incorrectly. To
change permissions later, open the app information in Settings >
Apps & notifications, then tap App Permissions to turn permissions
on or off.
Search
Search enables you to use a single, quick search to locate a variety of
information on the internet and on your tablet. To use Search, simply
tap in the search bar and type your query.
Searching on the internet
As you type, a list displays search suggestions. Based on the words
you enter, these suggestions try to help you quickly access what you
are looking for and may include the following:
• A previous search you performed on any device while you were
logged into your Google account and performed a Google search;
Note
In order to search or browse the internet, you must be connected to a
wireless network. See Going online on page 30.

Using your tablet - 15
• A new internet search suggesting what you might be looking for;
• A specific website address.
If what you’re looking for appears in the suggestions list, simply tap it.
Otherwise, tap on the keyboard.
Tap a category at the top of the results screen to filter the search
results to show just Images, News, or other type of result.
Searching on your tablet
Tablet search results are shown below the internet search
suggestions. These suggestions are taken from sources such as the
names of apps installed on your tablet, settings, media files from
Google Play apps, contacts, bookmarks, and browsing history.
Voice search and "OK Google"
With voice actions, you can send text messages, place calls, send
emails, find directions, search the internet and even send a note to
yourself using your voice.
To start a voice search, open Google app then say "OK Google" or
tap the microphone in the search bar. For information on using
voice search in the Chrome app, see Voice Search in Chrome on
page 33.
Status and notification area
Status and notification icons are shown at the top of the screen. The
top-right corner displays status information such as the battery status,
and connectivity. The top-left corner displays time and event
notifications, such as new message alerts.
Note
Voice Search is available only in selected regions. On some devices, you can
also say, "Hey Google."
Wi-Fi signal
strength
Battery
charge status
Time

16 - Using your tablet
Swipe down from the top of the screen to display Quick Settings
shortcuts, and notification details.
Tap a shortcut to see more information, or toggle the feature if more
information is not available. Tap and hold a shortcut to open
appropriate Settings.
Swipe down again to display the full list of Quick Settings tiles. To see
the Quick Settings tiles with one swipe, swipe down with two fingers.
Quick Settings tiles
Icon Name Description
Brightness Slide to adjust the screen’s brightness.
Wi-Fi
Tap to toggle Wi-Fi on and display Wi-Fi settings.
Small "up" and "down" arrows mean information
is being transmitted.
Battery usage Tap to see battery charge levels and access
Battery Saver settings.
Do not disturb Tap to silence some or all notifications or alarms.
Auto rotate Tap to toggle automatic screen rotation on and
off.
Bluetooth Tap to toggle Bluetooth on and open Bluetooth
settings.

Using your tablet - 17
Edit
Tap Edit to see more Quick Settings tiles. Tap and hold a tile and
drag to add, remove or move it. The first five tiles are visible in the
Quick Settings shortcuts.
Notifications
Tap a notification to open the appropriate app; tap and hold a
notification to see additional controls.
Split-screen mode
If you are using a compatible app (not from the Home
screen), tap and hold the Overview icon to enter split-screen
mode. The app that is open will move to the left (or top) of the
screen and the Overview of recently opened apps will open on the
Airplane mode
Tap to toggle Airplane mode on and off. When on,
wireless connectivity is turned off unless you
choose to turn a network on again.
Location Tap to toggle your device’s location services on
and off.
Bluelight Shield Tap to protect your eyes by reducing blue-light
emissions from the screen.
Note
Tap and hold a tile to open related settings.
Icon Name Description

18 - Using your tablet
other side. Tap on a compatible app to view and use both at the same
time.
Drag the divider to increase the size of one window to two-thirds of the
screen.
Note
You may view two tabs from Chrome in split-screen mode. Open Chrome
with more than one tab while in split-screen mode; the Menu icon and
select Move to other window.

Using your tablet - 19
Drag the divider to the edge of the screen or tap and hold the split-
screen icon to exit split-screen mode.
Personalizing Home screens
You can personalize your Home screen by moving apps, adding or
removing widgets, creating folders and by changing the wallpaper.
Moving an app or folder
Tap and hold an app or folder you want to move. To view information
about the app, drag it to App info at the top of the screen. Otherwise,
release your finger to place the app.
To place the app on an different Home screen, do the following:
1. Slide your finger to the right or left side of the screen.
2. Hold the app there until you are on the desired Home screen.
Note
In certain apps, you may tap and hold selected text or an image and drag it
to the other app.
Note
You may not place icons to the left of the main Home screen.

20 - Using your tablet
3. Release your finger to place the app.
Table of contents
Other Acer Tablet manuals

Acer
Acer B1-720 User manual

Acer
Acer ICONIA Tab A100 8GB User manual

Acer
Acer Iconia Tab A110 User manual

Acer
Acer Iconia A3-A20 User manual

Acer
Acer ICONIA User manual

Acer
Acer Iconia A1-810 User manual

Acer
Acer A200 User manual

Acer
Acer ACTAB721 User manual

Acer
Acer Iconia TAB A511 User manual

Acer
Acer Iconia W3 User manual

Acer
Acer B1-790 User manual

Acer
Acer One 7 User manual

Acer
Acer B1-750 Original instructions

Acer
Acer A500 User manual

Acer
Acer Iconia Tab 10 Operating and safety instructions

Acer
Acer Fossil HD B1-760 User manual

Acer
Acer Iconia Tab 10 User manual

Acer
Acer Iconia One 7 User manual

Acer
Acer A1407 User manual

Acer
Acer Iconia One 7 User manual