ACPro AWH18QD-D3DNA3G/I User manual

ACPro S-Series 18-24K
User Manual
Models
AWH18QD-D3DNA3G/I
AWH18QD-D3DNA1G/O
AWH24QE-D3DNA3D/I
AWH24QE-D3DNA1D/O
(Refrigerant R410A)

Technical Information Ʋ
Ʋ. FUNCTION AND CONTROL
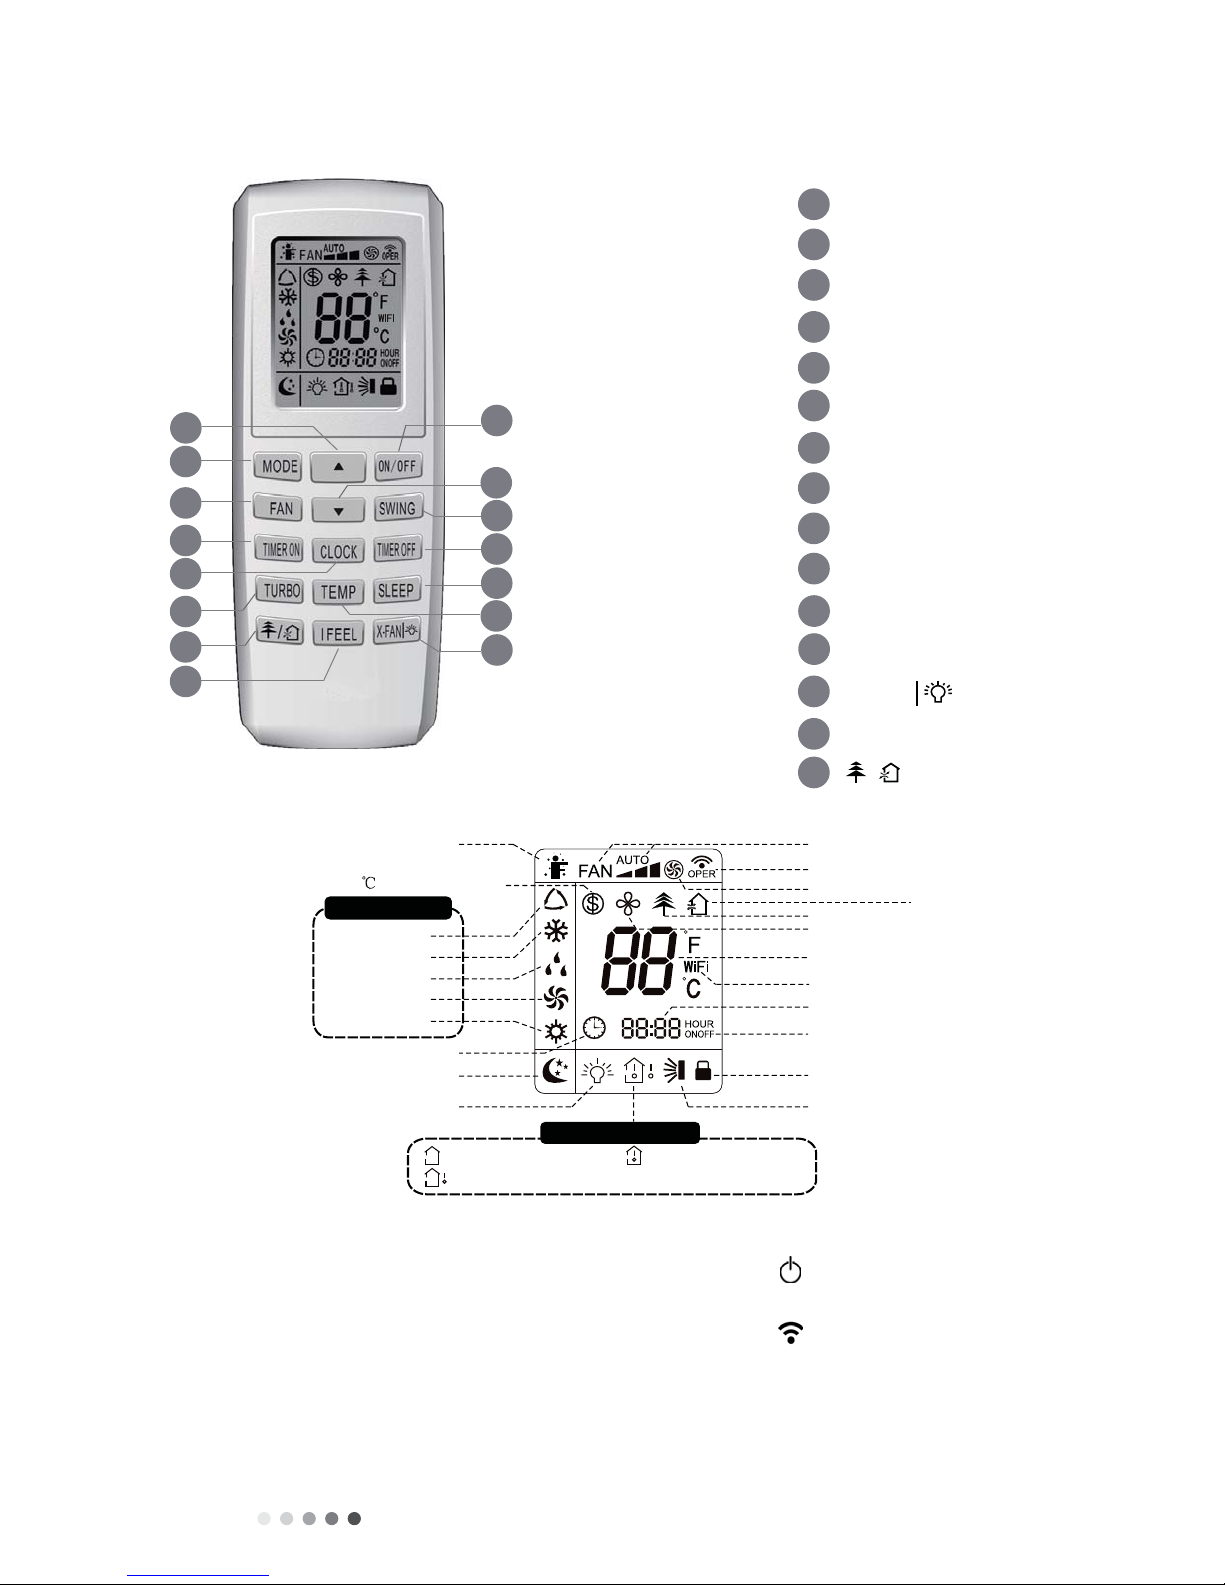
Ʋ.1 REMOTE CONTROLLER INTRODUCTION OF YV1FB9F
1
2
5
4
6
7
8
11
12
13
9
14
15
ON/OFF button
▲ button
3
FAN button
SWING button
TIMER OFF button
TURBO button
10
TEMP button
I FEEL button
button
CLOCK button
TIMER ON button
SLEEP button
X-FAN button
/
MODE button
▲
button
14
3
1
13
2
6
9
8
12
15
4
7
10
5
11
Send signal
Turbo mode
8heating function
Set temperature
Set time
WiFi
TIMER ON /
TIMER OFF
Child lock
Up & down swing
Set fan speed
ventilation operation
Light
Temp. display type
:Set temp.
:Outdoor ambient temp.
:Indoor ambient temp.
Sleep mode
Clock
Heat mode
Fan mode
Dry mode
Cool mode
Auto mode
Operation mode
I feel
X-fan mode
health function
Introduction for icons on display screen
Introduction for buttons on remote controller
• Turning on the power will cause the unit to make noise. The operation indicator , red in color, will be illuminated. Once
the power is turned on, you can operate the air conditioner by using the remote controller.
• While on, pressing any button on the remote controller will cause the signal icon to blink once, and the air conditioner
will give out a sound indicating the signal has been sent.
• When off, the set temperature and clock icons will be displayed. If the timer and light functions are set, those icons will be
displayed as well.
Technical Information
Ƴ
1. ON/OFF Button
Pressing this button will turn on or turn off the air conditioner. When on, the green operation indicator on indoor units
display will be on (color will vary for different models), and the indoor unit will make a sound.
2. SButton
Pressing this button will increase the set temperature by one degree per click. Holding the button down for more than 2
seconds will rapidly increase the set temperature. In AUTO MODE, the set temperature is not adjustable.
3. MODE Button
Press this button to select your required operation mode. Pressing this button will change mode: AUTO, COOL, DRY,
FAN, and HEAT will be set circularly in this sequence. AUTO MODE defaults when turning on the power. In AUTO
MODE, set temperature cannot be adjusted and will not be displayed on the LCD.
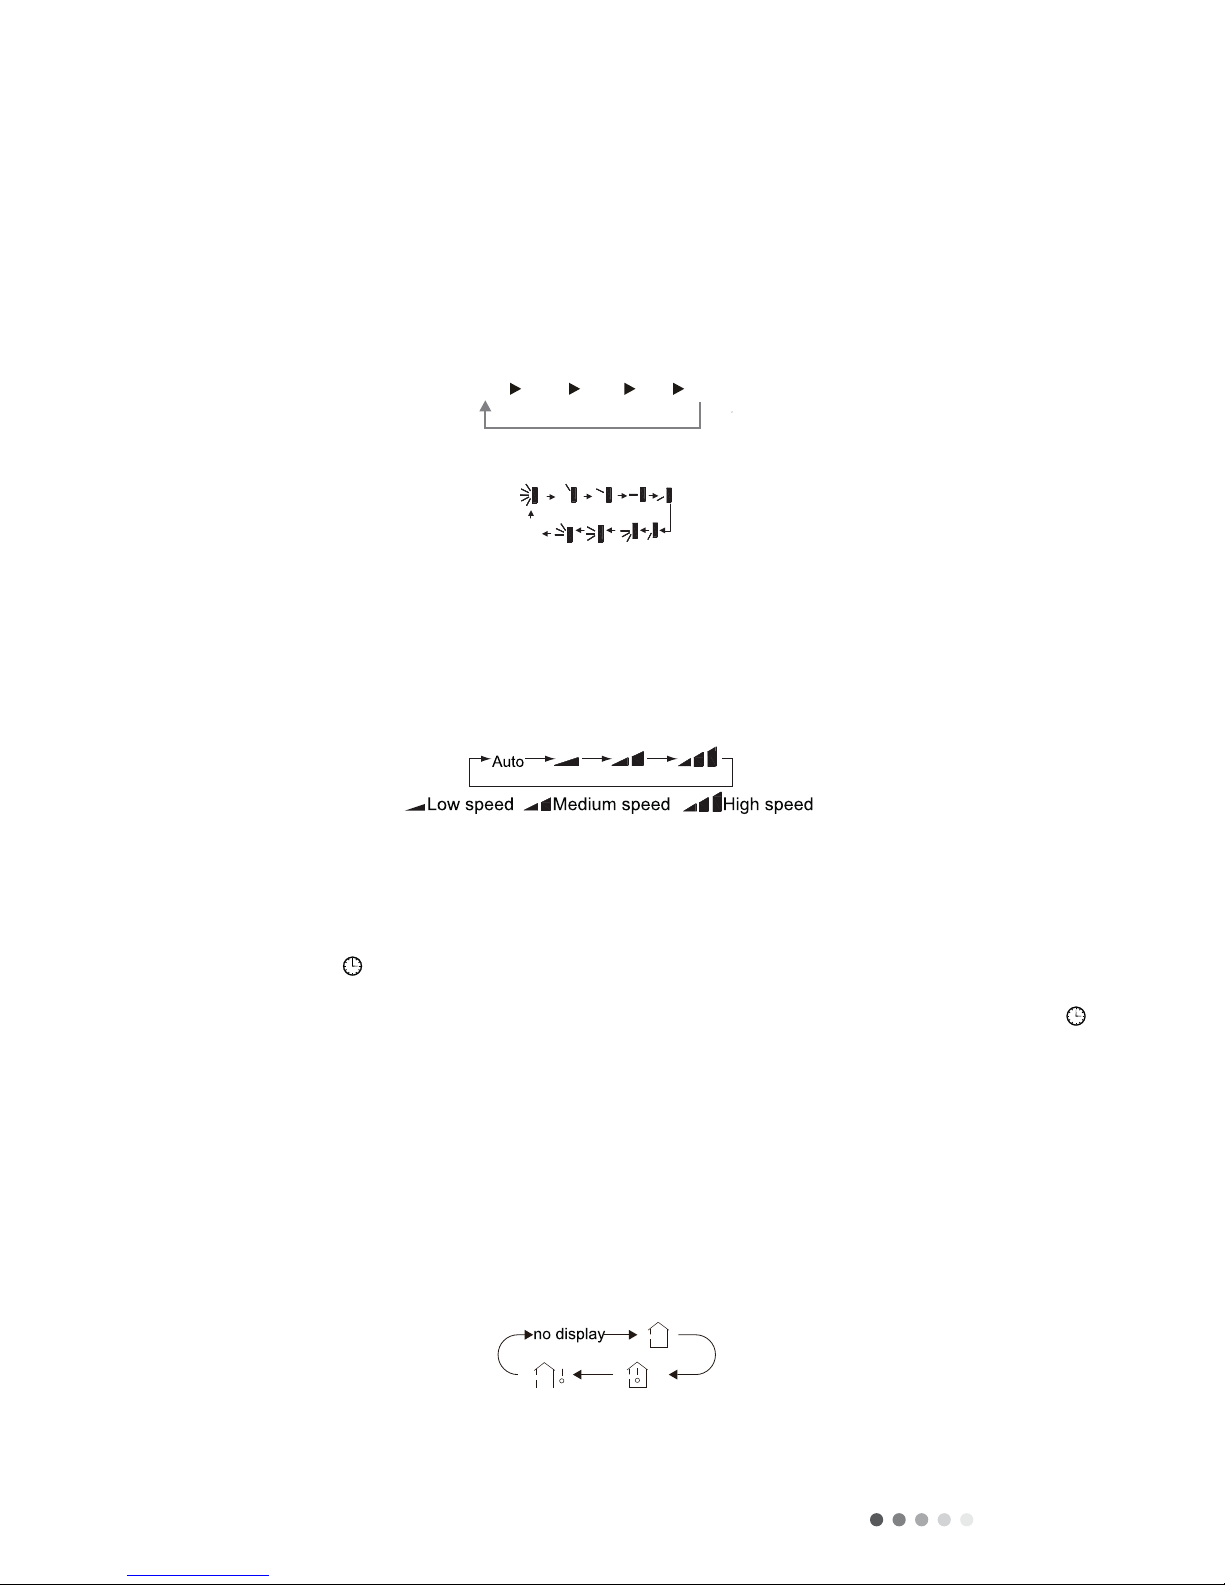
4. SWING Button
Pressing the SWING button will adjust the fan blowing angle, which changes circularly below.
5. TButton
Pressing this button will decrease the set temperature by one degree per click. Holding the button down for more than 2
seconds will rapidly increase the set temperature. In AUTO MODE, the set temperature is not adjustable.
6. FAN Button
This button is used for setting fan speed. Pressing this button will change fan speed: AUTO, LOW, MEDIUM-LOW,
MEDIUM, MEDIUM HIGH, HIGH will be set circularly in this sequence. When turning on the unit, AUTO fan speed is the
default setting. In DRY mode, the fan speed can only be set to LOW.
7. TIMER OFF Button
Press this button to initiate the auto-off timer. To cancel auto-off timer, simply press the button again. TIMER OFF
setting is the same as TIMER ON.
8. CLOCK Button
Press and hold this button to initiate CLOCK set. Within 5 seconds, press + or - buttons to adjust the time value.
Each pressing of the + or - buttons will increase or decrease the time by one minute. Holding down these buttons for 2
seconds will increase or decrease the time in 10 minute intervals. Press the clock button again to confirm time. will be
constantly displayed.
9. TIMER ON Button
Pressing this button will initiate AUTO-ON timer. To cancel, simply press this button again.
10. SLEEP Button
Press this button to enter SLEEP operation mode. Pressing it again will cancel SLEEP function. This function available
in COOL and HEAT modes.
11. TEMP Button
Pressing this button will reveal the indoor set temperature and the indoor ambient temperature on the display of the
indoor unit. The setting is selected circularly as shown below:
NOTE:
• TEMP button is only for models with temperature indicator on indoor unit.
• Set temperature is defaulted to display on indoor unit during power up.
• Outdoor ambient temperature display is not available for models.
AUTO COOL DRY FAN HEAT*
OFF

Technical Information ƴ
12. TURBO Button
Press this button to activate/deactivate the TURBO function which enables the unit to reach the preset temperature in
the shortest amount of time. In COOL mode, the unit will blow cooling air at a high fan speed. In HEAT mode, the unit
will blow heating air at a high fan speed.
13. X-FAN | Button
For use in COOL or DRY mode: Pressing this button will activate the fan at low speed for 2 minutes in order to dry the
indoor unit, the unit will then completely power down. On unit start-up, the X-FAN feature is defaulted to OFF. X-FAN
feature is not available in AUTO, FAN or HEAT modes.
14. I FEEL Button
Press this button to start I FEEL function. The unit will automatically adjust the temperature according to the sensed
temperature. Press this button again to cancel the I FEEL function.
15. Button (This function is not available on all models).
Press this button to achieve the on and off of healthy and scavenging functions inoperation status. Press this button
for the first time to start scavenging function, LCD displays . Press the button for the second time to start healthy
and scavenging functions simultaneously, LCD displays . Press the button for the third time to quit healthy and
scavenging functions simultaneously. Press the button for the fourth time to start healthy function, LCD displays .
Press this button again to repeat the operation above. (This function is applicable to partial of models).
Function Introduction for Combination Buttons
Pressing Sand Tbuttons simultaneously to lock or unlock the keypad. If the remote controller is locked, is displayed.
While this icon is displayed, pressing any button will cause the icon to blink three times.
While the unit is OFF; press MODE and Tbuttons simultaneously to switch between Cº and Fº.
While the unit is in COOL mode, press TEMP and CLOCK simultaneously to initiate energy saving mode.The remote
controller will display SE. Press TEMP and CLOCK simultaneously again to quit energy savings mode.
In heating mode, press theTEMP and CLOCK buttons simultaneously to start or turn off the 8ºC/46ºF heating function.
When this operation starts, and 8ºC/46ºF will be shown on the remote controller and the air conditioner will keep the
heating status at 8ºC/46ºF.
Operation Guide
1. Press ON/OFF button on the remote controller to turn on the air conditioner.
2. Press MODE button to select the desired operation: AUTO, COOL, DRY, FAN, HEAT.
3. Press Sand Tbutton to set your desired temperature. (Temperature cannot be adjusted in AUTO mode).
4. Press FAN button to set the desired fan speed: AUTO, LOW, MEDIUM and HIGH.
5. Press SWING button to select fan blowing angle.
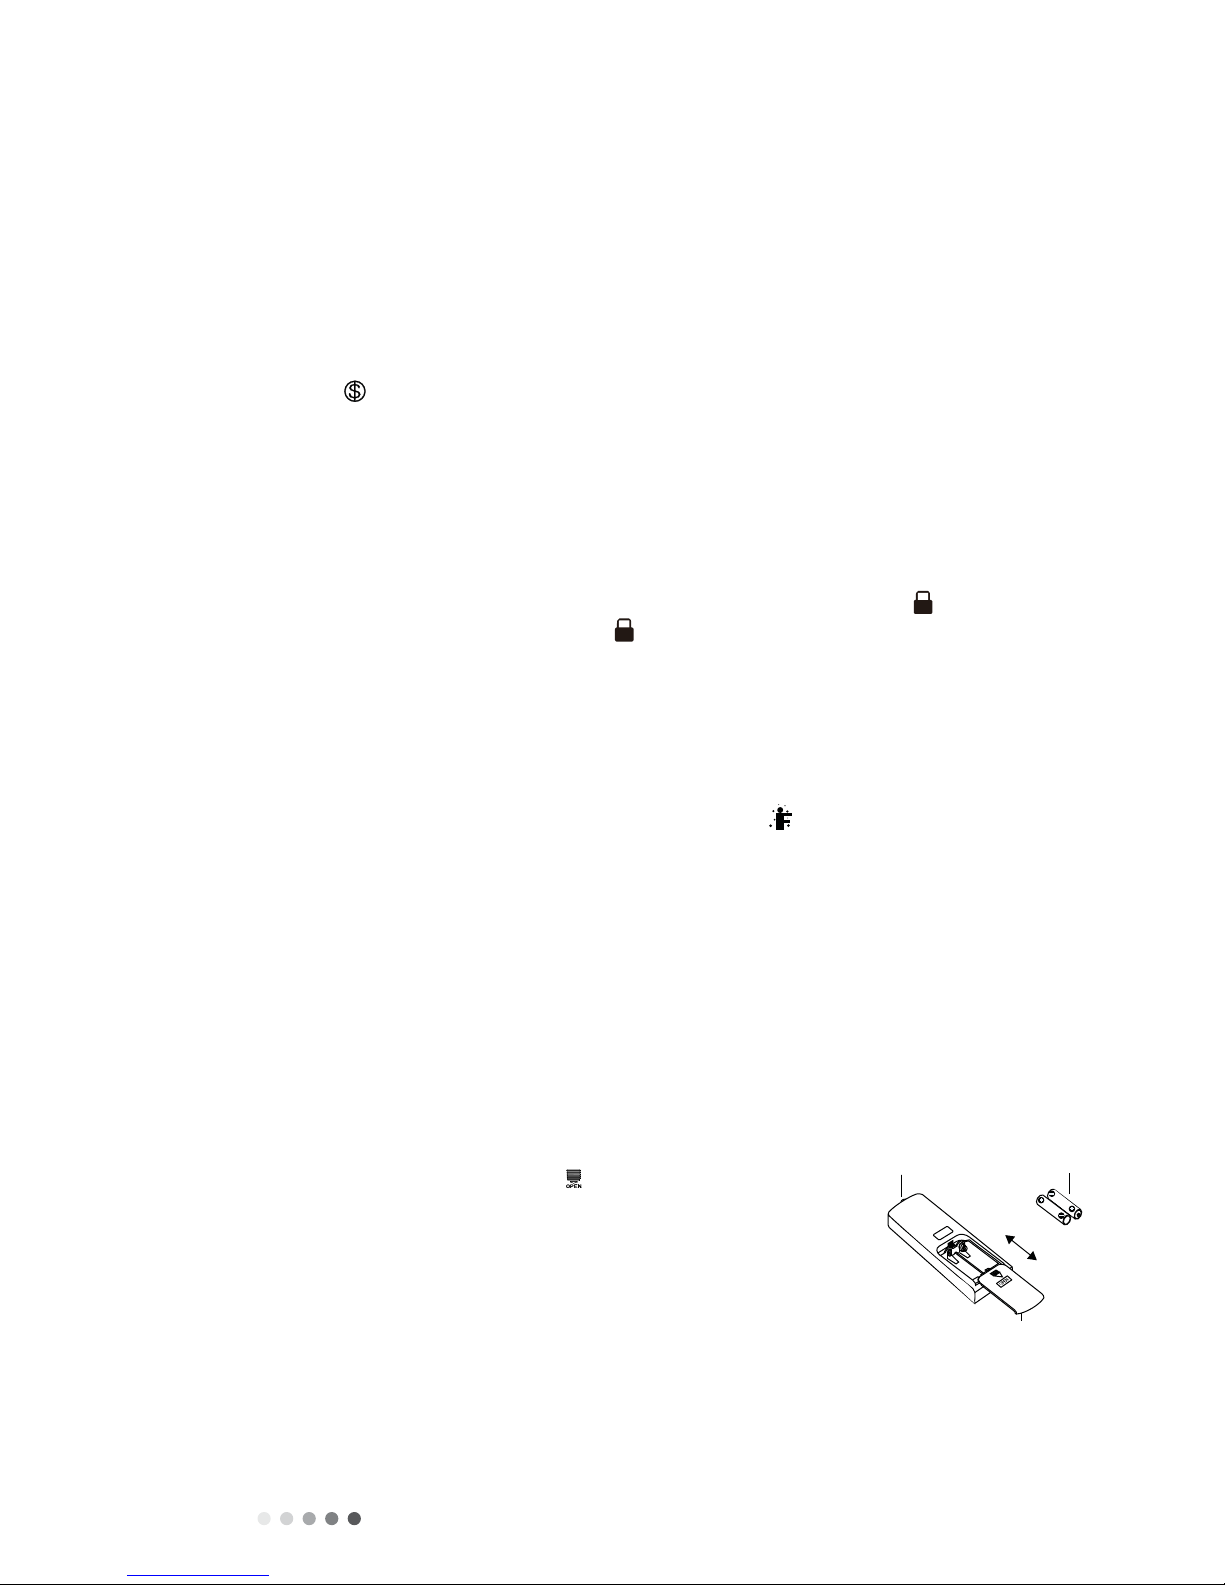
Replacement of Batteries in Remote Controller
1. Press the back side of remote controller marked with , as shown in the figure on the right, and then push out the cover
of the battery box.
2. Replace the two AAA batteries with fresh AAA batteries, making sure to position them on the correct polar sides “+” and
“-“.
3. Reinstall the cover of the battery box.
NOTE:
• Aim the signal sending end (top) of the remote controller at the unit to operate.
• Distance between the unit and the remote controller should be no more than 20 feet and there should be no obstacles in
between them.
• Remote controller signal may be interfered in the present of fluorescent lighting or wireless telephones.
• Replace batteries when remote control signal is weak or when display becomes fuzzy or difficult to read.
• Remove batteries during prolonged periods of time where the controller will not be used.
battery
Cover of battery box
remove
reinstall
Technical Information
Ƶ
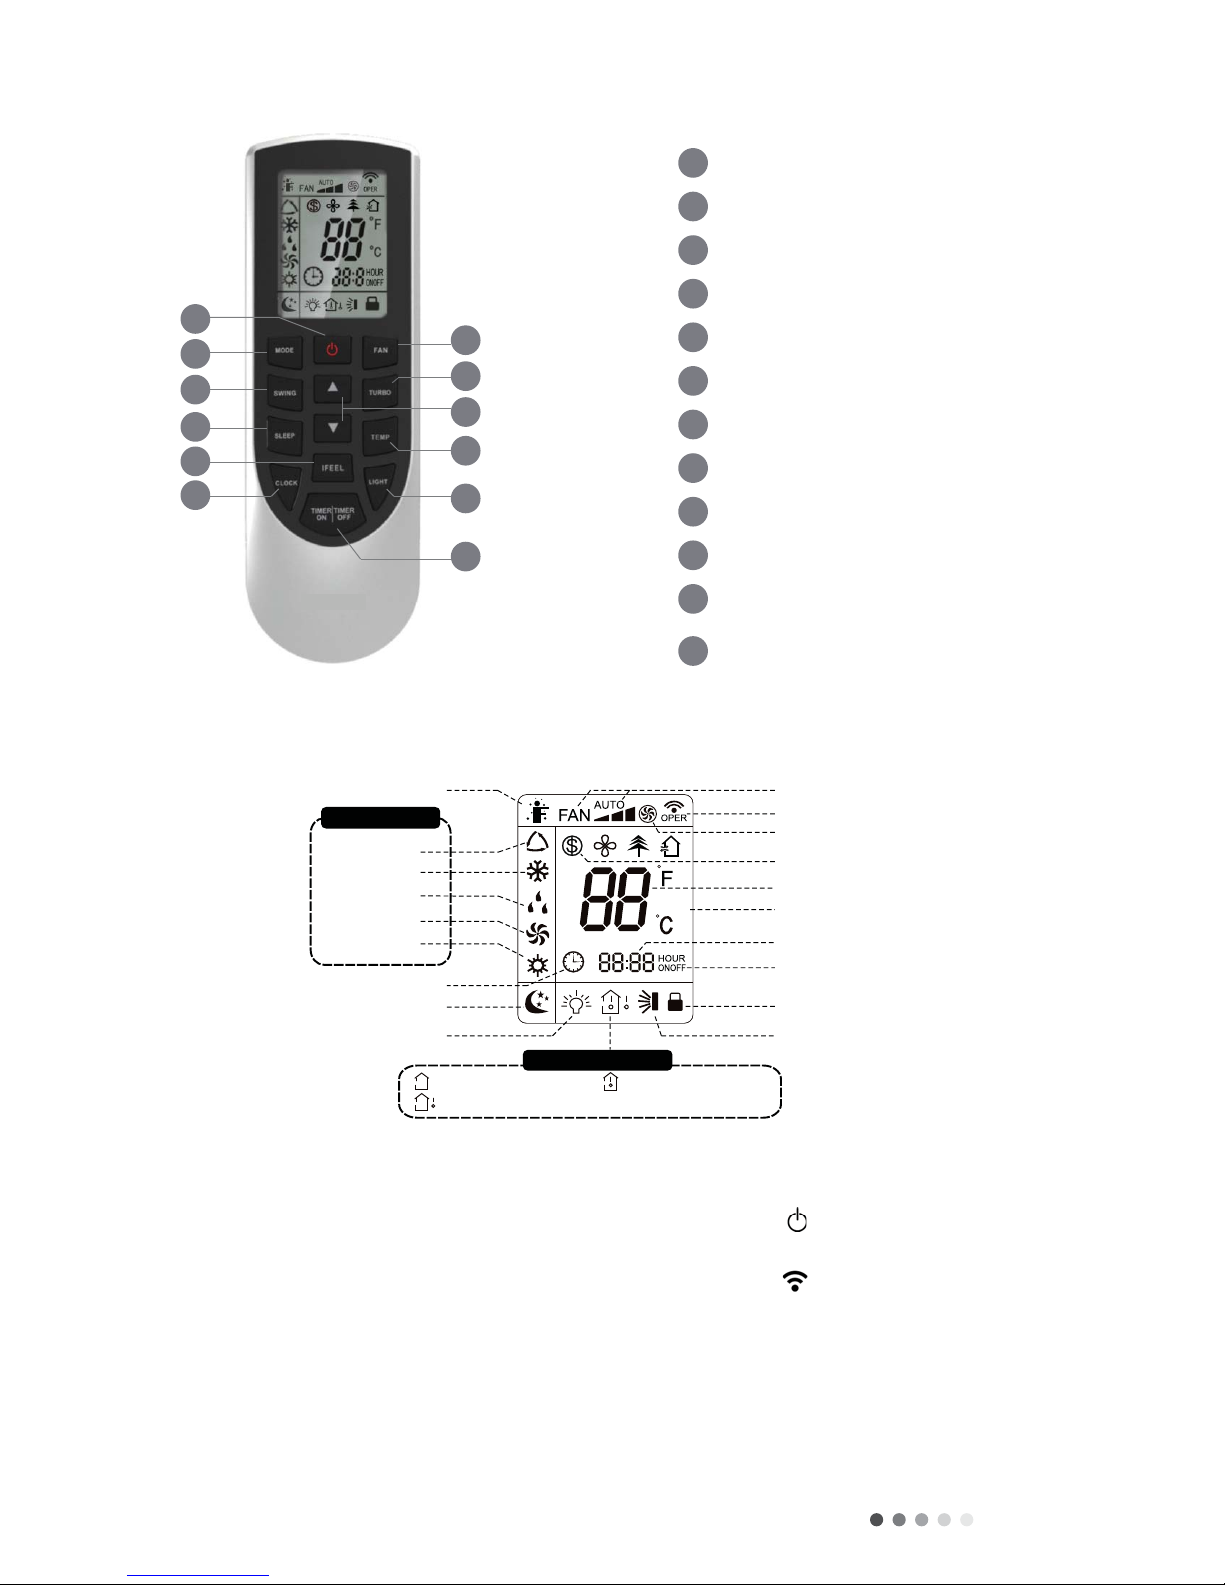
Ƴ.2 REMOTE CONTROLLER INTRODUCTION OF YAN1F6F
o
duction for icons on display screen
WIFI
1
5
3
6
8
10
12
11
9
7
4
2
1
2
3
4
5
6
7
8
9
10
11
12
212))EXWWRQ
02'(EXWWRQ
)$1EXWWRQ
6:,1*EXWWRQ
785%2EXWWRQ
7(03EXWWRQ
,)((/EXWWRQ
/,*+7EXWWRQ
&/2&.EXWWRQ
7,0(5217,0(52))
EXWWRQ
6/((3EXWWRQ
ŸEXWWRQ
Ÿ
WIFI
Send signal
7XUERPRGH
8ćKHDWLQJIXQFWLRQ
6HWWHPSHUDWXUH
Set time
7,0(5217,0(52))
&KLOGORFN
Up & down swing
Set fan speed
/LJKW
Temp. display type
:Set temp.
2XWGRRUDPELHQWWHPS
,QGRRUDPELHQWWHPS
Sleep mode
&ORFN
Heat mode
)DQPRGH
Dry mode
Cool mode
$XWRPRGH
Operation mode
I feel
:,),
Introduction for icons on display screen
Introduction for buttons on remote controller
• This is general use remote controller. It is compatible with multifunctional air conditioners.
• Turning on the power will cause the unit to make noise. The operation indicator , red in color, will be illuminated. Once
the power is turned on, you can operate the air conditioner by using the remote controller.
• While on, pressing any button on the remote controller will cause the signal icon to blink once, and the air conditioner
will give out a sound indicating the signal has been sent.
• When off, the set temperature and clock icons will be displayed. If the timer and light functions are set, those icons will be
displayed as well.

Technical Information ƶ
1. ON/OFF Button
Pressing this button will turn on or turn off the air conditioner. When on, the green operation indicator on indoor units
display will be on (color will vary for different models), and the indoor unit will make a sound.
2. MODE Button
Press this button to select your required operation mode. Pressing this button will change mode: AUTO, COOL, DRY,
FAN, and HEAT will be set circularly in this sequence. AUTO MODE defaults when turning on the power. In AUTO
MODE, set temperature cannot be adjusted and will not be displayed on the LCD.
• In AUTO mode, the set temperature cannot be adjusted. The set temperature will not be displayed. Pressing the FAN
button will adjust fan speed. Pressing the swing button will adjust the swing blowing angle.
• After selecting COOL mode, the COOL indicator on the indoor unit will be ON. Press Sor Tbutton to adjust
the set temperature. Pressing the FAN button will adjust fan speed. Pressing the swing button will adjust the swing
blowing angle.
• When DRY mode has been selected, the air conditioner will operate under low speed. The DRY indicator on the
indoor unit will be displayed. In DRY mode, the FAN speed cannot be adjusted. Pressing the swing button will adjust
the swing blowing angle.
• When selecting FAN mode, only the fan will operate – cooling and heating modes will be disabled. All indicators will be
OFF. Pressing the FAN button will adjust fan speed. Pressing the swing button will adjust the swing blowing angle.
• When HEAT mode has been selected, the HEAT indicator on the indoor unit will be displayed. Press Sor Tbutton
to adjust the set temperature. Pressing the FAN button will adjust fan speed. Pressing the swing button will adjust
the swing blowing angle.
3. Fan Button
This button is used for setting fan speed. Pressing this button will change fan speed: AUTO, LOW, MEDIUM-LOW,
MEDIUM, MEDIUM HIGH, HIGH will be set circularly in this sequence. When turning on the unit, AUTO fan speed is the
default setting. In DRY mode, the fan speed can only be set to LOW.
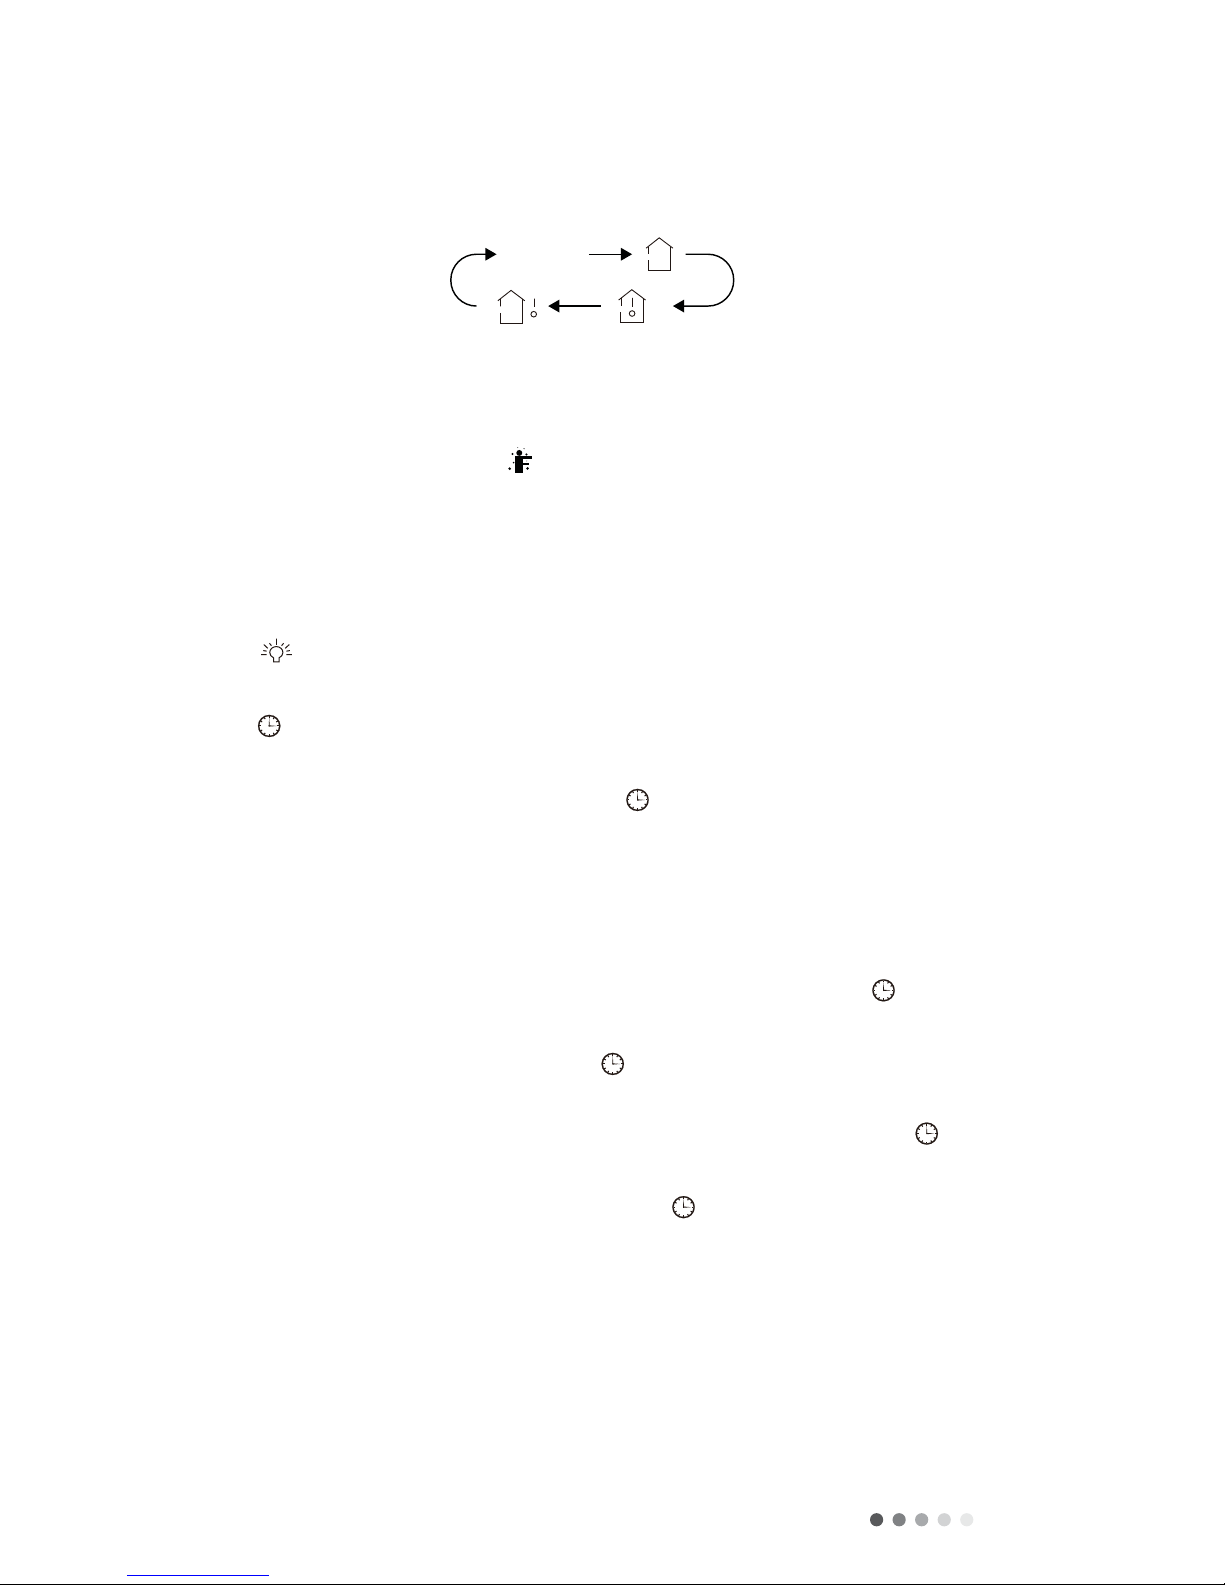
4. SWING Button
Pressing the SWING button will adjust the fan blowing angle, which changes circularly below.
• When selecting , the air conditioner will operate the fan automatically.The horizontal louvers will automatically swing
up and down at their maximum angles.
• When selecting , the air conditioner will operate the fan at a fixed position. The horizontal louvers will
stop at the fixed position.
• When selecting , the air conditioner will operate the fan at a fixed angle. The horizontal louvers will stop at the
fixed angle.
• Hold button for two seconds to set your required swing angle.When you reach you desired angle, release the button.
Note:
• may not be available. When the air conditioner receives this signal, the fan will operate on automatic.
5. TURBO Button
Press this button to activate/deactivate the TURBO function which enables the unit to reach the preset temperature in
the shortest amount of time. In COOL mode, the unit will blow cooling air at a high fan speed. In HEAT mode, the unit
will blow heating air at a high fan speed.
6. S/TButton
Pressing one of these buttons will increase or decrease the set temperature by one degree per click. Holding a
button down for more than 2 seconds will rapidly increase or decrease the set temperature. In AUTO MODE, the set
temperature is not adjustable.
AUTO COOL )$1'5< HEAT
Auto
no display
ǃǃǃǃ
ǃǃ
ǃǃ
Technical Information
Ʒ
7. SLEEP Button
Press this button to enter SLEEP operation mode. Press it again to cancel. This function is available in COOL and HEAT
modes.
8. TEMP Button
Pressing this button will reveal the indoor set temperature and the indoor ambient temperature on the display of the
indoor unit. The setting is selected circularly as shown below:
NOTE:
• TEMP button is only for models with temperature indicator on indoor unit.
• Set temperature is defaulted to display on indoor unit during power up.
• Outdoor ambient temperature display is not available for models.
9. I FEEL Button
Press this button to start I FEEL function and will be displayed on remote controller. The remote controller will send
the ambient temperature to the unit.This will cause the unit to adjust and set the airflow accordingly in order to maximize
energy savings while providing maximum comfort.
• Do not place remote controller near an object of high or low temperature.This will prevent the controller from detecting
an inaccurate ambient temperature. Make sure the remote controller stays within the area in which the unit can
continuously receive its signal.
10. LIGHT Button
Press this button to turn on/off the display light on the indoor unit.
11. CLOCK Button
Press this button to set clock time. The icon on the remote controller will blink. Press the Sor Tbuttons within
5 seconds to adjust the clock time. Each pressing of the (symbol) button will increase/decrease the time by 1 minute.
Holding down the Sor Tbutton for 2 seconds will rapidly change the time setting. Release button when you reach
desired time. Press the CLOCK button to confirm the time. icon will stop blinking.
NOTE:
• The clock time adopts 24-hour mode.
• The interval between two operations cannot exceed 5 seconds. Otherwise, the remote controller will quit the setting
status.
12. TIMER ON/OFF Button
• TIMER ON
TheTIMER ON button sets the time for the timer status to on. After pressing this button icon disappears and the
word ON on the remote controller will blink. Press Sor Tto adjust TIMER ON setting. This will increase or decrease
the timer by 1 minute. Holding down the Sor Tbutton for 2 seconds will rapidly change the time setting. Press
TIMER ON to confirm.The word ON will stop blinking. icon will reappear. To cancel TIMER ON, press theTIMER
ON button again.
• TIMER OFF
TheTIMER OFF button sets the time for the timer status to off. After pressing this button icon disappears and
the word OFF on the remote controller will blink. Press Sor Tto adjust TIMER OFF setting. This will increase or
decrease the timer by 1 minute. Holding down the Sor Tbutton for 2 seconds will rapidly change the time setting.
Press TIMER OFF to confirm.The word OFF will stop blinking. icon will reappear. To cancel TIMER OFF, press the
TIMER OFF button again.
Note:
• Under the ON/OFF status, you can set TIMER ON/TIMER OFF simultaneously.
• Before setting TIMER ON/TIMER OFF, please adjust the clock time.
no display
WK
Technical Information Ƹ
Function Introduction for Combination Button
1. Energy-Saving Function
In cooling mode, pressTEMP and CLOCK buttons simultaneously to start up or turn-off the energy-savings function.
When energy savings function is started, SE will be shown on the remote controller display. The air conditioner will adjust
the set temperature automatically.
NOTE:
• The fan speed will default to an auto speed that cannot be adjusted.
• The set temperature also cannot be adjusted. This will render the turbo function inoperable.
• The sleep function and energy saving function cannot operate at the same time. If one of these functions is set and
the user attempts to set the other, the previous function will be cancelled.
2. 8ºC/46ºF Heating Function.
In heating mode, press theTEMP and CLOCK buttons simultaneously to start or turn off the 8ºC/46ºF heating function.
When this operation starts, and 8ºC/46ºF will be shown on the remote controller and the air conditioner will keep the
heating status at 8ºC/46ºF.
NOTE:
• While this function is operating, the fan speed will default to an auto speed that cannot be adjusted.
• The set temperature also cannot be adjusted. This will render the turbo function inoperable.
• The sleep function and energy saving function cannot operate at the same time. If one of these functions is set and
the user attempts to set the other, the previous function will be cancelled.
3. Child Lock Function
Press Sor Tsimultaneously to turn on/off the child lock function. When this function is on, icon is displayed on the
remote controller. If you operate the remote controller, the icon will blink 3 times without sending a symbol to the
unit.
4. Temperature display switchover function
While powered OFF, press Tand MODE buttons simultaneously to switch the temperature display between Celsius and
Fahrenheit.
5. I FEEL Function
Pressing Sand MODE buttons simultaneously to start I FEEL function and will be displayed on the remote
controller. The remote controller will send the ambient temperature to the unit. This will cause the unit to adjust and set
the airflow accordingly in order to maximize energy savings while providing maximum comfort.
• Do not place remote controller near an object of high or low temperature. This will prevent the controller from
detecting an inaccurate ambient temperature. Make sure the remote controller stays within the area in which the unit
can continuously receive its signal.
Operation Guide
1. Press ON/OFF button on the remote controller to turn on the air conditioner.
2. Press MODE button to select the desired operation: AUTO, COOL, DRY, FAN, HEAT.
3. Press Sand Tbutton to set your desired temperature. (Temperature cannot be adjusted in AUTO mode).
4. Press FAN button to set the desired fan speed: AUTO, LOW, MEDIUM and HIGH.
5. Press SWING button to select fan blowing angle.
signal sender EDWWHU\
&RYHURIEDWWHU\ER[
UHPRYH
reinstall
Replacement of Batteries in Remote Controller
1. Press the back side of remote controller marked with , as shown in the figure on the
right, and then push out the cover of the battery box.
2. Replace the two AAA batteries with fresh AAA batteries, making sure to position them
on the correct polar sides “+” and “-“.
3. Reinstall the cover of the battery box.
NOTE:
• Aim the signal sending end (top) of the remote controller at the unit to operate.
• Distance between the unit and the remote controller should be no more than 20 feet and there should be no
obstacles in between them.
• Remote controller signal may be interfered in the present of fluorescent lighting or wireless telephones.
• Replace batteries when remote control signal is weak or when display becomes fuzzy or difficult to read.
• Remove batteries during prolonged periods of time where the controller will not be used.

Technical Information
ƹ
Ʋ.3 GREE + APP OPERATION MANUAL
For the ultimate in convenience, selected AC Pro Heat Pump and Air Conditioner models feature a
built-in intelligent WiFi capability and GREE+ SmartPhone app.This allows you to operate the unit
through your smartphone anywhere a WIFI network can be found. The GREE+ app is compatible with
devices using standard Android or iOS operating systems.
Download the Gree + app directly to your phone from the
Apple Store or Google Play Store. When the GREE+ app has
successfully downloaded to your phone, close the Apple Store or
Google Play Store app.
iOS System supports iOS 7.0 and above.
Android System supports Android 4.0 and above.
Remote Controls with a “WIFI” button: turn ON the Gree system. Press
and hold the “WIFI” button for 1 second until the unit beeps for the
second time and theWIFI icon appears on the display. Repeat the
procedure to turn WIFI mode OFF.
Remote controls without a “WIFI” button: press and hold both the
“Mode” and “Turbo” buttons for 10 seconds until the unit beeps for the
second time and theWIFI icon appears on the display. Repeat the
procedure to turn WIFI mode OFF.
Control the comfort - With your smartphone!
Operating System Requirements forYour Smartphone
Adding the Gree + App to Your Phone
Registering your AC Pro Unit to Wifi System
Step 1: Turn on the Units wifi interface
Apple Store Google Play Store

Technical Information ƺ
Locate the GREE+ icon on your phone.Tap the icon to launch the app.
The GREE+ Login screen will be displayed.
For first-time users, select the “Sign Up” button to create an
account and register your AC Pro unit on the WIFI System.
On the Sign Up screen, you should
-Create a User Name
-Enter your email address
-Create a password
-Select region (i.e., North America)
Then tap “Sign Up” button.
For future reference, record the user name, email address and password used to set up your account.
User Name: _________________________________________________________________________________
Email Address: _______________________________________________________________________________
Password: ___________________________________________________________________________________
Step 2: Launch the GREE+ app on your smartphone.
Step 3: Sign up for Gree Universal WIFI access.
Login Screen 1st Time Sign Up Screen

Technical Information
ƲƱ
The GREE+ Login screen will be displayed.
This is the local WIFI network the AC Pro unit will be connected to and
communicating through. From the My Home screen, tap the “+”
button to add yourWIFI network. Select your home or office WIFI
network and enter the WIFI network password. If you want GREE+
to remember your network password, check the box (optional).
Tap the “Search for Device” button.
GREE+ will search yourWIFI network for AC Pro units.
When a AC Pro unit is found, it will automatically be registered on
the WIFI system. GREE+ will display the device
name (ex., AC5bcf) of your AC Pro unit.
Tap the back “<” button to return to the My Home screen.
Your unit will be displayed on the My Home screen.
Turn your unit “ON” and “OFF” by tapping the
circle button.
For a full screen display, tap the unit display.
Step 4: Add yourWIFI network to the GREE+ app.
Step 5: Add your AC Pro unit to the GREE+ app.
Step 6: Return to the Home Screen
WIFI Network Screen
Registration Confirmation
Screen
Unit “OFF” My Home Screen Unit “ON” Full ScreenUnit “ON” My Home Screen

Technical Information ƲƲ
Tap the “Settings” button to open the settings screen.
From the settings screen, you can customize the unit
name, lock the device and check your version of Firmware.
Set a custom name for your Gree unit for easy and quick
identification (ex., Living Room, Den, Bedroom).To change the
device name, tap on the current device name and then type
in a new name.
Privacy Lock Mode prevents unauthorized access to the unit
controls and prevents unauthorized users from tampering with
system settings.Turn Lock on and off by sliding the Device Lock
button to the right or left to lock or unlock.
Repeat the “Registering your AC Pro unit on theWIFI System” section
above for each new device.
Tap the “Save” button.
Tap the “<” button to return to this screen.
Customize the GREE+ app on your smartphone.
Step 1: Settings
Step 2: Customize
Step 3: Turn On/Off Privacy Lock Mode
Add up to four units to the GREE+ app on your smartphone.
Step 4: Return to Full Screen Display.
Step 5: Return to my home screen.
Settings Screen
Home Screen
Single Unit Screen
72°F
68°F
Multiple Units Screen
Technical Information
ƲƳ
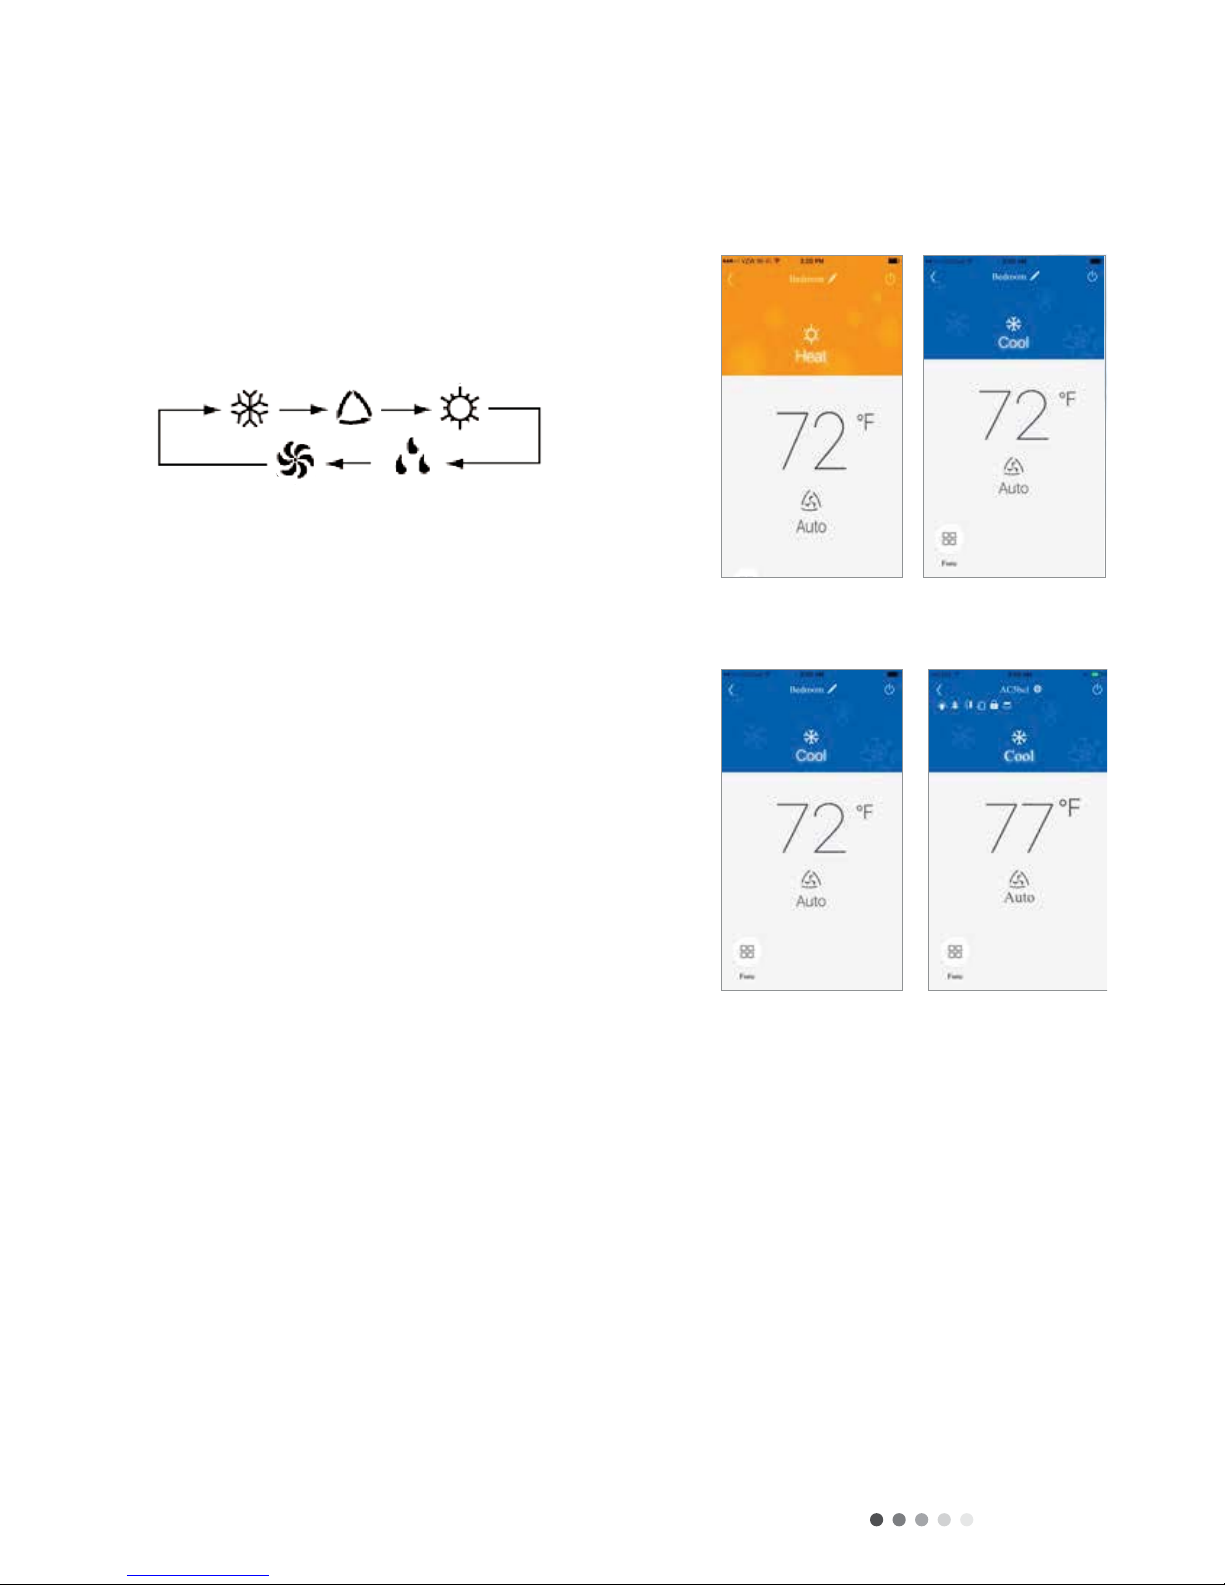
Select “Auto”, “Cool”, “Dry”, “Fan” or “Heat” by sliding the
mode icon right or left on the smartphone display.The modes
will be displayed as follows:
Room temperature setting can be adjusted between 61°F to
86°F by scrolling to the room temperature icon right or left
on the smartphone display.
See Remote Controller instructions for detailed operation of
these modes.
OPERATING MODE
ADJUSTTEMPERATURE SETTING
72°F
68°F
Cool Mode
Temperature Setting
Heat Mode

Technical Information Ʋƴ
Initially, the GREE+ app will display temperatures in °F.
To switch the display to °C, tap the °F icon on the smartphone
Screen. Repeat the procedure to switch the display back to °F.
Fan mode can be adjusted by sliding the fan icon right or left on the
smartphone screen.The fan modes will be displayed as follows:
See Remote Controller instructions for detailed operation
FAHRENHEIT °F/CELSIUS °C SCREEN
Fan Modes
Fahrenheit °F/Celcius °C Screen
Fan Mode Screens

Technical Information
ƲƵ
The GREE+ app has multiple special functions to improve your
comfort, save time and lower energy usage.Tap the “Function”
icon to open the Special Function window.
When operating in humid areas, the unit has a DRY COIL function
called X-Fan.This function will allow the indoor fan to run for a
pre-determined amount of time after the unit is turned off (cooling
or dry modes) to ensure that additional moisture is removed from
coil.Turn the X-Fan feature on by tapping the “Function”
button and then the “X-Fan” button.Tap again to turn off.
This function is not included with your system.
OPEN SPECIAL FUNCTIONS
X-FAN MODE
Ventilate
Ventilate Mode
X-Fan Mode
Special Functions
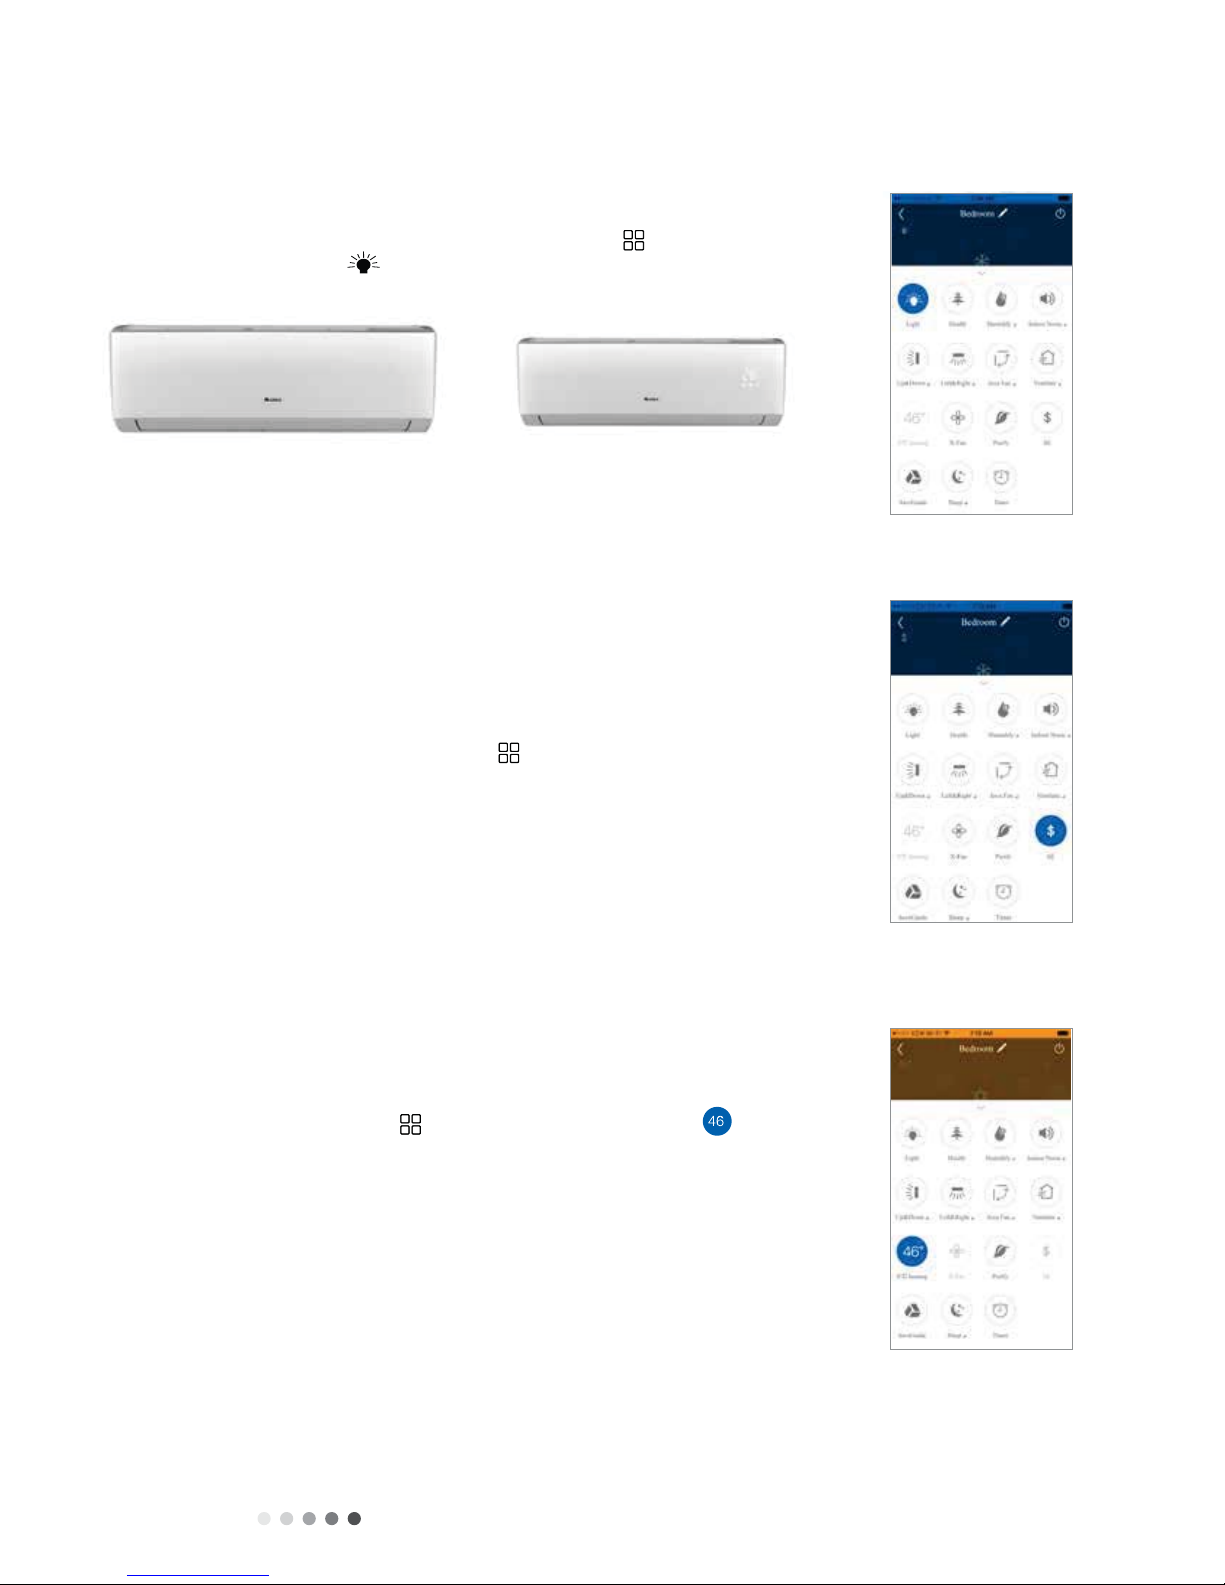
Technical Information Ʋƶ
Turn the indoor unit display on by tapping the “Function”
button and then the “Light” button.Tap again to turn it back off.
Energy Saving mode will automatically select the optimal compressor
and fan speeds to allow for energy savings while operating in Cooling
or Heating modes. The compressor and fan will automatically slow
down as the room temperature reaches the set point. Turn the Energy
Saving on and off by tapping the “Function” button and then
the “SE” $ button.
Freeze Guard mode (or vacation mode) will automatically
maintain room temperature above 46°F.Turn Freeze Guard on
and off by tapping the “Function” button and then the “46°F”
heating button. Freeze Guard can only be activated in heat mode.
UNIT DISPLAY LIGHT ON/OFF
ENERGY SAVING MODE
FREEZE GUARD (46°F Heating)
Unit Screen Control
Energy Saving Mode
Freeze Guard Mode
Unit Screen OFF Unit Screen ON
°F

Technical Information
ƲƷ
Turn the Vertical (Up & Down) Swing Louvers on and off by tapping the
“Function” button and then the “Vertical Swing Louver” button.
To adjust the discharge air direction, tap on the Up & Down button under
the icon to bring up the Swing Louver Setting screen.Then, tap the
desired vertical air discharge direction.
Sleep mode will automatically adjust room temperature during your
sleep time.This slight change in temperature will not affect your
comfort level due to the natural effects that sleeping has on the body,
but it will save on energy consumption and lower your electric bill.
For more information, see Sleep Modes in the remote controller
instructions.Turn Sleep Mode ON and OFF by tapping the “Function”
button and then the “Sleep” Button
VERTICAL SWING LOUVERS
SLEEP MODE
Note: Multiple air directions can be selected by sliding across the screen icons
Vertical Swing Louvers

Technical Information ƲƸ
The Gree unit contains between 1 to 4 different Sleep mode functions depending on the model.To
select a Sleep Mode, tap the “Sleep” title under the Sleep icon to open the Sleep Setting screen.
From the Sleep Setting screen, you can select a desired sleep function. You can select the Expert,
Nap,Tradition or DIY Sleep functions by tapping the buttons at the bottom of the screen.
SLEEP MODE SETTINGS
Sleep Setting Screen

Technical Information
Ʋƹ
T
radition Slee
p
Mode Scree
n
DIY Sleep Mode Screen
Nap Sleep Mode Screen
Expert Sleep Mode Screen
EXPERTSLEEP MODE TRADITION SLEEP MODE
NAP SLEEP MODE DIY SLEEP MODE
This manual suits for next models
3
Table of contents


